Remix v2をCloudflare Pages + D1で動かすチュートリアル
Remix v2 がリリースされ、型やインタフェースが一部変更されているため、Remix + Cloudflare Pages + D1 構成を動作確認できる最小構成で試してみました。
前提環境
ライブラリのバージョン。
remix    v2.0.1
wrangler v3.10.1
wrangler のインストールおよび wrangler login されている状態を確認してください。
npx wrangler whoami
 ⛅️ wrangler 3.10.1
-------------------
Getting User settings...
👋 You are logged in with an OAuth Token, associated with the email xxx@example.com!
┌──────────────────────────────┬──────────────────────────────────┐
│ Account Name                 │ Account ID                       │
├──────────────────────────────┼──────────────────────────────────┤
│ xxx@example.com's Account    │ xxxxxxxxxxxxxxxxxxxxxxxxxxxxxxxx │
└──────────────────────────────┴──────────────────────────────────┘
🔓 Token Permissions: If scopes are missing, you may need to logout and re-login.
Scope (Access)
- account (read)
- user (read)
- workers (write)
- workers_kv (write)
- workers_routes (write)
- workers_scripts (write)
- workers_tail (read)
- d1 (write)
- pages (write)
- zone (read)
- ssl_certs (write)
- constellation (write)
- offline_access
Remix + Cloudflare Pages 構成をセットアップ
create-remix でプロジェクトを作成
create-remix を使ってセットアップしていきます。
Remix v2 から実行時に引数でテンプレートを指定します。
今回は公式で提供されている Cloudflare Pages のテンプレートを利用します。
以下を実行してください。
npx create-remix@latest --template remix-run/remix/templates/cloudflare-pages
対話形式で各種設定をしていきます。今回はディレクトリ名を remix にしています。
$ npx create-remix@latest --template remix-run/remix/templates/cloudflare-pages

 remix   v2.0.1 💿 Let's build a better website...

   dir   Where should we create your new project?
         remix

      ◼  Template: Using remix-run/remix/templates/cloudflare-pages...
      ✔  Template copied

   git   Initialize a new git repository?
         Yes

  deps   Install dependencies with npm?
         Yes

      ✔  Dependencies installed

      ✔  Git initialized

  done   That's it!

         Enter your project directory using cd ./remix
         Check out README.md for development and deploy instructions.

         Join the community at https://rmx.as/discord
作成されたディレクトリに移動します。
cd ./remix
現時点で作成される node-version は 18.0.0 となっています。
$ cat .node-version
18.0.0
これを任意のバージョンに変更します。今回は 18.18.0 に変更します。
$ node -v
v18.18.0
echo "18.18.0" > .node-version
最小限のセットアップは以上です。ローカルで立ち上げてみましょう。
$ npm run dev

> dev
> remix dev --manual -c "npm run start"


 💿  remix dev

 info  building...
 info  built (266ms)

> start
> wrangler pages dev --compatibility-date=2023-06-21 ./public

Compiling worker to "/var/folders/hl/frth8xln7nzb8v671ldj5c_80000gn/T/functionsWorker-0.5842657134185703.mjs"...
✨ Compiled Worker successfully
 ⛅️ wrangler 3.10.1
-------------------
wrangler dev now uses local mode by default, powered by 🔥 Miniflare and 👷 workerd.
To run an edge preview session for your Worker, use wrangler dev --remote
⎔ Starting local server...

▲ [WARNING] Parsed 2 valid header rules.

[mf:inf] Ready on http://0.0.0.0:8788
[mf:inf] - http://127.0.0.1:8788
[REMIX DEV] c781a4f8 ready
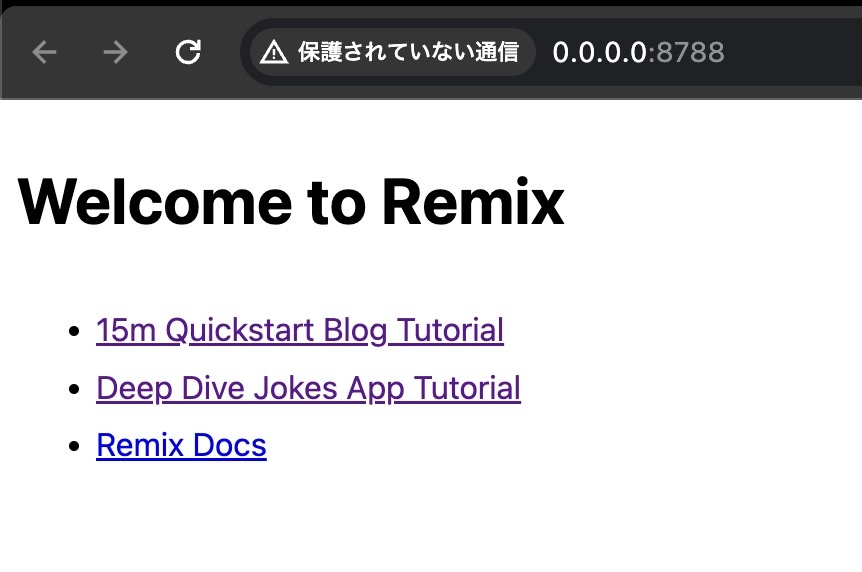
http://0.0.0.0:8788 を開くと以下のような表示になれば OK です。
ファイル構成はこのような内容です。
$ ls -T
./
├── app/
│  ├── entry.client.tsx
│  ├── entry.server.tsx
│  ├── root.tsx
│  └── routes/
│     └── _index.tsx
├── node_modules/
├── package-lock.json
├── package.json
├── public/
│  ├── _headers
│  ├── _routes.json
│  └── favicon.ico
├── README.md
├── remix.config.js
├── remix.env.d.ts
├── server.ts
└── tsconfig.json
デプロイ
今回は wrangler を使った CLI でのデプロイをします。ほかには Git と連携した自動デプロイなども用意されています。
まずはコマンドを用意します。
"deploy": "npm run build && wrangler pages deploy ./public" を package.json の scripts に追加します。
   "scripts": {
     "build": "remix build",
     "dev": "remix dev --manual -c \"npm run start\"",
     "start": "wrangler pages dev --compatibility-date=2023-06-21 ./public",
-    "typecheck": "tsc"
+    "typecheck": "tsc",
+    "deploy": "npm run build && wrangler pages deploy ./public"
   },
用意したコマンドでデプロイしてみます。
npm run deploy
初回デプロイ時にはプロジェクト名を聞かれるので任意の名前で作成します。
$ npm run deploy
> deploy
> npm run build && wrangler pages deploy ./public
> build
> remix build
info building... (NODE_ENV=production)
info built (147ms)
No project selected. Would you like to create one or use an existing project?
❯ Create a new project
Use an existing project
✔ Enter the name of your new project: … remix
✔ Enter the production branch name: … master
✨ Successfully created the 'remix' project.
✨ Compiled Worker successfully
🌍 Uploading... (7/7)
✨ Success! Uploaded 7 files (1.78 sec)
✨ Uploading _headers
✨ Uploading Functions bundle
✨ Uploading _routes.json
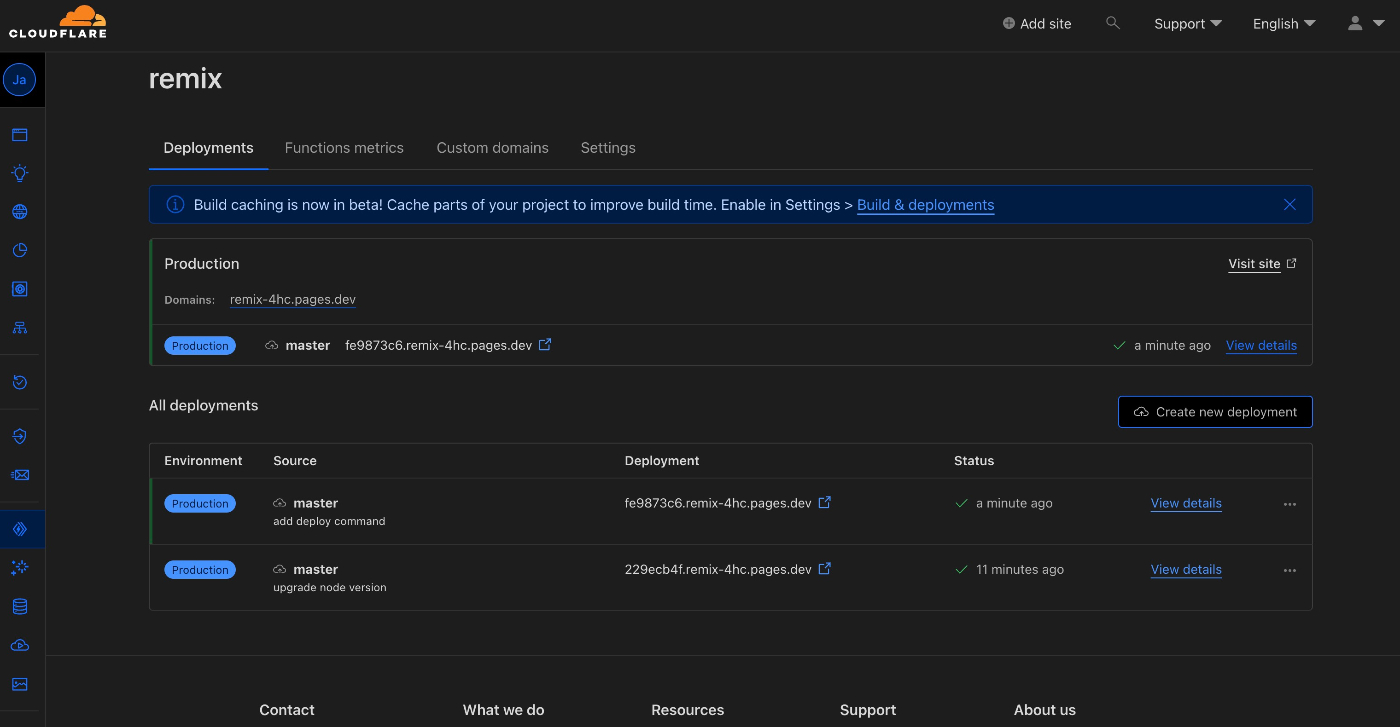
✨ Deployment complete! Take a peek over at https://229ecb4f.remix-4hc.pages.dev
最後の行にある URL を開いて表示されれば完了です。Cloudflare の Dashboard からも確認できます。
D1 のセットアップ
D1 を作成
続いて D1 を作成していきます。こちらも remix という名前で作成します。
npx wrangler d1 create remix
$ npx wrangler d1 create remix

✅ Successfully created DB 'remix' in region APAC
Created your database using D1's new storage backend. The new storage backend is not yet recommended for production workloads, but backs up your data via point-in-time
restore.

[[d1_databases]]
binding = "DB" # i.e. available in your Worker on env.DB
database_name = "remix"
database_id = "647377a9-f57f-4e70-9c04-3e659bfcadb2"
[[d1_databases]] 以下の情報は D1 に接続する設定となります。
wrangler.toml に、この設定を記載していきます。
まずは wrangler.toml を作成します。
touch wrangler.toml
続いて、作成された D1 の設定を記入します。
+[[d1_databases]]
+binding = "DB" # i.e. available in your Worker on env.DB
+database_name = "remix"
+database_id = "647377a9-f57f-4e70-9c04-3e659bfcadb2"
また .wrangler 配下に D1 関連のファイルが作成されますが、ローカル用なので .gitignore に追加します。
echo "/.wrangler" >> .gitignore
Migrations
D1 が提供しているマイグレーションの方法でテーブルを作成します。
任意の名前でマイグレートファイルを作成できます。今回は users テーブルを作成するので users
としました。
npx wrangler d1 migrations create remix users
初回はディレクトリを聞かれるので、デフォルトのまま作成します。
$ npx wrangler d1 migrations create remix users
✔ No migrations folder found. Set `migrations_dir` in wrangler.toml to choose a different path.
Ok to create ~/migrations? … yes
✅ Successfully created Migration '0000_users.sql'!

The migration is available for editing here
~/migrations/0000_users.sql
今回は users という簡素なテーブルを作ってみます。
 -- Migration number: 0000 	 2023-10-02T05:08:21.139Z
+CREATE TABLE `users` (
+  `id` INTEGER PRIMARY KEY AUTOINCREMENT,
+  `username` TEXT NOT NULL
+);
ローカルに反映します。
npx wrangler d1 migrations apply remix --local
$ npx wrangler d1 migrations apply remix --local
Migrations to be applied:
┌────────────────┐
│ name           │
├────────────────┤
│ 0000_users.sql │
└────────────────┘
✔ About to apply 1 migration(s)
Your database may not be available to serve requests during the migration, continue? … yes
🌀 Mapping SQL input into an array of statements
🌀 Loading 647377a9-f57f-4e70-9c04-3e659bfcadb2 from .wrangler/state/v3/d1
┌────────────────┬────────┐
│ name           │ status │
├────────────────┼────────┤
│ 0000_users.sql │ ✅       │
└────────────────┴────────┘
users テーブルにデータを作成します。
$ npx wrangler d1 execute remix --local --command="INSERT INTO users (username) VALUES ('Taro'), ('Hanako')"
🌀 Mapping SQL input into an array of statements
🌀 Loading 647377a9-f57f-4e70-9c04-3e659bfcadb2 from .wrangler/state/v3/d1
レコードを確認してみます。
$ npx wrangler d1 execute remix --local --command="SELECT * FROM users"
🌀 Mapping SQL input into an array of statements
🌀 Loading 647377a9-f57f-4e70-9c04-3e659bfcadb2 from .wrangler/state/v3/d1
┌────┬──────────┐
│ id │ username │
├────┼──────────┤
│ 1  │ Taro     │
├────┼──────────┤
│ 2  │ Hanako   │
└────┴──────────┘
これでローカルの D1 が作成されたことを確認しました。
本番にも反映します。
npx wrangler d1 migrations apply remix
npx wrangler d1 execute remix --command="INSERT INTO users (username) VALUES ('Taro'), ('Hanako')"
npx wrangler d1 execute remix --command="SELECT * FROM users"
実行結果。
$ npx wrangler d1 migrations apply remix
Migrations to be applied:
┌────────────────┐
│ name           │
├────────────────┤
│ 0000_users.sql │
└────────────────┘
✔ About to apply 1 migration(s)
Your database may not be available to serve requests during the migration, continue? … yes
🌀 Mapping SQL input into an array of statements
🌀 Parsing 2 statements
🌀 Executing on remix (647377a9-f57f-4e70-9c04-3e659bfcadb2):
🚣 Executed 2 commands in 0.6229469776153564ms
┌────────────────┬────────┐
│ name           │ status │
├────────────────┼────────┤
│ 0000_users.sql │ ✅       │
└────────────────┴────────┘
$ npx wrangler d1 execute remix --command="INSERT INTO users (username) VALUES ('Taro'), ('Hanako')"
🌀 Mapping SQL input into an array of statements
🌀 Parsing 1 statements
🌀 Executing on remix (647377a9-f57f-4e70-9c04-3e659bfcadb2):
🚣 Executed 1 commands in 0.1962520033121109ms
$ npx wrangler d1 execute remix --command="SELECT * FROM users"
🌀 Mapping SQL input into an array of statements
🌀 Parsing 1 statements
🌀 Executing on remix (647377a9-f57f-4e70-9c04-3e659bfcadb2):
🚣 Executed 1 commands in 0.30927400290966034ms
┌────┬──────────┐
│ id │ username │
├────┼──────────┤
│ 1  │ Taro     │
├────┼──────────┤
│ 2  │ Hanako   │
└────┴──────────┘
Binding D1
続いては Pages Functions と D1 を紐づけます。
Cloudflare の Dashboard から該当の Pages > Settings > Functions を開きます。
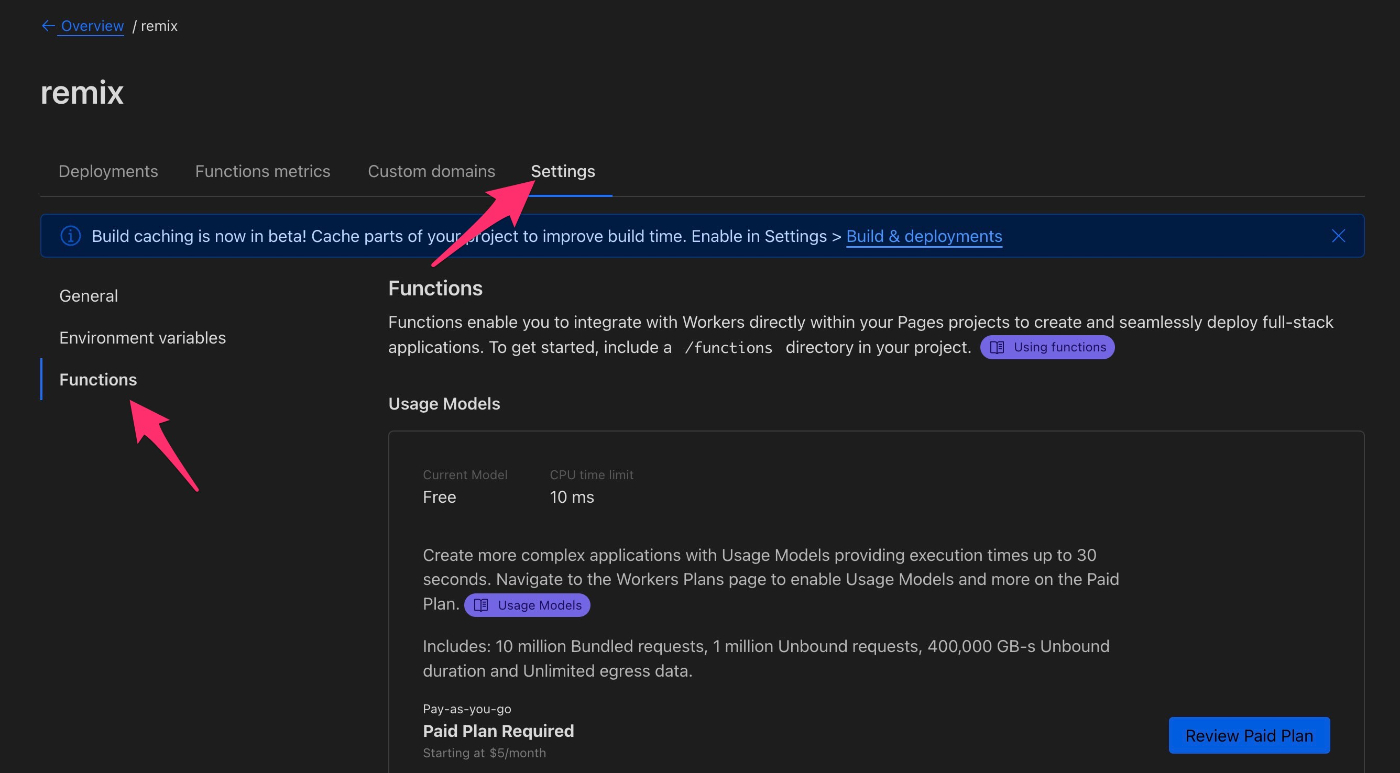
中間くらいの D1 database bindings > Add bindings を押します。
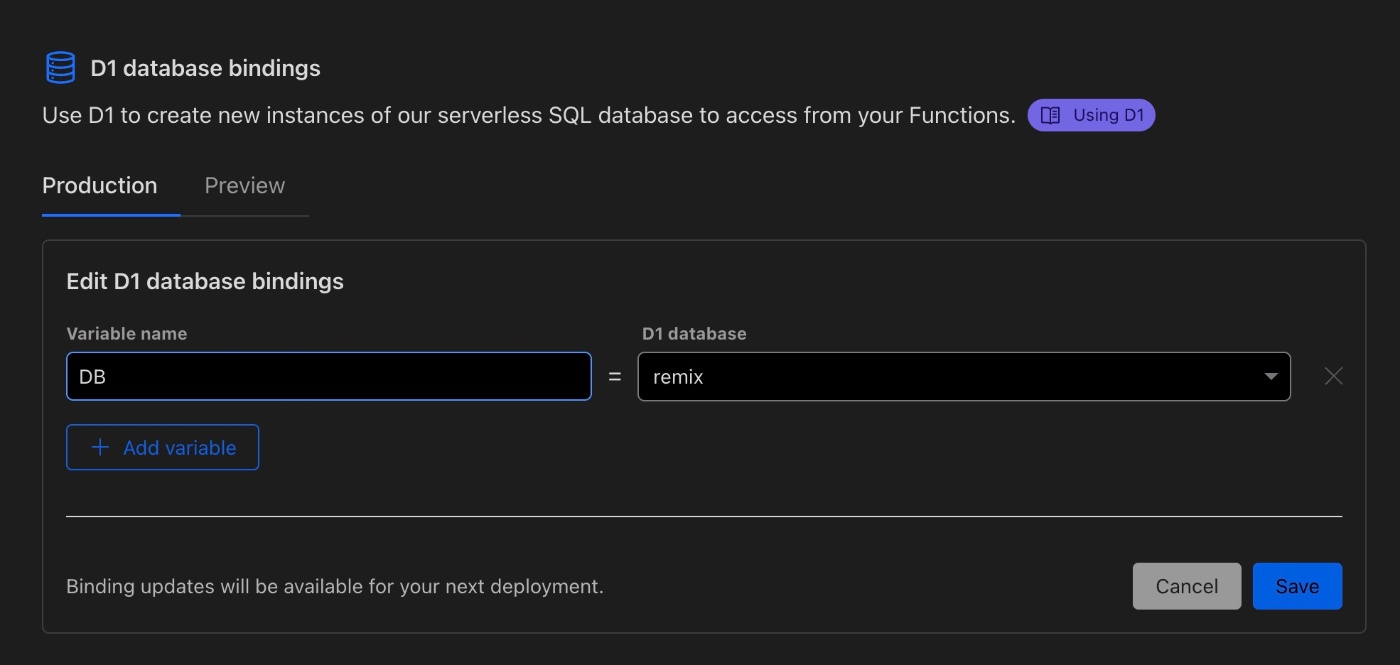
以下の値をセットし Save を押します。
Variable name: DB
D1 database: remix
これで本番の Pages Functions(Workers) からも D1 へ接続ができるようになりました。
D1 のセットアップは完了です。
Remix から D1 を呼ぶ
_index.tsx に D1 を呼び出す処理を追加してみます。
Remix v2 から以下の情報が変わっているようです。
-
LoaderArgs→LoaderFunctionArgs -
context.DB→context.env.DB
@@ -1,4 +1,25 @@
-import type { MetaFunction } from "@remix-run/cloudflare";
+import type { LoaderFunctionArgs, MetaFunction } from "@remix-run/cloudflare";
+import { json } from "@remix-run/cloudflare";
+import { useLoaderData } from "@remix-run/react";
+
+interface Env {
+  DB: D1Database;
+}
+
+type User = {
+  id: number;
+  username: string;
+};
+
+export async function loader({ context }: LoaderFunctionArgs) {
+  const env = context.env as Env;
+
+  const { results } = await env.DB.prepare("SELECT * FROM users").all<User>();
+
+  return json({
+    users: results ?? [],
+  });
+}

 export const meta: MetaFunction = () => {
   return [
@@ -8,6 +29,8 @@ export const meta: MetaFunction = () => {
 };

 export default function Index() {
+  const { users } = useLoaderData<typeof loader>();
+
   return (
     <div style={{ fontFamily: "system-ui, sans-serif", lineHeight: "1.8" }}>
       <h1>Welcome to Remix</h1>
@@ -35,6 +58,9 @@ export default function Index() {
             Remix Docs
           </a>
         </li>
+        {users.map((user) => (
+          <li key={user.id}>{user.username}</li>
+        ))}
       </ul>
     </div>
   );
index.tsx 全文はこちら。
import type { LoaderFunctionArgs, MetaFunction } from "@remix-run/cloudflare";
import { json } from "@remix-run/cloudflare";
import { useLoaderData } from "@remix-run/react";

interface Env {
  DB: D1Database;
}

type User = {
  id: number;
  username: string;
};

export async function loader({ context }: LoaderFunctionArgs) {
  const env = context.env as Env;

  const { results } = await env.DB.prepare("SELECT * FROM users").all<User>();

  return json({
    users: results ?? [],
  });
}

export const meta: MetaFunction = () => {
  return [
    { title: "New Remix App" },
    { name: "description", content: "Welcome to Remix!" },
  ];
};

export default function Index() {
  const { users } = useLoaderData<typeof loader>();

  return (
    <div style={{ fontFamily: "system-ui, sans-serif", lineHeight: "1.8" }}>
      <h1>Welcome to Remix</h1>
      <ul>
        <li>
          <a
            target="_blank"
            href="https://remix.run/tutorials/blog"
            rel="noreferrer"
          >
            15m Quickstart Blog Tutorial
          </a>
        </li>
        <li>
          <a
            target="_blank"
            href="https://remix.run/tutorials/jokes"
            rel="noreferrer"
          >
            Deep Dive Jokes App Tutorial
          </a>
        </li>
        <li>
          <a target="_blank" href="https://remix.run/docs" rel="noreferrer">
            Remix Docs
          </a>
        </li>
        {users.map((user) => (
          <li key={user.id}>{user.username}</li>
        ))}
      </ul>
    </div>
  );
}
ベースブランチへコミットしデプロイします。
npm run deploy
本番の Pages を開いてみましょう。
users テーブルの情報が表示されていたら完了です。

まとめ
今回は D1 が Beta になったので触ってみたら Remix v2 関連で地味に書き方が変わっていたため、メモとして記事にしました。誰かの参考になれば幸いです。
参照
参考にさせていただいた記事です。
Discussion
Awesome!
D1 の設定を参考にさせていただきました。