firebase auth で cookie での session 管理試す
firebase auth を利用する場合、 cookie を利用しない idToken による認証しかやったことないので、cookie base な方法を試す。
こちらのドキュメントをもとに進める。
Project setup
Next に firebase auth 組み込む形で進める。
Next.js setup
npx create-next-app@latest
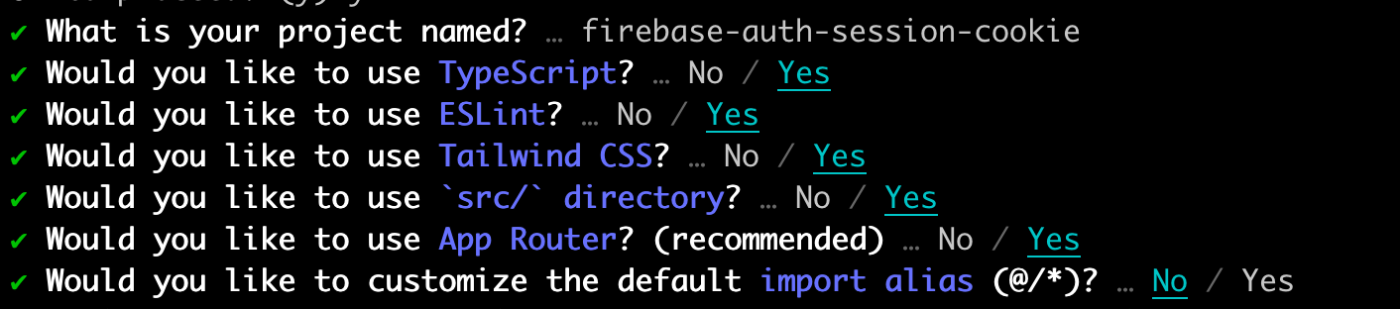
準備完了 (Next.js 14.2.3)
firebase setup
npm install firebase
import { initializeApp } from 'firebase/app';

const firebaseConfig = {
  apiKey: "xxxxxxxxxx",
  authDomain: "xxxxxxxxxx.firebaseapp.com",
  databaseURL: "https://xxxxxxxxxx.firebaseio.com",
  projectId: "xxxxxxxxxx",
  storageBucket: "xxxxxxxxxx.appspot.com",
  messagingSenderId: "xxxxxxxxxx",
  appId: "xxxxxxxxxx"
};

const firebaseApp = initializeApp(firebaseConfig);
import { getAuth } from 'firebase/auth';
import { firebaseApp } from './app';

export const firebaseAuth = getAuth(firebaseApp);
firebase-admin setup
npm i firebase-admin server-only
import 'server-only';

import { getApps, initializeApp } from 'firebase-admin/app';

const [existingApp] = getApps();

export const adminApp = existingApp ?? initializeApp();
読み進めていく
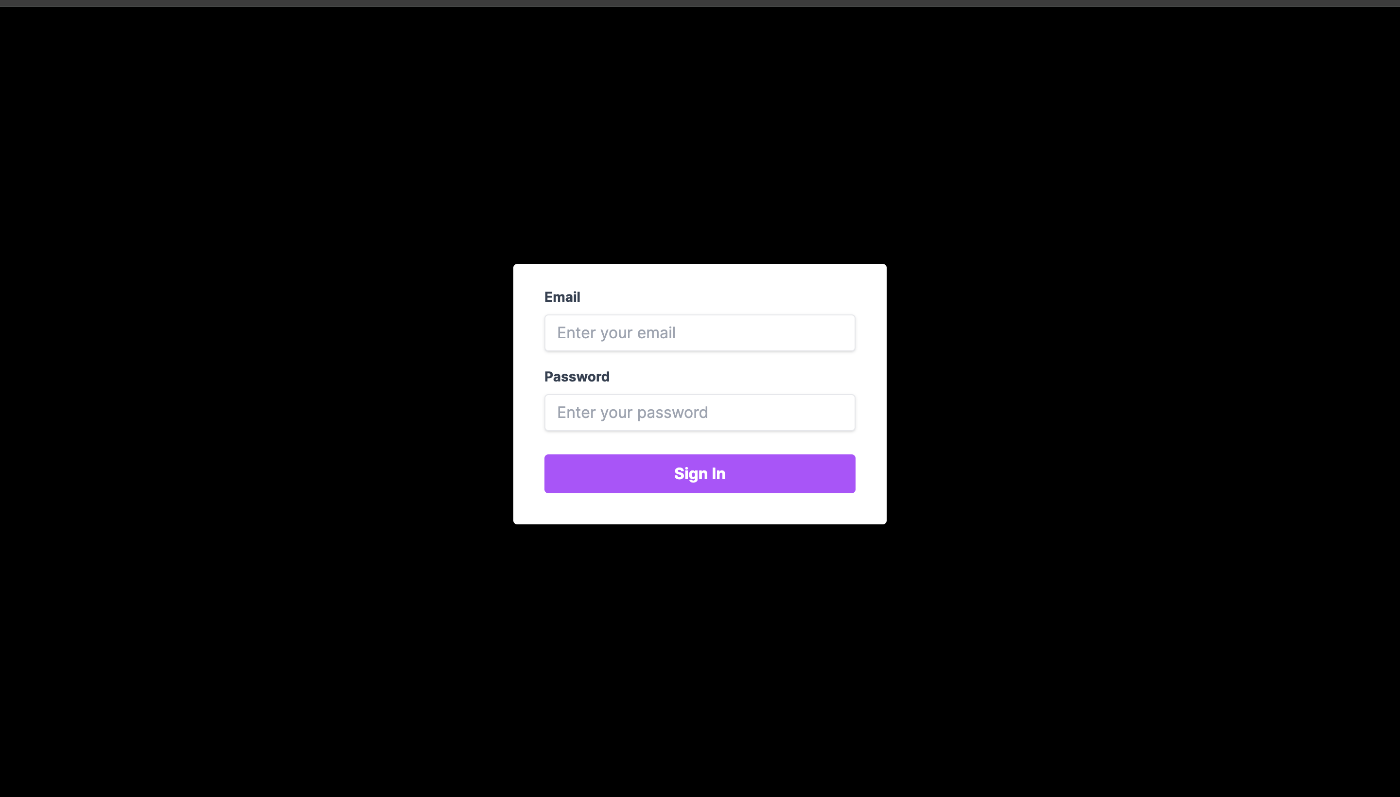
SignIn
SignInForm
email password 認証用の UI 作っとく。
コード詳細
client side での処理をする想定なので client component で作る。
'use client';

export const SignInForm = () => {
  return (
    <form
      className='bg-white shadow-md rounded px-8 pt-6 pb-8 mb-4 w-96'
      action={async (formData) => {
        const email = formData.get('email') as string;
        const password = formData.get('password') as string;

        console.debug('Get email and password', { email, password });

        //TODO: do something with email and password
      }}
    >
      <div className='mb-4'>
        <label
          htmlFor='email'
          className='block text-gray-700 text-sm font-bold mb-2'
        >
          Email
        </label>
        <input
          id='email'
          type='email'
          name='email'
          required
          className='shadow appearance-none border rounded w-full py-2 px-3 text-gray-700 leading-tight focus:outline-none focus:shadow-outline'
          placeholder='Enter your email'
        />
      </div>
      <div className='mb-6'>
        <label
          htmlFor='password'
          className='block text-gray-700 text-sm font-bold mb-2'
        >
          Password
        </label>
        <input
          id='password'
          type='password'
          name='password'
          required
          className='shadow appearance-none border rounded w-full py-2 px-3 text-gray-700 leading-tight focus:outline-none focus:shadow-outline'
          placeholder='Enter your password'
        />
      </div>
      <div className='grid'>
        <button
          className='bg-purple-500 hover:bg-purple-700 text-white font-bold py-2 px-4 rounded focus:outline-none focus:shadow-outline'
          type='submit'
        >
          Sign In
        </button>
      </div>
    </form>
  );
};
client-side でやることを整理する
Assuming an application is using httpOnly server side cookies, sign in a user on the login page using the client SDKs. A Firebase ID token is generated, and the ID token is then sent via HTTP POST to a session login endpoint where, using the Admin SDK, a session cookie is generated. On success, the state should be cleared from the client side storage.
- email, password で signIn
- idToken を取得
- idToken を session login 用の endpoint へ投げる
- client-side の login state を消す
On success, the state should be cleared from the client side storage.
client-side の login state を消すってことは、client-side の firebase auth は未認証とみなされるのか...?
client-side から直接 firestore や storage にアクセスした場合の security rules での認証はどうなるんだ...?
とりあえず実装して確かめるか。
email password で signIn
import * as FirebaseAuth from 'firebase/auth';
import { firebaseApp } from './app';

export const firebaseAuth = FirebaseAuth.getAuth(firebaseApp);

export const signInWithEmailAndPassword = (email: string, password: string) => {
  return FirebaseAuth.signInWithEmailAndPassword(firebaseAuth, email, password);
};
'use client';

import { signInWithEmailAndPassword } from '@/lib/firebase/auth';

const handleAction = async (formData: FormData) => {
  const email = formData.get('email') as string;
  const password = formData.get('password') as string;

  console.debug('Get email and password', { email, password });

  try {
    const userCredential = await signInWithEmailAndPassword(email, password);
    console.debug('Sign in success', userCredential);
  } catch (error) {
    console.error('Sign in failed', error);
  }
};

export const SignInForm = () => {
  return (
    <form
      className='bg-white shadow-md rounded px-8 pt-6 pb-8 mb-4 w-96'
      action={handleAction}
    >
idToken 取得
const handleAction = async (formData: FormData) => {
  const email = formData.get('email') as string;
  const password = formData.get('password') as string;

  console.debug('Get email and password', { email, password });

  try {
    const userCredential = await signInWithEmailAndPassword(email, password);
    console.debug('Sign in success', userCredential);

+    const idToken = await userCredential.user.getIdToken();
+    console.debug('Get ID token', idToken);
  } catch (error) {
    console.error('Sign in failed', error);
  }
};
idToken を session login 用の endpoint へ投げる
session login 処理を行う server action を用意する。処理の詳細は後で実装。
'use server';

export const sessionLoginAction = async (idToken: string) => {
  //TODO: Implement session login action
};
server action に idToken を渡す。
const handleAction = async (formData: FormData) => {
  const email = formData.get('email') as string;
  const password = formData.get('password') as string;

  console.debug('Get email and password', { email, password });

  try {
    const userCredential = await signInWithEmailAndPassword(email, password);
    console.debug('Sign in success', userCredential);

    const idToken = await userCredential.user.getIdToken();
    console.debug('Get ID token', idToken);

+    await sessionLoginAction(idToken);
+    console.debug('Session login success');
  } catch (error) {
    console.error('Sign in failed', error);
  }
};
client-side の login state を消す
client-side での認証情報は不要なので、session login 後に client-side で signOut して client-side での login state を消す。
export const signOut = () => {
  return FirebaseAuth.signOut(firebaseAuth);
};
const handleAction = async (formData: FormData) => {
  const email = formData.get('email') as string;
  const password = formData.get('password') as string;

  console.debug('Get email and password', { email, password });

  try {
    const userCredential = await signInWithEmailAndPassword(email, password);
    console.debug('Sign in success', userCredential);

    const idToken = await userCredential.user.getIdToken();
    console.debug('Get ID token', idToken);

    await sessionLoginAction(idToken);
    console.debug('Session login success');

+    await signOut();
+    console.debug('Clear client-side authentication state');
  } catch (error) {
    console.error('Sign in failed', error);
  }
};
Create session cookie
server action で cookie をセットしていく。
やること整理
To generate a session cookie in exchange for the provided ID token, an HTTP endpoint is required. Send the token to the endpoint, setting a custom session duration time using the Firebase Admin SDK. Appropriate measures should be taken to prevent cross-site request forgery (CSRF) attacks.
- idToken から session cookie データ (cookie に保存する値) を作成
- cookie に session cookie データをセット
CSRF token について
All Server Actions can be invoked by plain <form>, which could open them up to CSRF attacks. Behind the scenes, Server Actions are always implemented using POST and only this HTTP method is allowed to invoke them. This alone prevents most CSRF vulnerabilities in modern browsers, particularly due to Same-Site cookies being the default.
As an additional protection Server Actions in Next.js 14 also compares the Origin header to the Host header (or X-Forwarded-Host). If they don't match, the Action will be rejected. In other words, Server Actions can only be invoked on the same host as the page that hosts it. Very old unsupported and outdated browsers that don't support the Origin header could be at risk.
Next.js v14 の server action では、デフォである程度の CSRF に対する protection が存在するため、今回の playground project では実装はしないでいく。
idToken から session cookie データ (cookie に保存する値) を作成
adminAuth.createSessionCookie() で session cookie データを作成する。
'use server';

import { adminAuth } from '@/lib/firebase-admin/auth';

export const sessionLoginAction = async (idToken: string) => {
  console.debug('Start session login action', { idToken });

+  // Set session expiration to 5 days.
+  const expiresIn = 60 * 60 * 24 * 5 * 1000;
+
+  const sessionCookie = await adminAuth.createSessionCookie(idToken, {
+    expiresIn,
+  });
+
+  console.debug('Session cookie created', { sessionCookie });
};
この session cookie データには何が入っているんだ...?
cookie に session cookie データをセット
Next.js の cookies().set() を利用して cookie に session cookie データをセットする。
export const sessionLoginAction = async (idToken: string) => {
  console.debug('Start session login action', { idToken });

  // Set session expiration to 5 days.
  const expiresIn = 60 * 60 * 24 * 5 * 1000;

  const sessionCookie = await adminAuth.createSessionCookie(idToken, {
    expiresIn,
  });

  console.debug('Session cookie created', { sessionCookie });

+  cookies().set('session', sessionCookie, {
+    maxAge: expiresIn,
+    httpOnly: true,
+    secure: true,
+  });
};
createSessionCookie() は何を返す...?
cookie に保存するcreateSessionCookie() の戻り値は一体何なのか調べる。
  const sessionCookie = await adminAuth.createSessionCookie(idToken, {
    expiresIn,
  });
中身は JWT
中身は普通に jwt。別に encrypt されているわけではない。
client-side で生成された jwt と何が違う...?
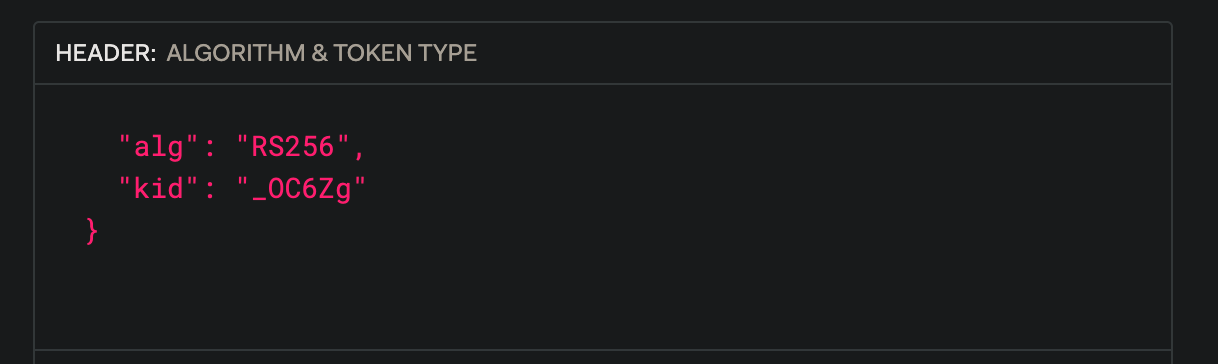
HEADER の kid が違うだけ
client-side で生成した jwt の HEADER
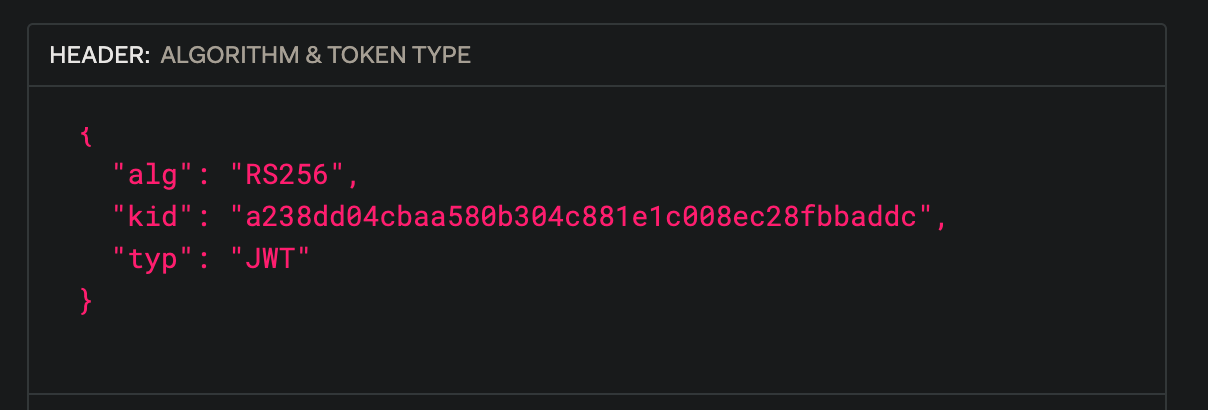
createSessionCookie() で生成された jwt の HEADER
payload はほぼ同じ
どちらも firebase auth idToken の claims が入っているだけ
こんな感じの値↓
{
  "iss": "https://securetoken.google.com/xxxxx-xxxxxx",
  "aud": "xxxxxxxxxxxx",
  "auth_time": 1714320942,
  "user_id": "xxxxxxxxxxxxxxx",
  "sub": "xxxxxxxxxxxxxxx",
  "iat": 1714320942,
  "exp": 1714324542,
  "email": "test@example.com",
  "email_verified": false,
  "firebase": {
    "identities": {
      "email": [
        "test@example.com"
      ]
    },
    "sign_in_provider": "password"
  }
}
有効期限 (payload.exp)が異なる
Firebase ID tokens are short lived and last for an hour
client-side で生成した jwt (idToken) は有効期限が1時間のみ。
Ability to create session cookies with custom expiration times ranging from 5 minutes to 2 weeks.
一方、createSessionCookie() で生成された jwt は5分から2週間までの有効期限が設定できる。
コード見てみる
Identity Platform REST API の createSession の endpoint へ request 投げてるだけに見える。
Identity Platform REST API createSession
The session cookie that has been created from the Identity Platform ID token specified in the request. It is in the form of a JSON Web Token (JWT). Always present.
jwt ですよ、としか書いてない。
違いは有効期限だけか...?
Verify session cookie and check permissions
session の検証を行う。
Next.js の公式 Doc も参考にしつつ、verifySession() util を用意する方向性でいく。
import { cookies } from 'next/headers';
import { cache } from 'react';

export const verifySession = cache(async () => {
  const sessionCookie = cookies().get('session')?.value;

  //TODO: Implement session verification.
});
session の検証
verifySessionCookie() を利用すると、session cookie データ (jwt) の検証 & jwt の decode を行う。
export const verifySession = cache(async () => {
  const sessionCookie = cookies().get('session')?.value;
  if (!sessionCookie) return null;

+  const decodedIdToken = await adminAuth.verifySessionCookie(
+    sessionCookie,
+    true /* checkRevoked */
+  );
+
+  return decodedIdToken;
});
server action で session の検証
先ほど作成した verifySession() を利用すればOK。
'use server';

import { verifySession } from '../_utils/auth';

export const createSomethingAction = async () => {
  const session = await verifySession();
  if (!session) {
    throw new Error('Unauthorized');
  }

  console.log('Create something', session);
};
Sign out
SessionLogoutAction 作る
login 時に cookie に set した session を消せばOK
'use server';

import { cookies } from 'next/headers';

export const sessionLogoutAction = async () => {
  console.debug('Start session logout action');

  cookies().delete('session');

  console.debug('Session cookie cleared');
};
server component から呼び出す
import { sessionLogoutAction } from './_actions/session-logout-acion';

//...

          <form action={sessionLogoutAction}>
            <button
              type='submit'
              className='bg-red-500 hover:bg-red-700 text-white font-bold py-2 px-4 rounded mt-4'
            >
              Logout
            </button>
          </form>
revoke refresh token
現状の signOut 処理は、cookie を clear しただけで cookie に set されていた jwt は生き続ける。(= firebase auth としてはその session は生きている扱い)
firebase auth の session もきちんとログアウトさせる(= 同一 user の他の session も無効にする)ためには revokeRefreshTokens() で revoke してあげる。
'use server';

+ import { adminAuth } from '@/lib/firebase-admin/auth';
import { cookies } from 'next/headers';
import { verifySession } from '../_utils/auth';

export const sessionLogoutAction = async () => {
+   const session = await verifySession();
+   if (!session) {
+     console.debug('No session found');
+     return;
+   }

  console.debug('Start session logout action');

  cookies().delete('session');

  console.debug('Session cookie cleared');

+   await adminAuth.revokeRefreshTokens(session.sub);
+
+   console.debug('Refresh tokens revoked');
};
ちなみに、refreshToken が revoke されたことは client-side firebase auth onAuthStateChanged でリアルタイム検知することはできない。client-side でページロードが生じると refreshToken が無効なため login できず signOut した状態になる。
firebase の他のサービスでの認証状態はどうなる?
一般的な方法で firebase auth でログインしている場合、callable functions の呼び出し時に自動的に認証情報が受け渡されたり、firestore security rules で idToken の中身を利用して認可ロジックを組み立てたりできる。
今回の session cookie で認証管理を行う場合 client-side でのログイン state は削除しているわけだが、他の firebase service を利用する際に認証情報はどのように扱われるのかわからないので調査する。client-side での firebase auth では未ログイン状態になるので、等しく未ログインとして扱われる気はしているが....
firestore security rules 試す
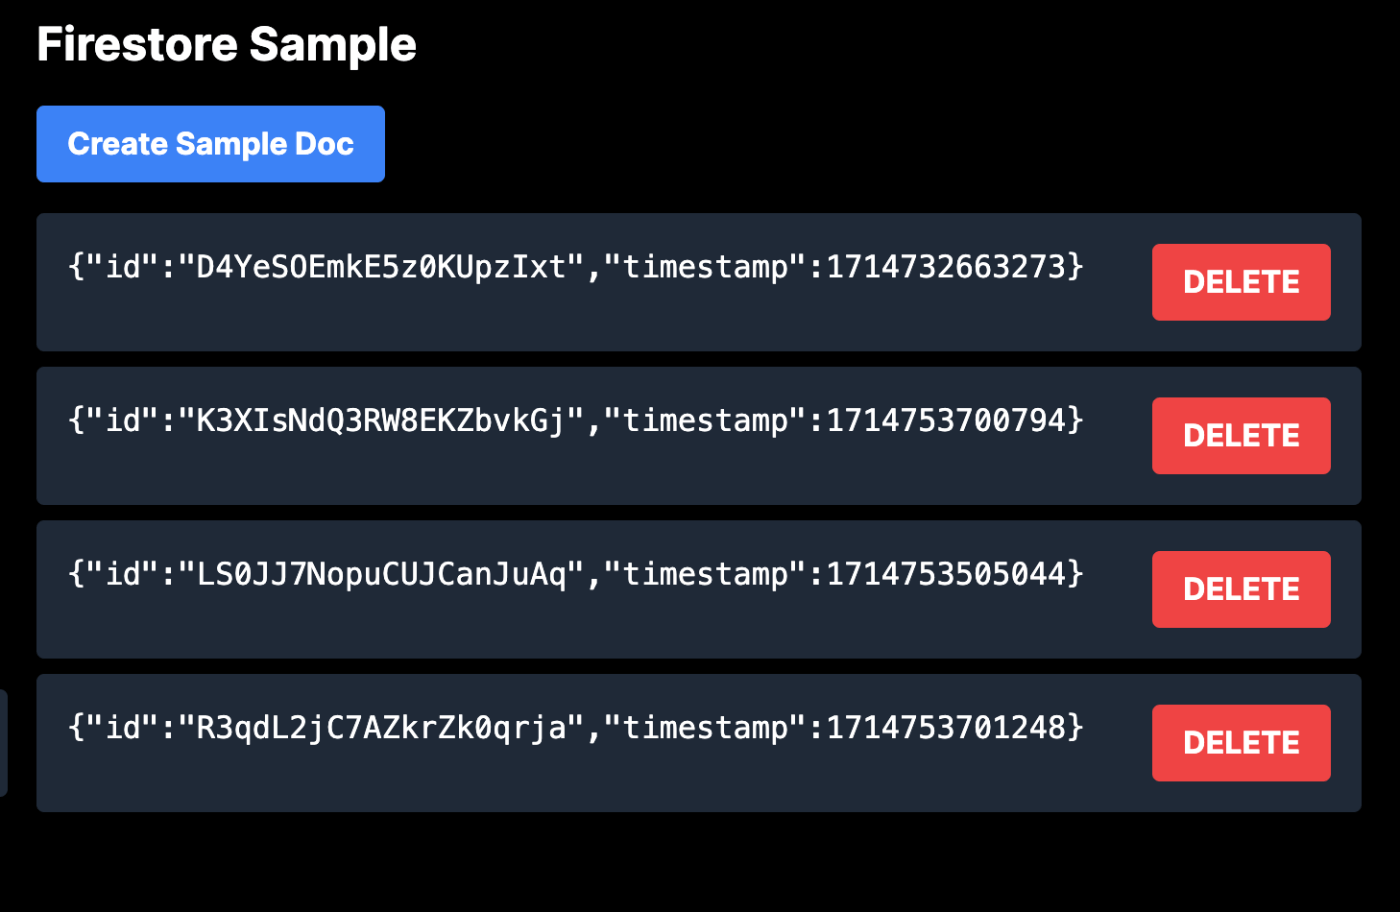
sample document を読み書きする component 用意する。
必要最低限のコードでいく。
ソースコード
'use client';

import { firestore } from '@/lib/firebase/firestore';
import {
  addDoc,
  collection,
  deleteDoc,
  doc,
  onSnapshot,
} from 'firebase/firestore';
import React, { useEffect } from 'react';

type SampleDoc = {
  id: string;
  timestamp: number;
};

const addSampleDoc = async () => {
  await addDoc(collection(firestore, 'samples'), {
    timestamp: Date.now(),
  });
};

const deleteSampleDoc = async (docId: string) => {
  await deleteDoc(doc(firestore, 'samples', docId));
};

const FirestoreSample: React.FC = () => {
  const [sampleDocs, setSampleDocs] = React.useState<SampleDoc[]>([]);

  useEffect(() => {
    return onSnapshot(collection(firestore, 'samples'), (snapshot) => {
      const sampleDocs = snapshot.docs.map((docSnap) => {
        return {
          id: docSnap.id,
          ...docSnap.data(),
        } as SampleDoc;
      });
      setSampleDocs(sampleDocs);
    });
  }, []);

  return (
    <div className=''>
      <button
        className='bg-blue-500 hover:bg-blue-700 text-white font-bold py-2 px-4 rounded'
        onClick={async () => {
          await addSampleDoc();
        }}
      >
        Create Sample Doc
      </button>

      <ul className='mt-4'>
        {sampleDocs.map((doc, index) => (
          <li
            key={doc.id}
            className='bg-gray-800 p-4 mb-2 rounded flex justify-between'
          >
            <pre>{JSON.stringify(doc)}</pre>
            <button
              className='bg-red-500 hover:bg-red-700 text-white font-bold py-2 px-4 rounded'
              onClick={async () => {
                await deleteSampleDoc(doc.id);
              }}
            >
              DELETE
            </button>
          </li>
        ))}
      </ul>
    </div>
  );
};

export default FirestoreSample;
security rules 用意
samples document だけ認証必須にする。
rules_version = '2';
service cloud.firestore {
  match /databases/{database}/documents {
    match /{document=**} {
      allow read, write: if false;
    }

    match /samples/{sampleDocId} {
      allow read, write: if request.auth != null;
    }
  }
}
未ログイン状態で "Missing or insufficient permissions. " エラー出ること確認。

session cookie でログインして確認
やはり、sessin cookie でログインした状態では、firestore にアクセスする際は未ログイン状態と判定され、アクセスは弾かれる。

ログイン時に client-side の login state を保持するよう変更
firebase 公式 Doc では session cookie で login した際は client-side の login state を消すよう書いてあったが、client-side の login state を保持するよう変更。
const handleAction = async (formData: FormData) => {
  const email = formData.get('email') as string;
  const password = formData.get('password') as string;

  console.debug('Get email and password', { email, password });

  try {
    const userCredential = await signInWithEmailAndPassword(email, password);
    console.debug('Sign in success', userCredential);

    const idToken = await userCredential.user.getIdToken();
    console.debug('Get ID token', idToken);

    await sessionLoginAction(idToken);
    console.debug('Session login success');

-    await signOut();
-    console.debug('Clear client-side authentication state');
  } catch (error) {
    console.error('Sign in failed', error);
  }
};
ログイン後に firebase auth の client-side state が保持されており、firestore にアクセスできていることを確認↓
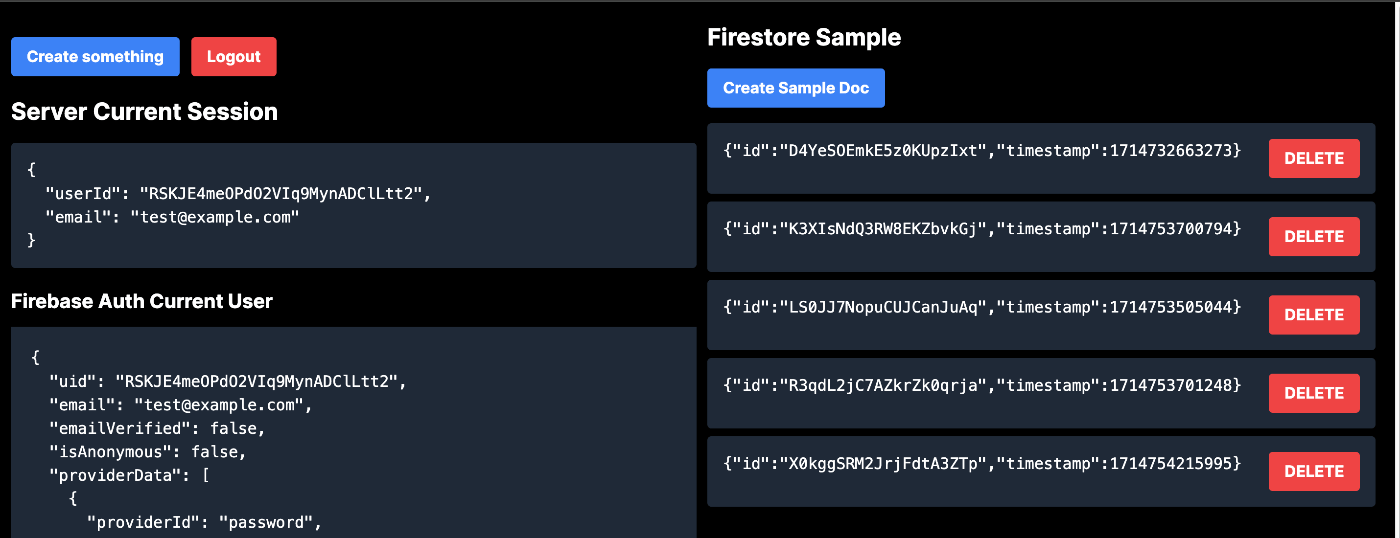
やはり、client-side から直接 firebase のサービスにアクセスする場合は、client-side の login state を保持している必要性はありそう。
公式 Docs で client-side login state を消しているのは、login state が client-side, server-side で二重管理になることを避ける目的か...? もしくは、従来型の cookie による session management の場合は、server-side に処理を束ねて、client-side から直接 firestore を叩くようなことしない想定なのか...?