Nx 触ってみる
長らく lerna + yarn workspace の monorepo しか経験がないのだが、lerna が事実上 nx 化してるので完全鞍替えを視野に nx を触ってみる。
Package-Based Monorepo tutorial
tutorial 進めてみる
Create a New Workspace
project を scaffold
npx create-nx-workspace@latest nx-package-based-tutorial --preset=npm
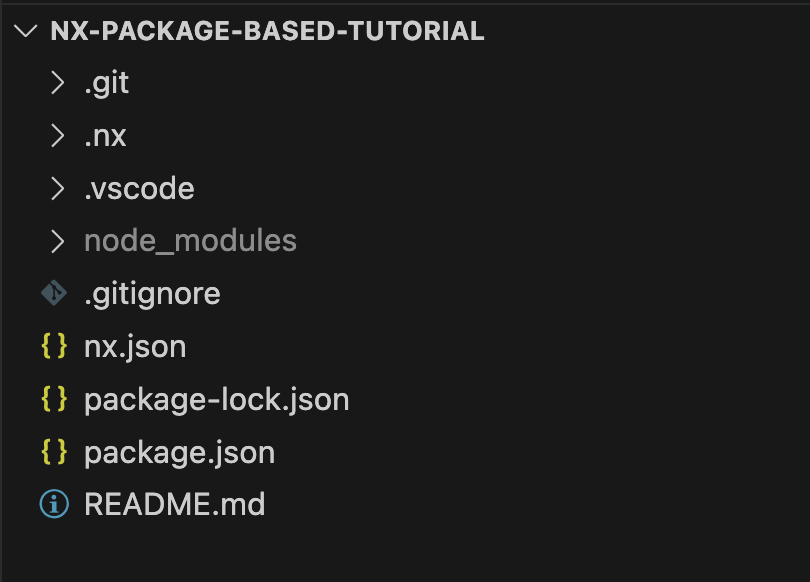
生成される files
Create a Package
package を作っていく。
手動で folder, file を作成するらしい。生成コマンドはないのか...?
package-based/
├── packages/
│   └── is-even/
│       ├── index.ts
│       └── package.json
├── nx.json
└── package.json
以下を作成。
export const isEven = (x: number) => x % 2 === 0;
{
  "name": "is-even",
  "version": "0.0.0",
  "main": "dist/index.js",
  "devDependencies": {},
  "scripts": {
    "build": "tsc index.ts --outDir dist"
  }
}
typescript を install
typescript を project root の devDependencies に install。
npm add -D typescript
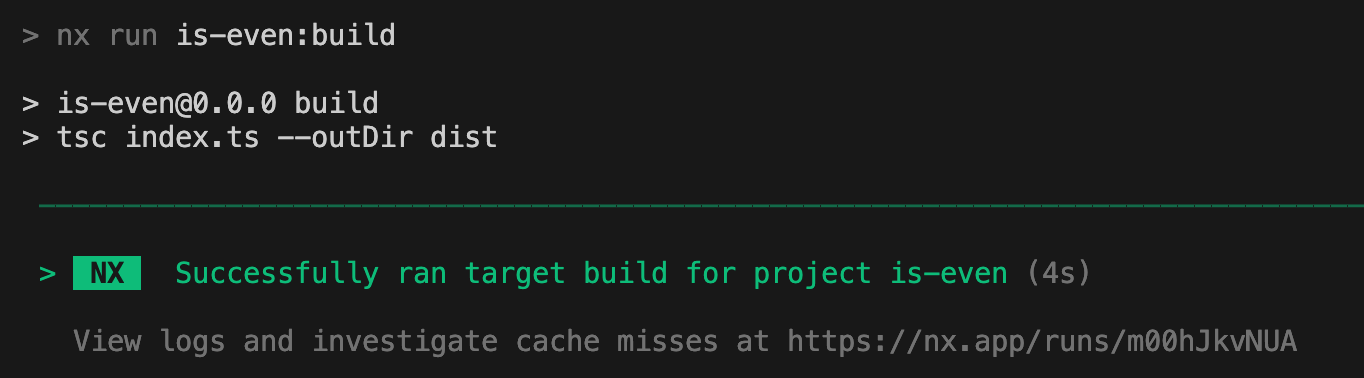
build
project root で以下を実行。lerna 同様 project root から対象の workspace 名を指定してコマンドを実行できるみたい。
npx nx build is-even
Local Linking of Packages
Linking packages locally in a package-based monorepo style is done with NPM/Yarn/PNPM workspaces.
別の workspace を作って、is-even を使ってみる
is-old package を作成して、is-event を import して使う。
folder structure はこんな感じ↓
package-based/
├── packages/
│   ├── is-even/
│   │   ├── index.ts
│   │   └── package.json
│   └── is-odd/
│       ├── index.ts
│       └── package.json
├── nx.json
└── package.json
is-even package を dependencies に追加。
{
  "name": "is-odd",
  "version": "0.0.0",
  "main": "dist/index.js",
  "devDependencies": {},
  "scripts": {
    "build": "tsc index.ts --outDir dist"
  },
  "dependencies": {
    "is-even": "*"
  }
}
is-even package を import して使う。
import { isEven } from 'is-even';

export const isOdd = (x: number) => !isEven(x);
The workspaces property in the root-level package.json tells NPM to create links for all packages found in the packages directory. This removes the need to publish them first to a NPM registry. (Similar functionality exists for Yarn and PNPM workspaces as well.)
NPM will create a Symbolic Link in your file system at: node_modules/is-even and node_modules/is-odd, so they reflect changes to your packages/is-even and packages/is-odd directories as they happen.
project root で npm install すれば、workspace の symlink が効く。
npm install
現時点では、yarn workspace で可能なことなので、nx 特有のものは特にはない
Task Dependencies
"ある task を実行するためには、依存 package のこの task を実行する必要がある" みたいな場合に、nx がよしなに必要な task を実行してくれる。
nx.json の targetDefaults を以下のようにすると build ccommand を実行する場合は、依存 package の build command を実行するように設定できる。
{
  ...
  "targetDefaults": {
    "build": {
      "dependsOn": ["^build"]
    }
  }
}
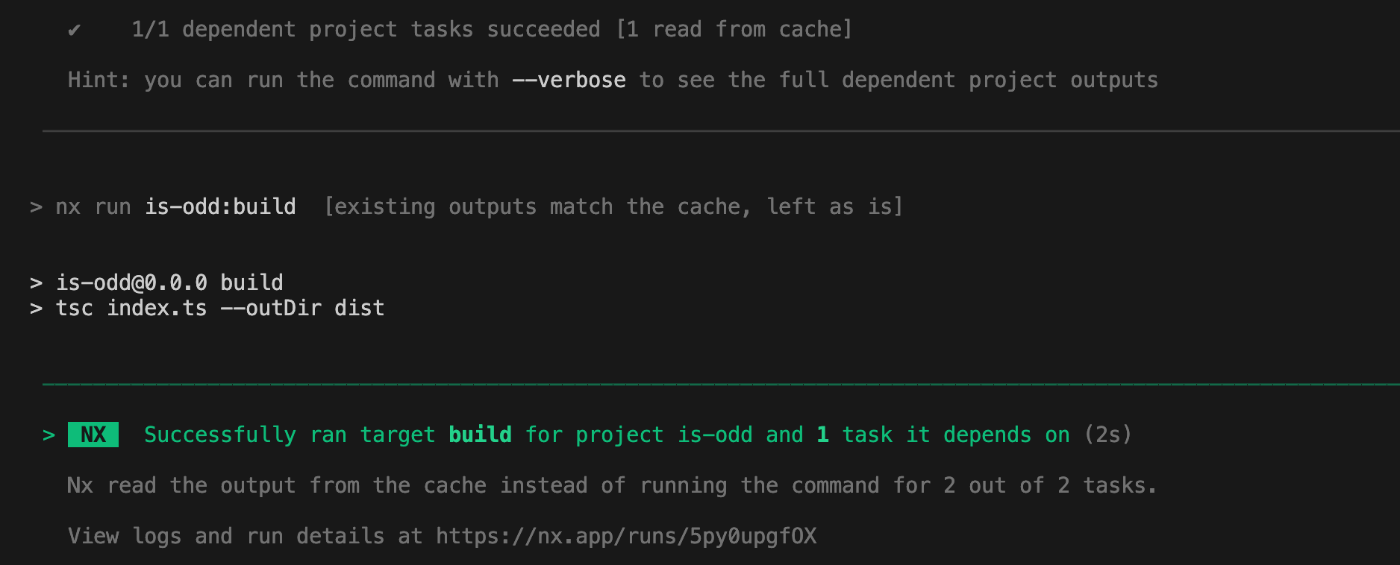
Cache Build Results
build 結果は cache される。
この tutorial の例でいくと、is-odd を再度 build すると、is-even も is-odd も cache 結果が利用されていることがわかる。
Running Multiple Tasks
nx run-many -t で複数 workspaces のコマンドを一括で実行できる。
この時の実行順序は nx.json の targetDefaults に準拠する。
npx nx run-many -t build

cache の無効化
--skip-nx-cache で cache を無効化できる。
npx nx run-many -t build --skip-nx-cache

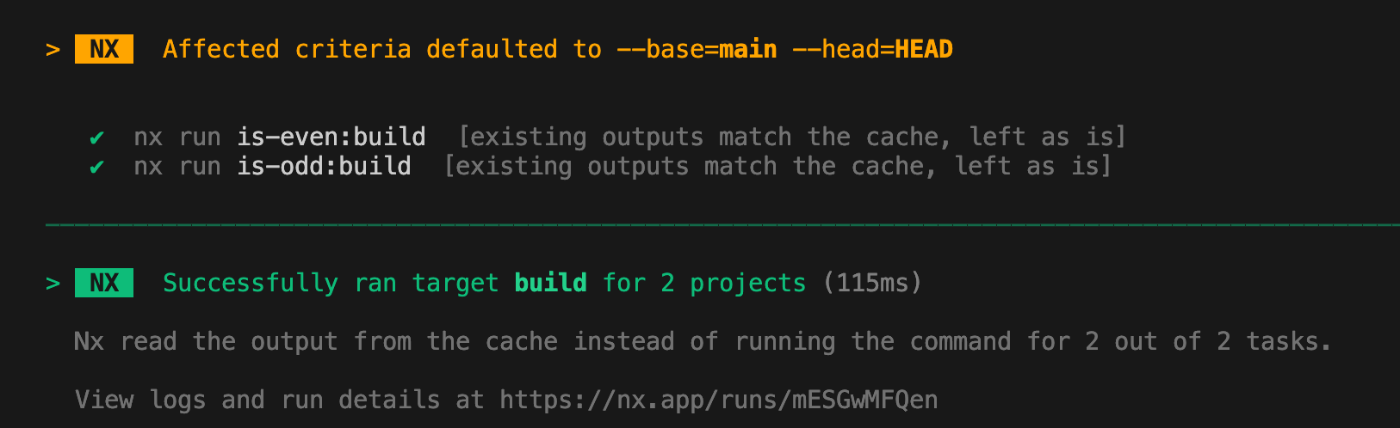
差分に影響を受けた packageg のみ実行
nx affected で、影響を受けた package のみ実行できる。
--base と --head で差分の範囲指定可能。
npx nx affected -t build
所感
- 基本 yarn workspace でやってたことと同じことができる
- workspace 間の依存関係に依拠したタスクの実行便利
- workspace を跨いだコマンドの一括実行便利
正直この tutorial レベルだと、 lerna + yarn workspace でやっていたことと大差ない。他にも nx の良さがある気はするのでもうちょい公式 Doc 深ぼる。
Integrated Monorepo tutorial
Integrated Monorepo の tutorial を進めてみる。
Create a New Workspace
npx create-nx-workspace@latest myorg --preset=ts
これが作成される↓
myorg/
├── packages/
├── tools/
├── nx.json
├── package.json
├── README.md
└── tsconfig.base.json
Create a Package
Nx comes with generators that can help with scaffolding applications. Run this generator to make a new library named is-even:
package を作成する。前回の tutorial では手動で package を作成したが、今回は generator を使っていく。やっぱり generator あるのか。
npx nx generate @nx/js:library is-even \
--directory=libs/is-even \
--publishable \
--importPath=@myorg/is-even
いくつかの prompt が出る
-
test runner
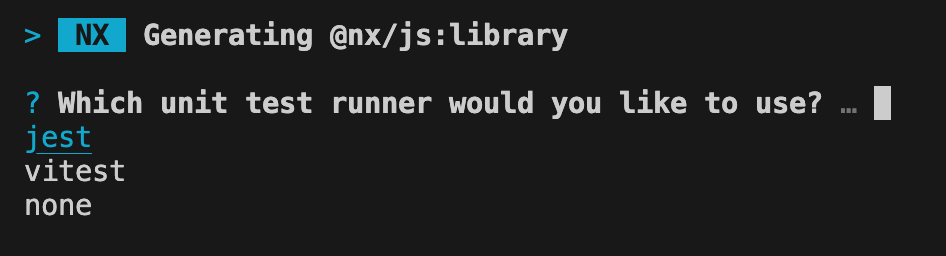
-
bundler

-
project name
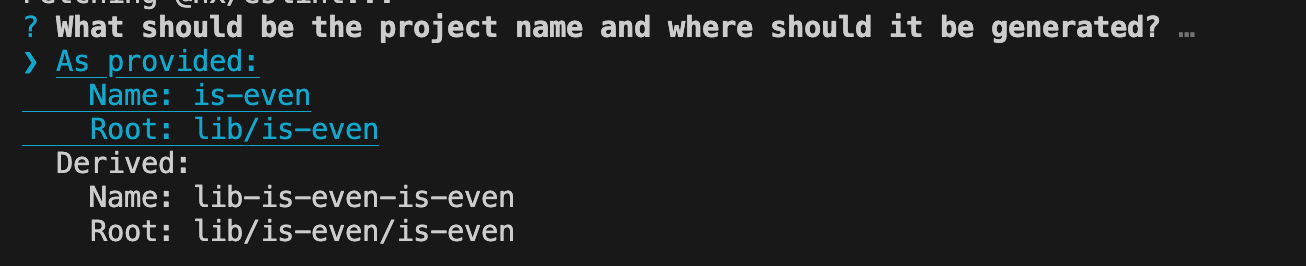
色々自動生成されたり、更新されたりするが、以下のような is-even package が生成される↓
packages/
└── is-even/
    ├── src/
    |  └── lib/
    |  |  ├── is-even.spec.ts
    |  |  ├── is-even.ts
    |  └── index.ts
    ├── project.json
    ├── package.json
    ├── ...
    └── tsconfig.json
project.json
The Nx plugins use a project-level project.json to manage the metadata around the available targets that can be run for a given project. The generated project.json for is-even contains build, publish, lint and test targets:
nx では、project.json というファイルで、自動生成された project の build やら test やらの設定値を管理する。
実際に生成された project.json
{
  "name": "is-even",
  "$schema": "../../node_modules/nx/schemas/project-schema.json",
  "sourceRoot": "lib/is-even/src",
  "projectType": "library",
  "targets": {
    "build": {
      "executor": "@nx/vite:build",
      "outputs": ["{options.outputPath}"],
      "options": {
        "outputPath": "dist/lib/is-even"
      }
    },
    "publish": {
      "command": "node tools/scripts/publish.mjs is-even {args.ver} {args.tag}",
      "dependsOn": ["build"]
    },
    "test": {
      "executor": "@nx/vite:test",
      "outputs": ["{options.reportsDirectory}"],
      "options": {
        "reportsDirectory": "../../coverage/lib/is-even"
      }
    },
    "lint": {
      "executor": "@nx/eslint:lint",
      "outputs": ["{options.outputFile}"]
    }
  },
  "tags": []
}
command
npx nx build is-even
npx nx build is-even builds the src files and places a ready-to-be-published package in dist/packages/is-even at the root of your workspace
package を build
npx nx publish is-even
npx nx publish is-even runs a publish script from dist/packages/is-even to push your package to NPM
dist folder のコンテンツを publish
npx nx test is-even
npx nx test is-even runs the pre-configured Jest tests for the package
test を実行
npx nx lint is-even
npx nx lint is-even runs the pre-configured ESLint checks for the package
lint を実行
Local Linking of Packages
The local linking of packages in an integrated monorepo style is handled by Nx automatically by leveraging TypeScript path mappings in the tsconfig.base.json file.
前回の package-based monorepo の場合は local linking は yarn, npm, pnpm の workspace によって管理されてたが、Integrated monorepo の場合、local linking も Nx が管理すると。tsconfig.base.json の path mappings をもとに管理されるわけね。
is-odd package を作成して link してみる
npx nx generate @nx/js:library is-odd \
--directory=libs/is-odd \
--publishable \
--importPath=@myorg/is-odd
先ほどと同様に generator を利用して package を作成すると、package が scaffold されると同時に、root の tsconfig.base.json に以下が追記される。
{
  "compileOnSave": false,
  "compilerOptions": {
    ...
    "paths": {
      "@myorg/is-even": ["packages/is-even/src/index.ts"],
>      "@myorg/is-odd": ["packages/is-odd/src/index.ts"]
    }
  }
}
以上でOK。
generator 使っていれば特別やるべきことはない。
あとは、普段通り package を import して開発を進めれば良い。
tsconfig.base.json の paths mapping をもとに Nx がよしなに依存関係を把握して、必要なタスクを実行してくれる。
import { isEven } from '@myorg/is-even';

export function isOdd(x: number): boolean {
  return !isEven(x);
}
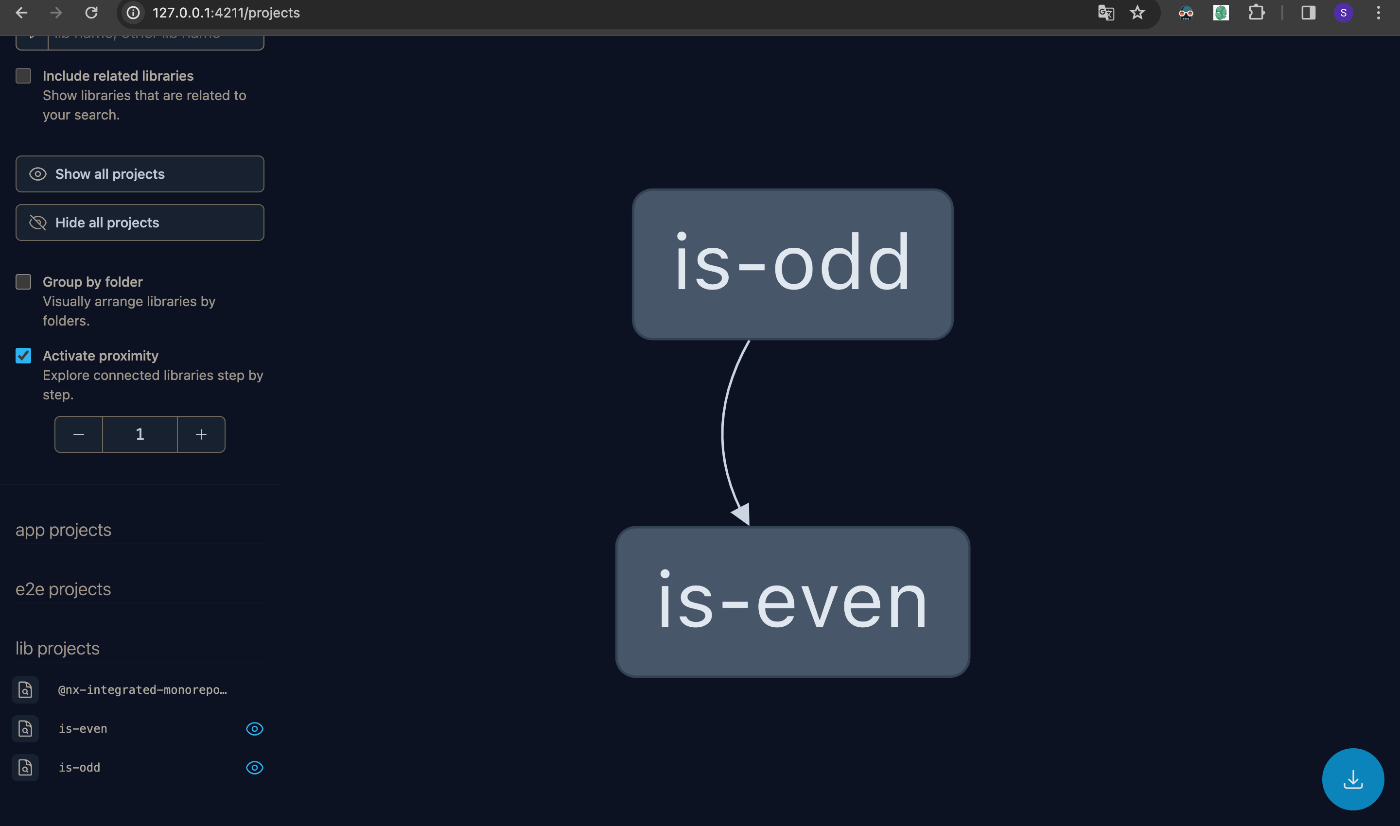
is-odd で @myorg/is-even を import しているので、is-even が is-odd の依存になっている。以下コマンドで依存関係を表示してみる。
npx nx graph
以降は package-based tutorial と同じなので割愛。
- Task Dependencies
- Cache Build Results
- Running Multiple Tasks
所感
- generator めちゃ便利
- がっつり Nx 依存になる
- nx に詳しいエンジニアがちゃんと workspace の管理できる状態でないと導入するのはハードル高いかも...
- ts の path mapping をもとに package 間の依存関係が管理されるのは楽ではある
- しかし、npm, yarn, pnpm の workspace に準拠していた方が安心感あるかも...
- package.json 記載の依存関係と実際の依存関係が乖離することがないのは良い
- "実際に使われているもの = 依存" となりわかりやすい
- しかし、package.json に依存関係が集約されないのは初見殺しかも...
- nx で依存関係を確認できるので問題ないかも
"integrated" というだけあって、Nx にがっつり乗っかる形だった。その分便利だけど、Nx と共に生きていく覚悟が必要そう。With great power comes great responsibility って感じ。
React Standalone Tutorial
React Standalone Tutorial 進めてみる。
Nx なのに standalone ってどういうことなんだろ...
Creating a new React App
npx create-nx-workspace@latest myreactapp --preset=react-standalone

選択項目↓
- bundler
- e2e
- style
- CI
これが生成される↓
└─ myreactapp
   ├─ ...
   ├─ e2e
   │  └─ ...
   ├─ public
   │  └─ ...
   ├─ src
   │  ├─ app
   │  │  ├─ app.module.css
   │  │  ├─ app.spec.tsx
   │  │  ├─ app.tsx
   │  │  └─ nx-welcome.tsx
   │  ├─ assets
   │  ├─ main.tsx
   │  └─ styles.css
   ├─ index.html
   ├─ nx.json
   ├─ package.json
   ├─ project.json
   ├─ tsconfig.app.json
   ├─ tsconfig.json
   ├─ tsconfig.spec.json
   └─ vite.config.ts
Serving the App
npm start で dev server 起動。
npm start
内部的には、nx serve で dev server を起動してる↓
  "scripts": {
    "start": "nx serve",
    "build": "nx build",
    "test": "nx test"
  },
Inferred Tasks
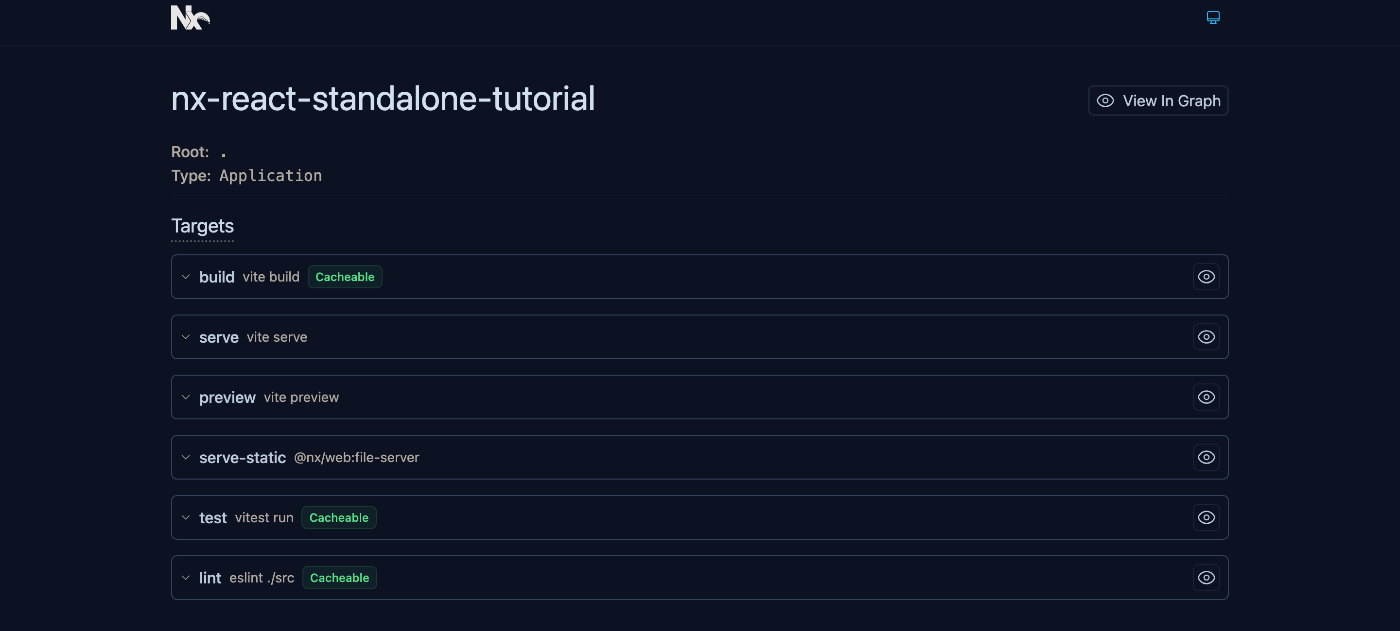
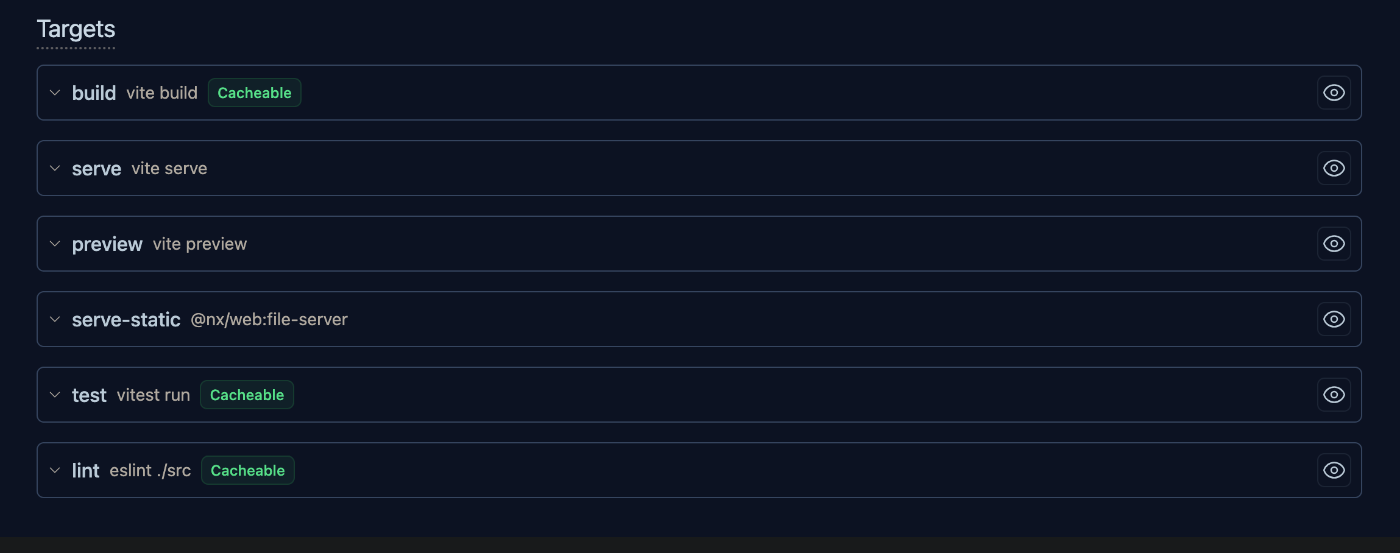
nx show project でその project の詳細がみれる。
nx show project my-project-name --web
Testing and Linting - Running Multiple Tasks
test, lint, e2e も nx で実行可能。
nx test
nx lint
nx e2e e2e
nx run-many で一括実行も可能。
nx run-many -t test lint e2e
Caching
"cachable" な target に関しては cache が効くらしい↓
実際に、コードを編集せずに nx run-many -t test lint e2e を実行してみると、
existing outputs match the cache, left as is
と出てくる。

Nx Plugins? Why?
"Nx plugin を使うと、nx がいい感じに project が使っている tool やその config に基づいてよしなに task を実行できるようにしてくて便利だよ" みたいな感じらしい。ただ、別に必須ではないので自前で諸々の task をセットアップしてもいいみたい。
Nx plugin の情報は、nx.json の plugins に書いてある↓
  "plugins": [
    {
      "plugin": "@nx/vite/plugin",
      "options": {
        "buildTargetName": "build",
        "previewTargetName": "preview",
        "testTargetName": "test",
        "serveTargetName": "serve",
        "serveStaticTargetName": "serve-static"
      }
    },
    {
      "plugin": "@nx/eslint/plugin",
      "options": {
        "targetName": "lint"
      }
    },
    {
      "plugin": "@nx/playwright/plugin",
      "options": {
        "targetName": "e2e"
      }
    }
  ],
今回の tutorial では vite, eslint, playwrite を使ってるからそれぞれの plugin がセットされてる。
nx test とか nx lint とかが特に何も設定せずにちゃんと動くのは Nx plugin のおかげ。