Shopifyでクラウドファンディングを行う方法について考察
はじめに
今回は、Shopify でクラウドファンディングを行う方法について考察してみました。
商品のメタフィールドを使用する方法や、Shopify の API を用いる方法を調べてみました。
それでは、頑張っていきましょう。
クラウドファンディングとは
今更説明するまでもないと思いますが、まずはクラウドファンディングについて解説していきます。
クラウドファンディングは、新しいプロジェクトやビジネスアイデアを実現するために、多くの人々から少額ずつ資金を集める手法です。近年、インターネットの普及とともにクラウドファンディングの人気が高まり、多くのクリエイターや起業家がこの手法を利用して成功を収めています。以下に、クラウドファンディングの基本概念とその活用方法について解説します。
クラウドファンディングの種類
クラウドファンディングには、いくつかの主要な種類があります。
-
リターン型(購入型)クラウドファンディング
支援者は資金提供の見返りに、完成した製品やサービスを受け取ります。これは最も一般的なクラウドファンディングの形式で、KickstarterやMakuakeなどのプラットフォームが該当します。 -
寄付型クラウドファンディング
支援者はリターンを求めずに資金提供を行います。主に慈善活動や社会貢献プロジェクトに利用されます。 -
融資型クラウドファンディング
支援者は資金提供を行い、後に利息付きで返済を受け取ります。主に中小企業の資金調達に利用されます。 -
投資型クラウドファンディング
支援者は資金提供の見返りに株式や利益分配を受け取ります。新興企業やスタートアップの資金調達に利用されます。
Shopify でクラウドファンディングを実装する方法
クラウドファンディングには様々な種類が有りますが、今回はリターン型(購入型)クラウドファンディングに絞って実装を行いたいと思います。
リターン型クラウドファンディングを行う際には、Shopify の予約販売 API を使う場合と、予約販売を使用せずにそのまま決済を行う二つのパターンが有ります。

pre-order API を使用すると、顧客からの注文が保留中の決済として提供されることになります。
こちらの API をカスタムアプリとして利用すれば、予約販売を用いたリターン型クラウドファンディングを行える可能性が有ります。
しかし、pre-orders のドキュメントを読み進めていくと、以下の記述が有ります。
Vaulting payment methods: Don't vault payment methods for any purpose other than processing recurring or deferred payments.
Overbilling: A selling plan specifies how to bill a customer. Don't overbill a customer.
Unsupported usage: APIs are built to support only authorized selling plans, such as pre-orders, try before you buys, and subscriptions. Don't use the APIs to solve for other business use cases, such as installments, layaways, and crowdfunding campaigns.
上記の制限に記載の通り、Shopify の pre-order API は、クラウドファンディングアプリの作成に使用することはできません。
そのため、そのまま決済を行うリターン型(購入型)クラウドファンディングに絞って実装を考察していきます。
Shopify でクラウドファンディングを実装する際のメタフィールド
Shopify でクラウドファンディングを実装する際に必要なデータを考察していきます。
マクアケ等の表示を参考にすると、以下のデータをどこかに持つ必要が有るかと思います。
- 目標金額
- 応援購入総額
- サポーター数
- クラウドファンディング開始日時
- クラウドファンディング終了日時
- 購入金額(クラウドファンディング期間内)
上記のデータを、shop もしくは 商品のメタフィールドに保存しておけば、マクアケのようなクラウドファンディング表示を行うことができるかと思います。
Shopify の商品詳細ページでは、shop のメタフィールドと商品のメタフィールドの両方にアクセスすることができます。
クラウドファンディングを行う商品が複数あることを考えると、商品のメタフィールドにオブジェクト形式で以下のデータを持たせましょう。
{
  "start_datetime": Date,
  "end_datetime": Date,
  "target_amount": number,
  "achieved_amount": number,
  "achieved_supporter_count": number
}
上記のオブジェクトを、商品のメタフィールドに作成しましょう。
「設定 > カスタムデータ」 より、カスタムデータ設定画面に移動します。
ここから、メタフィールドの設定を行いましょう。

商品のメタフィールドを選択しましょう。
カスタムデータの商品を選択しましょう。

ここで、定義を追加から、商品メタフィールドの定義を作成することができます。

JSONスキーマに、先ほど作成した情報を入力しましょう。
{
  "start_datetime": '',
  "end_datetime": '',
  "target_amount": 0,
  "achieved_amount": 0,
  "achieved_supporter_count": 0
}
これで、保存してください。
ここまでで、商品のメタフィールドを設定することができました。
次に、顧客の購入時に上記で作成したクラウドファンディング用のメタフィールドを更新する実装を考えましょう。
クラウドファンディング用のメタフィールドを更新
クラウドファンディングの値の更新には、webhookを利用することになるかと思います。
上記のドキュメントから、orders/createの項目を探してください。
orders/createの webhook からは、以下の情報が取得できます。
{
  "id": 820982911946154508,
  "admin_graphql_api_id": "gid://shopify/Order/820982911946154508",
  "app_id": null,
  "browser_ip": null,
  "buyer_accepts_marketing": true,
  "cancel_reason": "customer",
  "cancelled_at": "2021-12-31T19:00:00-05:00",
  "cart_token": null,
  "checkout_id": null,
  "checkout_token": null,
  "client_details": null,
  "closed_at": null,
  "confirmation_number": null,
  "confirmed": false,
  "contact_email": "jon@example.com",
  "created_at": "2021-12-31T19:00:00-05:00",
  "currency": "USD",
  "current_subtotal_price": "398.00",
  "current_subtotal_price_set": {
    "shop_money": {
      "amount": "398.00",
      "currency_code": "USD"
    },
    "presentment_money": {
      "amount": "398.00",
      "currency_code": "USD"
    }
  },
  "current_total_additional_fees_set": null,
  "current_total_discounts": "0.00",
  "current_total_discounts_set": {
    "shop_money": {
      "amount": "0.00",
      "currency_code": "USD"
    },
    "presentment_money": {
      "amount": "0.00",
      "currency_code": "USD"
    }
  },
  "current_total_duties_set": null,
  "current_total_price": "398.00",
  "current_total_price_set": {
    "shop_money": {
      "amount": "398.00",
      "currency_code": "USD"
    },
    "presentment_money": {
      "amount": "398.00",
      "currency_code": "USD"
    }
  },
  "current_total_tax": "0.00",
  "current_total_tax_set": {
    "shop_money": {
      "amount": "0.00",
      "currency_code": "USD"
    },
    "presentment_money": {
      "amount": "0.00",
      "currency_code": "USD"
    }
  },
  "customer_locale": "en",
  "device_id": null,
  "discount_codes": [

  ],
  "email": "jon@example.com",
  "estimated_taxes": false,
  "financial_status": "voided",
  "fulfillment_status": "pending",
  "landing_site": null,
  "landing_site_ref": null,
  "location_id": null,
  "merchant_of_record_app_id": null,
  "name": "#9999",
  "note": null,
  "note_attributes": [

  ],
  "number": 234,
  "order_number": 1234,
  "order_status_url": "https://jsmith.myshopify.com/548380009/orders/123456abcd/authenticate?key=abcdefg",
  "original_total_additional_fees_set": null,
  "original_total_duties_set": null,
  "payment_gateway_names": [
    "visa",
    "bogus"
  ],
  "phone": null,
  "po_number": null,
  "presentment_currency": "USD",
  "processed_at": "2021-12-31T19:00:00-05:00",
  "reference": null,
  "referring_site": null,
  "source_identifier": null,
  "source_name": "web",
  "source_url": null,
  "subtotal_price": "388.00",
  "subtotal_price_set": {
    "shop_money": {
      "amount": "388.00",
      "currency_code": "USD"
    },
    "presentment_money": {
      "amount": "388.00",
      "currency_code": "USD"
    }
  },
  "tags": "tag1, tag2",
  "tax_exempt": false,
  "tax_lines": [

  ],
...
}
かなり長いので途中で割愛していますが、上記の値を参照すれば、商品のメタフィールドの更新できそうですね。
Shopify のカスタムアプリを作成して、orders/createの webhook を登録して、商品のメタフィールドを更新しましょう。
後は、更新した商品のメタフィールドの情報をストアフロントから作成すれば、Shopify でクラウドファンディングを行うことができそうです。
しかし、カスタムアプリを作成してクラウドファンディングを行うのはかなり難しいと思うので、念のため日本製の Shopify アプリも紹介しておきます。
アプリを使ってクラウドファンディングを実現する方法
それでは次に、アプリを使ってクラウドファンディングを実現する方法について解説していきます。
今回は、以下の記事を参考にしました。
今回紹介するアプリは、シンプルクラウドファンディング|お手軽自社クラファンという日本製の Shopify アプリです。

以下の画像のようなクラウドファンディングが行えます。

こちらのアプリを使用すれば、かなり簡単に Shopify でクラウドファンディングを行うことができます。
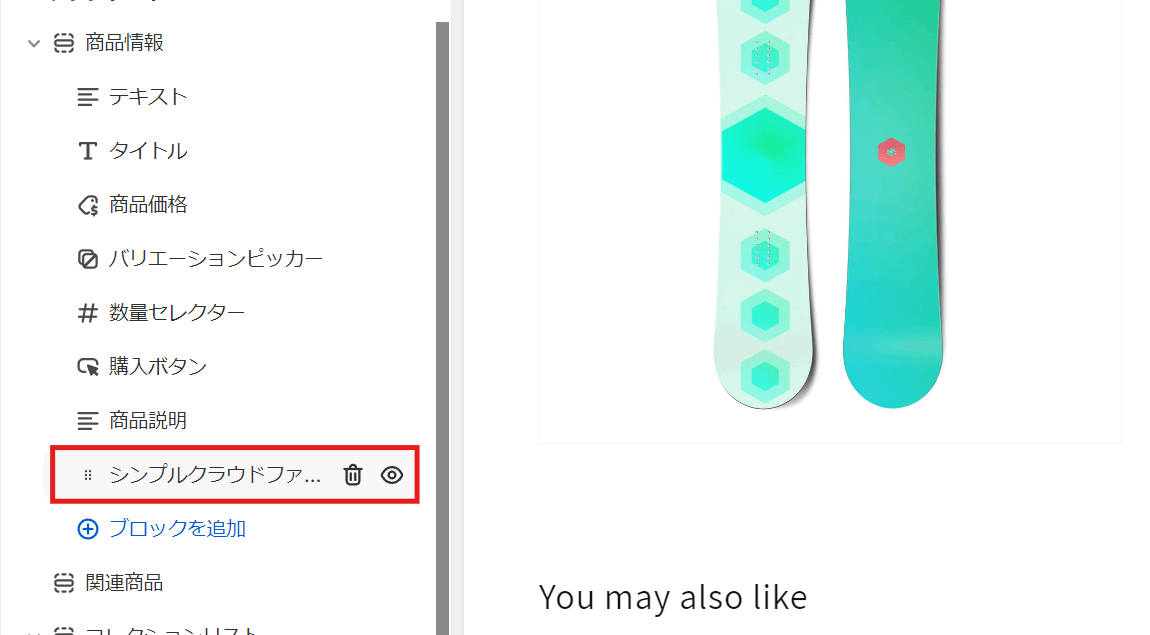
アプリをインストールすると、以下の画面が表示されます。

右上のクラウドファンディング設定を追加より、クラウドファンディング設定を作成できます。

目標金額・初期金額・初期サポーター数・開始日・終了日を設定することができます。

上記を入力して設定を保存した後は、設定からクラウドファンディング用のアプリブロックを追加すれば完了です。

下記の画像のように、商品セクションの中にシンプルクラウドファンディング|お手軽自社クラファンのアプリブロックが挿入されれば、設定は完了です。
カスタムアプリを用いてクラウドファンディングを作成するのが難しければ、こちらのアプリを使用する選択肢もあるかと思います。
最後に
ここまでで、カスタムアプリを作成してクラウドファンディングを作成する方法と、Shopify のクラウドファンディングアプリを用いて実装する方法の二つを解説しました。
お疲れさまでした。
参考記事
Discussion