Add-to-appでiOSアプリにFlutterモジュールを統合する
この記事は、GENDA Advent Calendar 2024 15日目の記事です。
はじめに
本記事ではFlutterのAdd-to-appという機能を使ってiOSプロジェクトにFlutterモジュールを統合する方法について紹介します。
Add-to-app
「Add-to-app」は、既存のネイティブアプリケーション(iOSやAndroidなど)にFlutter製のUIや機能をモジュールとして組み込む手法を指します。
Flutterは本来、プロジェクト全体をFlutterで構築する「フルFlutter」なアプリ開発スタイルが有名ですが、「Add-to-app」を利用することで、すでに運用中のネイティブアプリに部分的にFlutterコンポーネントを導入することが可能になります。
Add-to-appいつ使う?
ほとんどの場合が、ネイティブで開発しているアプリをFlutter化したい あるいは 一部の機能をFlutter化したい などと思います。
使いたいケースは限定的でそこまでニーズの高い機能ではないと(個人的に)思っています。
Add-to-appを導入する
公式ドキュメントにある通りに進めていけば特に難しいことはありません。
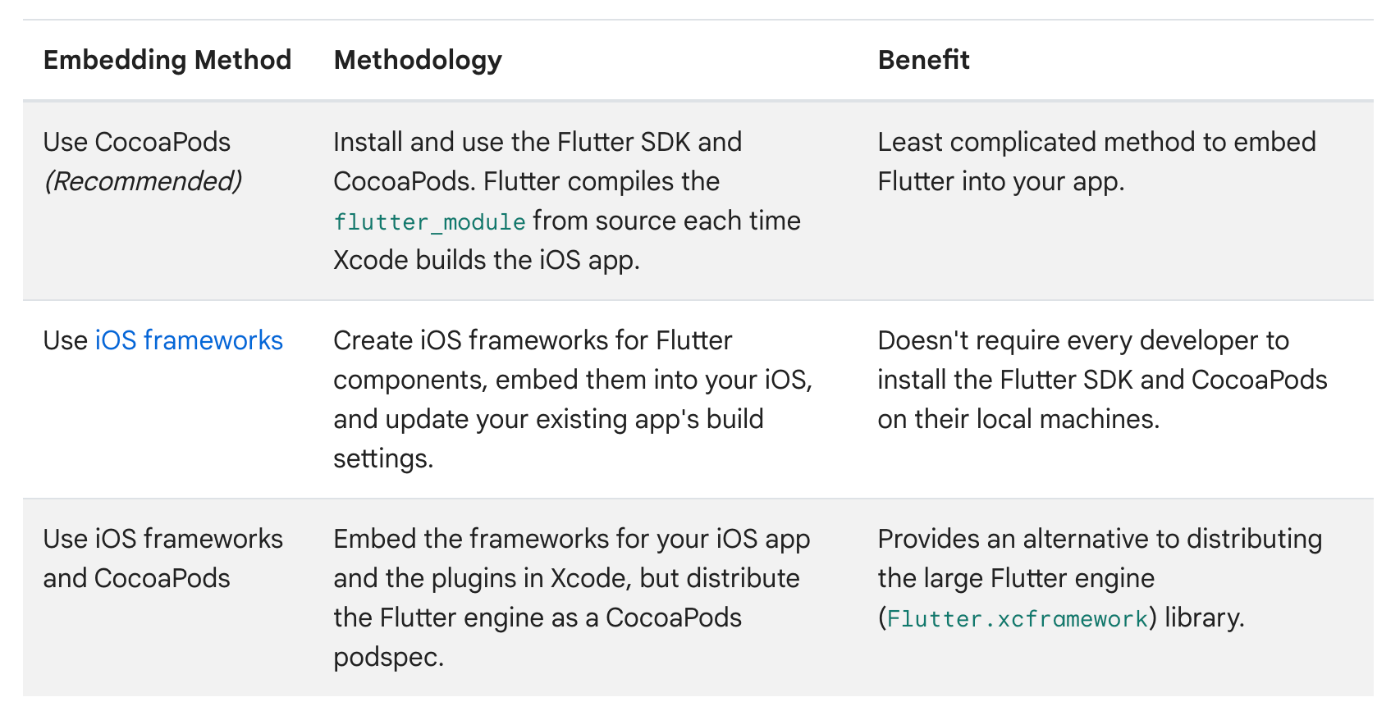
Flutterの統合にあたってはいくつかの方法があり、CocoaPodsの使用が推奨されています。
今回はCocoaPodsを使用していきます。

画像出典:Flutter公式ページ
1. Flutterモジュールを作成する
cd /path/to/my_flutter
flutter create --template module my_flutter
2. podfileを編集する
# Uncomment the next line to define a global platform for your project
# platform :ios, '9.0'

flutter_application_path = '../my_flutter'
load File.join(flutter_application_path, '.ios', 'Flutter', 'podhelper.rb')

target 'IOSUsingPlugin' do
  # Comment the next line if you don't want to use dynamic frameworks
  use_frameworks!

  # Pods for IOSUsingPlugin
  install_all_flutter_pods(flutter_application_path)

  target 'IOSUsingPluginTests' do
    inherit! :search_paths
    # Pods for testing
  end

  target 'IOSUsingPluginUITests' do
    inherit! :search_paths
    # Pods for testing
  end
end

post_install do |installer|
  flutter_post_install(installer) if defined?(flutter_post_install)
end
出典:公式サンプル
3. pod install
pod install を実行すると下記がインストールされます。
- Flutter (1.0.0)
- FlutterPluginRegistrant (0.0.1)
注意点
.ios/はgitignoreする
公式ドキュメントには下記のようにあります。
・Add custom iOS code to your own existing application's project or to a plugin, not to the module's .ios/ directory. Changes made in your module's .ios/ directory don't appear in your existing iOS project using the module, and might be overwritten by Flutter.
・Exclude the .ios/ directory from source control as it's autogenerated.
・Before building the module on a new machine, run flutter pub get in the my_flutter directory. This regenerates the .ios/ directory before building the iOS project that uses the Flutter module.
下記を実行すると.ios/が自動生成されるためgit管理などせず自動生成される.ios/を毎回使用するのが良いようです。
flutter pub get
Flutterモジュールを管理する
Add-to-appを使用したい目的のほとんどは、iOS/Androidアプリの個別開発をFlutterに1本化することで開発コストの削減に繋げることだと思います。
そのためFlutterモジュールはiOS/Androidそれぞれから柔軟に参照可能な形でネイティブアプリと連携する必要があります。方法はいくつか考えられますが、Git submoduleを使うのが良いと思います。
※ Git submodule:サブモジュールを使うと、ある Git リポジトリを別の Git リポジトリのサブディレクトリとして扱うことができるようになります。 これで、別のリポジトリをプロジェクト内にクローンしても自分のコミットは別管理とすることができるようになります。
iOS側からFlutterの画面を表示する
iOSの画面からFlutterの画面を呼び出すには下記の手順を踏むことで実現できます。
1.AppDelegateの編集
import UIKit
import Flutter
// The following library connects plugins with iOS platform code to this app.
import FlutterPluginRegistrant

@UIApplicationMain
class AppDelegate: FlutterAppDelegate { // More on the FlutterAppDelegate.
  lazy var flutterEngine = FlutterEngine(name: "my flutter engine")

  override func application(_ application: UIApplication, didFinishLaunchingWithOptions launchOptions: [UIApplication.LaunchOptionsKey: Any]?) -> Bool {
    // Runs the default Dart entrypoint with a default Flutter route.
    flutterEngine.run();
    // Connects plugins with iOS platform code to this app.
    GeneratedPluginRegistrant.register(with: self.flutterEngine);
    return super.application(application, didFinishLaunchingWithOptions: launchOptions);
  }
}
参照:公式ドキュメント
2.FlutterViewControllerを表示
import UIKit
import Flutter

class ViewController: UIViewController {
  override func viewDidLoad() {
    super.viewDidLoad()

    // Make a button to call the showFlutter function when pressed.
    let button = UIButton(type:UIButton.ButtonType.custom)
    button.addTarget(self, action: #selector(showFlutter), for: .touchUpInside)
    button.setTitle("Show Flutter!", for: UIControl.State.normal)
    button.frame = CGRect(x: 80.0, y: 210.0, width: 160.0, height: 40.0)
    button.backgroundColor = UIColor.blue
    self.view.addSubview(button)
  }

  @objc func showFlutter() {
    let flutterEngine = (UIApplication.shared.delegate as! AppDelegate).flutterEngine
    let flutterViewController =
        FlutterViewController(engine: flutterEngine, nibName: nil, bundle: nil)
    present(flutterViewController, animated: true, completion: nil)
  }
}
上記の実装だとmain.dartで実装しているinitialの画面が表示されます。
表示する画面を指定したい場合は下記のように実装します。FlutterViewControllerをinitする際にinitialRouteにパスを指定することで特定の画面を表示することができます。
main.dart
Widget build(BuildContext context) {
return MaterialApp(
initialRoute: '/',
routes: {
'/': (context) => const HomeScreen(),
'/screen1': (context) => const Screen1(),
'/screen2': (context) => const Screen2(),
},
);
}
viewController
let flutterEngine = (UIApplication.shared.delegate as! AppDelegate).flutterEngine
let flutterViewController = FlutterViewController(project: nil, initialRoute: "/screen1", nibName: nil, bundle: nil)
present(flutterViewController, animated: true, completion: nil)
Flutter側からiOSの画面を表示する
MethodChannelを使うことで実現できます。手順は下記の2ステップです。
- flutter 側で ネイティブの画面表示したいタイミングで invokeMethod をコール
- ネイティブ側のコールバックでハンドリングして画面遷移などの処理を実装する
swift 側コード
let flutterViewController = FlutterViewController(project: nil, initialRoute: "/screen1", nibName: nil, bundle: nil)
let closeChannel = FlutterMethodChannel(name: "com.example.app/close",
                                                binaryMessenger: flutterViewController.binaryMessenger)
closeChannel.setMethodCallHandler({(call: FlutterMethodCall, result: FlutterResult) -> Void in
    if call.method == "something" {
        // to do something
    }
})
present(flutterViewController, animated: true, completion: nil)
flutter 側コード
Future<void> _pushScreen() async {
    try {
      await platform.invokeMethod('something');
    } on PlatformException catch (e) {
      print("Failed to close screen: '${e.message}'.");
    }
}
上記のinovokeMethodの第二引数にパラメータを渡してFlutter↔︎iOSのデータ連携をすることも可能です。下記の型が渡せるようです。
-
プリミティブ型:
- int
- double
- bool
- String
-
コレクション型:
- List(リスト)
- Map(辞書)
開発・本番環境を切り分ける
Flutterの開発・本番環境の切り分け方はいくつものやり方がありますが、ここでは開発環境と本番環境をmain.dart/main_dev.dartで分けるている場合について説明します。
先ほどAppDelegateに記載した flutterEngine.run(); はmain.dartを参照しますがエントリーポイントを指定することができます。
#ifdef DEVELOPMENT
    self.flutterEngine.run(withEntrypoint: "main", libraryURI: "package:my_flutter/main_dev.dart")
#else
    flutterEngine.run();
#endif
上記のように実装することでiOSの開発環境とFlutterの開発環境を上手く連動させてビルドすることが可能です。
この時の注意点としては、main.dart内でmain_dev.dartをimportする必要があります。(これになかなか気づけず苦戦しました...)
まとめ
今回は導入の基本的な部分について触れましたがFirebaseなどライブラリのバージョンをiOS/Flutterで揃える必要があるなど注意する点は多々あります。
導入・運用事例があればぜひ教えてください!
Discussion