Orvalによる自動生成で型安全なフロントエンド開発をやってみる
はじめに
バックエンド(FastAPI)とフロントエンド(React)を別々に開発していると、REST APIのスキーマ定義に不一致が生じることがあります。
せっかくTypeScriptで型定義をして安全性を高めようとしているのに、そもそもバックエンドと矛盾があってしまうとTypeScriptの強みが活かせない状態になってしまいます。
本記事では、そのようなスキーマの不一致を防ぐ方法を検証します。
また、検証にかかる時間を短縮するため、本題以外の実装にはAIコーダーClineを活用しています。
方法
バックエンドで定義しているOpenAPIの定義ファイルを利用して、フロントエンドのスキーマを自動生成することで不一致をなくします。
つまり、バックエンドを正としてフロントエンドがバックエンドを追従するようにします。
ツール
今回利用するツールはOrvalです。
Orval は React との相性が良く、React Query や SWR 用のコードも自動生成でき、メンテナンスも活発に行われています。今回はその利便性を活かして Orval を採用しました。
OrvalはOpenAPIの定義ファイルを読み込んでデータフェッチ関数や型定義などを生成することができます。
検証環境の準備
検証環境はシンプルにこのようにしました。
- バックエンド
- Python、FastAPI、Pydantic ...
- フロントエンド
- TypeScript、React、SWR、Vite ...
バックエンド構築
1. Clineにお願いする
AIコーダーのClineを利用してFastAPIの簡単なモックを作成してもらいました。
下記のプロンプトでClineに指示を出したらいい感じに作成してくれました。
(実際には3回やり取りをして修正改善をしてもらいました)
ちなみにAPI ProviderにはOpenAI gpt-4.1を利用しました。
非常にシンプルなFastAPIのモックを作成してください。
ユーザーに関する情報を取得するモックです。
ユーザーの情報は下記です。
ユーザー名、年齢、性別、出身都道府県。
openapi.jsonを作成してください。
ユーザー名、年齢、性別、出身都道府県でフィルターできるようにしてください。
uvicornで起動するようにしてください。
サンプルデータは100件用意してください。
クライアント(http://localhost:5173) からのリクエストを許可するようにしてください。
プロンプトを実行するとClineがコードを生成してくれました。
バックエンドの準備はトータルで10分もかからずに完了しました。
Clineとてもありがたいですね!
sample-app/
 ├─ main.py
 └─ openapi.json
main.py
from fastapi import FastAPI, Query
from fastapi.middleware.cors import CORSMiddleware
from pydantic import BaseModel
from typing import List, Optional
import random

app = FastAPI(title="User Mock API", description="ユーザー情報を取得するモックAPI", version="1.0.0")

# CORS設定
app.add_middleware(
    CORSMiddleware,
    allow_origins=["http://localhost:5173"],
    allow_credentials=True,
    allow_methods=["*"],
    allow_headers=["*"],
)

# サンプルデータ生成用
PREFS = [
    "北海道", "青森県", "岩手県", "宮城県", "秋田県", "山形県", "福島県",
    "茨城県", "栃木県", "群馬県", "埼玉県", "千葉県", "東京都", "神奈川県",
    "新潟県", "富山県", "石川県", "福井県", "山梨県", "長野県",
    "岐阜県", "静岡県", "愛知県", "三重県",
    "滋賀県", "京都府", "大阪府", "兵庫県", "奈良県", "和歌山県",
    "鳥取県", "島根県", "岡山県", "広島県", "山口県",
    "徳島県", "香川県", "愛媛県", "高知県",
    "福岡県", "佐賀県", "長崎県", "熊本県", "大分県", "宮崎県", "鹿児島県", "沖縄県"
]
GENDERS = ["男性", "女性", "その他"]

class User(BaseModel):
    username: str
    age: int
    gender: str
    prefecture: str

def generate_users(n: int = 100) -> List[User]:
    users = []
    for i in range(1, n+1):
        user = User(
            username=f"user{i:03d}",
            age=random.randint(18, 65),
            gender=random.choice(GENDERS),
            prefecture=random.choice(PREFS)
        )
        users.append(user)
    return users

SAMPLE_USERS = generate_users(100)

@app.get(
    "/users",
    response_model=List[User],
    summary="ユーザー一覧取得",
)
def get_users(
    username: Optional[str] = Query(None, description="ユーザー名でフィルタ"),
    age: Optional[int] = Query(None, description="年齢でフィルタ"),
    gender: Optional[str] = Query(None, description="性別でフィルタ"),
    prefecture: Optional[str] = Query(None, description="出身都道府県でフィルタ"),
):
    results = SAMPLE_USERS
    if username is not None:
        results = [u for u in results if u.username == username]
    if age is not None:
        results = [u for u in results if u.age == age]
    if gender is not None:
        results = [u for u in results if u.gender == gender]
    if prefecture is not None:
        results = [u for u in results if u.prefecture == prefecture]
    return results
openapi.json
{
    "openapi": "3.1.0",
    "info": {
        "title": "User Mock API",
        "description": "ユーザー情報を取得するモックAPI",
        "version": "1.0.0"
    },
    "paths": {
        "/users": {
            "get": {
                "summary": "ユーザー一覧取得",
                "operationId": "get_users_users_get",
                "parameters": [
                    {
                        "name": "username",
                        "in": "query",
                        "required": false,
                        "schema": {
                            "anyOf": [
                                {
                                    "type": "string"
                                },
                                {
                                    "type": "null"
                                }
                            ],
                            "description": "ユーザー名でフィルタ",
                            "title": "Username"
                        },
                        "description": "ユーザー名でフィルタ"
                    },
                    {
                        "name": "age",
                        "in": "query",
                        "required": false,
                        "schema": {
                            "anyOf": [
                                {
                                    "type": "integer"
                                },
                                {
                                    "type": "null"
                                }
                            ],
                            "description": "年齢でフィルタ",
                            "title": "Age"
                        },
                        "description": "年齢でフィルタ"
                    },
                    {
                        "name": "gender",
                        "in": "query",
                        "required": false,
                        "schema": {
                            "anyOf": [
                                {
                                    "type": "string"
                                },
                                {
                                    "type": "null"
                                }
                            ],
                            "description": "性別でフィルタ",
                            "title": "Gender"
                        },
                        "description": "性別でフィルタ"
                    },
                    {
                        "name": "prefecture",
                        "in": "query",
                        "required": false,
                        "schema": {
                            "anyOf": [
                                {
                                    "type": "string"
                                },
                                {
                                    "type": "null"
                                }
                            ],
                            "description": "出身都道府県でフィルタ",
                            "title": "Prefecture"
                        },
                        "description": "出身都道府県でフィルタ"
                    }
                ],
                "responses": {
                    "200": {
                        "description": "Successful Response",
                        "content": {
                            "application/json": {
                                "schema": {
                                    "type": "array",
                                    "items": {
                                        "$ref": "#/components/schemas/User"
                                    },
                                    "title": "Response Get Users Users Get"
                                }
                            }
                        }
                    },
                    "422": {
                        "description": "Validation Error",
                        "content": {
                            "application/json": {
                                "schema": {
                                    "$ref": "#/components/schemas/HTTPValidationError"
                                }
                            }
                        }
                    }
                }
            }
        }
    },
    "components": {
        "schemas": {
            "HTTPValidationError": {
                "properties": {
                    "detail": {
                        "items": {
                            "$ref": "#/components/schemas/ValidationError"
                        },
                        "type": "array",
                        "title": "Detail"
                    }
                },
                "type": "object",
                "title": "HTTPValidationError"
            },
            "User": {
                "properties": {
                    "username": {
                        "type": "string",
                        "title": "Username"
                    },
                    "age": {
                        "type": "integer",
                        "title": "Age"
                    },
                    "gender": {
                        "type": "string",
                        "title": "Gender"
                    },
                    "prefecture": {
                        "type": "string",
                        "title": "Prefecture"
                    }
                },
                "type": "object",
                "required": [
                    "username",
                    "age",
                    "gender",
                    "prefecture"
                ],
                "title": "User"
            },
            "ValidationError": {
                "properties": {
                    "loc": {
                        "items": {
                            "anyOf": [
                                {
                                    "type": "string"
                                },
                                {
                                    "type": "integer"
                                }
                            ]
                        },
                        "type": "array",
                        "title": "Location"
                    },
                    "msg": {
                        "type": "string",
                        "title": "Message"
                    },
                    "type": {
                        "type": "string",
                        "title": "Error Type"
                    }
                },
                "type": "object",
                "required": [
                    "loc",
                    "msg",
                    "type"
                ],
                "title": "ValidationError"
            }
        }
    }
}
uvicorn main:app --host 127.0.0.1 --port 8000
2. Swaggerを確認
http://localhost:8000/docs にアクセスしてSwaggerを確認します。
SwaggerのTry it outからもAPIが動作することを確認できたらバックエンドの準備は完了です。

フロントエンド構築
1. プロジェクト作成
ViteでReactのプロジェクトを作成します。
npm create vite@latest

> npx
> create-vite

│
◇  Project name:
│  orval-poc
│
◇  Select a framework:
│  React
│
◇  Select a variant:
│  TypeScript + SWC
│
◇  Scaffolding project in /orval-poc...
│
└  Done. Now run:
2. SWRとAxiosのインストール
データ取得にはSWRを利用してみます。
2.3.3がインストールされました。
npm i swr
HTTPクライアントにはAxiosを利用してみます。
1.9.0がインストールされました。
npm i axios
3. 起動確認
npm install
npm run dev
4. OpenAPI定義ファイルの配置
OrvalはOpenAPIの定義ファイルを基にコードを生成するため、バックエンドで作成したopenapi.jsonをフロントエンドのプロジェクトに保存します。
バックエンドで作成したopenapi.jsonをプロジェクトのルートに保存。

これで検証環境が整いました。
Orvalの導入
1. Orvalをインストール
7.9.0がインストールされました。
npm i orval -D
2. Orvalの設定
プロジェクトのルートにorval.config.tsを作成します
設定ファイルが無くてもデフォルト設定で利用することはできるのですが、今回は下記の内容で設定を行いました。
import { defineConfig } from "orval";

export default defineConfig({
  orvalPoc: {
    input: "./openapi.json", // OpenAPIのスキーマファイルのパス
    output: {
      target: "./src/apiSchemas", // 生成されるコードの出力先
      client: "swr", // APIクライアントの種類
      httpClient: "axios", // HTTPクライアントの種類
      baseUrl: "http://localhost:8000", // ベースURL
      mode: "split", // 生成されるファイルのモード(APIクライアントとスキーマのファイルを分割)
    },
  },
});
3. Orvalの実行
Orvalの設定が完了したら実際にコマンドを実行してTypeScriptの型を生成します。
--config ./orval.config.ts のオプションで先程の設定ファイルを参照するように指定しています。
npx orval --config ./orval.config.ts
コマンドを実行すると数秒で設定ファイルのtargetで指定したディレクトリにuserMockAPI.schemas.tsとuserMockAPI.tsが生成されます。
sample-app/
  ├─ src/
+    ├─ apiSchemas/
+      ├─ userMockAPI.schemas.ts
+      └─ userMockAPI.ts
中身を確認すると、openapi.jsonの内容を忠実に反映したTypeScriptの型が生成されていることが分かります。
userMockAPI.tsに関してもAxiosとSWRでデータフェッチの関数が生成されていることが確認できます。
userMockAPI.schemas.ts
/**
 * Generated by orval v7.9.0 🍺
 * Do not edit manually.
 * User Mock API
 * ユーザー情報を取得するモックAPI
 * OpenAPI spec version: 1.0.0
 */
export interface HTTPValidationError {
  detail?: ValidationError[];
}

export interface User {
  username: string;
  age: number;
  gender: string;
  prefecture: string;
}

export type ValidationErrorLocItem = string | number;

export interface ValidationError {
  loc: ValidationErrorLocItem[];
  msg: string;
  type: string;
}

export type GetUsersUsersGetParams = {
  /**
   * ユーザー名でフィルタ
   */
  username?: string | null;
  /**
   * 年齢でフィルタ
   */
  age?: number | null;
  /**
   * 性別でフィルタ
   */
  gender?: string | null;
  /**
   * 出身都道府県でフィルタ
   */
  prefecture?: string | null;
};
userMockAPI.ts
/**
 * Generated by orval v7.9.0 🍺
 * Do not edit manually.
 * User Mock API
 * ユーザー情報を取得するモックAPI
 * OpenAPI spec version: 1.0.0
 */
import * as axios from "axios";
import type { AxiosError, AxiosRequestConfig, AxiosResponse } from "axios";

import useSwr from "swr";
import type { Key, SWRConfiguration } from "swr";

import type {
  GetUsersUsersGetParams,
  HTTPValidationError,
  User,
} from "./userMockAPI.schemas";

/**
 * @summary ユーザー一覧取得
 */
export const getUsersUsersGet = (
  params?: GetUsersUsersGetParams,
  options?: AxiosRequestConfig
): Promise<AxiosResponse<User[]>> => {
  return axios.default.get(`http://localhost:8000/users`, {
    ...options,
    params: { ...params, ...options?.params },
  });
};

export const getGetUsersUsersGetKey = (params?: GetUsersUsersGetParams) =>
  [`http://localhost:8000/users`, ...(params ? [params] : [])] as const;

export type GetUsersUsersGetQueryResult = NonNullable<
  Awaited<ReturnType<typeof getUsersUsersGet>>
>;
export type GetUsersUsersGetQueryError = AxiosError<HTTPValidationError>;

/**
 * @summary ユーザー一覧取得
 */
export const useGetUsersUsersGet = <TError = AxiosError<HTTPValidationError>>(
  params?: GetUsersUsersGetParams,
  options?: {
    swr?: SWRConfiguration<
      Awaited<ReturnType<typeof getUsersUsersGet>>,
      TError
    > & { swrKey?: Key; enabled?: boolean };
    axios?: AxiosRequestConfig;
  }
) => {
  const { swr: swrOptions, axios: axiosOptions } = options ?? {};

  const isEnabled = swrOptions?.enabled !== false;
  const swrKey =
    swrOptions?.swrKey ??
    (() => (isEnabled ? getGetUsersUsersGetKey(params) : null));
  const swrFn = () => getUsersUsersGet(params, axiosOptions);

  const query = useSwr<Awaited<ReturnType<typeof swrFn>>, TError>(
    swrKey,
    swrFn,
    swrOptions
  );

  return {
    swrKey,
    ...query,
  };
};
これらのOrvalによって生成されたコードを利用することでバックエンドとフロントエンドの型定義の矛盾をなくし安全に開発を行うことができそうです。
【ついでに】ClineでUIの実装をお願いしてみる
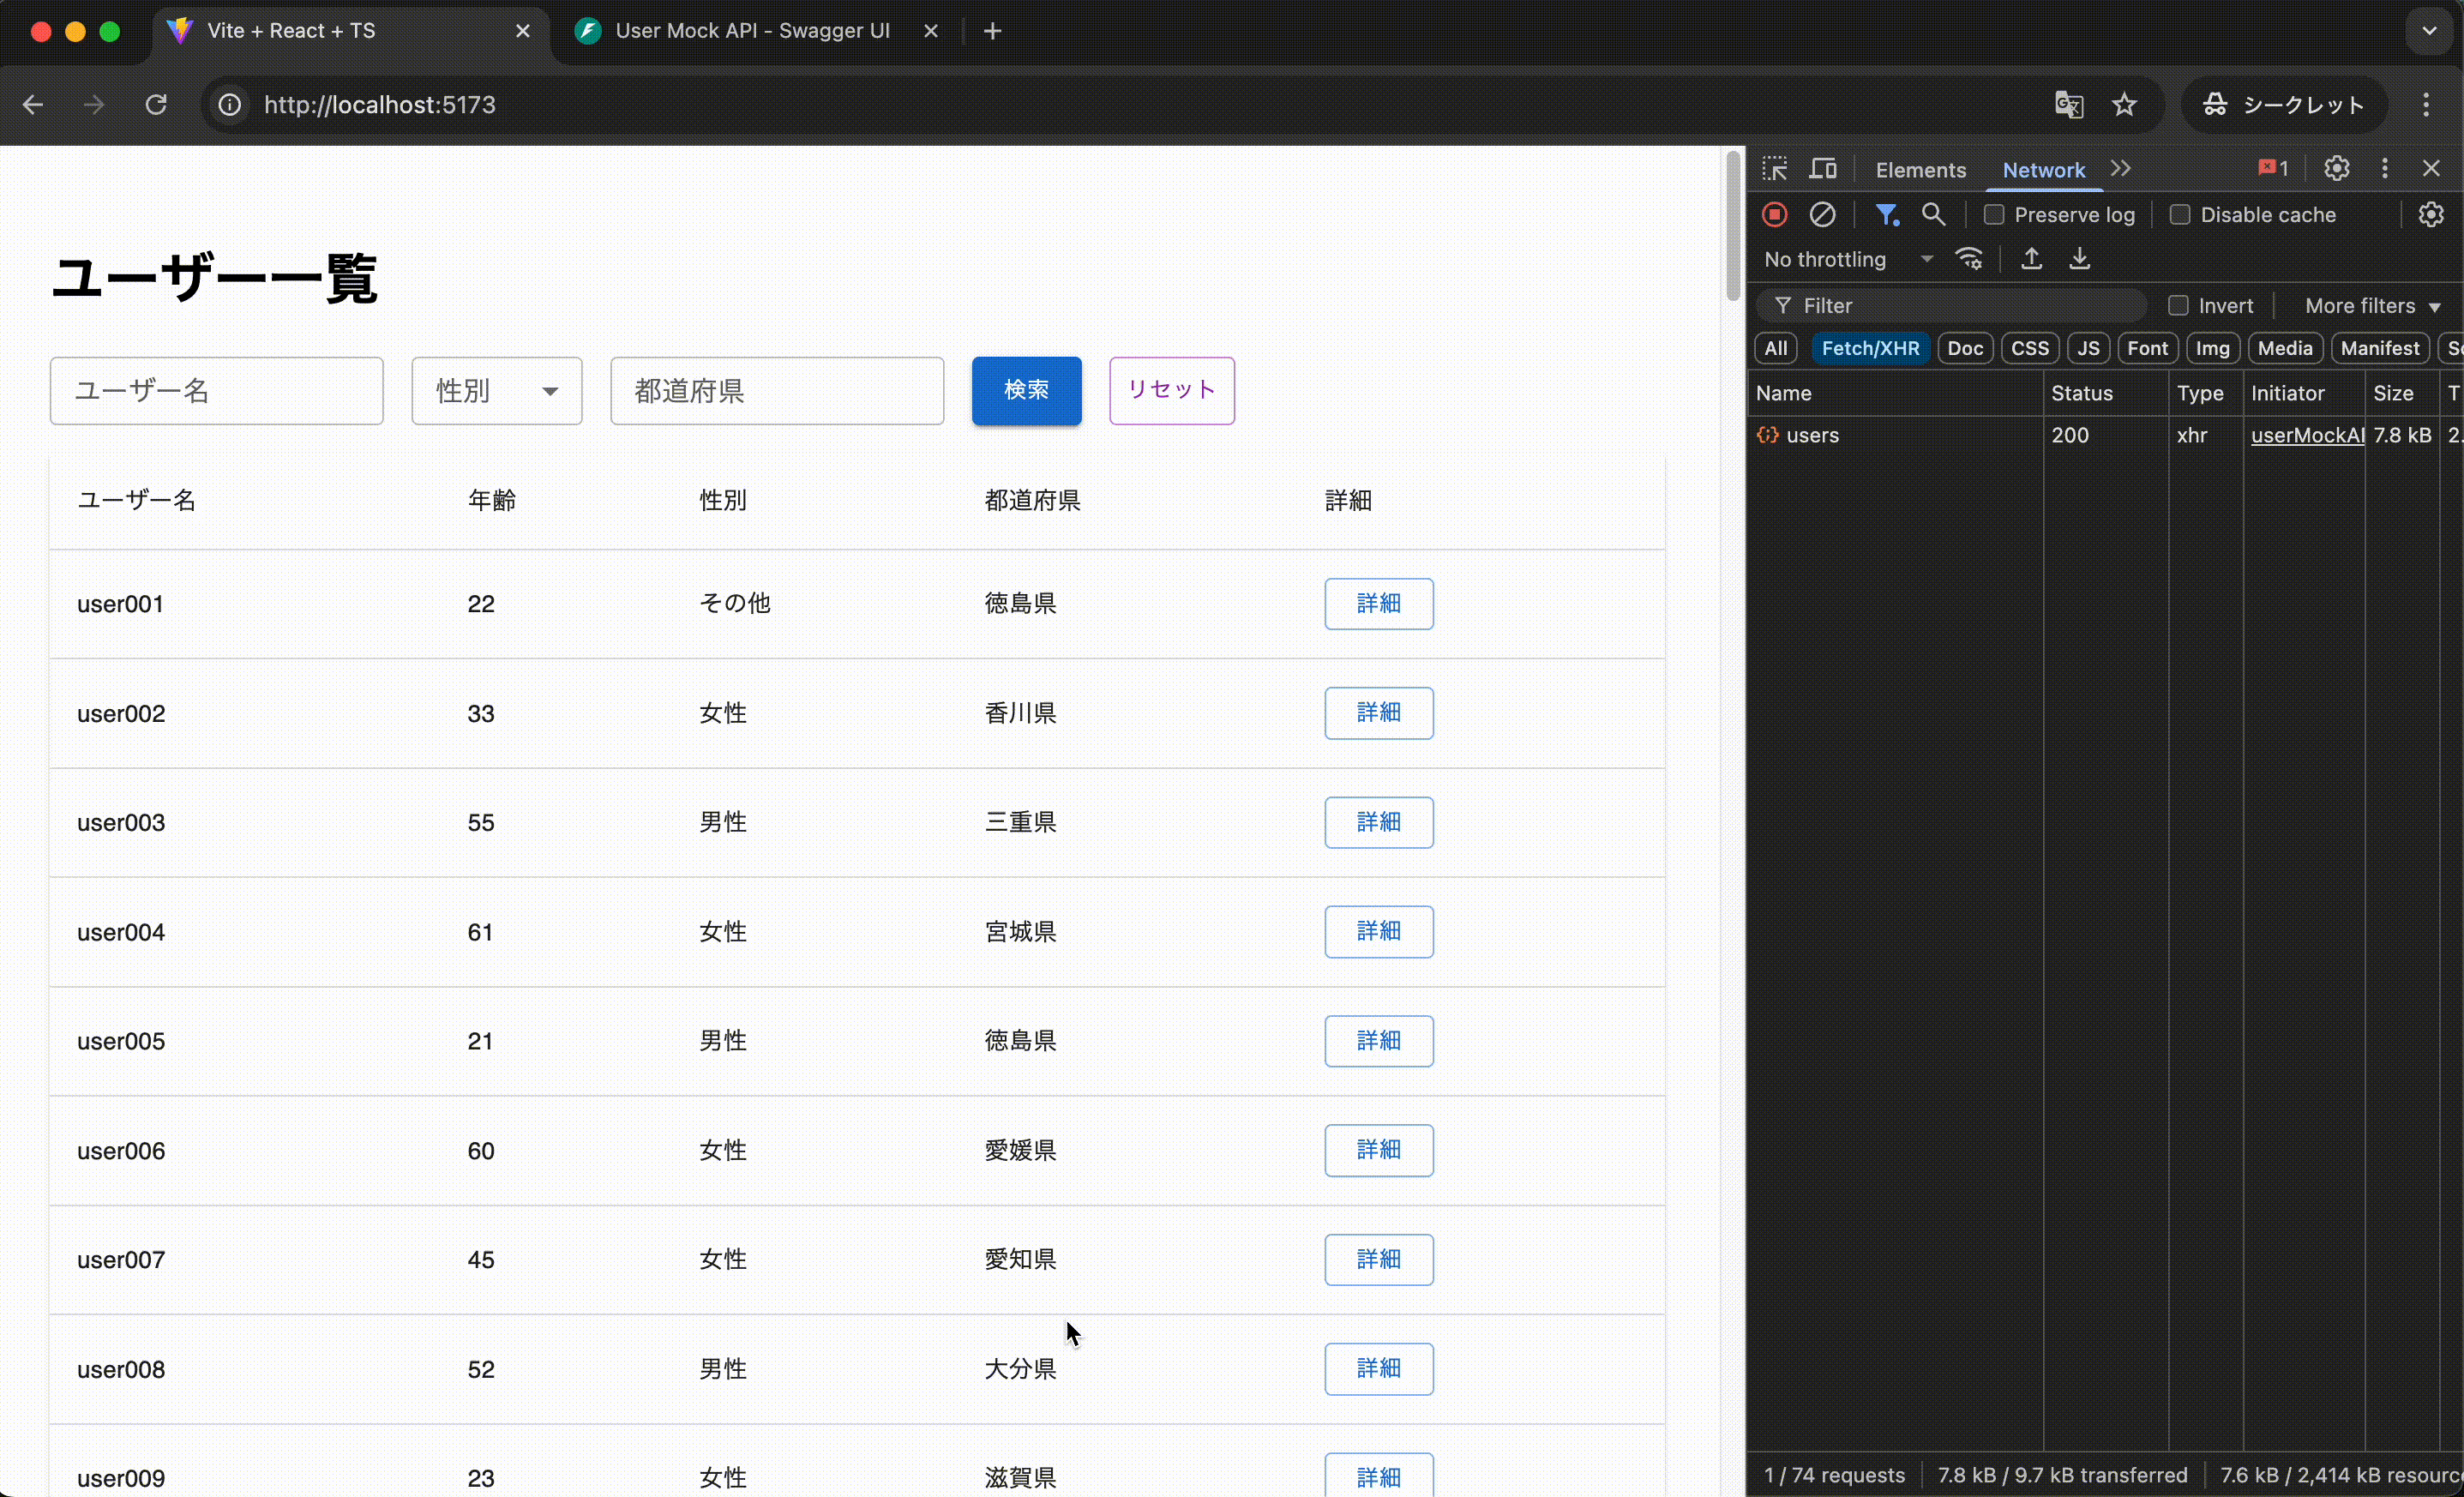
Orvalが生成したコードを利用してMUIでユーザー一覧を表示する機能を実装してもらいました。
/src/apiSchemasは/openapi.jsonを元にOrvalが生成したものです。

これを理解して利用してユーザー一覧を表示するシンプルな機能を実装してください。
UIフレームワークはMUIを利用してください。
一覧テーブルにはMUIのtableを利用してください。
ユーザー名、性別、都道府県でフィルターできるようにしてください。
追加機能としてダイアログで詳細を確認できるようにしてもらいました。
ユーザー一覧で「詳細」というボタンを表示する列を追加して、クリックするとその行のユーザー情報をダイアログで表示する機能を実装してください
実際は数回のやり取りを行い15分程度でイメージしていたものが完成しました。
リセットボタンを実装してくれたりテキスト入力ではenterキーで検索を実行してくれるなどUI/UXにも勝手に気を使ってくれるのでとてもありがたいです。
おわりに
安全でバグの少ない開発を行うために「バックエンドとフロントエンドのAPIレスポンスの型を一致させる方法の検証」を行ってみました。
方法は他にも色々とあると思いますが、今回利用したOrvalはとてもシンプルにも関わらず、設定ファイルでカスタマイズできたり最近ではMCPに関する機能も追加されるなど今後も注目のツールだと感じました。
また、Orvalが生成したコードは人間が作成するコードよりも一貫性があると思うのでClineなどのAIコーダーも理解しやすいのではと思いました。
Orvalを使うことで、OpenAPIに基づいた型安全なAPIクライアントを簡単に構築することができ、これによりバックエンドとのスキーマ不一致を未然に防ぎ、フロントエンド開発の信頼性も向上しました。
今後はCIでの自動生成も含めて、さらに開発フローに組み込んでいきたいと考えています。
Discussion