Drupalのsimple_oauthモジュールを用いたRESTリソースのoauth2認証を試す
概要
DrupalのSimple OAuth (OAuth2) & OpenID ConnectモジュールはOAuth 2.0認証フレームワークRFCの実装と説明されています。
関連する記事として、cookie認証の例や、jwt認証の例も参考にしてください。
インストール
simple_oauthモジュールには、5系と6系があるようですが、今回は5系を使用します。以下でインストールします。
composer.phar require 'drupal/simple_oauth:^5.2'
ただし、さくらレンタルサーバを使用している場合、以下のエラーが発生しました。PHP's sodium extensionが必要でした。
composer.phar require 'drupal/simple_oauth:^5.2'
./composer.json has been updated
Running composer update drupal/simple_oauth
Loading composer repositories with package information
Updating dependencies
Your requirements could not be resolved to an installable set of packages.

  Problem 1
    - steverhoades/oauth2-openid-connect-server v2.4.0 requires lcobucci/jwt 4.1.5 -> satisfiable by lcobucci/jwt[4.1.5].
    - steverhoades/oauth2-openid-connect-server[v2.6.0, ..., v2.6.1] require lcobucci/jwt 4.1.5|^4.2|^4.3|^5.0 -> satisfiable by lcobucci/jwt[4.1.5, ..., 4.4.x-dev, 5.0.0, ..., 5.3.x-dev].
    - steverhoades/oauth2-openid-connect-server v2.5.0 requires lcobucci/jwt 4.1.5|^4.2 -> satisfiable by lcobucci/jwt[4.1.5, ..., 4.4.x-dev].
    - drupal/simple_oauth[5.2.0, ..., 5.x-dev] require drupal/core ^8 || ^9 -> found drupal/core[8.0.0-beta6, ..., 8.9.x-dev, 9.0.0-alpha1, ..., 9.5.x-dev] but the package is fixed to 10.2.0 (lock file version) by a partial update and that version does not match. Make sure you list it as an argument for the update command.
    - lcobucci/jwt[4.1.5, ..., 4.4.x-dev, 5.0.0, ..., 5.3.x-dev] require ext-sodium * -> it is missing from your system. Install or enable PHP's sodium extension.
    - drupal/simple_oauth[5.2.3, ..., 5.2.x-dev] require steverhoades/oauth2-openid-connect-server ^2.4 -> satisfiable by steverhoades/oauth2-openid-connect-server[v2.4.0, v2.5.0, v2.6.0, v2.6.1].
    - Root composer.json requires drupal/simple_oauth ^5.2 -> satisfiable by drupal/simple_oauth[5.2.0, ..., 5.x-dev].

To enable extensions, verify that they are enabled in your .ini files:
    - /usr/local/php/8.1/etc/php.ini
    - /usr/local/php/8.1/etc/conf.d/apcu.ini
    - /usr/local/php/8.1/etc/conf.d/imagick.ini
    - /usr/local/php/8.1/etc/conf.d/mcrypt.ini
    - /usr/local/php/8.1/etc/conf.d/opcache.ini
You can also run `php --ini` in a terminal to see which files are used by PHP in CLI mode.
Alternatively, you can run Composer with `--ignore-platform-req=ext-sodium` to temporarily ignore these required extensions.

Use the option --with-all-dependencies (-W) to allow upgrades, downgrades and removals for packages currently locked to specific versions.

Installation failed, reverting ./composer.json and ./composer.lock to their original content.
そこで、以下のサイトを参考に、PHP-sodium 拡張を追加しました。
ただし、上記のサイトではPHPのバージョンが8.0系を対象にしているのに対して、今回使用しているPHPのバージョンが8.1.24だったため、「3. Download and Compile PHP Extension」の部分を一部変更しています。
# 1. Create Working Directories
mkdir -p {~/usr/local/src,~/usr/local/php/extension}

# 2. Download and Compile libsodium
cd ~/usr/local/src
wget https://download.libsodium.org/libsodium/releases/libsodium-1.0.18.tar.gz
tar xzvf libsodium-1.0.18.tar.gz
cd libsodium-1.0.18
./configure --prefix=$HOME/usr/local
make && make check
make install

# 3. Download and Compile PHP Extension
cd ~/usr/local/src
wget https://www.php.net/distributions/php-8.1.24.tar.bz2  # Adjust link for the correct PHP 8.1.24 source
tar -xjf php-8.1.24.tar.bz2
cd php-8.1.24/ext/sodium
/usr/local/php/8.1/bin/phpize  # Ensure this points to your PHP 8.1 binary
./configure --with-php-config=/usr/local/php/8.1/bin/php-config --with-sodium PKG_CONFIG_PATH=$HOME/usr/local/lib/pkgconfig/ LDFLAGS=-L$HOME/usr/local/lib/
make
gmake test

# 4. Install the PHP Extension
cp modules/sodium.so ~/usr/local/php/extension/
cat <<EOF >> $HOME/www/php.ini
extension=$HOME/usr/local/php/extension/sodium.so
EOF

# 5. Verify Installation
php -c ~/www/php.ini -m | grep sodium
sodium
上記を行った後に、再度以下を実行した結果、モジュールのインストールに成功しました。
composer.phar require 'drupal/simple_oauth:^5.2'
その後、以下でモジュールを有効化しました。
./vendor/bin/drush en simple_oauth
OAuthクライアントの作成
simple_oauthモジュールの設定に関するドキュメントをうまく見つけることができなかったのですが、今回は以下の「Next.js for Drupal」のドキュメントを参考にします。
操作方法は上記のドキュメントに記載されていますので、画面キャプチャやメモを以下に記載します。
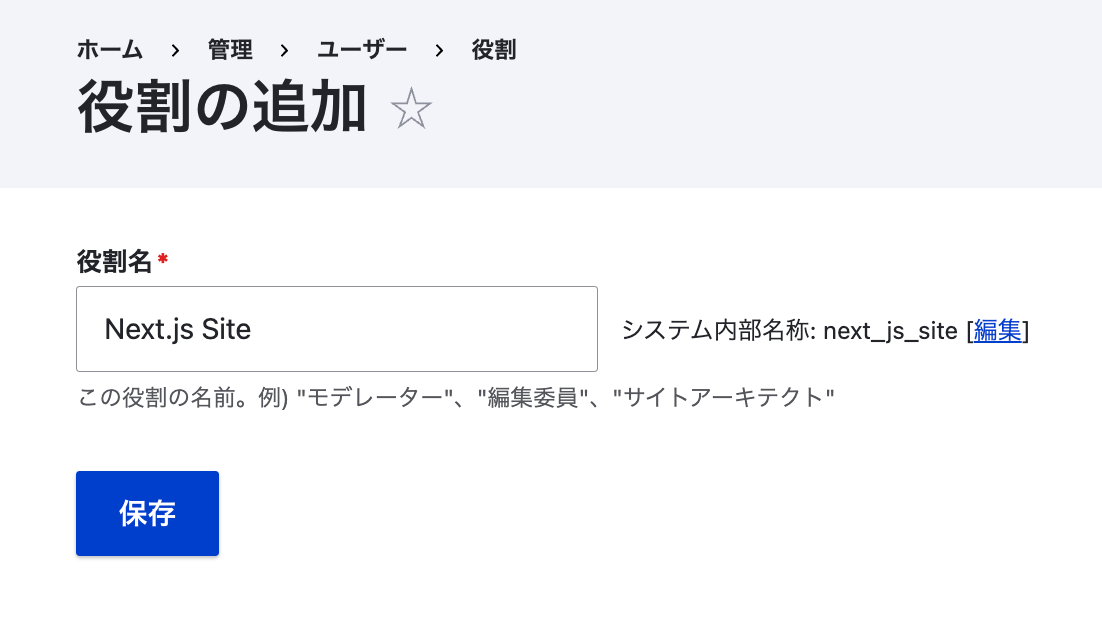
1. Create Role
/admin/people/roles
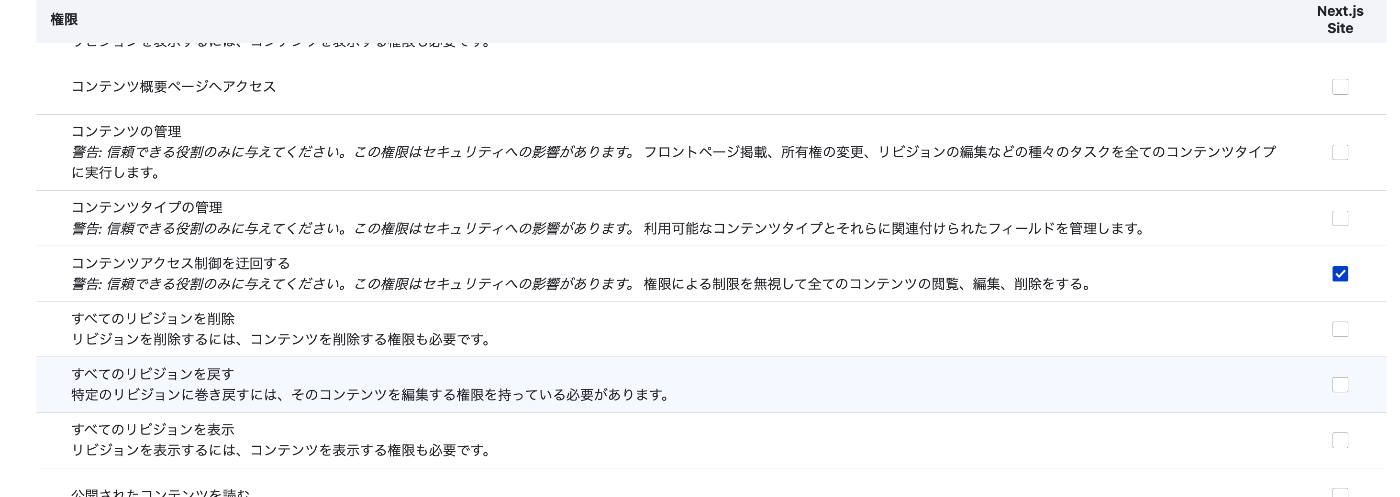
2. Assign Permissions
特に、Bypass content access controlは後述の過程で必要な項目のようでした。
3. Create User
/admin/people/create
今回は、nextという名前のユーザを作成しました。

4. Generate keys
/admin/config/people/simple_oauth
Generate keysを行うにあたり、../が例示されていますが、さくらレンタルサーバを使用している場合には、/home/{ユーザ名}/.ssh/drupalなどのほうが適切かと考えられます。
そのため、まず以下のようなコマンドでフォルダを作成し、
mkdir -p /home/{ユーザ名}/.ssh/drupal
Generate keysのボタンをクリックした際に表示されるフォームに、上記のパスを入力します。
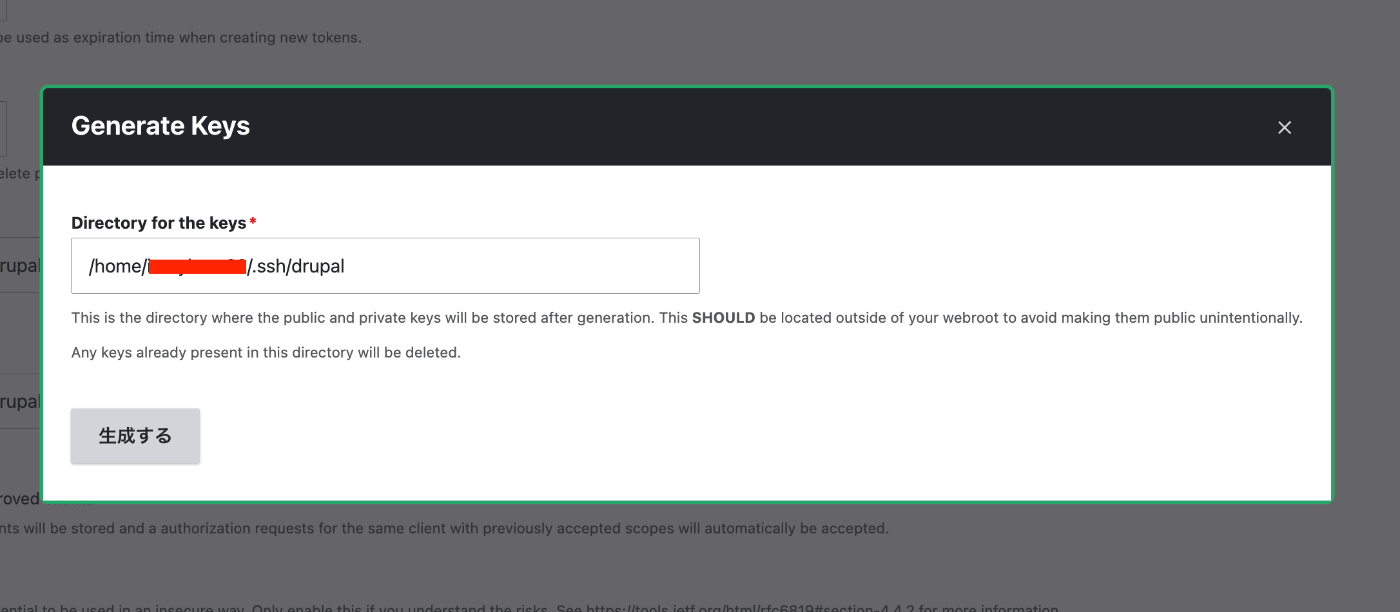
その後、「構成を保持」のボタンをクリックして、設定を保存します。
5. Create Consumer
/admin/config/services/consumer/add
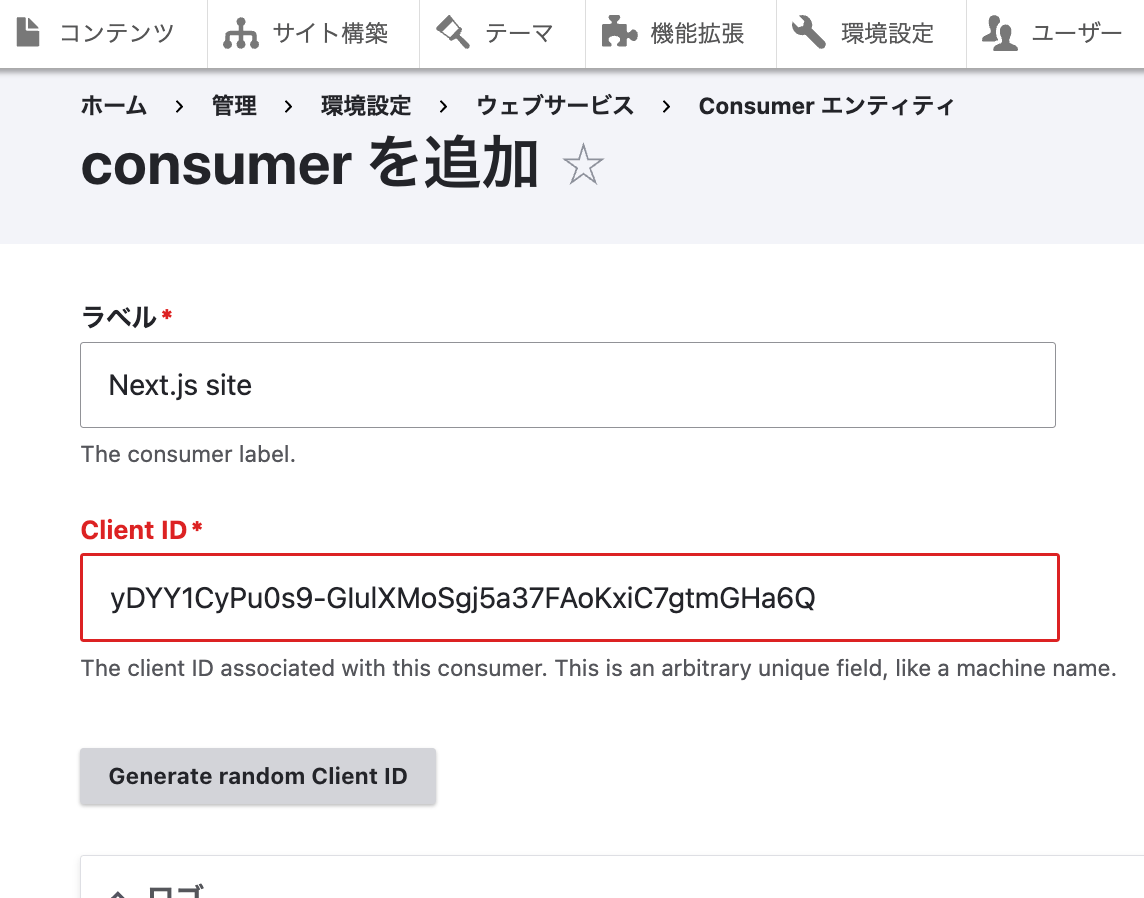
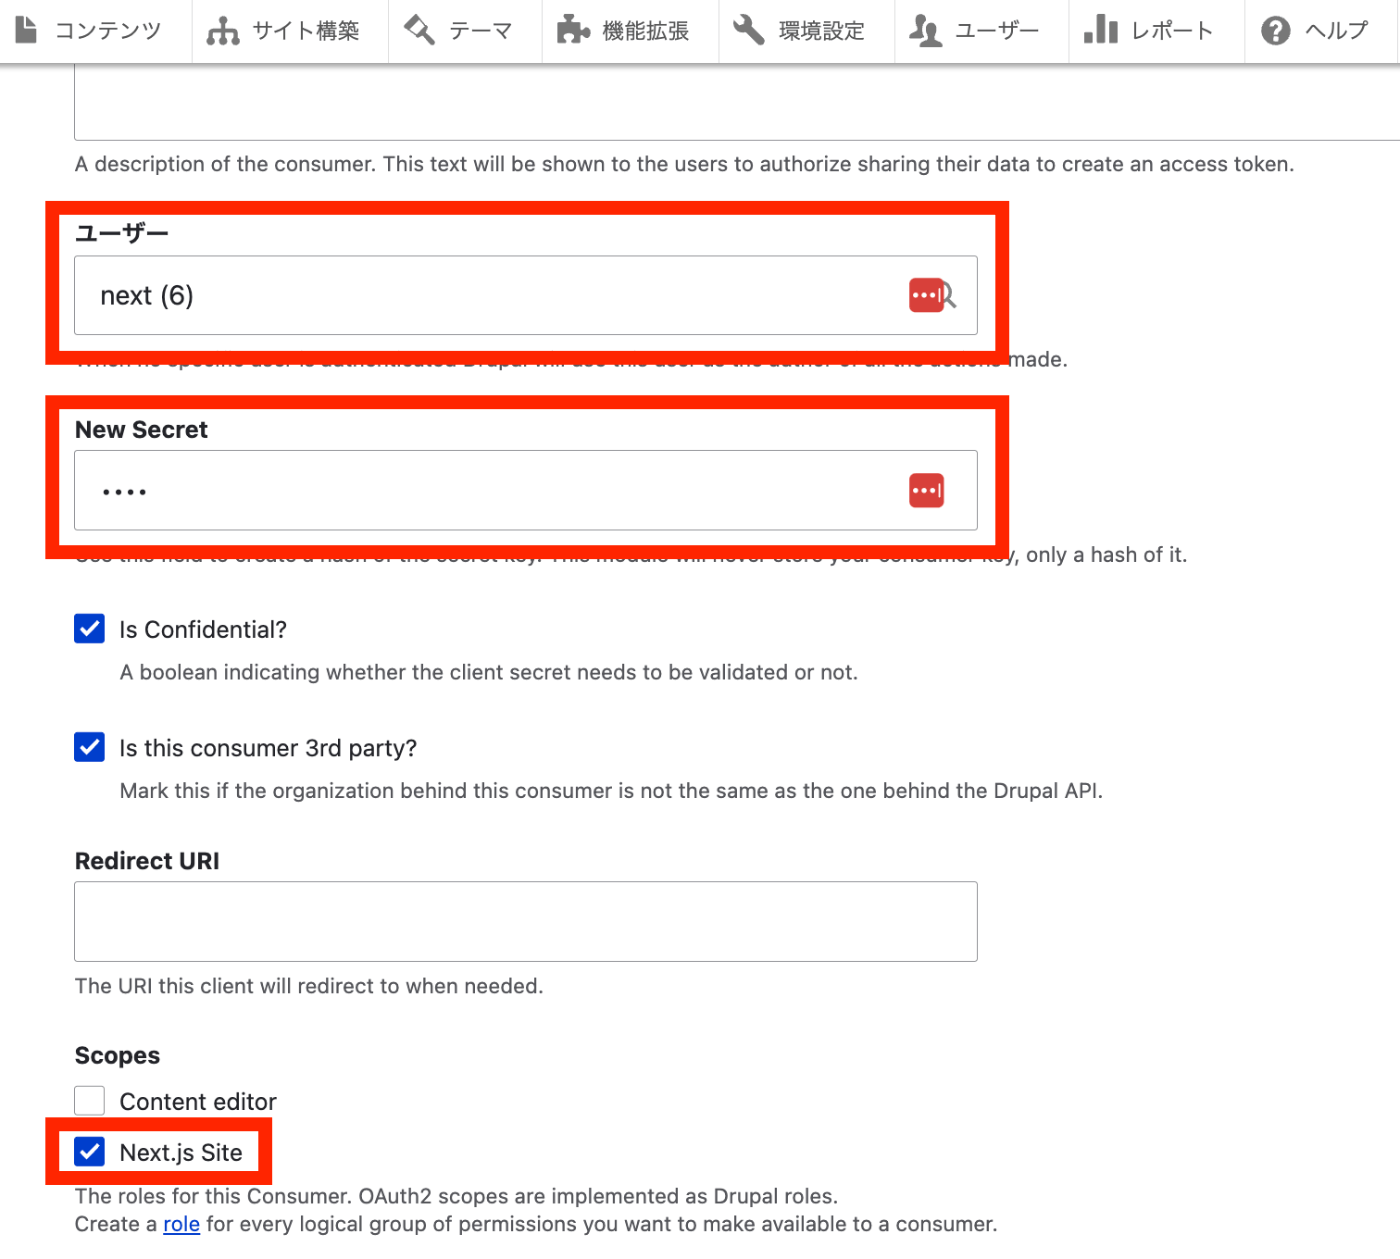
以上で、OAuthクライアントの作成は完了です。
Postmanで試す
POSTで{DRUPALのパス}/oauth/tokenを指定します。
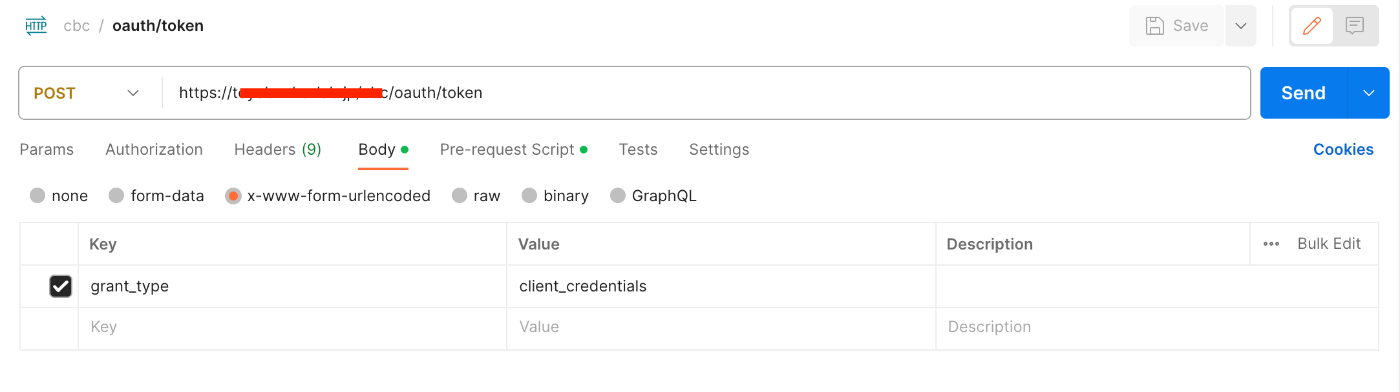
Bodyでは、x-www-form-urlencodedを指定して、Keyにgrant_type、Valueにclient_credentialsを指定します。
また、Pre-request Scriptで、以下を指定します。
const DRUPAL_CLIENT_ID = "{先ほど作成したCLIENT_ID}"
const DRUPAL_CLIENT_SECRET = "{先ほど設定したCLIENT_SECRET}"
const myString = `${DRUPAL_CLIENT_ID}:${DRUPAL_CLIENT_SECRET}`; // エンコードしたい文字列
const encodedString = btoa(myString); // btoa関数を使ってbase64エンコード
postman.setEnvironmentVariable("encodedAuth", encodedString);

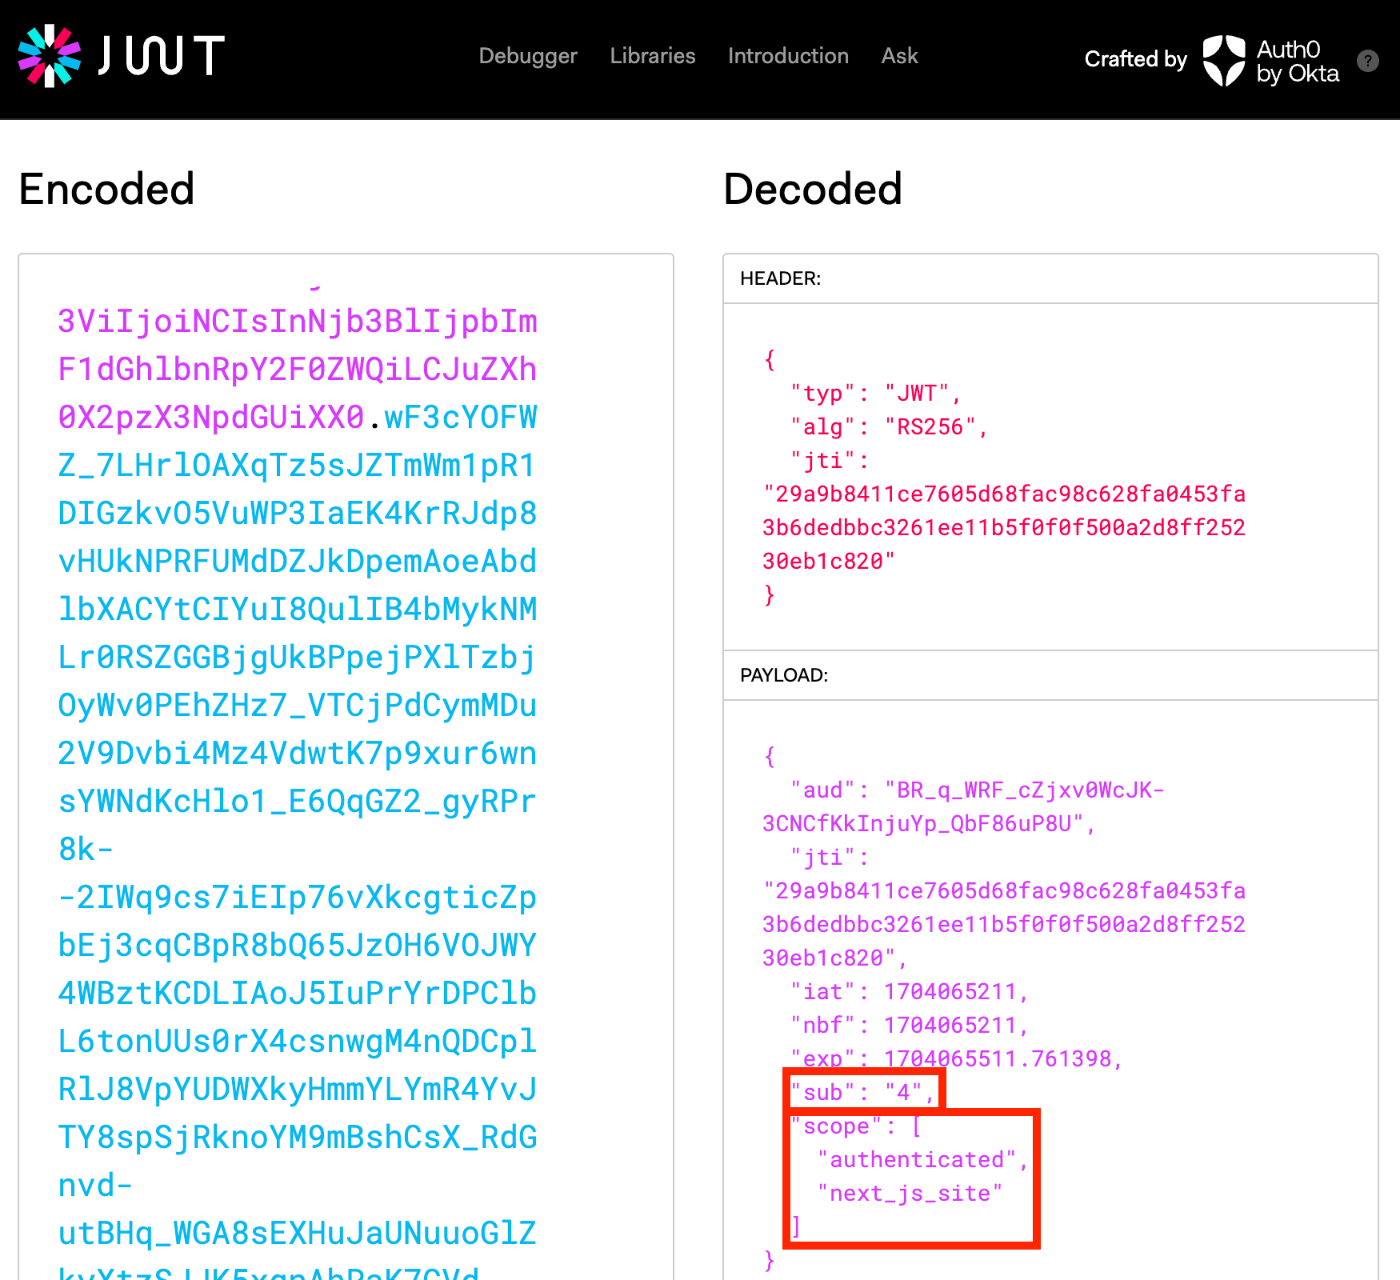
結果、以下のようなJSONデータを取得できます。
{
    "token_type": "Bearer",
    "expires_in": 300,
    "access_token": "eyJ0eXAiOiJKV1QiLCJhbGciOiJSUzI1NiIsImp0aSI6..."
}
上記のaccess_tokenをjwt.ioで検証してみると、以下のように、User IDが4、scopeとして「認証済みユーザー」および先ほど指定した「Next.js Site」が設定されていることが確認できます。
DrupalのREST UIでoauth2認証を試す
Drupalでの設定
Postmanを使い方については、以下の記事も参考にしてください。
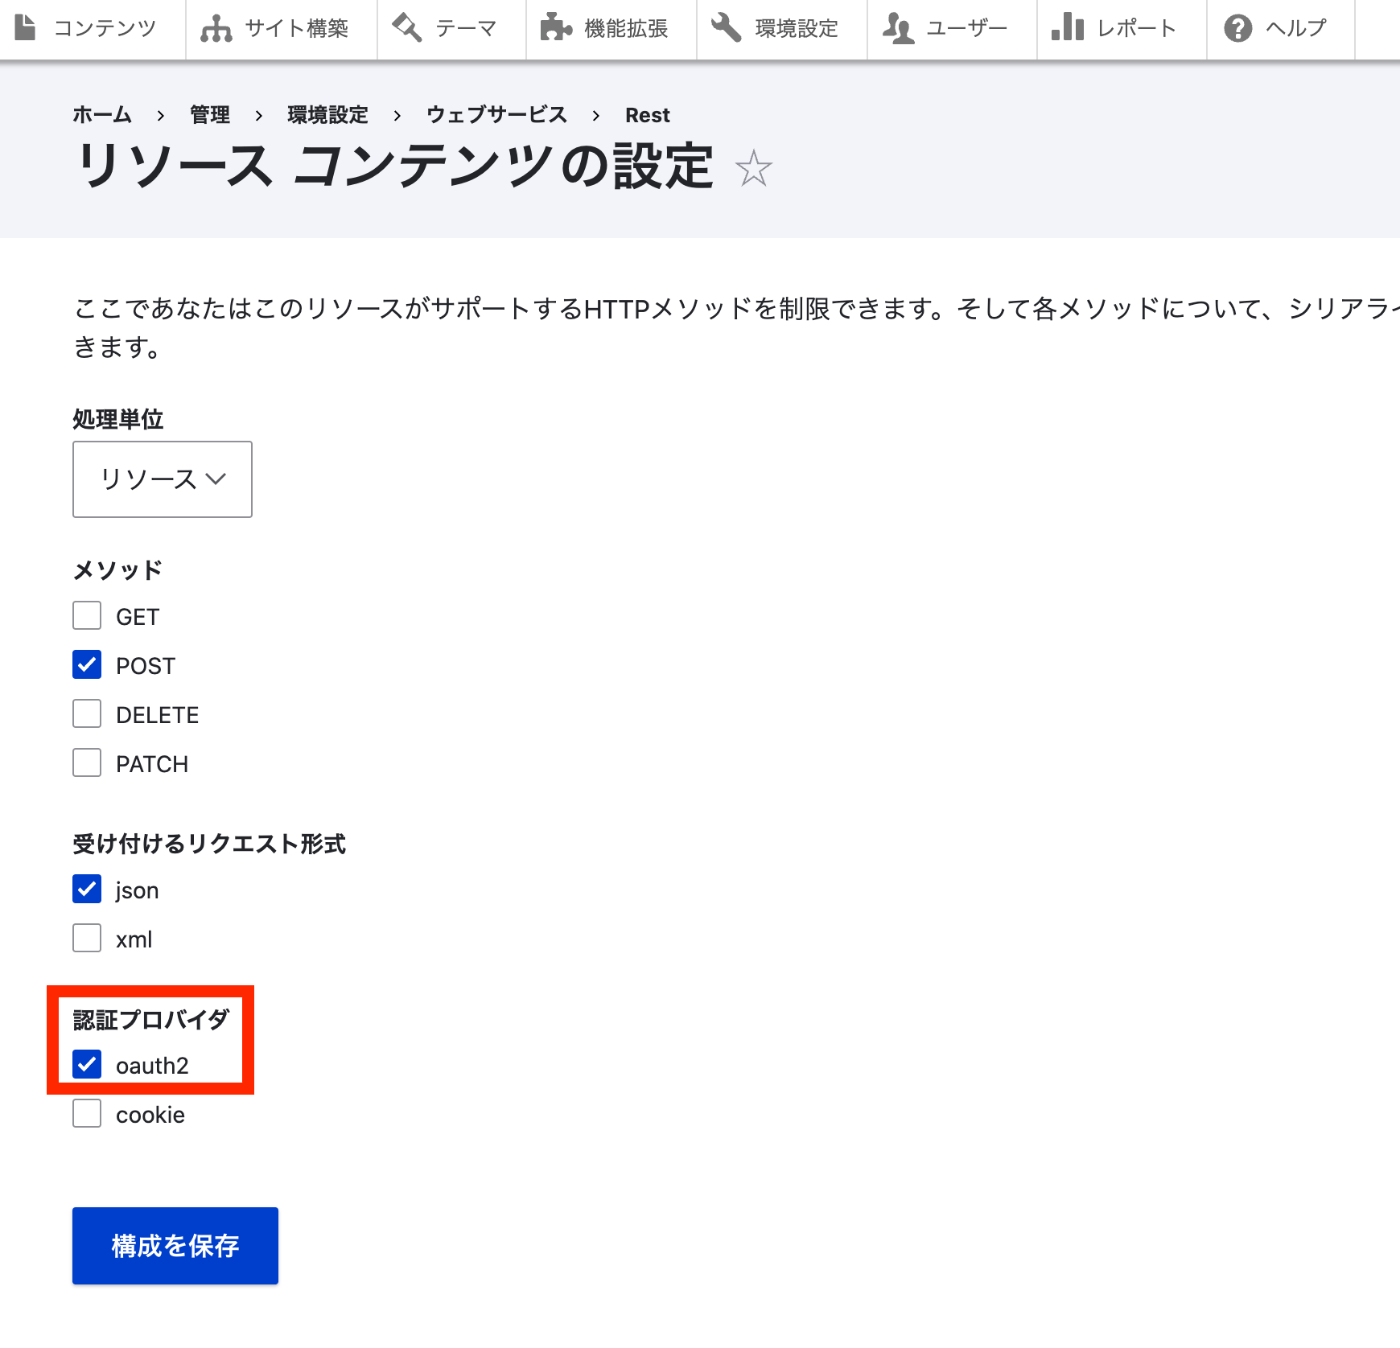
/admin/config/services/rest/resource/entity%3Anode/editにアクセスして、認証プロバイダで、「oauth2」を選択します。
Postmanでの操作(JSON:APIの場合)
以下のようにPOSTリクエストを投げてみます。
{DRUPALをインストールしたパス}/jsonapi/node/article
{
    "data": {
        "type": "node--article",
        "attributes": {
            "title": "Page Title"
        }
    }
}
この時、AuthorizationでBear Tokenを選択して、先ほど取得したトークンを入力しておきます。
結果、正しくコンテンツを追加できました。
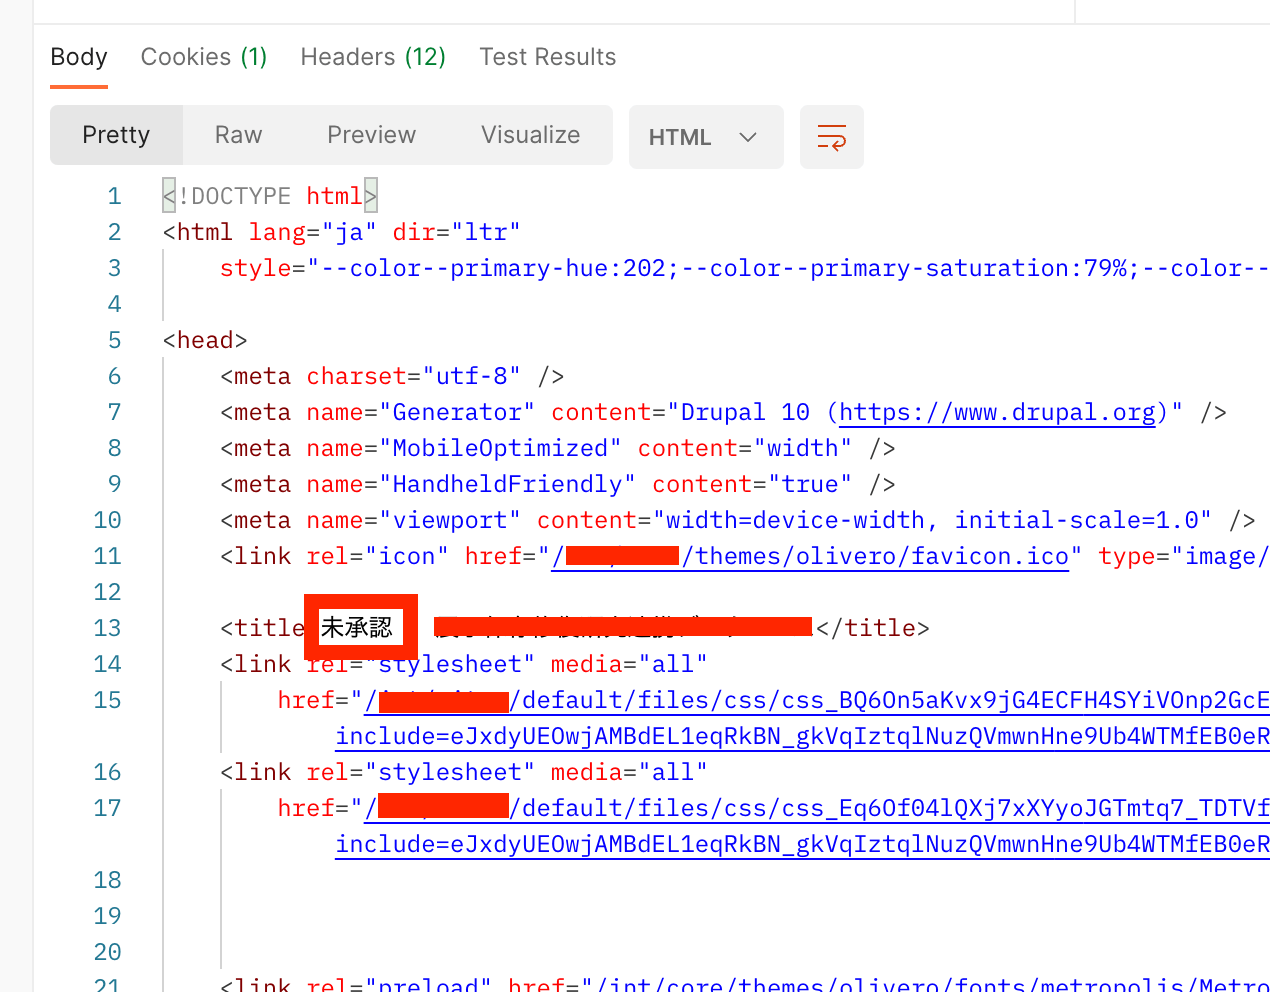
トークンの有効期限が切れている場合などは、以下のように、「未承認」という結果が返却されました。
Postmanでの操作(非JSON:APIの場合)
一方、{DRUPALをインストールしたパス}/node?_format=jsonにリクエストした場合、以下の結果が返却されました。
{
    "message": "Access token could not be verified"
}
JSON Web Token Authenticationモジュールを使用した際にはうまくいったので、設定等のどこかに間違いがあるのかもしれません。引き続き調査してみたいと思います。
まとめ
simple_oauthモジュールの使用例を紹介しました。誤っている点などがあるかもしれませんが、参考になりましたら幸いです。
Discussion