🦔
LEAF WriterのEditor Toolbarをカスタマイズする
概要
LEAF Writerでは、画面上部にタグの挿入をサポートするボタンが提供されています。本記事では、その編集方法について紹介します。
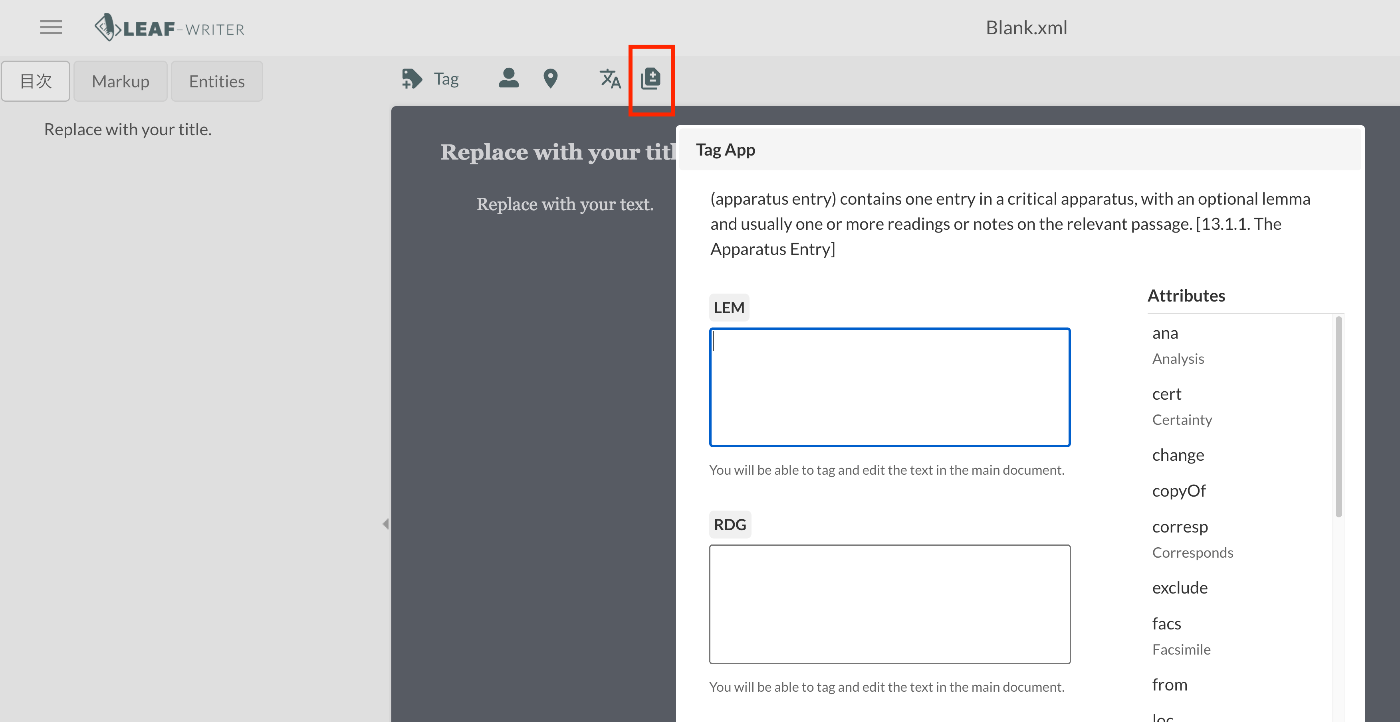
結果、以下のように、<app><lem>あああ</lem><rdg>いいい</rdg></app>を挿入する機能を追加しました。
編集
以下のファイルを編集します。
packages/cwrc-leafwriter/src/components/editorToolbar/index.tsx
以下のように、人名や地名のタグをサポートする機能が設定されています。例えば、以下では、organizationに関する記述をコメントアウトしています。
packages/cwrc-leafwriter/src/components/editorToolbar/index.tsx
...
  const items: (MenuItem | Item)[] = [
    {
      group: 'action',
      hide: isReadonly,
      icon: 'insertTag',
      onClick: () => {
        if (!container.current) return;

        const rect = container.current.getBoundingClientRect();
        const posX = rect.left;
        const posY = rect.top + 34;

        showContextMenu({
          // anchorEl: container.current,
          eventSource: 'ribbon',
          position: { posX, posY },
          useSelection: true,
        });
      },
      title: 'Tag',
      tooltip: 'Add Tag',
      type: 'button',
    },
    { group: 'action', type: 'divider', hide: isReadonly },
    {
      color: entity.person.color.main,
      group: 'action',
      disabled: !isSupported('person'),
      hide: isReadonly,
      icon: entity.person.icon,
      onClick: () => window.writer.tagger.addEntityDialog('person'),
      title: 'Tag Person',
      type: 'iconButton',
    },
    {
      color: entity.place.color.main,
      group: 'action',
      disabled: !isSupported('place'),
      hide: isReadonly,
      icon: entity.place.icon,
      onClick: () => window.writer.tagger.addEntityDialog('place'),
      title: 'Tag Place',
      type: 'iconButton',
    },
    /*
    {
      color: entity.organization.color.main,
      group: 'action',
      disabled: !isSupported('organization'),
      hide: isReadonly,
      icon: entity.organization.icon,
      onClick: () => window.writer.tagger.addEntityDialog('organization'),
      title: 'Tag Organization',
      type: 'iconButton',
    },
...
結果、以下のように選択肢が限定されます。

新規追加
今回は、校異情報を付与するappタグを追加する機能を追加してみます。
packages/cwrc-leafwriter/src/components/editorToolbar/index.tsx
...
    {
      icon: 'translate',
      group: 'action',
      hide: isReadonly,
      onClick: () => window.writer.dialogManager.show('translation'),
      title: 'Add Translation',
      type: 'iconButton',
    },
    {
      icon: 'difference',
      group: 'action',
      hide: isReadonly,
      onClick: () => window.writer.dialogManager.show('app'),
      title: 'Add App',
      type: 'iconButton',
    },
...
iconについては、以下のファイルも編集する必要があります。
packages/cwrc-leafwriter/src/icons/index.tsx
次に、以下を編集します。
packages/cwrc-leafwriter/src/js/dialogs/dialogManager.ts
...
import App from './app'; // 追加
...
const defaultDialogs = new Map<string, DefaultDialogConfig>([
  ['attributesEditor', { dialogClass: AttributesEditor }],
  ['copyPaste', { dialogClass: CopyPaste }],
  ['loadingindicator', { dialogClass: LoadingIndicator }],
  ['message', { dialogClass: Message }],
  ['popup', { dialogClass: Popup }],
  ['translation', { dialogClass: Translation }],
  ['app', { dialogClass: App }], // 追加
]);
...
そして、以下のファイルを作成します。作成にあたっては、もともと提供されていたtranslation.tsを参考にしました。
packages/cwrc-leafwriter/src/js/dialogs/app.ts
import $ from 'jquery';
import 'jquery-ui/ui/widgets/dialog';
import Writer from '../Writer';
import AttributeWidget from './attributeWidget/attributeWidget';
import type { LWDialogConfigProps, LWDialogProps } from './types';

class App implements LWDialogProps {
  readonly writer: Writer;
  readonly $el: JQuery<HTMLElement>;
  readonly id: string;
  readonly attributesWidget: AttributeWidget;

  // TODO hardcoded
  readonly tagName: string = 'app';
  readonly lemTagName: string = 'lem';
  readonly rdgTagName: string = 'rdg';

  constructor({ writer, parentEl }: LWDialogConfigProps) {
    this.writer = writer;
    this.id = writer.getUniqueId('app_');

    const entityAttributesSection = `
    <div class="entityAttributes">
      ${this.lemField(this.id)}
      ${this.rdgField(this.id)}
    </div>
  `;

    this.$el = $(`
    <div class="annotationDialog">
      <div class="schemaHelp" />
        <div class="content">
          <div class="main">
            ${entityAttributesSection}

            <hr style="width: 100%; border: none; border-bottom: 1px solid #ccc;">

            <div class="attributeWidget" />
          </div>

          <div class="attributeSelector">
            <h3 style="border-bottom: 1px solid #ddd; padding-bottom: 4px;">Attributes</h3>
            <ul></ul>
          </div>

        </div>
      </div>`).appendTo(parentEl);

    //@ts-ignore
    this.$el.dialog({
      title: 'Tag App',
      modal: true,
      resizable: true,
      closeOnEscape: true,
      height: 650,
      width: 575,
      autoOpen: false,
      buttons: [
        {
          text: 'Cancel',
          role: 'cancel',
          //@ts-ignore
          click: () => this.$el.dialog('close'),
        },
        {
          text: 'Ok',
          role: 'ok',
          click: () => {
            this.formResult();
            //@ts-ignore
            this.$el.dialog('close');
          },
        },
      ],
      open: (event: JQuery.Event) => {},
      close: (event: JQuery.Event) => {},
    });

    this.attributesWidget = new AttributeWidget({
      writer,
      $parent: this.$el,
      $el: this.$el.find('.attributeWidget'),
      showSchemaHelp: true,
    });
  }

  private lemField(id: string) {
    const fieldTitle = 'lem';

    const html = `
      <div class="attribute">
        <div>
          <p class="fieldLabel">${fieldTitle}</p>
        </div>

        <textarea id="${id}_lem" style="width: 100%; height: 100px;" spellcheck="false">
        </textarea>
        <p style="font-size: 0.7rem; color: #666;">
          You will be able to tag and edit the text in the main document.
        </p>
      </div>
    `;

    return html;
  }

  private rdgField(id: string) {
    const fieldTitle = 'rdg';

    const html = `
      <div class="attribute">
        <div>
          <p class="fieldLabel">${fieldTitle}</p>
        </div>

        <textarea id="${id}_rdg" style="width: 100%; height: 100px;" spellcheck="false">
        </textarea>
        <p style="font-size: 0.7rem; color: #666;">
          You will be able to tag and edit the text in the main document.
        </p>
      </div>
    `;

    return html;
  }

  private formResult() {
    let lem = $(`#${this.id}_lem`).val();
    if (Array.isArray(lem)) lem = lem[0];
    if (typeof lem === 'number') lem = lem.toString();
    if (!lem) lem = '';

    let rdg = $(`#${this.id}_rdg`).val();
    if (Array.isArray(rdg)) rdg = rdg[0];
    if (typeof rdg === 'number') rdg = rdg.toString();
    if (!rdg) rdg = '';

    const attributes = this.attributesWidget.getData();

    //@ts-ignore
    const currTagId = this.writer.tagger.getCurrentTag().attr('id');

    const newTag = this.writer.tagger.addStructureTag({
      action: this.writer.tagger.ADD,
      attributes,
      bookmark: { tagId: currTagId },
      tagName: this.tagName,
    });

    const lemTag = this.writer.tagger.addStructureTag({
      action: this.writer.tagger.INSIDE,
      attributes: {},
      bookmark: { tagId: newTag?.id },
      tagName: this.lemTagName,
    });

    if (!lemTag) return;

    $(lemTag).html(lem);

    const rdgTag = this.writer.tagger.addStructureTag({
      action: this.writer.tagger.AFTER,
      attributes: {},
      bookmark: { tagId: lemTag?.id },
      tagName: this.rdgTagName,
    });

    if (!rdgTag) return;

    $(rdgTag).html(rdg);
  }

  show() {
    $(`#${this.id}_lem`).val('');
    $(`#${this.id}_rdg`).val('');

    this.attributesWidget.mode = AttributeWidget.ADD;
    const atts = this.writer.schemaManager.getAttributesForTag(this.tagName);

    const initVals = {};

    this.attributesWidget.buildWidget(atts, initVals, this.tagName);

    //@ts-ignore
    this.$el.dialog('open');
  }

  destroy() {
    //@ts-ignore
    this.$el.dialog('destroy');
  }
}

// module.exports = Translation;
export default App;
結果、以下のようにアイコンが追加され、アイコンをクリックすると、ダイアログが表示されます。

まとめ
考慮が不足している点もあるかもしれませんが、LEAF Writerの利用にあたり、参考になりましたら幸いです。
Discussion