📚
pythonを使ってcvatのデータを操作する
概要
pythonを使ってcvatのデータを操作する機会がありましたので、備忘録です。
セットアップ
今回はDockerを使って起動します。
git clone https://github.com/cvat-ai/cvat --depth 1
cd cvat
docker compose up -d
アカウントの作成
http://localhost:8080にアクセスして、アカウントを作成します。
Pythonによる操作
まず、以下のライブラリをインストールします。
pip install cvat-sdk
アカウントの情報を.envに記載します。
host=http://localhost:8080
username=<username>
password=<password>
インスタンスの作成
import os
from dotenv import load_dotenv
import json
from cvat_sdk.api_client import Configuration, ApiClient, models, apis, exceptions
from cvat_sdk.api_client.models import PatchedLabeledDataRequest
import requests
from io import BytesIO

load_dotenv(verbose=True)

host = os.environ.get("host")
username = os.environ.get("username")
password = os.environ.get("password")

configuration = Configuration(
    host=host,
    username=username,
    password=password
)

api_client = ApiClient(configuration)
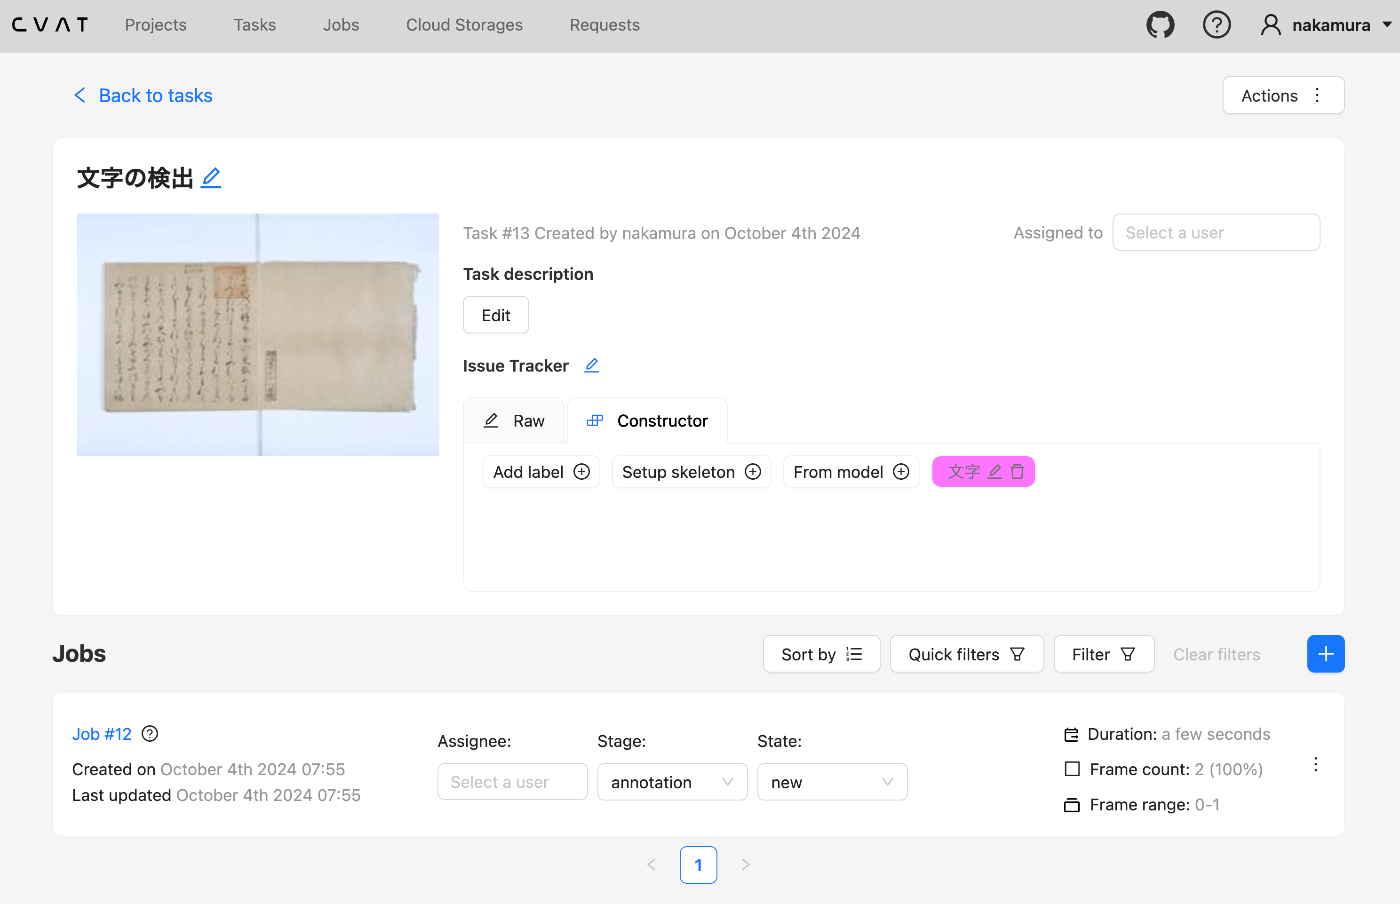
タスクの作成
task_spec = {
    'name': '文字の検出',
    "labels": [{
        "name": "文字",
        "color": "#ff00ff",
        "attributes": [
            {
                "name": "score",
                "mutable": True,
                "input_type": "text",
                "values": [""]
            }
        ]
    }],
}

try:
    # Apis can be accessed as ApiClient class members
    # We use different models for input and output data. For input data,
    # models are typically called like "*Request". Output data models have
    # no suffix.
    (task, response) = api_client.tasks_api.create(task_spec)
except exceptions.ApiException as e:
    # We can catch the basic exception type, or a derived type
    print("Exception when trying to create a task: %s\n" % e)

print(task)
以下のような結果が得られます。
{'assignee': None,
 'assignee_updated_date': None,
 'bug_tracker': '',
 'created_date': datetime.datetime(2024, 10, 3, 22, 50, 41, 980773, tzinfo=tzutc()),
 'dimension': '2d',
 'guide_id': None,
 'id': 13,
 'jobs': {'completed': 0,
          'count': 0,
          'url': 'http://localhost:8080/api/jobs?task_id=13',
          'validation': 0},
 'labels': {'url': 'http://localhost:8080/api/labels?task_id=13'},
 'mode': '',
 'name': '文字の検出',
 'organization': None,
 'overlap': None,
 'owner': {'first_name': 'Satoru',
           'id': 1,
           'last_name': 'Nakamura',
           'url': 'http://localhost:8080/api/users/1',
           'username': 'nakamura'},
 'project_id': None,
 'segment_size': 0,
 'source_storage': None,
 'status': 'annotation',
 'subset': '',
 'target_storage': None,
 'updated_date': datetime.datetime(2024, 10, 3, 22, 50, 41, 980798, tzinfo=tzutc()),
 'url': 'http://localhost:8080/api/tasks/13'}
画像のアップロード
東京大学および京都大学所蔵の源氏物語の画像を利用しています。
# Function to download the image from a URL and return a BytesIO object
def get_image_from_url(image_url):
    response = requests.get(image_url)
    response.raise_for_status()
    img = BytesIO(response.content)
    img.name = image_url.split("/")[-1]  # Manually set the name attribute
    return img

image_urls = [
    "https://huggingface.co/spaces/nakamura196/yolov5-char/resolve/main/%E3%80%8E%E6%BA%90%E6%B0%8F%E7%89%A9%E8%AA%9E%E3%80%8F(%E6%9D%B1%E4%BA%AC%E5%A4%A7%E5%AD%A6%E7%B7%8F%E5%90%88%E5%9B%B3%E6%9B%B8%E9%A4%A8%E6%89%80%E8%94%B5).jpg",
    "https://huggingface.co/spaces/nakamura196/yolov5-char/resolve/main/%E3%80%8E%E6%BA%90%E6%B0%8F%E7%89%A9%E8%AA%9E%E3%80%8F(%E4%BA%AC%E9%83%BD%E5%A4%A7%E5%AD%A6%E6%89%80%E8%94%B5).jpg"
]

client_files = []

for image_url in image_urls:
    client_files.append(get_image_from_url(image_url))

# Here we will use models instead of a dict
task_data = models.DataRequest(
    image_quality=75,
    client_files=client_files
)

# If we pass binary file objects, we need to specify content type.
(result, response) = api_client.tasks_api.create_data(task.id,
    data_request=task_data,
    _content_type="multipart/form-data",

    # we can choose to check the response status manually
    # and disable the response data parsing
    # _check_status=False, _parse_response=False
)

ラベル情報の取得
labels_api_instance = apis.LabelsApi(api_client)
data, response = labels_api_instance.list(task_id=task.id)
print(data)
以下の結果が得られます。特に、labelのid(ここでは16)、attributes「score」のid(ここでは16)を確認します。
{'count': 1,
 'next': None,
 'previous': None,
 'results': [{'attributes': [{'default_value': '',
                              'id': 16,
                              'input_type': 'text',
                              'mutable': True,
                              'name': 'score',
                              'values': ['']}],
              'color': '#ff00ff',
              'has_parent': False,
              'id': 16,
              'name': '文字',
              'parent_id': None,
              'sublabels': [],
              'task_id': 13,
              'type': 'any'}]}
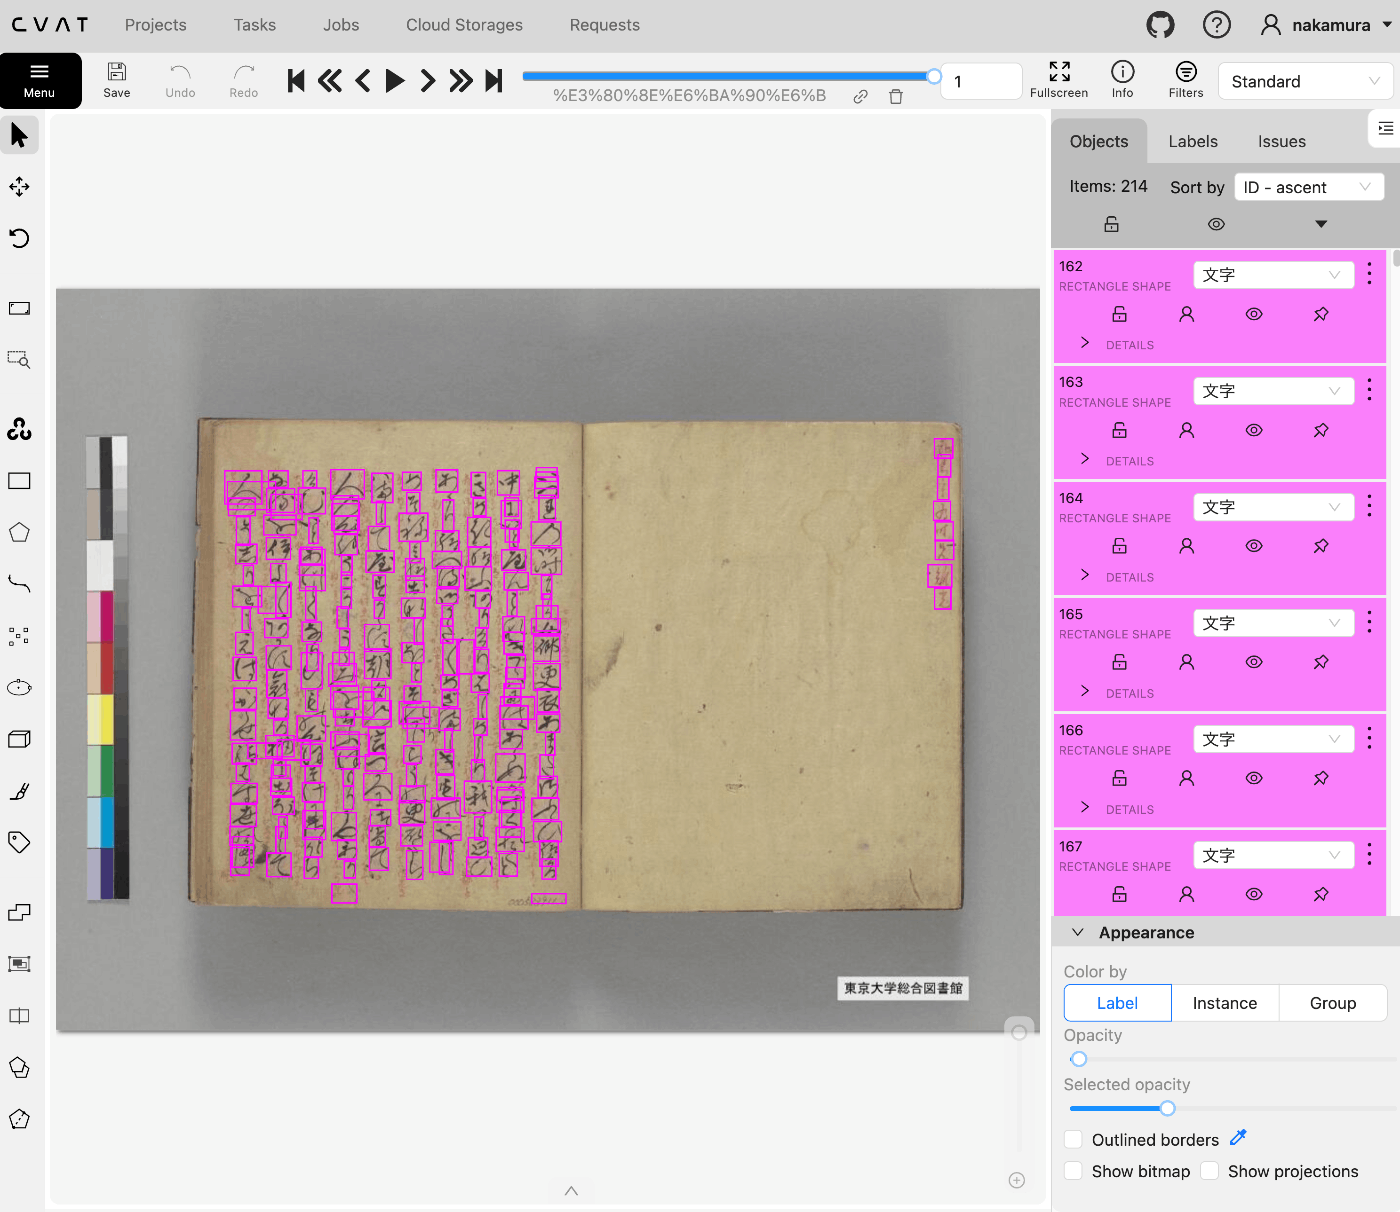
アノテーションの登録
以下のようなファイルを用意します。以下を使用しています。
[
    {
        "input": "https://huggingface.co/spaces/nakamura196/yolov5-char/resolve/main/%E3%80%8E%E6%BA%90%E6%B0%8F%E7%89%A9%E8%AA%9E%E3%80%8F(%E4%BA%AC%E9%83%BD%E5%A4%A7%E5%AD%A6%E6%89%80%E8%94%B5).jpg",
        "output": [
            {
                "xmin": 321.3383483887,
                "ymin": 272.1787414551,
                "xmax": 350.4551086426,
                "ymax": 294.3336791992,
                "confidence": 0.8533232212,
                "class": 0,
                "name": "item"
            },
            {
                "xmin": 319.8204956055,
                "ymin": 373.8805236816,
                "xmax": 347.2329101562,
                "ymax": 404.5750732422,
                "confidence": 0.8523860574,
                "class": 0,
                "name": "item"
            },
            {
                "xmin": 183.5310821533,
                "ymin": 382.4324645996,
                "xmax": 207.5614776611,
                "ymax": 406.6483154297,
                "confidence": 0.8470823765,
                "class": 0,
                "name": "item"
            },
...
]
アノテーションを登録します。
with open("annotations.json") as f:
    annotations = json.load(f)

label_id = data.results[0].id
score_attribute_id = data.results[0].attributes[0].id

shapes = []

for i in range(len(annotations)):

    image = annotations[i]

    image_url = image["input"]

    frame = image_urls.index(image_url)

    for item in image["output"]:

        shape = models.LabeledShapeRequest(
            type="rectangle",
            frame=frame,
            label_id=label_id,
            points=[
                item["xmin"],
                item["ymin"],
                item["xmax"],
                item["ymax"]
            ],
            attributes=[
                models.AttributeValRequest(
                    spec_id=score_attribute_id,
                    value=str(item["confidence"])
                )
            ]
        )
        shapes.append(shape)

tasks_api_instance = apis.TasksApi(api_client)
# annotations_api_instance = apis.AnnotationsApi(api_client)

try:
    # Task ID to which you want to add annotations
    task_id = task.id

    patched_labeled_data_request = PatchedLabeledDataRequest(
        shapes=shapes
    )

    # Upload the annotations using the correct parameter
    response = tasks_api_instance.partial_update_annotations(
        action="create",
        id=task_id,
        patched_labeled_data_request=patched_labeled_data_request # annotations_data
    )

    print(f"Annotations added successfully to task {task_id}.")

except exceptions.ApiException as e:
    print(f"Exception when trying to add annotations: {e}\n")
結果、以下のようにアノテーションが反映されます。

(参考)タスクの一括削除
タスクの一括削除は以下で行うことができました。
try:
    # List tasks, you can specify filters if needed, like page size or ordering
    tasks = tasks_api_instance.list()[0]

    # Iterate through and print task details
    for task in tasks["results"]:
        # print(task)
        print(f"Task ID: {task.id}, Name: {task.name}, Size: {task.size}, Status: {task.status}")

        response = tasks_api_instance.destroy(task.id)

        print(response)

except exceptions.ApiException as e:
    print("Exception when trying to list tasks: %s\n" % e)
まとめ
pythonを使ってcvatのデータを操作する方法を記載しました。
一部の機能の利用に留まりますが、参考になりましたら幸いです。
Discussion