🙄
Oxygen XML Editorのイメージマップエディタの使用例
概要
Oxygen XML Editorのイメージマップエディタの使用方法に関する説明です。
動画
使用方法
以下のようなTEI/XMLファイルを用意します。<graphic>のurlの値は、当該ファイルからの相対パスや、PC上の絶対パス、およびインターネット上で公開されているURLを指定します。
以下の例では、TEI/XMLファイルと同じフォルダに格納されているdigidepo_3437686_pn_null_9c48d89b-e2ec-4593-8d00-6fbc1d29d1bd.jpgというファイルを参照しています。
<?xml version="1.0" ?>
<?xml-model href="http://www.tei-c.org/release/xml/tei/custom/schema/relaxng/tei_all.rng" type="application/xml" schematypens="http://relaxng.org/ns/structure/1.0"?>
<TEI xmlns="http://www.tei-c.org/ns/1.0">
  <teiHeader>
    <fileDesc>
      <titleStmt>
        <title>Sample</title>
      </titleStmt>
      <publicationStmt>
        <ab/>
      </publicationStmt>
      <sourceDesc>
        <ab/>
      </sourceDesc>
    </fileDesc>
  </teiHeader>
  <facsimile>
    <surface>
      <graphic url="digidepo_3437686_pn_null_9c48d89b-e2ec-4593-8d00-6fbc1d29d1bd.jpg"/>
    </surface>
  </facsimile>
</TEI>
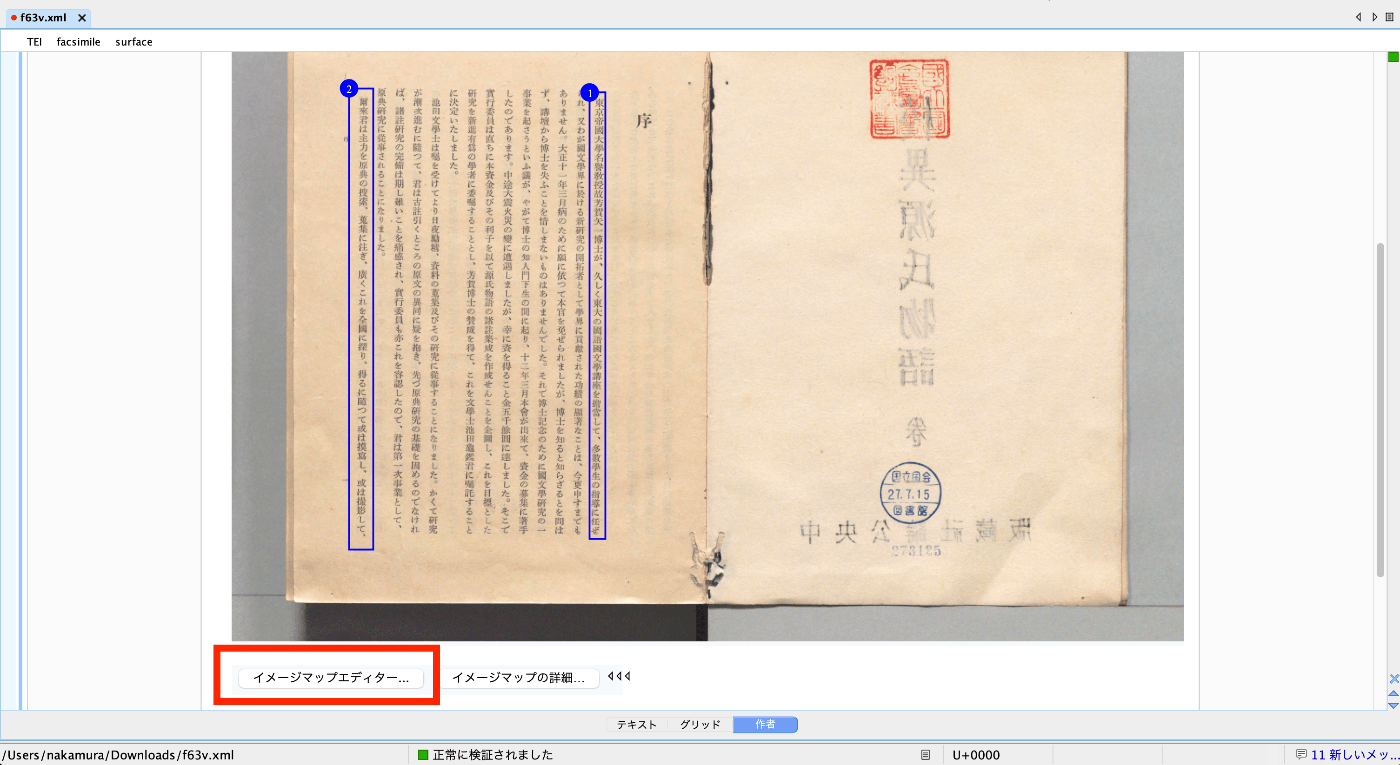
画面下部の「作者」というボタンをクリックすると、以下のように「イメージマップエディタ」が表示されます。上記の動画を参考に、アノテーションを付与します。
結果、以下のようにzoneタグが自動的に追加されます。
<?xml version="1.0" ?>
<?xml-model href="http://www.tei-c.org/release/xml/tei/custom/schema/relaxng/tei_all.rng" type="application/xml" schematypens="http://relaxng.org/ns/structure/1.0"?>
<TEI xmlns="http://www.tei-c.org/ns/1.0">
  <teiHeader>
    <fileDesc>
      <titleStmt>
        <title>Sample</title>
      </titleStmt>
      <publicationStmt>
        <ab/>
      </publicationStmt>
      <sourceDesc>
        <ab/>
      </sourceDesc>
    </fileDesc>
  </teiHeader>
  <facsimile>
    <surface>
      <graphic url="digidepo_3437686_pn_null_9c48d89b-e2ec-4593-8d00-6fbc1d29d1bd.jpg"/>
      <zone xml:id="zone_z3p_zll_szb" change="#ch1" lry="3960" lrx="2705" uly="730" ulx="2590"/>
      <zone xml:id="zone_fmm_xnv_szb" change="#ch2" lry="4038" lrx="1025" uly="700" ulx="850"/>
    </surface>
  </facsimile>
</TEI>
まとめ
Oxygen XML Editorの利用に際して、参考になりましたら幸いです。
Discussion