🚀
Device Preview for Flutter、githubaction,firebasehostringを使って爆速レビューを目指す
目的
複数に flutter を開発する際に、自分のローカルにコードを入れて画面を確認するため、手間と時間がかかってしまっていた。そこで Device Preview for Flutter を使い、web 上に画面に出力を行うことでローカルでの確認を省くことにした。また githubaction と firebase hostring を使うことで自動化を行い、時間の削減を行なった。
実際のコード
技術選定
今回は、vercel と firebasehostring どちらを利用するか迷ったらが、 vercel の方は、preview として作成した deploy を期間を決めて動かすことができる(基本 10 日)ため無駄なリソースを割かないで済むため firebasehostring を利用した。
使用技術
- cupertino_icons: ^1.0.6
- device_preview: ^1.1.0
事前準備
flutter の構築
パッケージのインストール
flutter pub add device_preview
main.dart の変更
変更箇所
- runApp の中に devicePreview の設定を追加
- wight の中に builder と locale を設定
import 'package:flutter/material.dart';
import 'package:device_preview/device_preview.dart';

void main() {
  runApp(
    DevicePreview(
      enabled: true,
      tools: const [
        ...DevicePreview.defaultTools,
      ],
      builder: (context) => const MyApp(),
    ),
  );
}

class MyApp extends StatelessWidget {
  const MyApp({super.key});

  // This widget is the root of your application.
  @override
  Widget build(BuildContext context) {
    return MaterialApp(
      title: 'Flutter Demo4',
      theme: ThemeData(
        colorScheme: ColorScheme.fromSeed(seedColor: Colors.deepPurple),
        useMaterial3: true,
      ),
      builder: DevicePreview.appBuilder,
      locale: DevicePreview.locale(context),
      home: const MyHomePage(title: 'Flutter Demo Home Page2'),
    );
  }
}

class MyHomePage extends StatefulWidget {
  const MyHomePage({super.key, required this.title});

  final String title;

  @override
  State<MyHomePage> createState() => _MyHomePageState();
}

class _MyHomePageState extends State<MyHomePage> {
  int _counter = 0;

  void _incrementCounter() {
    setState(() {
      _counter++;
    });
  }

  @override
  Widget build(BuildContext context) {
    return Scaffold(
      appBar: AppBar(
        backgroundColor: Theme.of(context).colorScheme.inversePrimary,
        // Here we take the value from the MyHomePage object that was created by
        // the App.build method, and use it to set our appbar title.
        title: Text(widget.title),
      ),
      body: Center(
        child: Column(
          mainAxisAlignment: MainAxisAlignment.center,
          children: <Widget>[
            const Text(
              'You have pushed the button this many times:',
            ),
            Text(
              '$_counter',
              style: Theme.of(context).textTheme.headlineMedium,
            ),
          ],
        ),
      ),
      floatingActionButton: FloatingActionButton(
        onPressed: _incrementCounter,
        tooltip: 'Increment',
        child: const Icon(Icons.add),
      ), // This trailing comma makes auto-formatting nicer for build methods.
    );
  }
}
firebase hosting の設定
firebasehostring のプロジェクトの作成
プロジェクトの設定は、こちらを参考に行いました。
githubactions の設定
FIREBASE_TOKEN の取得
firebase login:ci
github の設定
1. setting を選択 2. Secrets and variables の中の action を選択 3. Repository secrets に New repository sercret で FIREBASE_TOKEN を作成
github 権限の変更
- settring を選択
- Action の generl を選択
- Workflow permissions を Read and write permissions にチェック
yml ファイルへの記述
- develop への pull request がされたタイミング
- develop への merge されたタイミング
この2つで実装を行いたいと思います。
develop への pull request がされたタイミングの yml ファイル
- トリガーを設定する(on の部分)。
- job の中の仮想マシンは、ubuntuu の最新を選択。
- step の順序としては、
- checkout(リポジトリをコピー)
- setup flutter (subosito/fultter-action のパッケージを使って環境を構築)
- build web (web 版として build)
- Deploy to Firebase Hosting Preview Channel(firebase に deploy)
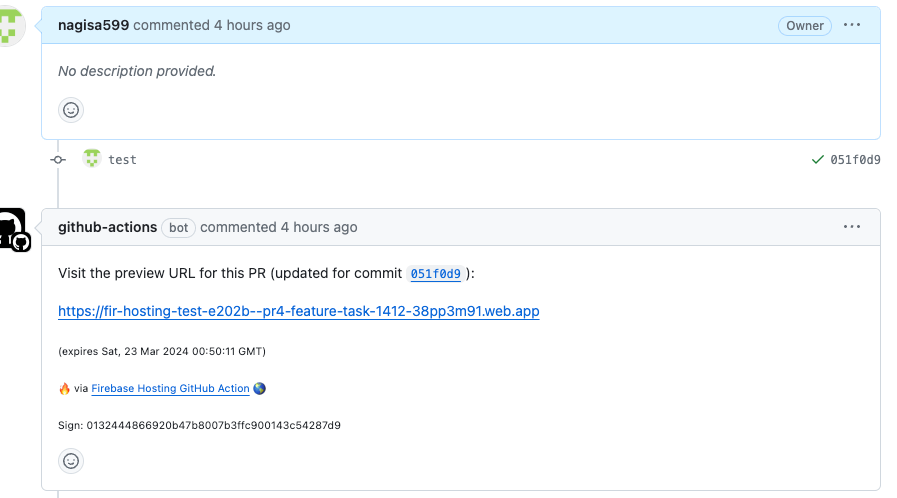
- channelId live の時は本番環境(今回は、develop に設定)
- channnelId を設定しない場合は、開発環境(preview) (今回は,pullrequest)の時
name: Deploy to Firebase Hosting Preview Channel

on:
  pull_request:
    branches:
      - develop

jobs:
  build_and_deploy:
    runs-on: ubuntu-latest
    steps:
      - name: Checkout Repo
        uses: actions/checkout@v2

      - name: Setup Flutter
        uses: subosito/flutter-action@v1
        with:
          flutter-version: "3.x"

      - name: Build Web
        run: flutter build web

      - name: Deploy to Firebase Hosting Preview Channel
        uses: FirebaseExtended/action-hosting-deploy@v0
        with:
          repoToken: "${{ secrets.GITHUB_TOKEN }}"
          firebaseServiceAccount: "${{ secrets.FIREBASE_TOKEN }}"
          # channelId: live
          projectId: fir-hosting-test-e202b
        env:
          FIREBASE_TOKEN: ${{ secrets.FIREBASE_TOKEN }}
name: Deploy to Firebase Hosting on Merge

on:
  push:
    branches:
      - develop

jobs:
  build_and_deploy:
    runs-on: ubuntu-latest
    steps:
      - name: Checkout Repo
        uses: actions/checkout@v2

      - name: Setup Flutter
        uses: subosito/flutter-action@v1
        with:
          flutter-version: "3.x"

      - name: Build Web
        run: flutter build web

      - name: Deploy to Firebase Hosting
        uses: FirebaseExtended/action-hosting-deploy@v0
        with:
          repoToken: "${{ secrets.GITHUB_TOKEN }}"
          firebaseServiceAccount: "${{ secrets.FIREBASE_TOKEN }}"
          channelId: live
          projectId: fir-hosting-test-e202b # あなたのFirebaseプロジェクトIDに置き換えてください
        env:
          FIREBASE_TOKEN: ${{ secrets.FIREBASE_TOKEN }}
補足・参考
おわりに,これから
開発環境の CI/CD の構築は、完了したので次は、本番環境(ios,andoroid)への CI/CD の部分を作成していきたい。
Discussion