Android Studioで既存プロジェクトを複製して別アプリにする方法
はじめに
Android Studioで、完成済みのプロジェクトを複製して使おうとしたら、なぜかうまくいきませんでした。
「ちゃんと動いてたプロジェクトをコピーしただけなのに、どうして…?」と思って調べて解決したので、メモとしてまとめておきます。
原因と必要なこと
原因:Android プロジェクトには内部にプロジェクト名やパスがベタ書きされてる
| ファイル | 中身 |
|---|---|
.idea/ |
プロジェクト設定がごちゃっと詰まってる(IDEの情報) |
.gradle/ |
キャッシュやビルドの記録 |
settings.gradle |
プロジェクト名(rootProject.name) |
build.gradle |
アプリIDやモジュール構成がある |
必要なこと:
- settings.gradle のプロジェクト名を変更
- rootProject.name = "新しいプロジェクト名に変更"
- .idea/ と .gradle/ を削除
- これらには元のパスや設定が残ってる!
- 前のプロジェクトの設定は捨ててクリーンにする必要がある。
- Android Studio が新しく設定し直してくれるから、消してOK。
うまくコピーして開くための手順
- フォルダをコピー(例:
MyApp → MyAppCopy) -
settings.gradleを開いて、プロジェクト名を修正(Android Studioじゃないエディタで) -
.idea/と.gradle/フォルダを削除! - Android Studioで「Open」→
MyAppCopyを開く
※パッケージについて
※package名も変えることができる(勝手に存在してた💦)
package名は「プロジェクト作成時に自動で決められてる」 らしい。
1.AndroidManifest.xml の package="..."
<manifest xmlns:android="http://schemas.android.com/apk/res/android"
    package="com.example.myapp">
2.build.gradle の applicationId
android {
    defaultConfig {
        applicationId "com.example.myapp"
    }
}
3.JavaやKotlinファイルの package 宣言
package com.example.myapp;
確認したら確かにパッケージに入ってました。手動で書き換えたり、Refactor するようです。
今はそこまで必要性が無いのでしません。
実際に試してみる
- フォルダをコピー(例:
MyApp → MyAppCopy) -
settings.gradleを開いて、プロジェクト名を修正(Android Studioじゃないエディタで) -
.idea/と.gradle/フォルダを削除! - Android Studioで「Open」→
MyAppCopyを開く
最初のプレーンなプロジェクトで試しても意味がないので適当なプロジェクトをコピーしてみます。
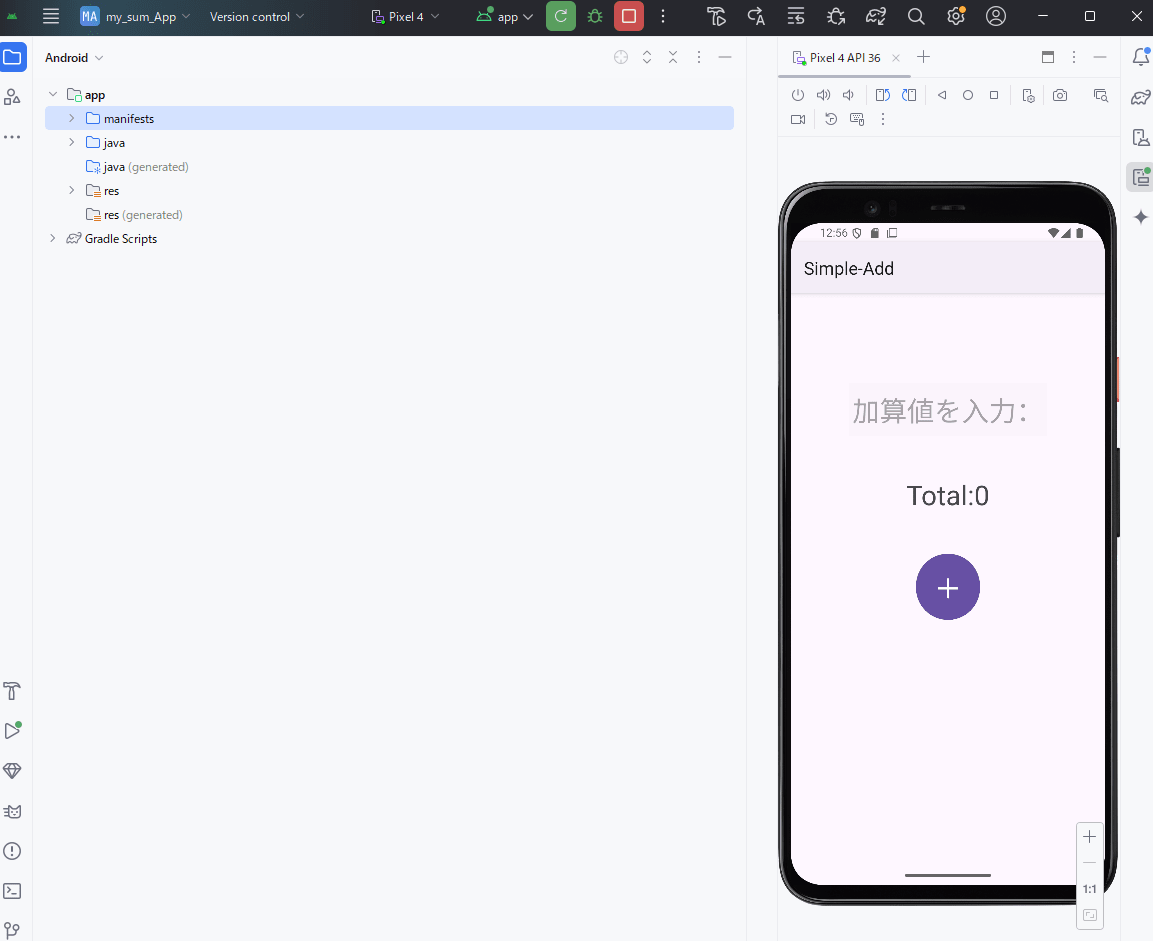
コピーするプロジェクト【SumApp】
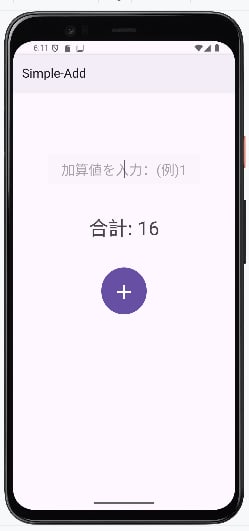
このプロジェクトのコード
activity_main.xml
<?xml version="1.0" encoding="utf-8"?>
<androidx.constraintlayout.widget.ConstraintLayout xmlns:android="http://schemas.android.com/apk/res/android"
    xmlns:app="http://schemas.android.com/apk/res-auto"
    xmlns:tools="http://schemas.android.com/tools"
    android:id="@+id/main"
    android:layout_width="match_parent"
    android:layout_height="match_parent"
    tools:context=".MainActivity">

    <EditText
        android:id="@+id/editValue"
        android:layout_width="248dp"
        android:layout_height="67dp"
        android:layout_marginTop="200dp"
        android:background="@color/cardview_shadow_end_color"
        android:ems="10"
        android:gravity="center"
        android:hint="加算値を入力:"
        android:inputType="number"
        android:textSize="34sp"
        app:layout_constraintEnd_toEndOf="parent"
        app:layout_constraintStart_toStartOf="parent"
        app:layout_constraintTop_toTopOf="parent" />

    <TextView
        android:id="@+id/txtTotal"
        android:layout_width="245dp"
        android:layout_height="43dp"
        android:layout_marginTop="50dp"
        android:gravity="center"
        android:text="Total:0"
        android:textSize="34sp"
        app:layout_constraintEnd_toEndOf="parent"
        app:layout_constraintStart_toStartOf="parent"
        app:layout_constraintTop_toBottomOf="@+id/editValue" />

    <Button
        android:id="@+id/btnSum"
        android:layout_width="80dp"
        android:layout_height="91dp"
        android:layout_marginTop="50dp"
        android:text="+"
        android:textSize="34sp"
        app:layout_constraintEnd_toEndOf="parent"
        app:layout_constraintStart_toStartOf="parent"
        app:layout_constraintTop_toBottomOf="@+id/txtTotal" />
</androidx.constraintlayout.widget.ConstraintLayout>
strings.xml
<resources>
    <string name="app_name">Simple-Add</string>
</resources>
thrmes.xml
<resources xmlns:tools="http://schemas.android.com/tools">
    <!-- Base application theme. -->
    <style name="Base.Theme.SumApp" parent="Theme.Material3.DayNight">
        <!-- Customize your light theme here. -->
        <!-- <item name="colorPrimary">@color/my_light_primary</item> -->    </style>

    <style name="Theme.SumApp" parent="Base.Theme.SumApp" />
</resources>
MainActivity.java
package com.example.sumapp;

import android.os.Bundle;

import android.widget.Toast;
import androidx.activity.EdgeToEdge;
import androidx.appcompat.app.AppCompatActivity;
import androidx.core.graphics.Insets;
import androidx.core.view.ViewCompat;
import androidx.core.view.WindowInsetsCompat;
import java.text.SimpleDateFormat;
import java.util.Date;
import java.util.Locale;
import android.util.Log;
import com.example.sumapp.databinding.ActivityMainBinding;

public class MainActivity extends AppCompatActivity {

    private ActivityMainBinding binding;  // バインディングのフィールド
    private int total;  // 加算合計

    @Override
    protected void onCreate(Bundle savedInstanceState) {
        super.onCreate(savedInstanceState);
        EdgeToEdge.enable(this);
        setContentView(R.layout.activity_main);
        ViewCompat.setOnApplyWindowInsetsListener(findViewById(R.id.main), (v, insets) -> {
            Insets systemBars = insets.getInsets(WindowInsetsCompat.Type.systemBars());
            v.setPadding(systemBars.left, systemBars.top, systemBars.right, systemBars.bottom);
            return insets;
        });

        binding = ActivityMainBinding.inflate(getLayoutInflater());
        setContentView(binding.getRoot());

        binding.btnSum.setOnClickListener(view -> {
            String input = binding.editValue.getText().toString();
            int addValue;
            int before = total;

            addValue = Integer.parseInt(input);

            total += addValue;
            binding.txtTotal.setText("合計: " + total);

            Toast.makeText(this, addValue + "加算されました。", Toast.LENGTH_SHORT).show();

            String date = new SimpleDateFormat("yyyy/MM/dd", Locale.getDefault()).format(new Date());
            Log.d("AddLog", "[" + date + "] " + before + "に" + addValue + "を加算し、合計" + total);
        });
    }
}
build.gradle(:app)
plugins {
    alias(libs.plugins.android.application)
}

android {
    namespace 'com.example.sumapp'
    compileSdk 35

    // バインディングのために追加
    buildFeatures {
        viewBinding = true
    }

    defaultConfig {
        applicationId "com.example.sumapp"
        minSdk 24
        targetSdk 35
        versionCode 1
        versionName "1.0"

        testInstrumentationRunner "androidx.test.runner.AndroidJUnitRunner"
    }

    buildTypes {
        release {
            minifyEnabled false
            proguardFiles getDefaultProguardFile('proguard-android-optimize.txt'), 'proguard-rules.pro'
        }
    }    compileOptions {
        sourceCompatibility JavaVersion.VERSION_11
        targetCompatibility JavaVersion.VERSION_11
    }
}

dependencies {

    implementation libs.appcompat
    implementation libs.material
    implementation libs.activity
    implementation libs.constraintlayout
    testImplementation libs.junit
    androidTestImplementation libs.ext.junit
    androidTestImplementation libs.espresso.core
}
コピーしたプロジェクト【my_sum_App】
1.コピー / 複製して名前を変える

2.settings.gradle
pluginManagement {
    repositories {
        google {
            content {
                includeGroupByRegex("com\\.android.*")
                includeGroupByRegex("com\\.google.*")
                includeGroupByRegex("androidx.*")
            }
        }
        mavenCentral()
        gradlePluginPortal()
    }
}
dependencyResolutionManagement {
    repositoriesMode.set(RepositoriesMode.FAIL_ON_PROJECT_REPOS)
    repositories {
        google()
        mavenCentral()
    }
}

rootProject.name = "SumApp"  // ここを変更
include ':app'
rootProject.name だけを変更・他はそのままです。
rootProject.name = "my_sum_App"  // 新しいプロジェクト名
include ':app'
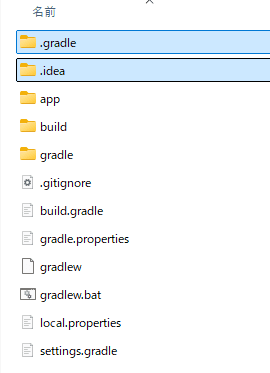
3. .idea/ と .gradle/ フォルダを削除!
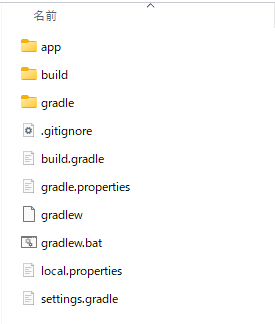
gradle/(ドット無し)は削除しない!
プロジェクトにどのバージョンのGradleを使うかを記録してる大事な構成。
(ここまではAndroidスタジオのプロジェクトが入ってるローカルフォルダでの作業です)
4.Androidスタジオで開くと・・(ここからAndroidスタジオ起動しての作業です)
ちゃんと追加されました。追加されるのに時間かかってダメかと思い、何度か再起動した後に追加されてました。

「信頼しますか?」のメッセージ
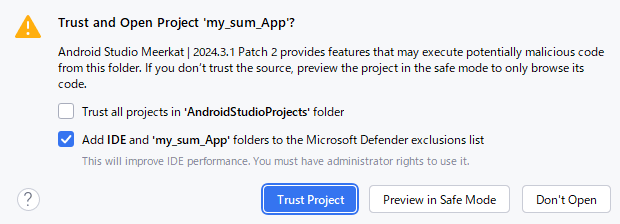
👉「Trust Project」このプロジェクトを信頼して開く。
✅Trust all projects in 'AndroidStudioProjects' folder
・今後、このフォルダ内にあるすべてのプロジェクトを信頼リストに追加(毎回聞かれなくなる)
✅Add IDE and 'my_sum_App' folders to the Microsoft Defender exclusions list
・プロジェクトが Defender に邪魔されないように除外設定してくれる(ビルド高速化に効果あり!)
Androidスタジオは大丈夫だった!って確定するまの時間が長いけど・・
成功しました!
ローカルフォルダで確認したら、.gradle/ .idea/ ありました。新プロジェクト用に新しくできたようです。
今回はこの方法でうまくいきました!
✅ Androidプロジェクト複製チェックリスト(コピーして動かすだけ)
- フォルダをコピーする(MyApp → MyAppCopy)
-
settings.gradleのrootProject.nameを変更 -
.idea/と.gradle/を削除(※gradle/は残す!) - Android Studio で「Open」→
MyAppCopyを開く - Trustメッセージが出たら「信頼する」を選択
注意:build.gradle について
build.gradle にある applicationId は アプリの「住所」みたいなもの
defaultConfig {
    applicationId "com.example.sumapp"
}
applicationId:実際に スマホにインストールされるときのID
コピーして開いただけ
- ローカルの別プロジェクトとして動いている
- 同じ
applicationIdでも、Android Studioやエミュレータは別アプリとして扱ってくれる
✅ まとめ
| 状況 |
build.gradleのapplicationIdは? |
|---|---|
| Android Studioでコピーして開くだけ | 変更しなくてもOK ✅ |
| スマホやエミュレータに元アプリと両方インストールしたい | 変える必要あり ⚠️ |
| Google Playに両方出したい | 一意である必要あり 🔑 |
✏️ 変えたいときはこう書き換えるだけ!
defaultConfig {
    applicationId "com.example.my_sum_app"
}
追記:複製後
複製プロジェクトから進化版を作成し閉じてから、複製前の元プロジェクトを開いたら元のプロジェクトのままでちゃんと開きました。
同じエミュレータでもそれぞれ別のタイミングで開くなら問題ないようです。両方のアプリをインストールはできません、塗り替えられます。
ダメ押しでもう一度複製を試してみました。
今度はbuild.gradle の applicationId を編集してやってみます。
【my_sum_App】をコピーして【my_sum_Copy】に名前を変更
注意:build.gradle は2種類ある!
| ファイル名 | 内容 | どこにある? |
|---|---|---|
build.gradle (Project) |
プロジェクト全体の設定(ライブラリ、バージョン共通管理など) | プロジェクトの直下 |
build.gradle (Module) ←これに applicationId がある! |
実際のアプリのビルド設定(アプリ名、ID、依存関係) |
app/ フォルダの中 |
MyAppCopy/
├─ .gradle/  複製の時に削除するフォルダ
├─ .idea/    複製の時に削除するフォルダ
├─ app/
│  └─ build.gradle ← ★こっち!(Moduleレベル)
├─ build/
├─ gradle/
├─ .gitignore
├─ build.gradle ← こっちじゃない
├─ gradle.properties
├─ gradlew
├─ gradlew.bat
├─ local.properties
├─ settings.gradle  複製の時に書き換える必要のあるファイル
build.gradleの内容
plugins {
    alias(libs.plugins.android.application)

}

android {
    namespace 'com.example.sumapp'  // ここではない!
    compileSdk 35

    buildFeatures {
        viewBinding = true
    }

    defaultConfig {
        applicationId "com.example.sumapp"   // ここを書き換える
        minSdk 24
        targetSdk 35
        versionCode 1
        versionName "1.0"
        testInstrumentationRunner "androidx.test.runner.AndroidJUnitRunner"
    }

    buildTypes {
        release {
            minifyEnabled false
            proguardFiles getDefaultProguardFile('proguard-android-optimize.txt'), 'proguard-rules.pro'
        }
    }
    compileOptions {
        sourceCompatibility JavaVersion.VERSION_11
        targetCompatibility JavaVersion.VERSION_11
    }
}

dependencies {

    implementation libs.appcompat
    implementation libs.material
    implementation libs.activity
    implementation libs.constraintlayout
    testImplementation libs.junit
    androidTestImplementation libs.ext.junit
    androidTestImplementation libs.espresso.core
}
書き換えた部分
    defaultConfig {
        applicationId "com.example.sumappv2"  // sumapp → sumappv2
        minSdk 24
        targetSdk 35
        versionCode 1
        versionName "1.0"

        testInstrumentationRunner "androidx.test.runner.AndroidJUnitRunner"
    }
.gradle/ .idea/ の削除
settings.gradle の書き換え
build.gradle の書き換え(今回のポイント)
で、Androidスタジオ起動
my_sum_Copy を開くと、
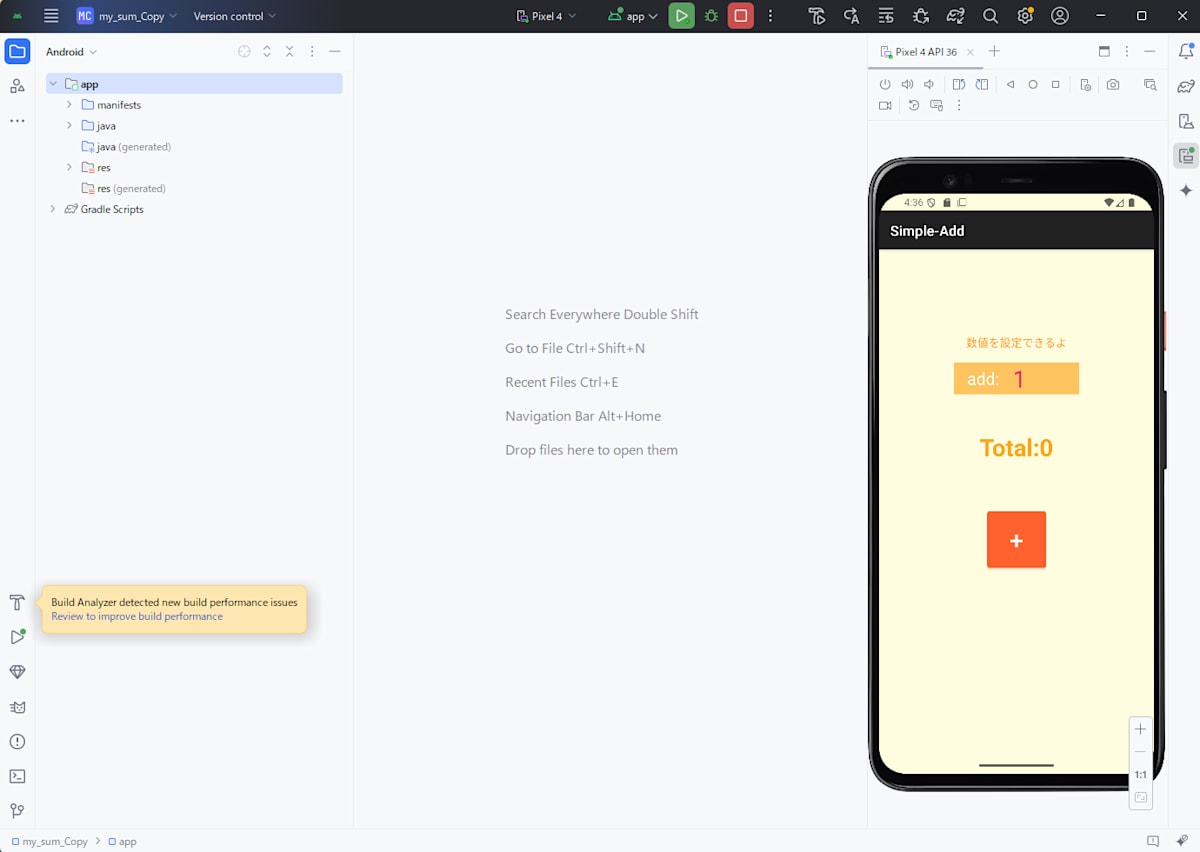
まずは複製OK!
エミュレータでアプリはどうなっているか見てみると
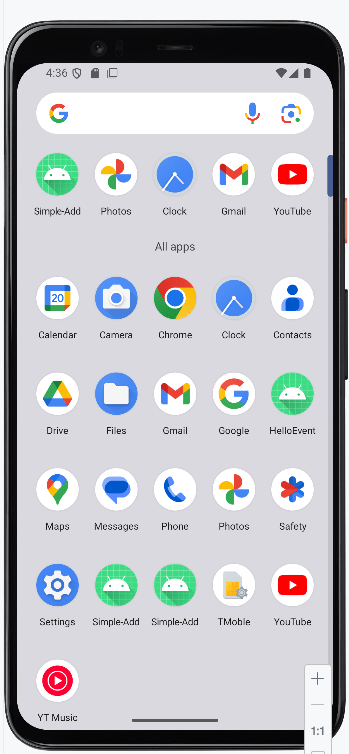
Simple-Add が2つ並んでいます。それぞれ開くと別バージョンです!
2つのアプリが別物として認識されエミュレータにインストールされています。
✅ 別アプリとして扱いたい場合の複製チェックリスト(エミュレータ・端末に両方入れたい)
- フォルダをコピーする(MyApp → MyAppCopy)
-
settings.gradleのrootProject.nameを変更 -
.idea/と.gradle/を削除(※gradle/は残す!) -
app/build.gradleのapplicationIdを変更する - Android Studio で「Open」→
MyAppCopyを開く - Trustメッセージが出たら「信頼する」を選択
最後に:ここまで読んでいただき、ありがとうございます。
プロジェクトをコピーするだけ…と思いきや、意外と落とし穴が多かったです。
今後また複製したいとき、自分でも見返せるようにメモにしておきました。
Discussion