Fly.ioへGleamアプリをデプロイする
スクラップからの転記記事です。
Fly.io上にGleamで作成したWebアプリケーションをデプロイしてみたので書き記しておきます。
利用したGleamのバージョンはv0.28.3です。
また、デプロイ方法については、以下の記事を参考にして実施しています。
Gleamプロジェクトの作成
プロジェクトの作成コマンドを入力します。
gleam new pidgey
cd pidgey
gleam add mist gleam_http gleam_erlang
実施内容は以下の通りです。
- 「pidgey」と言うGleamのプロジェクトを作成
- プロジェクトのルートディクトリに移動
- 以下の設定を追加
- Webサーバー「mist」を追加
- ヘルパータイプ&関数の「gleam_http」(HTTPランタイム)と「gleam_erlang」(Erlangランタイム)を追加
コード作成
「Hello MzRyuKa!!!」を常に返すWebアプリケーションのコードを作成します。
最初印も書きましたが、Glemaのバージョン違いにより、元のコードから修正が発生しています。
変更前
import mist
import gleam/io
import gleam/erlang
import gleam/bit_builder
import gleam/http/response.{Response}

pub fn main() {
  // Start the web server
  assert Ok(_) = mist.run_service(8080, web_service)

  // Put the main thread to sleep while the server works
  erlang.sleep_forever()
}

fn web_service(_request) {
  let body = bit_builder.from_string("Hello, Joe!")
  Response(200, [], body)
}
変更後
import mist
import gleam/io
//import gleam/erlang  ... (1)
import gleam/erlang/process
import gleam/bit_builder
import gleam/http/response.{Response}

pub fn main() {
  io.println("Hello from pidgey!")
  // Start the web server
  // assert Ok(_) = mist.run_service(8080, web_service) ... (2)(3)
  let assert Ok(_) =
    mist.run_service(8080, web_service, max_body_limit: 4_000_000)

  // Put the main thread to sleep while the server works
  // erlang.sleep_forever()  ... (4)
  process.sleep_forever()
}

fn web_service(_request) {
  let body = bit_builder.from_string("Hello, MzRyuKa!")
  Response(200, [], body)
}
修正ポイント
(1) : sleep_foreverを利用するモジュールのimport文変更
後続の(4)と関係します。
無限ループを行う関数sleep_foreverであるが、それを利用するモジュールがerlangからprocessに変割っています。
そのため、モジュールの宣言もimport gleam/erlangからimport gleam/erlang/processへ変更となります。
(2) : assert利用時のシンタックスの変更
以前はassert単体で定義できましたが、v0.27のリリースでlet assertのシンタックスへ変更されています。
そのため、受け側はlet assertへ修正となります。
(3) : mist.run_serviceの引数の変更
mist.run_serviceの引数の個数が3個に増えています。
従来の「port番号(Int)」、「hanndler(handler.Handler)」の他に、「max_body_limit(Int):レスポンスのbodyのサイズ上限」が追加されています。
なお、max_body_limitの値は、bytesとなります。
ソースコードとしては以下が該当。
pub fn run_service(
  port: Int,
  handler: handler.Handler,
  max_body_limit max_body_limit: Int,
) -> Result(Nil, glisten.StartError) {
  handler
  |> handler.with(max_body_limit)
  |> acceptor.new_pool_with_data(handler.new_state())
  |> glisten.serve(port, _)
}
なお、ローカル上のソースコードは以下の場所にあります。
- build/packages/mist/src/mist.gleam
(4) : sleep_foreverを利用するモジュール名の変更
(1)でも触れました、sleep_foreverを利用できるモジュールがgleam/erlang/processに変更されています。
そのため、process.sleep_forever()へ修正となります。
ソースコードは以下が該当。
- https://github.com/gleam-lang/erlang/blob/main/src/gleam/erlang/process.gleam
- https://github.com/gleam-lang/erlang/blob/main/src/gleam/erlang/process.gleam#L359-L360
pub external fn sleep_forever() -> Nil =
  "gleam_erlang_ffi" "sleep_forever"
なお、ソースコードについては、ローカルの以下の場所にあります。
- build/packages/gleam_erlang/src/gleam/erlang/process.gleam
余談
io.println("Hello from pidgey!")は本来不要ですが、import gleam/ioが他で利用されていないためThis imported module is never used.と警告が出ます。
そのため、警告回避のためにわざと残してあります。
コード実行:ローカル
ローカル上で実行をしてみます。
$gleam run
  Compiling gleam_stdlib
  Compiling gleam_erlang
  Compiling gleam_otp
  Compiling glisten
  Compiling gleam_http
  Compiling mist
  Compiling gleeunit
  Compiling pidgey
   Compiled in 23.08s
    Running pidgey.main
Hello from pidgey!
gleamのbuild&runは成功しました。
では、curlコマンドで確認してみます。
curl localhost:8080
以下のレスポンスが返ってきました。成功です。
Hello, MzRyuKa!
Image作成
ローカルでの動作が確認できたので、次はデプロイ準備です。
GleamアプリをFly.io上へデプロイするには、コンテナにする必要があります。
そのため、GleamのウェブアプリのベースとなりImageの用意、およびDockerファイルの用意を行います。
Imageのダウンロード
GleamのベースとなるImageファイルを探します。
Gleamのイメージは、ghcr.io/gleam-langに配置してあります。
URLはこちら。
なお、GitHubの画面から遷移するときはこちらから。

遷移すると、Imageの候補が出てきます。
上の方に出てくるのはnightlyなので、View all tagged versionsをクリックして、リリースバージョンのものを選択しておきます。
Elixirも入れておきたいので、今回はv0.28.3-elixirのイメージを利用してみます。
最終的に作成されるImageは大きくなるので注意してください。
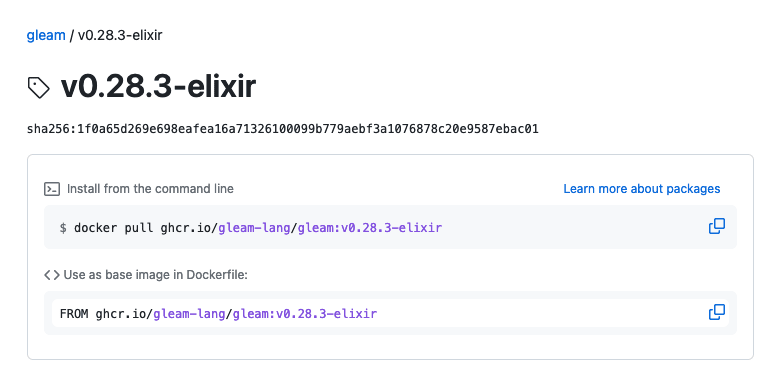
Imageのパスとしては、以下になります。
FROM ghcr.io/gleam-lang/gleam:v0.28.3-elixir
では、このImageをベースにしてDockerファイルを作成します。
Dockerファイルの作成
続いて、Dockerファイルの作成です。
ファイルの置き場所は、pidgeyディレクトリ直下になります。
FROM ghcr.io/gleam-lang/gleam:v0.28.3-elixir

# Add project code
COPY . /build/

# Compile the project
RUN cd /build \
  && gleam export erlang-shipment \
  && mv build/erlang-shipment /app \
  && rm -r /build

# Run the server
WORKDIR /app
ENTRYPOINT ["/app/entrypoint.sh"]
CMD ["run"]
これで準備はできました。
Fly.ioへデプロイ
それでは、実際にデプロイを開始してみましょう。
flyctlコマンドを利用して、デプロイを開始します。
flyctl launch
いくつか確認されるので答えていきます。
Update available 0.0.522 -> 0.0.538.
Run "flyctl version update" to upgrade.
Creating app in /<path>/<to>/work/gleam/v0.28/pidgey
Scanning source code
Detected a Dockerfile app
? Choose an app name (leave blank to generate one): pidgey
automatically selected personal organization: MzRyuKa
Some regions require a paid plan (fra, maa).
See https://fly.io/plans to set up a plan.

? Choose a region for deployment: Tokyo, Japan (nrt)
App will use 'nrt' region as primary
Created app 'pidgey' in organization 'personal'
Admin URL: https://fly.io/apps/pidgey
Hostname: pidgey.fly.dev
? Would you like to set up a Postgresql database now? No
? Would you like to set up an Upstash Redis database now? No
? Create .dockerignore from 1 .gitignore files? No
Wrote config file fly.toml
? Would you like to deploy now? Yes
今回の場合の、質問内容とその回答はこちらとなります。
- ? Choose an app name (leave blank to generate one): pidgey
- 「アプリの名前何にする?」→「pidgey」
- ? Choose a region for deployment: Tokyo, Japan (nrt)
- 「デプロイ先のリージョンどこにする?」→「Tokyo(ナリタ?)」
- ? Would you like to set up a Postgresql database now? No
- 「Postgresqlのセットアップする?」→「No」
- ? Would you like to set up an Upstash Redis database now? No
- 「Redislのセットアップする?」→「No」
- ? Create .dockerignore from 1 .gitignore files? No
- 「.dockerignore作る?」→「No」
- ? Would you like to deploy now? Yes
- 「今すぐデプロイする?」→「Yes」
ここまで回答すると、本格的にFly.ioへのデプロイが開始されます。
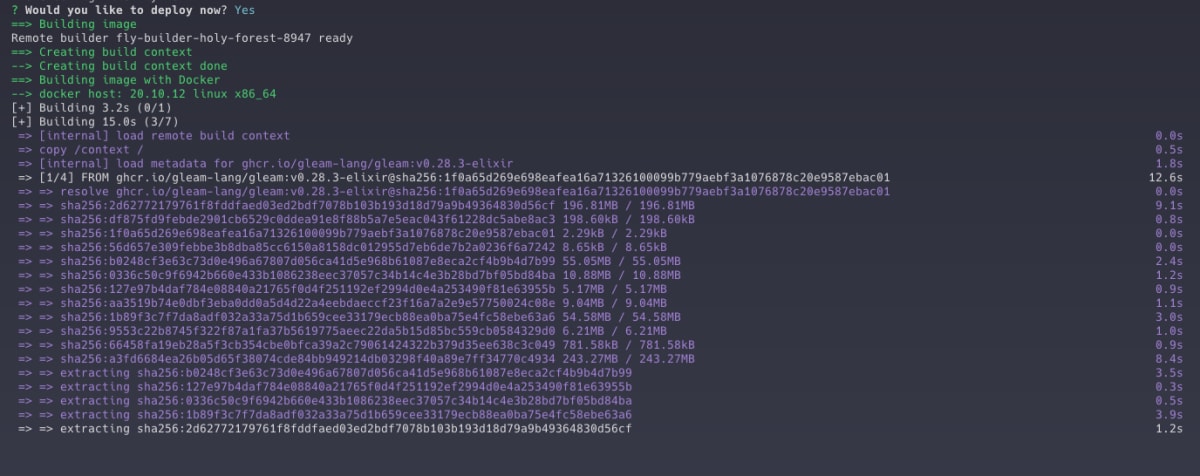
デプロイが完了したら、以下のような出力がされます。
--> Pushing image done
image: registry.fly.io/pidgey:deployment-01GYQ8NJMBA6RRQPX2YEZY3PJM
image size: 1.5 GB
Provisioning ips for pidgey
  Dedicated ipv6: xxxx:xxxx:1::xx:xxxx
  Shared ipv4: xx.xxx.xxx.210
  Add a dedicated ipv4 with: fly ips allocate-v4
Process groups have changed. This will:
 * create 1 "app" machine

No machines in group 'app', launching one new machine
  Machine xxxxxx15b97698 [app] update finished: success
Finished launching new machines
Updating existing machines in 'pidgey' with rolling strategy
  Finished deploying
imageサイズが1.5GBなのは、元にイメージが大きいからですね。
さて、デプロイが成功している様子なので、fly statusを実行して状態を確認します。

問題なさそうです。
それでは最後に、fly openコマンドで、デプロイしたGleamのWebアプリへブラウザでアクセスしてみます。

表示されました!
まとめ
以上、GleamのウェブアプリケーションをFly.io上にデプロイする方法について整理してみました。
今回はコンテナ対応をしておりますが、Fly.ioはGleamのスポンサーもしているので、もしかしたらコンテナ化しないでアプリをデプロイできる日が来る...かも。
というか、きてほしいなぁ、と思っております。
Discussion