3DCGメモ
Blenderのエクスポート先としてアニメーションSVGがあるから、Webフロントエンドで3Dモデルを表示するだけ(動かさない)なら、SVGでよさそう
Amazon Sumerian
簡単に3DモデルをWeb上に公開できる。
こんな感じで、キー押下に対してアクションを設定できたりする。可能性が無限大
Amazon Sumerianで気になること
- ドメイン適用の方法
- マイクラのワールドをfbxにエクスポートしたものの著作権・商用利用の可否
- ログイン機能の実装方法 cognitoは連携可能?
- 複数人でのリアルタイム利用の方法。マルチプレイ
- 移動ごとにRailsサーバーに位置情報送れる? Rails側ではWebsocketみたいなの使える?
- SumerianでのWeb上での音声通話の方法
- 最初のロード画面はカスタマイズ可能?
AWSのゲーム周辺サービス
これも読む
このブログを参考に、個人のマイクラのワールドデータをfbxに変換して、Sumerianに載せてみた
変換ツールどれ使うかとか、オプション次第でもっとクオリティ上げられそう!
Sumerian ✖︎ Cognitoの連携はこれでいける?
カメラを選択 -> 「メインの」にチェックをつけることで、メインカメラに設定することができる。
これでWebビューでのカメラに利用可能に。メインカメラ自体もおそらくステートマシンで切り替え可能
WASDキーで標準カメラを移動させることも可能だが、フライカムを使うともっと楽。フライカムにも多分spaceで上昇みたいなステートマシンを追加できる
これで簡単にWebに3DCGの埋め込みをしたり、VR対応できる
このツールで、高精度なマイクラのワールドを出力できる
マテリアルへのテクスチャの割り当て
HD-2Dグラフィックの仕組み。これをWebでやるのはかなり良さげ。
エフェクトどれくらいかけれるか検証
- 被写界深度(depth of field)
- bloom
など
難易度は高くないが、3DCGとの使い分けが難しそう
こんな感じで、3Dと2Dの切り替えができるメリットはある

Three.js入門サイト
- Three.jsを使って、WASDキーでオブジェクトの移動をできるようにする
- オブジェクトの移動をする際に、衝突検知してオブジェクトのある場所には移動できないようにする
- ActionCableを使って、複数ブラウザ間で3Dオブジェクトの座標を共有する
- ワールドデータとアバターを読み込み、アバターの後ろにカメラを追従させる
Sumerianに関してはこれ必読
Webでマイクラ再現したい。フィールドの生成をせずに静的なオブジェクトだけなら可能そう
目を通した方が良さそう。Three.jsでページに埋め込んだ3Dオブジェクトを、Oculusとかで見たい
ランタイム用途向けのアセットフォーマット
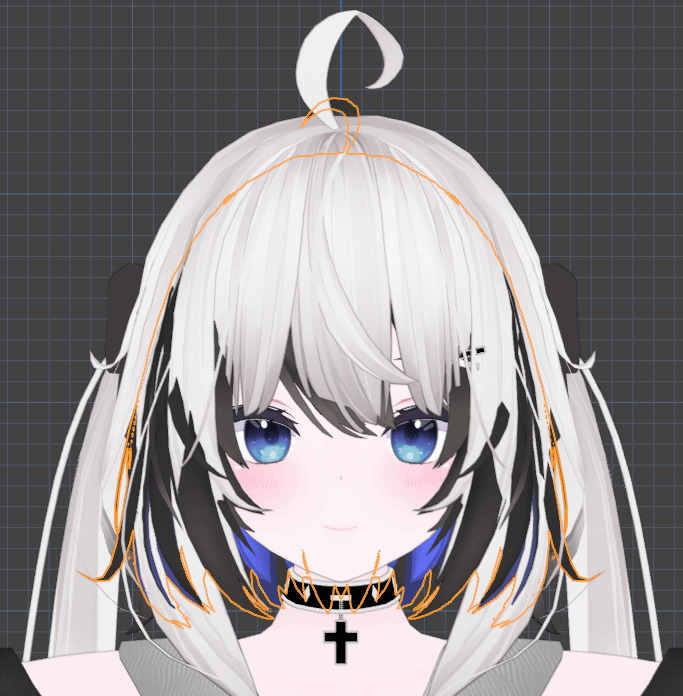
アバター同士をミックスする際に頭のボーンだけ削除とかするときは、編集モードにする
アーマチュアはBlenderの方で結合しなくても、Unity側で簡単に消せる。
髪型改変の場合は、髪型の方のボーンHeadを体の方に移動して、rootを元の体のHipにする
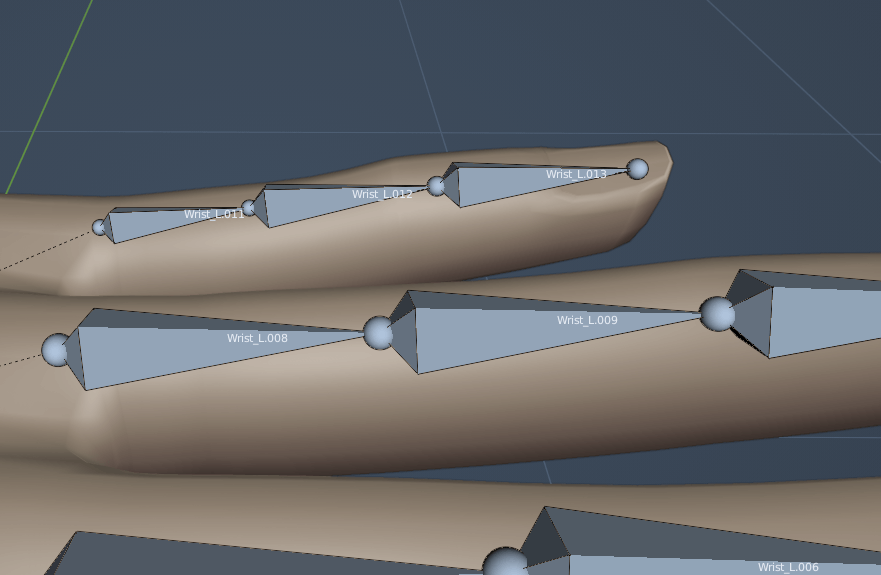
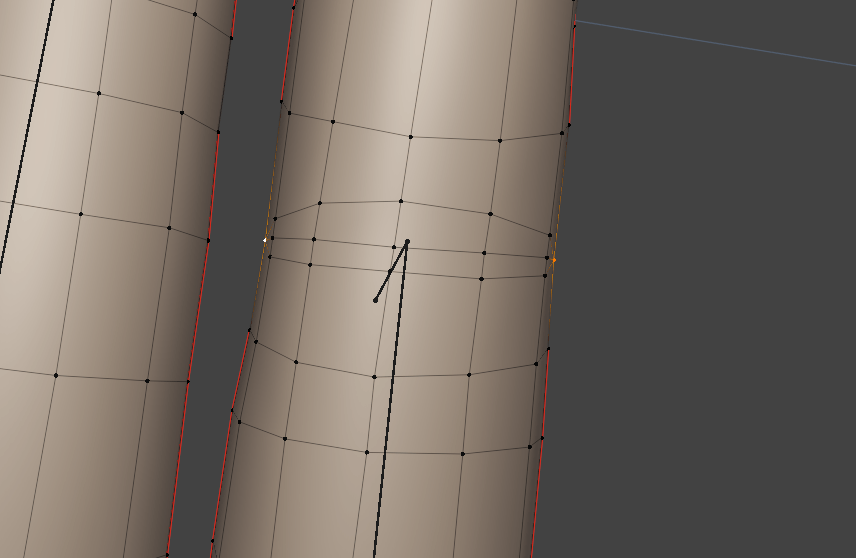
ループカット
Aで全選択して cmd + R
その後にcmd + Bで範囲を広げられる。bold
押し出し
面選択して E
面の削除
Xを押して選ぶ
面選択
左上のメニューから頂点・面などを選べる
ループ選択
Alt + 左クリック
丸カーソルが中央にない場合の戻し方
Shift + C
面 / 頂点 / 辺 選択の切り替え
1, 2, 3キー
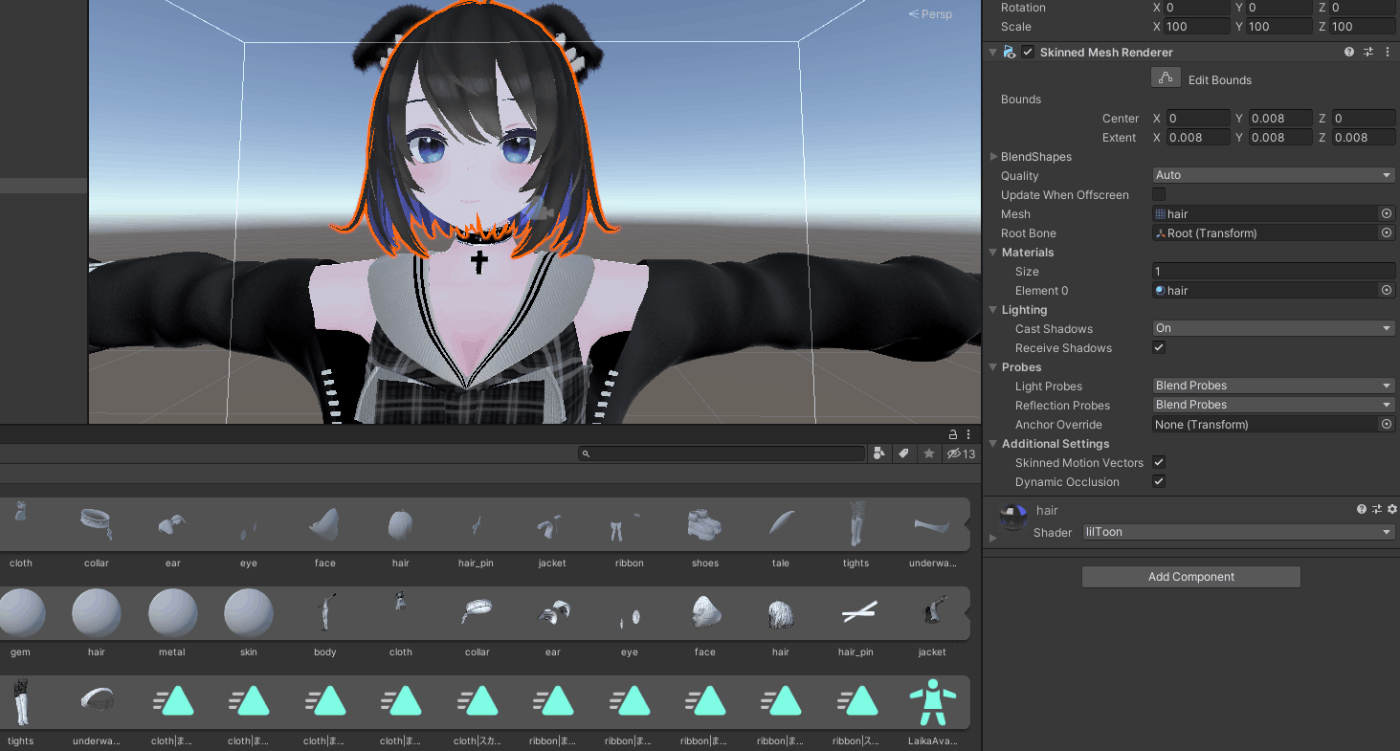
unityのskinned mesh rendererにテクスチャ画像をドラッグするとバグるので、それを利用してもふもふ生成できる
複数衣装登録
これをつかえばVRChat開かなくても確認できるっぽい?
額縁みたいな形を作るときは、面選択したあとEで押し出してクリック。Sで面を小さくしたあと、Eで逆向きに押し出す
Blenderで面選択してマテリアルを適用すると、面単位でマテリアルを指定できる
こういう部屋にアバター置いてみたい
Ctrl + Vで頂点メニューを開く。
smooth vertecsとか便利
編集モードの状態でオブジェクトを追加すると、同じオブジェクト扱いになってしまう
ミラーモディファイアは編集モードでのみ有効。オブジェクトモードでは、1つのオブジェクトとして扱われる。
眉毛みたいに、表面に簡単な平面を沿わせるときにはshrinkwrapモディファイアが有効
Zキーで表示方法を変更できる。ソリッドビューなど
2点を近づけるときはSキーの縮小を使うと便利
Alt + S 法線の方向に拡大
クリースは、Subdivision Surfaceを使用した際に、エッジの鋭さを決める事ができるパラメータ
左上の矢印を長押しで選択方法を変えることができる
プロポーショナル編集ではgなどを押した後にサークルが出てくる
Gキー二回押しで、頂点は辺の上しか移動できなくなる
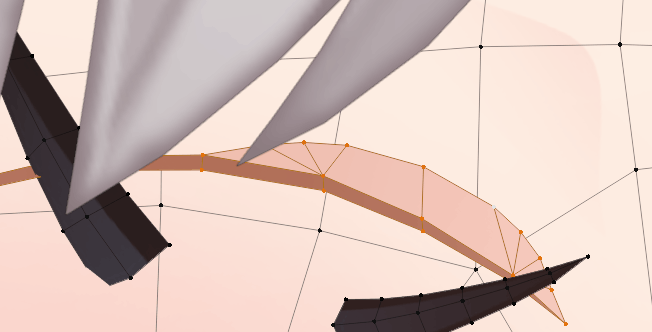
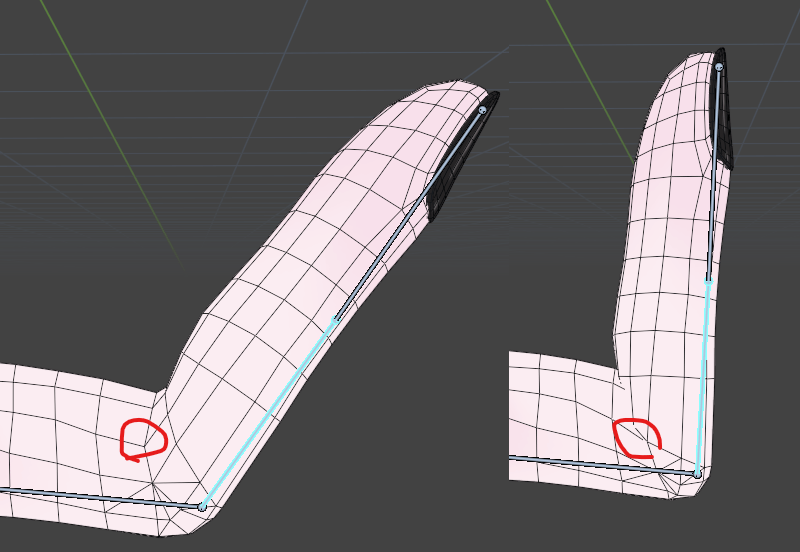
三角錐のような形だとループカットやベベルをきれいに入れられないので、底の部分の頂点の少し上をループカットして、G2回押しで頂点付近に移動すると、4角ポリゴンになり綺麗にループカットが入る
ミラーモディファイアの表示がズレるときは、object -> apply から原点のLocationやRotationを変更する
頂点を増やしたい場合は、2点を選択してからsubdivide
Pキー selectionで選択範囲のメッシュを分離できる
辺などをループ選択してから、select -> Checker deselectedで1つ飛ばしに選択できる
モディファイアの▽(編集ケージ)をオンにすると、サブディビジョンサーフェスと操作する辺が一致して編集しやすい
2つの頂点から新しく辺を作るときは、FではなくJを使う
Oでプロポーショナル編集切り替えができる
この3DCGの読み込み早くていい感じ
辺ループなどを選択して、S -> Z0で平らにできる
Alt + スクロールで、好きな軸の平行投影ができる
Decimateモディファイアで形を維持しつつ、ポリゴン数を削減できる
カーブモディファイアでオブジェクトがカーブに沿わない場合、メッシュを回転させたり、メッシュとカーブの原点をそろえたりする
Radial Inventoryを設定する際には適切な箇所にボーンを移動した上で、オブジェクトのみ選択する
アップロード時の注意点
- liltoon, Dynamic Boneなどはアバターimport前にimportする
- Quest用にDynamic Boneを削除する場合は保存しないように注意する
アーマチュアのobject data propertiesの「Viewport Display」の「In Front」からボーンを最前面に表示できる
編集モードで移動すると原点は動かない。
オブジェクトモードで移動すると原点も動く
ctrl + Aで選んでいるモディファイアを適用できる
法線を修正するには「メッシュ > ノーマル > 面の向きを外側に揃える」か「メッシュ > ノーマル > 面を反転」を実行する。
シャープとクリースの違い
シャープはスムースシェードに、クリースは頂点の位置関係に影響する
シャープを適用しても表示が変わらない場合、オブジェクトデータプロパティのNormal -> Auto Smoothにチェックを入れる
ctrl + Tabでオブジェクトモードやウェイトペインティングモードなどに切り替えられる
Shift + Zでソリッドモードとレンダリングモードを切り替えられる
アバターのポーズリセット
ポーズモードにしてAでアーマチュアを選択し、ポーズコンテキストメニューから一番下のClear User transformation.でリセットできる
UXを四角形に自動変形してくれるアドオン。GitHubからzipダウンロードすれば無料っぽい?
自動スムースで角ばる時は、Object Data PropertiesからNormalを選択し、自動スムースの角度を大きくする
メッシュを左右反転させたい場合
・編集モードで反転させたい頂点や辺、面を選択
・Mesh → Mirro → Intaractive Mirrorを選択したあとにXやYを押す
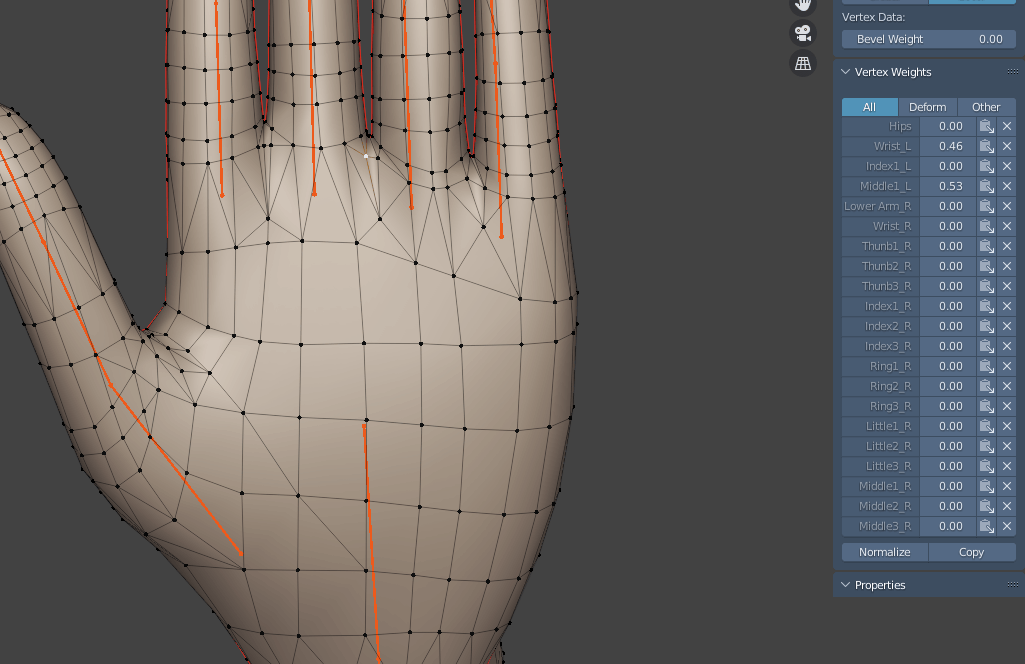
ボーンを軽く動かした状態でウェイトを塗ると、追従していない箇所を見ながら塗れて便利
ダブルクリックでリンク選択できるようにする
Ctrl + マウス押し込みドラッグで画面の拡大縮小ができる。
ホイールでの拡大縮小と違い、拡大後の画面移動距離の減衰がない
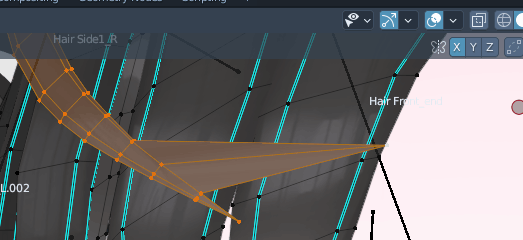
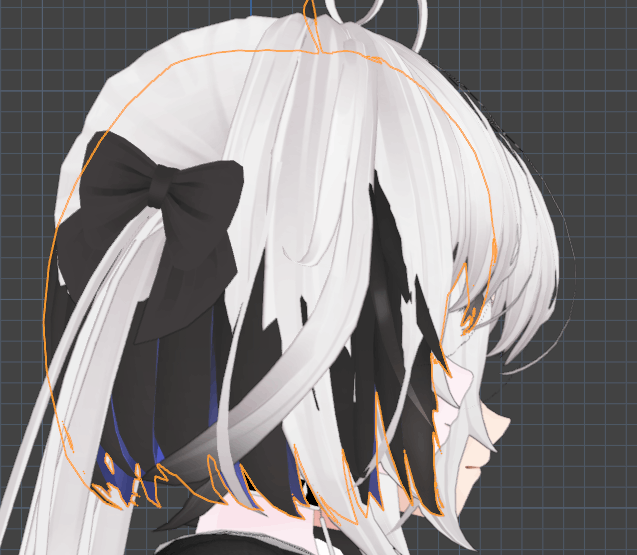
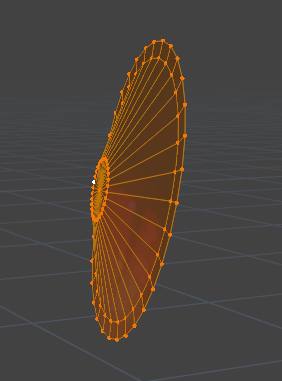
パスから髪の毛を作る。
パスの頂点からalt + Sで毛先を細くしたり、オブジェクトデータプロパティのshape->Resolution Previewからポリ数の細分化調整ができる
板ポリを並べて前髪を作るときなどは、直線パスを利用してResolution Previewを1にするといい.
全体選択ctrl + Tで沿うポリゴンの角度だけを変えられる。
頂点選択ctrl + Tで一部だけ角度を変えられるので、毛先だけ角度変えたりする時に使えそう
最初に髪の毛に沿う方のパスをキレイにしてから、もう一方のパスをアタッチするのがよさそう。
色々な方向からパスを見て綺麗に見えるか確認する。ベジェ曲線パスの場合、ハンドル線を一直線になるようにするときれいに見える
パスを編集モードにして、Vキーでパスの角度を変えられる。四角形のパスなど
ノーマルマップのベイク
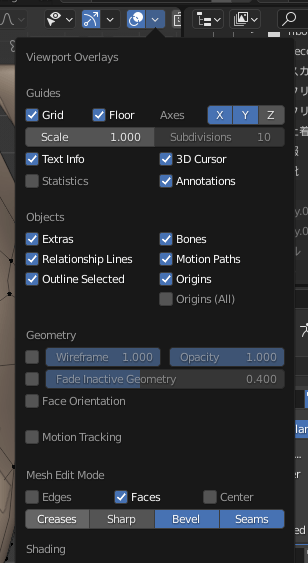
ビューポートオーバーレイからクリースやシャープの線を非表示にできる
複数オブジェクトに同じマテリアルを設定する
cloth作るのによさげ!
UV -> Export UVでUVだけの画像が出力できる。透明度は下げるのがよさそう
CustomShapeと呼ばれるBlenderのデフォルト機能がある。
ボーンの見た目を変えることでアニメーションを付ける際に視認性を高める役割がある。
Yonaoshi氏あたりが詳しく動画で説明してくれているらしい。
Zbrushでの便利なリトポロジー機能があるらしい
show overlaysを切り替えると、3dカーソルやグリッドを非表示にできる

こんな感じにシンプルかわいいのを練習で作りたい
ウェイト転送ができなかったり、ウェイト濡れない場合、アーマチュアとメッシュがペアリングされていない可能性がある。アーマチュアを親(ペアレント)にしてペアリングする
カーブで髪を作るとUVが綺麗になるとか
オブジェクトプロパティ-> Viewport Displayから表示方法をワイヤーに変更すると、ワイヤーフレームだけ表示される。

服にBlendShapes設定して好きな部分をフィットさせる仕組み

Blenderのclothはモディファイアの適用順しだいでは適用時に崩れてしまうので注意。
Blenderのノードを使ってノーマルマップを適用する
ノーマルマップ作成サイト
著作権フリーの素材サイト。色々ためしてみたい
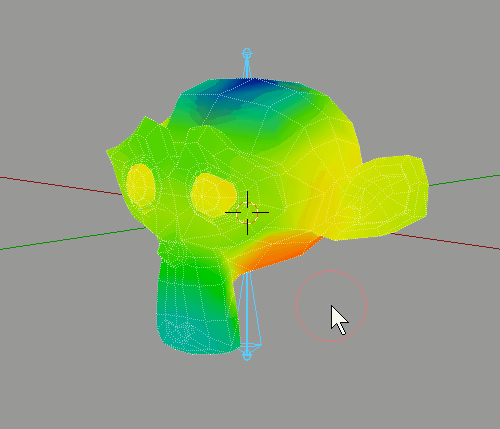
TexToolsの「Checker Map」ボタンを押すとこういうのが出る
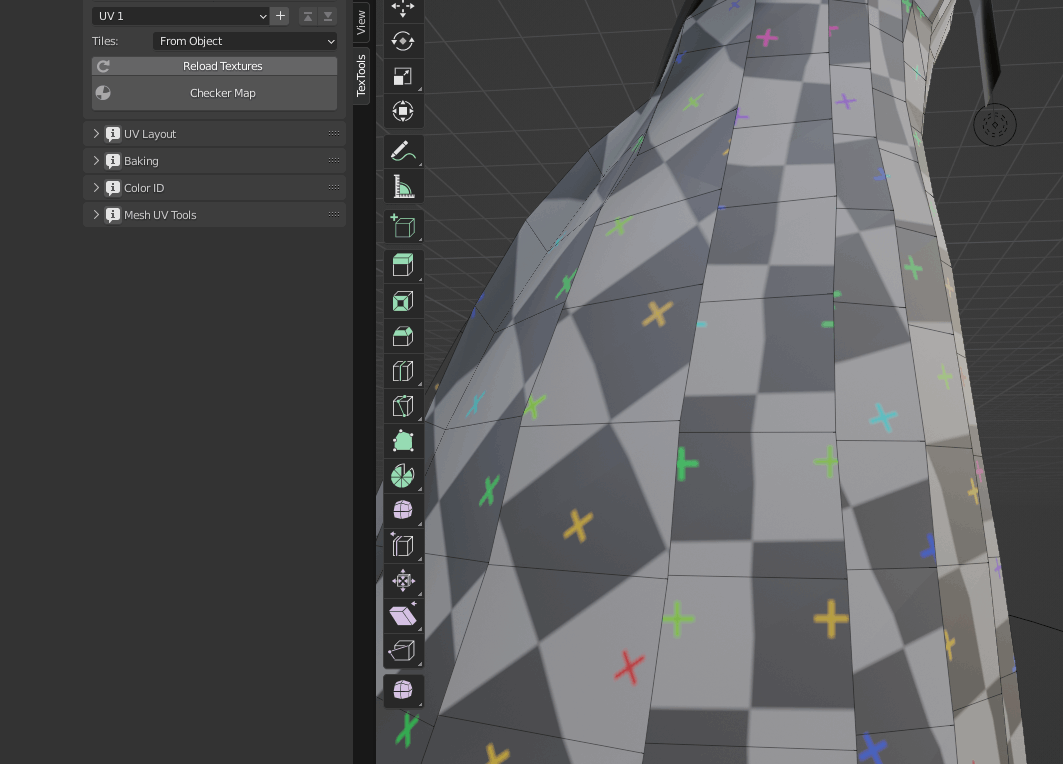
UV展開の時に、左上の矢印アイコンをオンにするとUVマップ上で選択したものがメッシュ側でも選択される

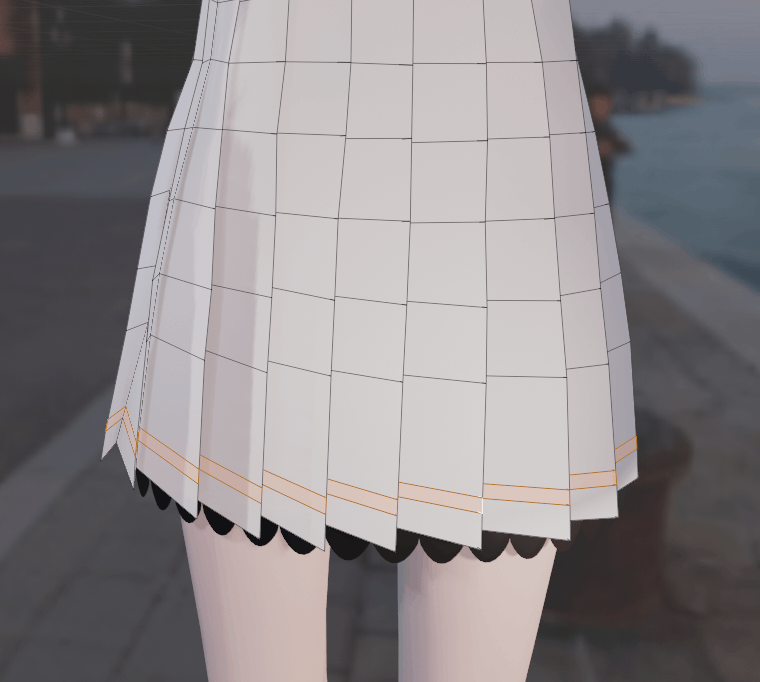
服のラインをテクスチャで書くときに、その形状にトポロジを合わせたら塗りやすそう
Blenderで重複している面やNゴンを見つける方法
五角形以上のポリゴン使うと消えちゃうことがあるらしいので避ける
Marvelous Designerのリトポ機能
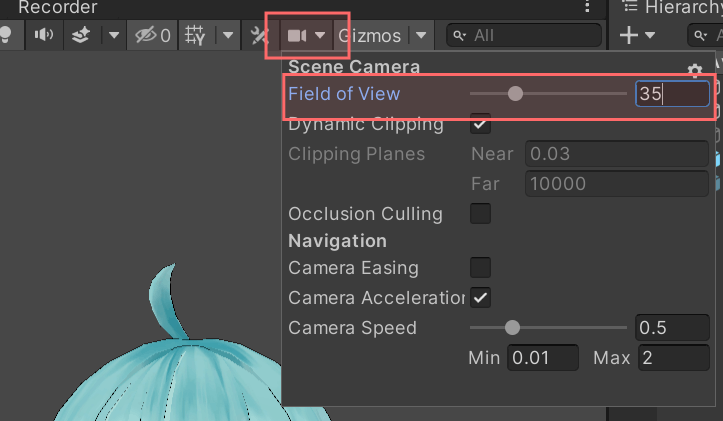
UnityのシーンのPerspカメラはデフォルトだとパースがきついので Field of View を変更するのがおすすめです。VRCで鏡を見てるときと同じような見た目にするには35~45ぐらいに設定がよさそう。
辺の切り分け
Alt + M から「Faces by Edges」
カーブで髪の毛つくるときは毛先にループ多めにするのが良さそう。
間違ってBasisでなくシェイプキーの方を編集してしまった場合、頂点-> Propagate to Shapesでシェイプキーの方をBasisにできる
UV展開したオブジェクトを結合する際、結合順によってどちらのオブジェクトのUVマップが優先されるかが決まるので注意。
マーベラスデザイナーなどですでにUVが整っている場合に、そうでないオブジェクトと結合する際にはUVをみながら結合するのがいい。
UV投影モディファイアをつかえばイラストをUVにできる
多面系の三角ポリゴン変換
Vketとかのイベントの制限が厳しかったら使えそう
これはめちゃくちゃ便利。
ctrl alt 左ドラッグで中心からウェイトのグラデーションをかけられる
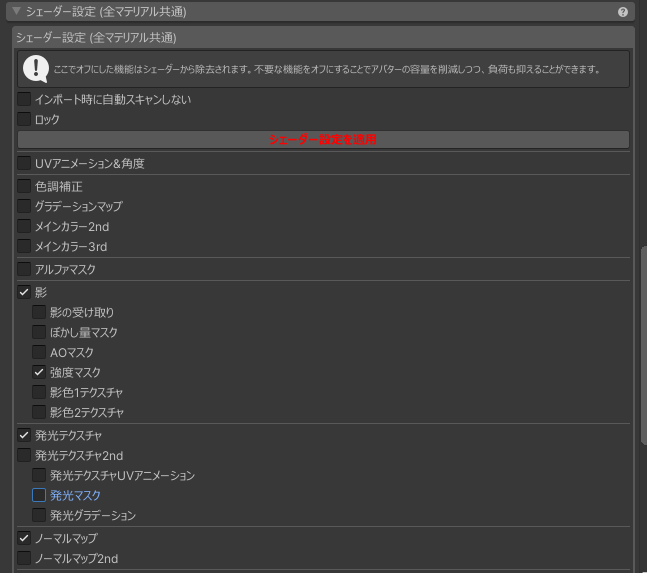
liltoonでは不要な機能を外すことで軽量化できる
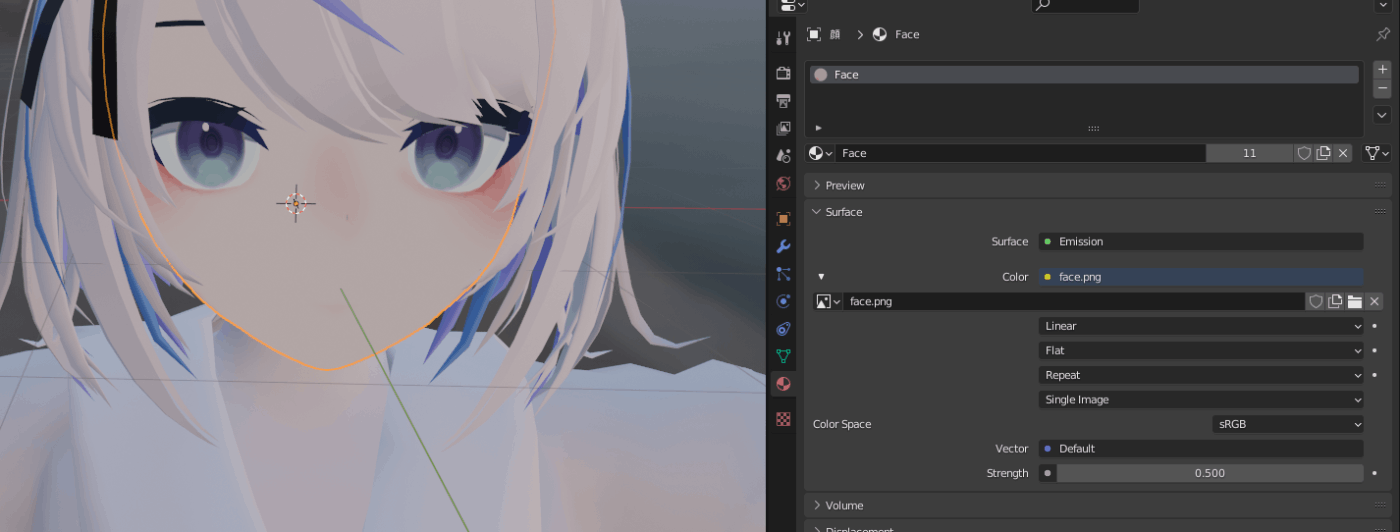
マテリアルのSurface -> Color Space -> Strengthでテクスチャの明るさ調整ができる。
クリスタのUVレイヤーはオーバーレイで重ねればいい感じに薄く見える
AOベイク

結果が真っ黒になるときは、ノーマルをリセットするといいかも
複数オブジェクトに対して一気にモディファイアを設定する方法。おそらく設定も一緒にコピーできる。
設定したいオブジェクトを選択し、最後にモディファイアを設定してあるオブジェクトを選択-> モディファイアから「Copy to selected」
Blender面の向き
シェーダーのフォールバックシステム。照れ顔の実装の時に参考になりそう。
シェーダーフォールバックの確認するパターン一覧
・Quest単騎/fallback shader
・Quest単騎/Toon lit
・PCVR/fallback shader
・PCVR/liltoon
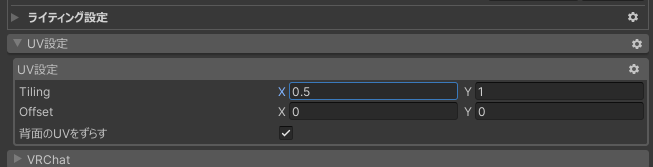
liltoonで裏表別々のテクスチャにするには、「背面のUVをずらす」をオンにして、TilingのXを0.5にして、テクスチャ画像を横方向に2枚分並べるとできるらしい。
ヘアツール
髪の毛
目のシェイプキーなどは合成できるので、基本片方ずつ作る。
両目一緒に作ってしまった場合は、片目選択して頂点メニューから「Blend from shape」を選び、左下にある追加のチェックを外せばいい。その後シェイプキーを複製してミラーする。
unityの揺れものパラメータ
Eeveeで画像透過するには
「マテリアルプロパティ」→「設定」から
ブレンドモード:「アルファブレンド」(「アルファクリップ」「アルファハッシュ」でもOK)
影のモード:「アルファクリップ」または「アルファハッシュ」
前髪だけ透過とかにつかえそう
Unityに持っていく前に、オブジェクトのlocationや角度を、ctrl+Aで現在のサイズに適用しておく。
トランスフォームの位置をX,Y,Z,それぞれ0を入力。
シェイプキーのある状態でrotationの値などを触るとシェイプキーが壊れてしまうので注意。
値をx90, y0, z0にした他のメッシュオブジェクトと結合するとシェイプキーを壊さずに上書きできる。(その後不要なものを消す)
他に方法あるかも。
ウェイトペイントツール
ボーンの位置確認はワイヤーフレームの方が見やすい

ボーンは片側だけ作って名前をつけて、シンメトライズ(対象化)すると名前も勝手に左右反転させてコピーしてくれる
メッシュに変換した後、手作業でボーンを入れて、HairToolから選択したボーンにJiggleを入れることでボーンの物理演算ができる。
歯の奥をグラデーションで口のいろにするのよさそう
ハンドサイン
サブスタ
布マテリアル
Alt押しながらホイール押し込みで移動、左ドラッグで方向切り替え、Fで正面に
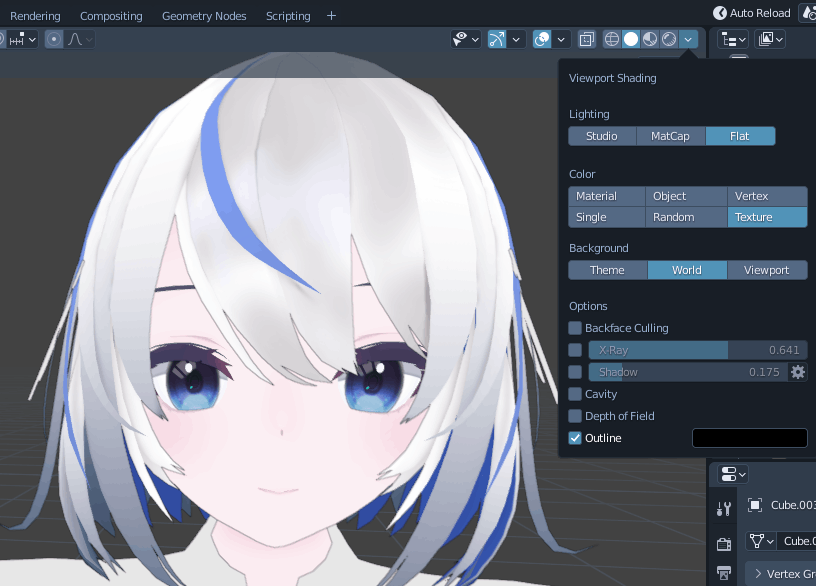
テクスチャそのままの色でBlenderに表示したい場合、エミッションでは彩度が低くなってしまうので、
3Dビューのシェーディング > ソリッド
照明 > フラット
カラー > テクスチャ
アウトラインのチェックを外す
眼鏡にMATCAP設定するのいい感じ化も
関節曲げた時にぷにってなるアドオン。5ドルくらい。
https://xeofrios.gumroad.com/l/squish?recommended_by=search&_ga=2.38188966.465221894.1651897275-719180872.1633477015&_gl=1hc1wzn_gaNzE5MTgwODcyLjE2MzM0NzcwMTU._ga_6LJN6D94N6*MTY1MzI2MTQ5My42MjYuMS4xNjUzMjYxNTI4LjA.
オーバーレイである程度ノーマルマップは合成できそう
liltoonには裏面と表面で別テクスチャを利用できる機能があるので、顔の裏面は(中身は)全部肌色にしちゃってもいいかも?
メッシュの見え方がおかしいとき
mesh -> normal -> reset vectors
ショートカット使う方が早いっていう偏見があったけど、複数頂点をマージするときは右クリックの方が早いときが多い気がする
シェイプキー作成後にbasisを変更するときは、変更後に頂点メニューからPropagate to Shapesをする
あとから再度ペアレントできるので、靴とか服は置いておいて先に体だけウェイトつけるの良さそう。転写すれば楽
liltoonにはテクスチャに影をベイクする機能があるので、Quest化対応でliltoonが使えなくなるときなどに焼くとよさそう
手を握った形はVRCではコントローラーを握った形になるので、グーよりななめグーがいい?
ウェイトペイントの際に、左上をオンにするとマスクができる。
・Lキーでリンク選択
・Bキーで矩形選択
できる

ウェイトペイントモード中に動かすボーンを選択する際は、shift押しながらで複数選択、ctrl押しながらで単一選択できる。何も押さないとウェイトを塗ってしまう
モディファイアを適用していないと、Unityでシェイプキーが認識されない
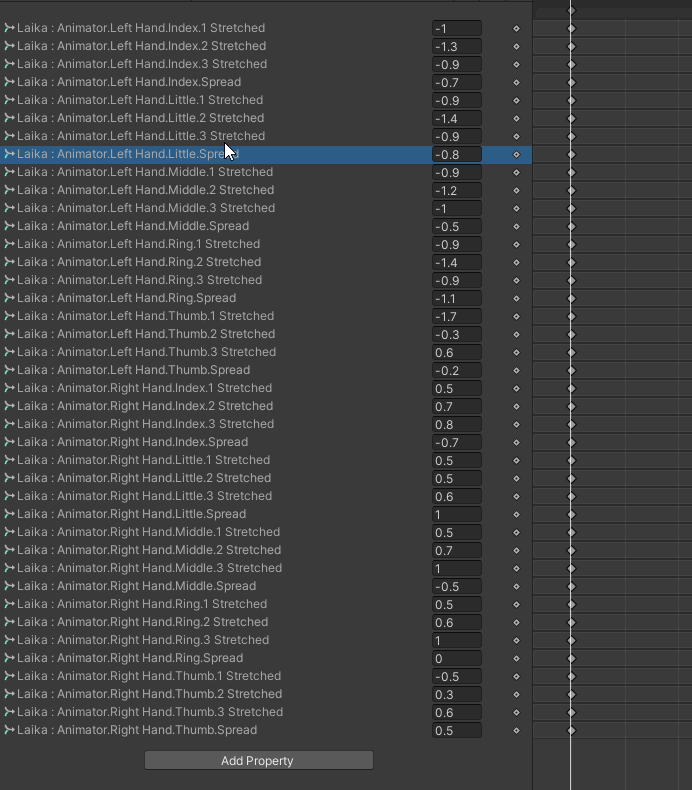
アニメーションの作成
ハンドサインの設定
ハンドサインに設定するアニメーションを、シェイプキーからではなくボーンの移動で作ったら、PhysBoneの入っている耳やしっぽをもっと自然に揺らせそう
substance はShift押しながらで直線描画ができる
自作モーションの作り方。
Blenderで塗ったテクスチャの色を確認するときは、Cavityをオフにすると白い線が表示されなくなるのでいい

ミスってUV展開して、並べたあとのUVマップを上書きしてしまった場合
・バックアップから同じオブジェクトをコピー
・UVマップがバラバラになった方、バックアップのメッシュの順に選択し、ctrl LでUVをバックアップから上書きできる
ここのアウトラインにチェックを入れると、アウトラインが表示される
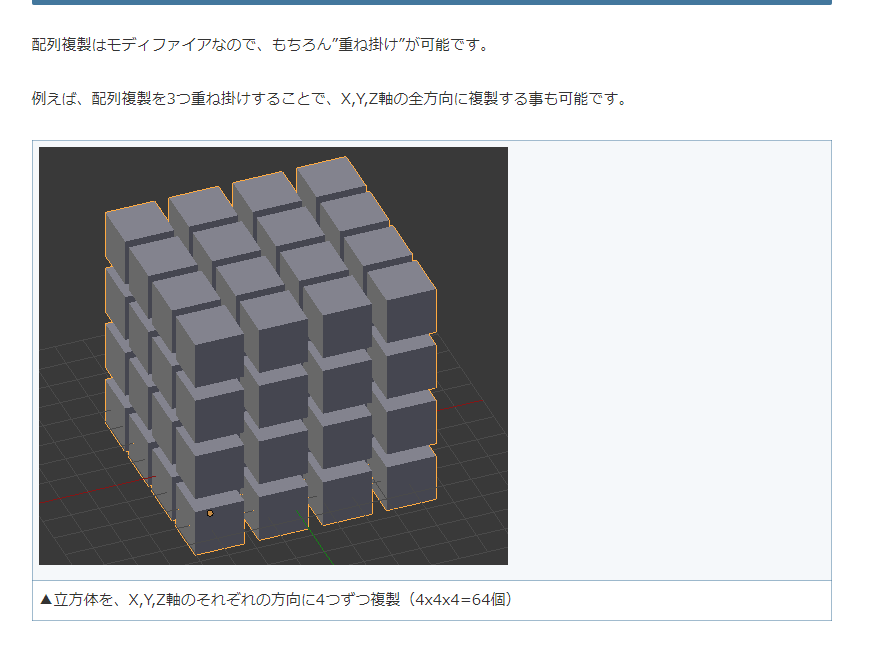
Arrayモディファイアは重ねがけも可能!
舞夜みたいに髪に動くハイライトを入れるのは、ハイライト部分のマスクを作ってマットキャップを設定し、加算すればok
ウェイトを塗る際に0.5くらいで塗っても1の強さで塗ってしまう場合、「ウェイトの自動正規化」がオンになってしまっているケースがある。
ボーンに登録されてるウェイトが1か所だけなので、0.01の強さであっても勝手に正規化して1にしてしまう。
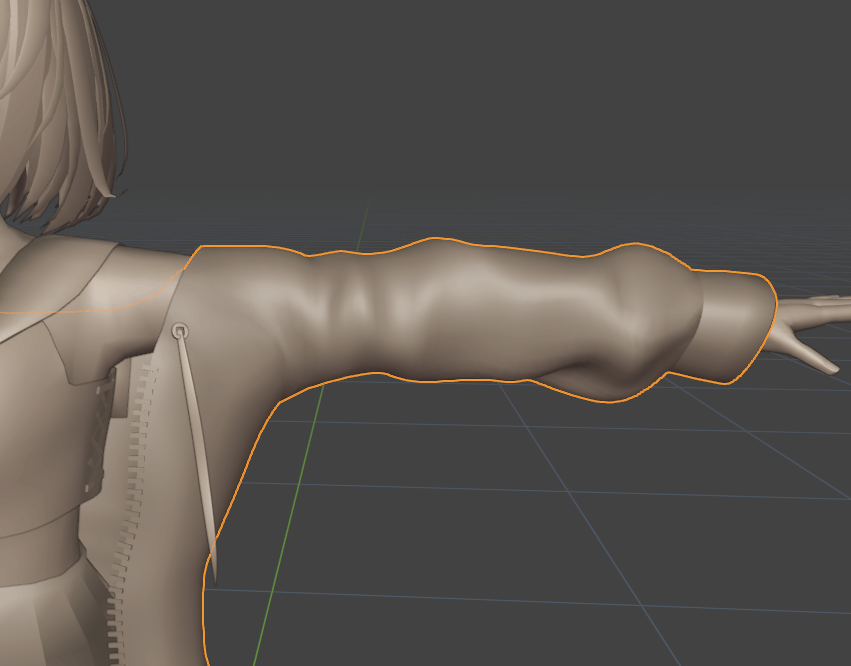
こういう太い袖は体に貫通するので、肩から肘の部分だけでも細めにして、曲げた際に胸部より下だけで貫通するようにする
シェイプキーを削除して、アーマチュアを適用すればfbx出力時にメッシュのデータだけを持っていくことができる。展示の時とかにちょうどよさそう。
ファーシェーダーは法線の向きで毛の向きを決めているっぽいので、先端はマージするか法線編集しないと毛先がキレイにならない
テクスチャのレイヤーはあとから修正しやすいようにアイランドごとにフォルダ分けする。影レイヤーを複数アイランドで共通して描かない方がいい
Shift Gで同一平面選択できる
X-rayモードでは、ポーズモードでボーン選択している状態からメッシュを選択できなくなってしまうので注意。
「編集」-> 「オブジェクトをロック」のチェックが外れているのにメッシュを選択できないケースはだいたいこれ。

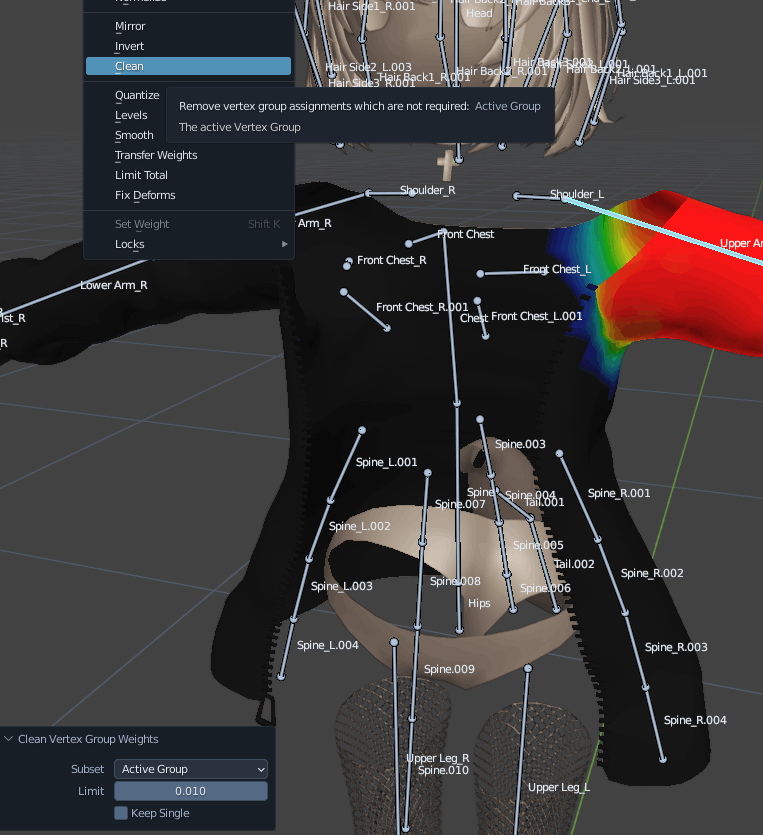
ウェイトのクリーンで、ちょこっとだけ割り当てられたウェイトを削除できる
メッシュを斜め削除するとき、先にナイフで切ったあとに削除すればUVが汚くならない。
適当に削除して、△ポリとかで埋めるとUVきたなくなる
頂点がちょうど中心にあったら、xミラー適用時に動かなくなってしまうときがある
shift ctrl m でミラー選択できる。両方選択も可能
VキーでUVの分割
髪の下に影を入れる方法
髪メッシュをコピーして、下に少しずらす。実際には髪と同じメッシュにするのがよさそう。
透過テクスチャを割り当て、ステンシル設定で肌の上だけで描画するように変更する。
FBXだけ更新するときは、ファイルマネージャーから既存のFBXを削除した後に新しいFBXを入れると設定そのままで読み込んでくれる。Unityの画面から削除してしまうと、メタファイルも消えて同名ファイルを置いても読み込んでくれないので注意。
snap to symphonyで左右対称にするときは、Xミラーを外しておかないとちゃんと動作しない。
一部だけ表示
選択部分を表示切替したいときは、Hと、Alt H
fbxのインポートでAnimatorコンポーネントが消えた時
fbxのrigをHumanoidにしていない可能性が高い。HumanoidにしていないのでAvatar設定がなくAnimatorコンポーネントが消える?
ハンドサインでループアニメーションを使用する方法
・アニメーションを作成。Loop Timeにチェック

・録画ボタンを使い、1フレーム分だけアニメーションを設定。1フレームだとUnity再生してみても見た目は変わらないように見える。再生するときは、アニメーションのウィンドウを開いた後、ヒエラルキーから対象のアバターを選択する。
・ハンドサインのコントローラーでMotion Timeをオフにする。
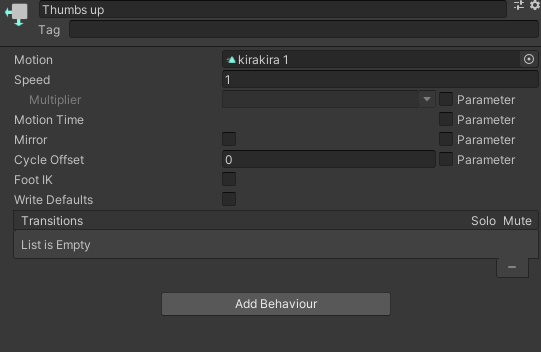
Motion Timeは簡単に言えば「アニメーションの再生位置を変数によって制御する」機能なので、ループさせたいアニメーションなどに使うものではない。
ボーンの動かし方。しっぽとか耳動かすのに使えそう。
Animatorに動かす項目を追加するときは、Shift押しながらだと連続して追加できる
Animationファイルは作成時のブレイドシェイプしか読み込まないっぽい?
シェイプキーが増えた時は、新しく追加設定するか、新しくファイルを作成する必要がありそう。
右手だけ表情が変わり、左手が変わらない場合、fxのdefaultにデフォルトのキーがないアニメーションが設定されていないかも。noneではだめ。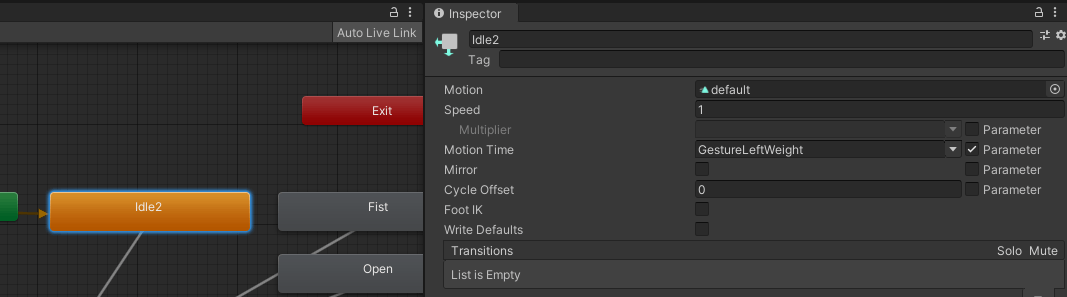
fbxを更新したりして、デフォルト顔アニメーションにシェイプキーが足りない場合、ない部分は戻らないので細心にする。
これとハンドサインのループアニメーションでしっぽふりふりできそう。
empty objectを作成し、そこにPhysBoneを設定したいボーンを2ついれる。
その後、親のオブジェクトにPhysBoneを設定すればQuest用にPhysBoneの削減ができる。
耳とか、左右対称のものだと特に有効かも? 髪とか同じ設定なら1つで全部設定できそう。

UnityとBlenderではメッシュの厚みの扱いが違うかもしれない。
Blenderでもテクスチャが問題なく描画されても、Unityでは裏にめり込むことがある。
おそらくUVマップのズレではなく、メッシュがめりこんで非表示になっていそう。
FBX更新時にUnity側で更新したオブジェクトが表示されない場合は、Skinned mesh rendererの「Mesh」の参照が切れている可能性があるので、ドラッグする。
Quest対応のしやすさも考えてPC版も作る。
両面描画はできない
しっぽとか、ループアニメーションがカクカクなとき
Humanoidアバターの場合、表情や物の出し入れ、Humanoid外ボーンのTransformの動きなどはFXレイヤーに入れないと動かない。
AFKアニメーションだからといってActionレイヤーに入れていませんか?
FXレイヤーにboolパラメータ[AFK]を作り、新規レイヤーを作り、物の出し入れの要領でAFK時にそれらがオンになるように設定するとよい。
ダイナミックボーンの入った尻尾や耳を動かすアニメーションが動かない
ダイナミックボーンの制御下にあるボーンをアニメーションで動かすことはできないので、ダイナミックボーンの制御下にない根本ボーンなどを作るなどしてそれを回す。
FXレイヤー
・Humanoidボーンを動かすことはできない。Gestureレイヤーなどを使う
・Humanoid以外のボーンは動きそう。
表情のAnimation Clip内に一緒に入れているはずの手の形が反映されない
FXレイヤーでHumanoidボーンを動かすことはできないのでGestureを使う。
FXに入れたHumanoidボーンの回転・移動のアニメーションが見えない
FXレイヤーでHumanoidボーンを動かすことはできないのでGesture等他レイヤーを用途に合わせて使う。
FX以外に入れた、Humanoidボーン以外のボーンやオブジェクトの回転・移動のアニメーションが見えない
Humanoidアバターの場合、FXレイヤー以外でHumanoid外ボーン等オブジェクトの回転移動ができないバグがあるので、FXを使う。
下着とかを作る時、素体選択から複製&分割するよりも、素体全体を複製した後にナイフで下着の形を切り、そのあとに不要部分を消すのが良さそう
アニメーションをpreviewする際は、ヒエラルキー上にあるモデルにアニメーションファイルをドラッグする必要がある。ボーンとかシェイプキーなどのプロパティをついかするときも同じ。
その際にコントローラーがモデルにアタッチされるので、必ず外すかコントローラーを削除する。
メッシュの名前変わったりすると、FBX差し替えの際に一部消えたりするけど、スキンドメッシュレンダラーの参照が外れてるだけなので、更新したら行ける。
瞳だけテクスチャを切り出せば、liltoonの色調補正機能で、Unity上で色変更できる。
メッシュの位置は後からでも修正しやすい。
・シェイプキー
・UVマップ テクスチャ
あたりは変更に弱く、修正コストが大きいかも。
デフォルトの顔変えるときは、まず変更なしのシェイプキーを作って、そっちを修正していくのがいいかも。戻せるし
テクスチャ塗りやすくしたり、輪郭線バグらせないために口の周りは1エッジがいい
Unity上でだけ画像が粗くなる現象
Compression(圧縮)設定がオンになってたのでオフにしたら戻る。
容量アップするかは要チェック

「」
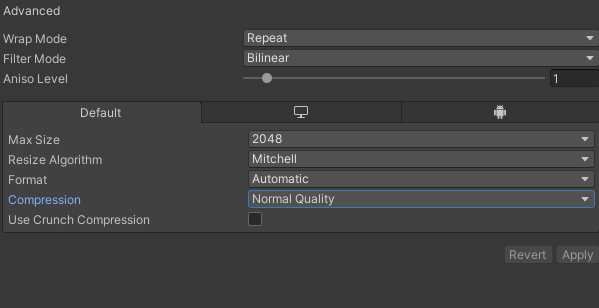
アップロードせずにアバター容量チェックする方法
Norml Quality Crunch comp 50 5.85MB
High Quality Crunch comp 50 7.57MB
High Quality Crunch comp 0 7.18MB
無圧縮 7.69MB
でした。
・High QualityならCrunch comp0 でも無圧縮と目視では差が分からない
・グラデーションは圧縮の際に目立ちやすい(とくに頬など)
結論としては、基本はデフォルト設定のNormal Qualityでよさそう。
顔に限ってはHigh Quality(Crunch comp 0)にするのもありで、High Quality Crunch comp 100 と無圧縮は基本使わないでよさそう
爪シェイプキーが指貫通してしまう場合、シェイプキーで変更する前の状態で若干貫通しているのを直せばいいかも
タイツのウェイト転送は、近接辺補完よりも近接面補完の方が相性が良さそう
PhysBoneのrootオブジェクトはからにしておけば、コンポーネントが設定されているオブジェクトになる。
NormalMapが変換されて紫にならないときは、ビルドターゲットがAndroidになってる。
表情シェイプキーで、普通はまぶたの位置だけかえるけど、瞳の形も同時に変えたらイラストよりの表現ができるかも
https://twitter.com/usagi3/status/1562086307144552448?s=20&t=6RcSvgb3XK7QIc3tsDk5Kg
shift alt sで球体にする
lilの輪郭線マスク、黒白で1,0分けるので、輪郭線太めに設定して全体をグレー、太くしたいところは白、補足したいところは9割くらい黒とかにすればだいぶ自由に輪郭線の強弱つけられそう
very animation
髪を板ポリにする場合、ある程度厚みのある方が貫通しづらい
[ボーン]の名称が同じ[FBX]を別途読み込んでオブジェクトを元の[アバター]に入れた場合、オブジェクトは元のアバターのボーンに追従するか?
追従しない
胸とか髪の根元に空のルートボーンを入れておいて、共通化できるPBは共通化する。
空のempty objectと違って、FBX更新時に毎回作らなくてよくなる。
contactで服の着脱できるようにしたい。
腕のブレスレットを指押しとかで
試着ワールド作るならこんな感じの開けたワールドがいいかも
lilのUVスクロールとか、アニメーションで光彩を動かせたりする?
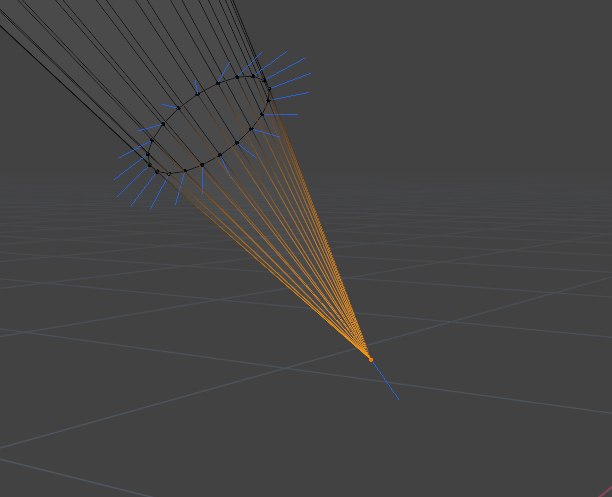
肘コンストレイント
Quest対応本
テクスチャ確認の際にモデルを変形しておけば1画面に写って時短できそう!
AOの影はそのままつかわないでぼかしかけた方が見栄えいい
まばたき
・VRCの瞬き機能を使わずに、デフォルトフェイスや目を開けた顔にまばたきのアニメーションを入れる。
その方がタイミング制御しやすそうなのと、顔ごとにまばたきを手作業で入れるので破綻・影響しないし壊れない。EXメニューでの表情固定にも対応できる。
・まばたき2回とかもこれで制御できる。
・まばたきアニメーション、まぶただけじゃなくて、ハイライトや瞳孔なども一緒に制御できる
・落下時のモーションなどはロコモーションのコントローラーに入ってる
・Very Animationで手のハンドサインも作れる
関節のメッシュ割は多くないとカクカクになる
VirtualDesktop使うならAFKモーションはデフォルトが便利
lilでの半透明
マスクを用意して、描画モード「半透明」「アルファマスク」に黒白の画像を設定する。
黒は透明に、白はテクスチャの色になる
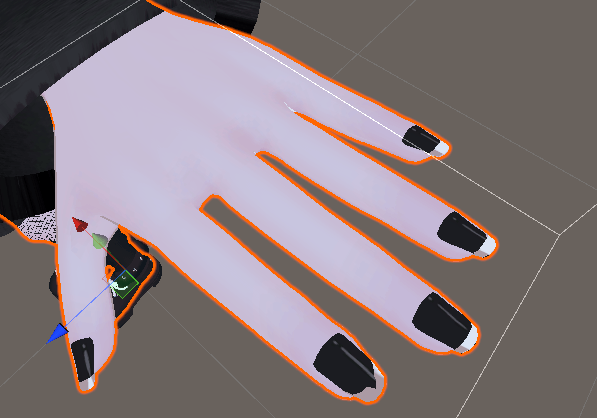
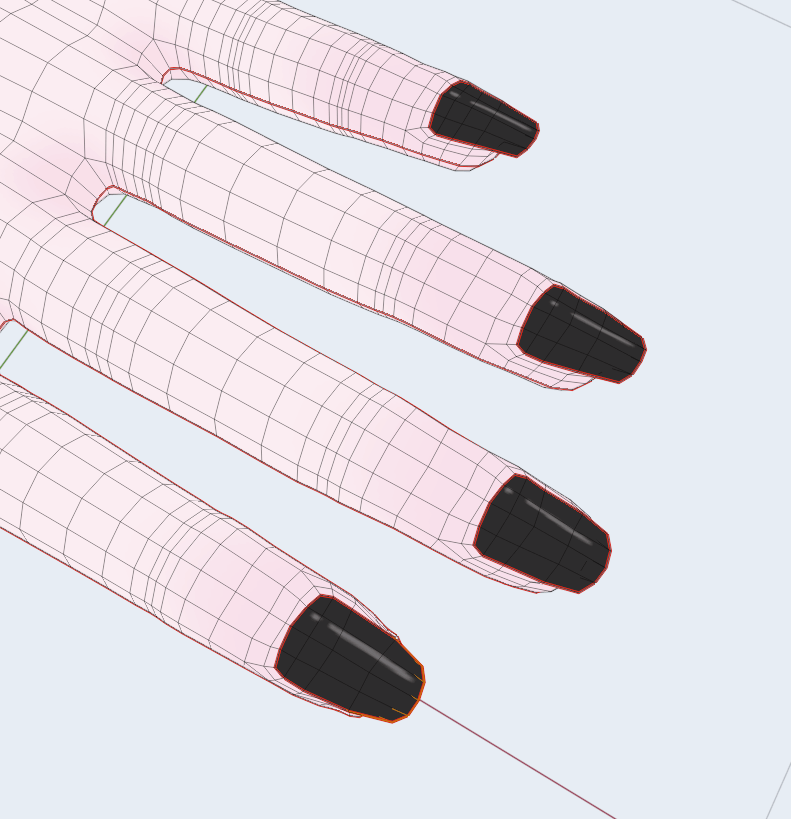
手を作る時、開くのは楽なので、最初から指の間を閉じた形で作るといいかも。ぐーも作りやすそう

こんな感じで瞳の中のメッシュ要素を立体的にするとかわいい目になるかも
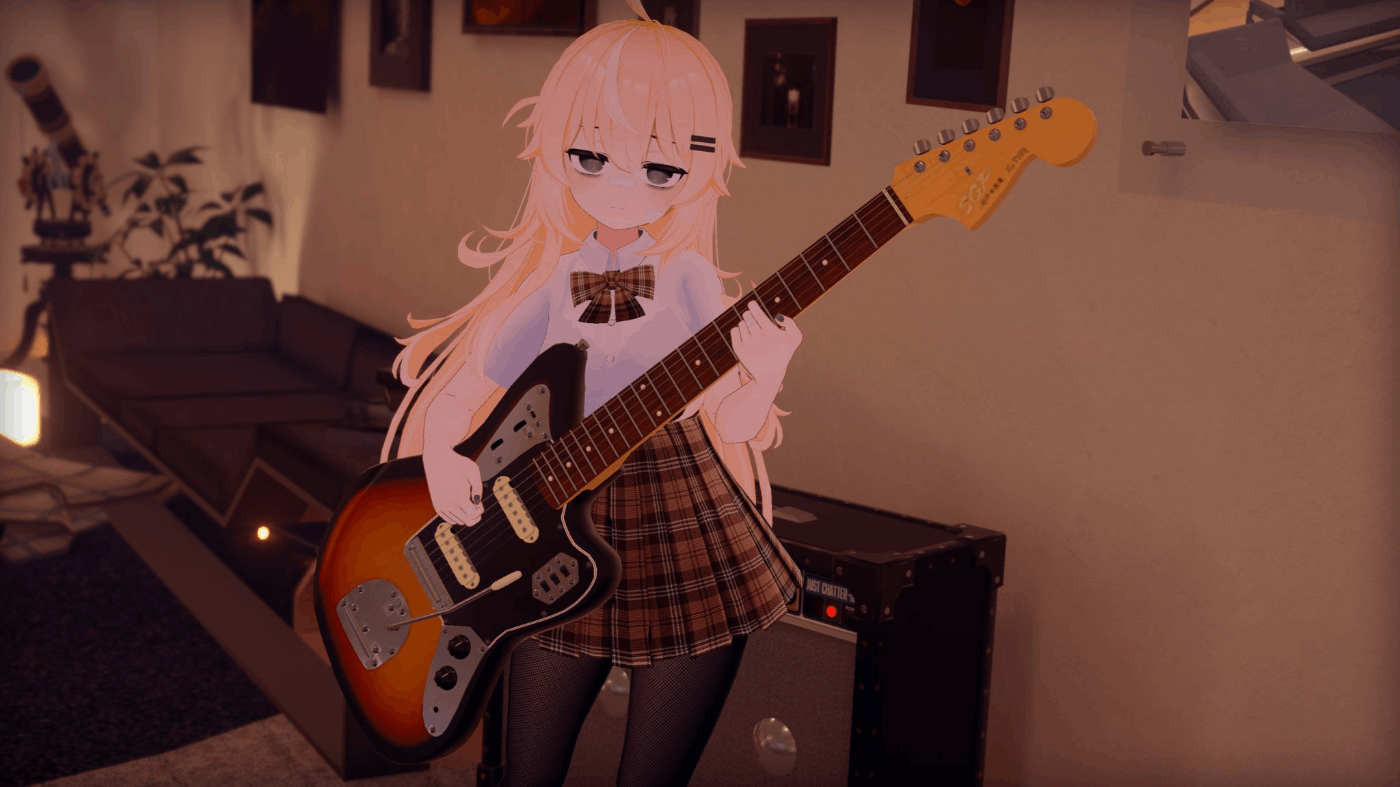
舞夜を研究してみて
・前髪に密度がある。毛束の本数が多い。
・瞳が奥にある
・目の下まつげメッシュ
・頭頂部・素体などUVを細かく割らずにUVの割り当てもそこまで広くないが、テクスチャを細かく書き込んでいる箇所がある
・足のシルエットがキレイで、カーブが多く情報量が多い
・髪に立体的な盛り上がりがある。髪や服も立体感を感じる。自分の服は2D的というか立体感に欠ける
・白と黒の配色のバランスが完璧
・指のテクスチャがキレイ
・メッシュを色々結合してる。素体とブラとか
・下着などのテクスチャのクオリティが高い
・手のポリゴンが少ない
・お腹のラインがしっかり出ている
・お尻と太ももの間のラインがしっかり出ている
・腰が細い
・テクスチャの色が濃いので、Questでもはっきり見える。
・まつげが大きく伸びている
・あごのテクスチャがしっかり分かれていないので、下から見た時にあごが丸く見えてかわいい
・まつげの裏側にもメッシュがある

・髪と顔の周辺の縁取りのような塗り
・髪と服を着せ変えたらかわいいので、顔だけじゃなくてデザインがいい
・素体のUVは横だけ切ってなるべく切らないようにしている
綺麗にテクスチャを塗りつぶしたいときはメッシュ分けるといいかも。
それか、メッシュのUVを切り分ける。
まぶた、鼻の先など
髪というか頭部のサイズがかなり違う
舞夜の目の立体感
白目が奥に深いので、色々な角度で見た時にテクスチャの奥行きを感じる
目の瞳孔も分けてる
瞳は富士山状
オブジェクトモード1 2 3 を押すとコレクションごとに表示・非表示を切り替えられる
色を抜くのには除算、全体的な色の統一感を出すのにはオーバーレイよりもソフトライトがいいときもあるかも
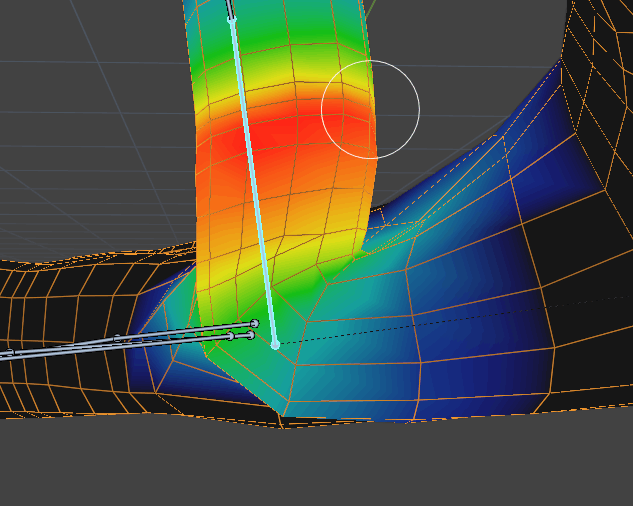
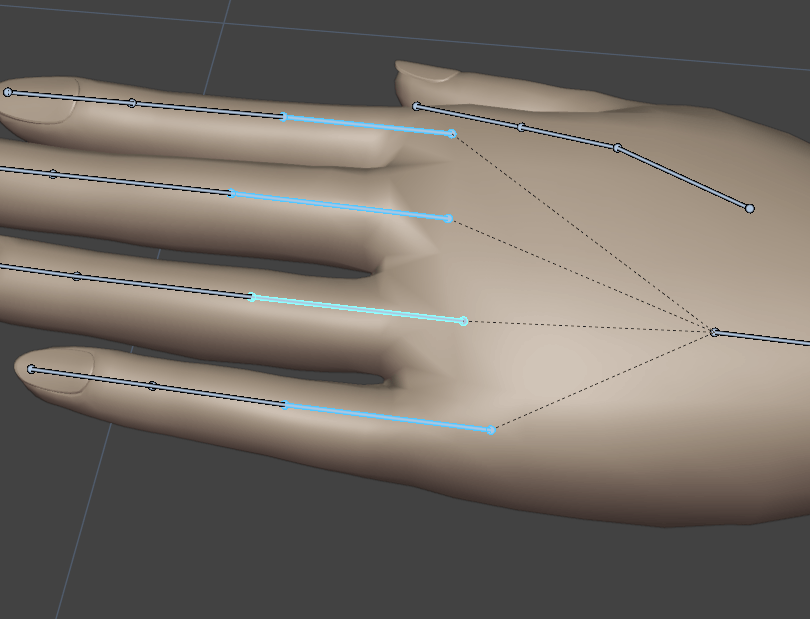
指の関節の位置
指先になるにつれ側面から見た高さは一緒になるが、根元の関節は高低差がある
指を曲げるときは手のひら側から見ると、まっすぐではなく左斜めにまがるのが分かる
指の付け根から曲がると思いがちだが、指の付け根より深いところに関節はあるので、手のひらの先くらいまで指と一緒に曲がる
腕と指をまっすぐに伸ばすと、中指の側面ラインと腕の側面ラインが1直線になる
グーなど指の間を埋めるときは、ボーンrotationだけでなく、位置も中央に寄せる必要がありそう
VRCで使える関節は位置を動かせなかったり(回転はできる)数が3つに制限されたりするので、握りこぶしの時にスペースができやすい。
元メッシュを閉じてボーンで開くようにしたり、ボーンの根元を奥の方にすることで隙間ができづらくなる

仮モデル
この曲がるところちょっと狭くすると、指曲げた時にとんがらなくていい感じ!
目はこういう形にして、前面は丸く、半透過テクスチャにすれば立体感のある目が作れそう

・環境光は青に振る
・影色の彩度は高め、光が当たっている部分はすこし白飛びさせる
こういう影の端に暗い色を入れたい
ボーンを複数選択して動かすと、明るい水色で選択されている部分を中心にして、それ以外のボーンの根元は動いてしまうので1つ1つ動かした方がいい?

眉毛は近ければくっついてなくても大丈夫
liltoonなどのシェーダーとか、コンポーネントのパラメータは、アニメーション録画ボタンを押した後に編集すればアニメーションにできそう。
下のassetからではなく、ヒエラルキーから選択して編集すること
liltoon GIFもいけるっぽい
服が見えなくなる問題
上手く曲げるために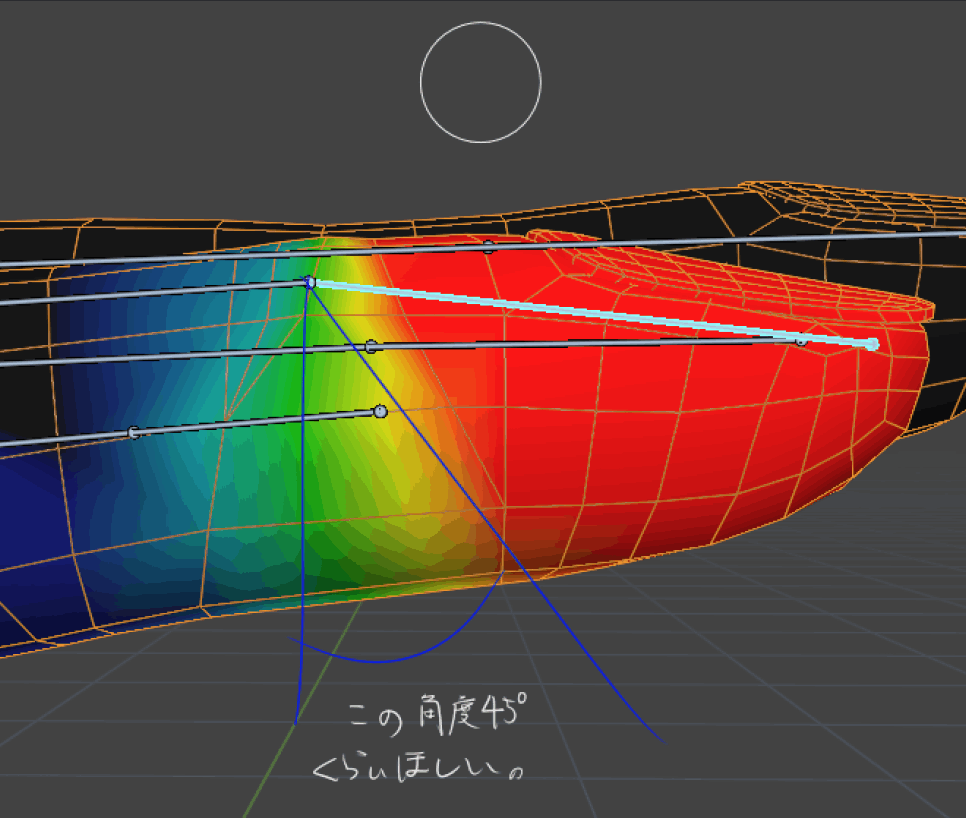
手をグーにする際、指の先の関節は90度と思いがちだが、実際は60度くらいで、真ん中の関節は100度くいらい曲がっている。
(小指だけは例外)
一枚目の段階ではトポロジが汚く見えるが、完全に曲げるとぴったりくっついて形が整う
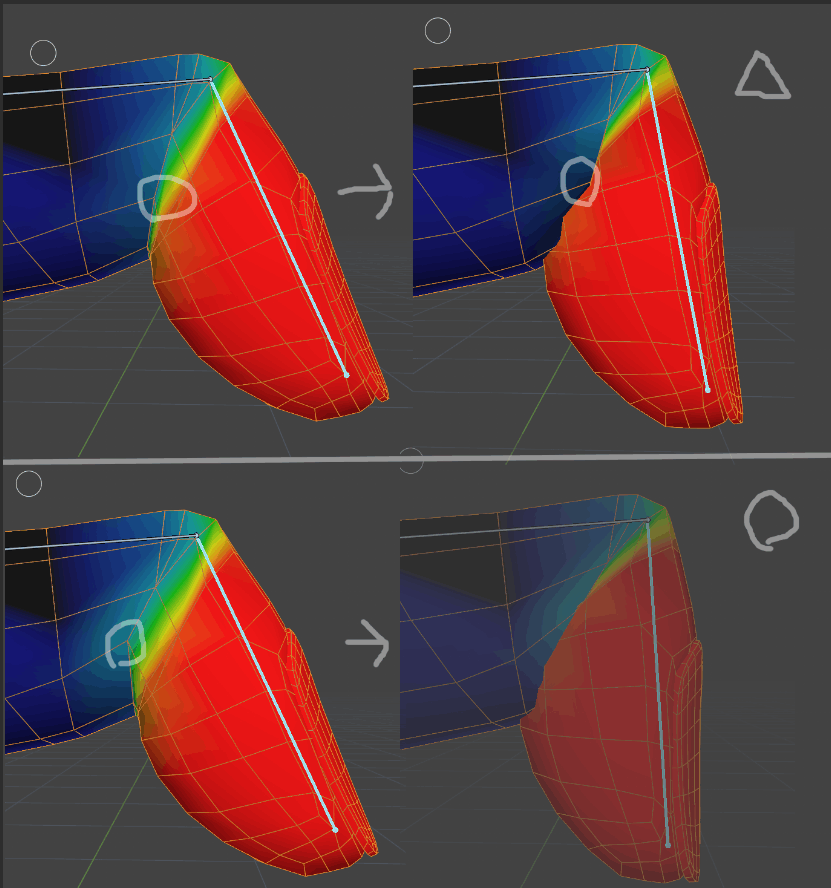
ポリ割にもよるけど、指関節の側面は角ばりやすいので少しへこます

へこませないとこうなる

指 メモ
- 曲げた際に四角ポリが予想しない方向に割れる際は3角ポリに割る。主に関節部や縮む部分など
- 握ったときに付け根の辺りが角ばる。上からだけではなく、横から見ても角ばるように
- 指の関節と長さの割合をしっかり観察する
- 握った時に隙間ができないように
- デフォルトの状態は指の間を空けないようにして、アニメーションで開くのがよさそう
髪にハイライトを入れていないのでマットな質感になってる
・親指の先端よくみるとめっちゃ細い
・指のしわがあるところに関節があると思いがちだが、付け根に関してはしわの位置に関節がない
ポーズモードでメッシュオブジェクトが選択できないとき、右上の透過モードがオンになっているかも
「0ウェイト」と、「頂点ウェイトが乗っていない」は別物。ウェイトcleanの機能で0ウェイトを頂点ウェイトが乗っていない状態にできる。
All Groupsを選択すると、すべてのボーン(すべての頂点グループ)を対象にできる

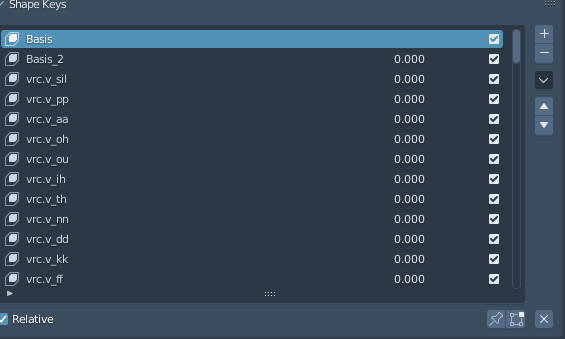
Basis消すと、一番上にあるやつが次のBasisになるっぽい?
照れ顔 板ポリじゃなくてもっと丸い形がいいかも。
右下の×ボタンでシェイプキーリセットできる
ドールの追視について
目のハイライトが入る位置は目のドームの位置と考えて、球体上にハイライト配置するとよさそう。
目の光、透過マットキャップでできないかな
liltoonの反射モード、眼鏡とかに使えそう
bounding boxとかPB設定は複数オブジェクトを選択してから編集すると早い
Unity
- コンポーネントの数値のコピーより、複数選択で編集する方が早いケースもある。
- 複数選択した際に数値が異なる部分はハイフンになるので、ミスしているかのチェックができる
unitypackageの中
フォルダ分けしない方が楽説あるかも。マテリアル10、テクスチャ10くらいなら1フォルダに入れてもいいかも。
特にマテリアルとテクスチャが別フォルダにあると設定や改変が面倒。
問題
BlenderからUnityに持っていくときに手のボーン位置がズレる
原因
Tポーズに矯正される際にボーン位置が変更されてしまう
対処法
ボーンマッピングの修正
Blenderでボーン位置をTポーズに近づける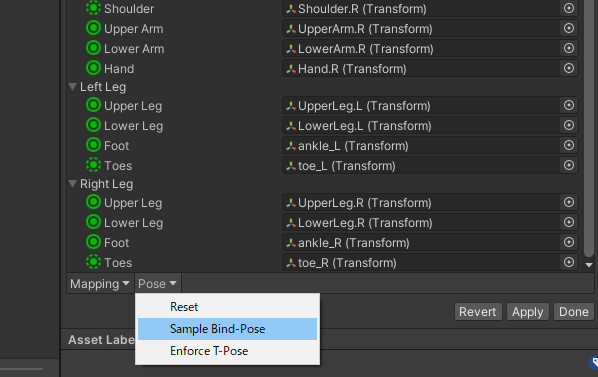
humanoidのマッピング
Unityのマッピングモード、右下のapply -> Doneを押せば終了する
コンストレイントをchestに設定することで、座った時のロング髪の毛がよこにばらけなくなりそう。
PBのあるボーンにはコンストレイント設定しても意味ないかも。上書きされる

階層のあるアニメーションを作成した後、アニメーションを設定したオブジェクト名を変更すると、アニメーションの項目にmissingと表示され、アニメーションが正常に動作しなくなります。
首のすげ替えなどでメッシュ名など変えるとこうなる。
faceトラッキングのためには顔メッシュのUnity上の名前を「body」にしないといけないっぽい?
u -> project from viewで、画面に写っている平面の通りにUV展開してくれる。色々応用効きそう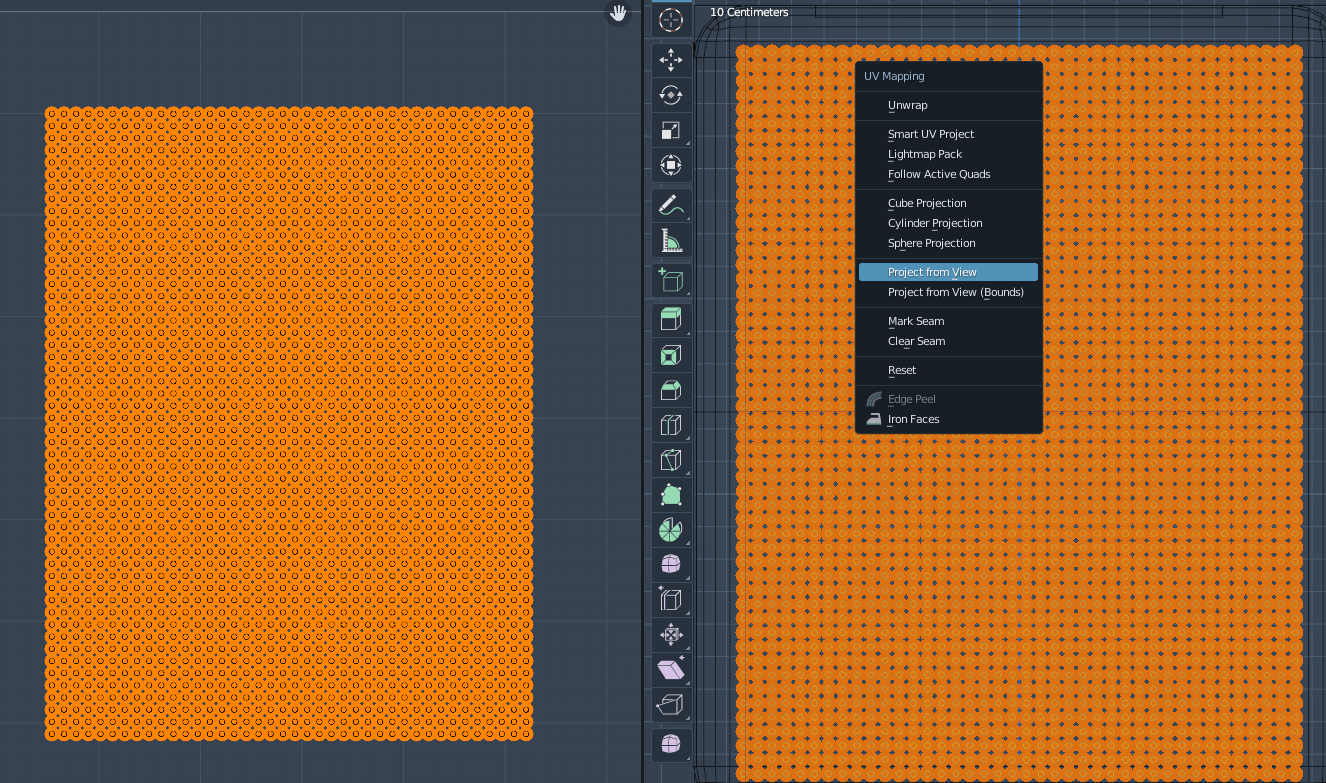
animationは一括コピペできる
render queue 2501以上だとカメラピント合わなくなる
アバターアップロードの画面、うまく表示されない時は、上からアスペクト比を固定すればレイアウトが崩れない
Unity skyboxを変えるやつ
Unityに入れる数値は、実数値だけでなくinfinityや数式も使える
ハイタッチ
ついてくるやつ。商用利用もokっぽい
EXメニューのアイコンとかに
ギミックのワールド固定
シェイプキーがある状態でモディファイアを適用
liltoonの透けマスクをグラデーションすれば、こんな感じに透けたシャツもできそう
liltoonのAOマップ設定
Matcapマスクに入れてTilingで模様をつけるなど
Matcapのマスクに適当なノイズテクスチャ入れてTilingするとNormalMap無しで布地の質感が
毛先の輪郭線はマスクをかける
exメニューの作成に
フィギュア用のモデル
リップシンク、口を動かす際にデフォルトの口に戻せる設定が一番よさそう。
めんゆんがそういう設定になっている
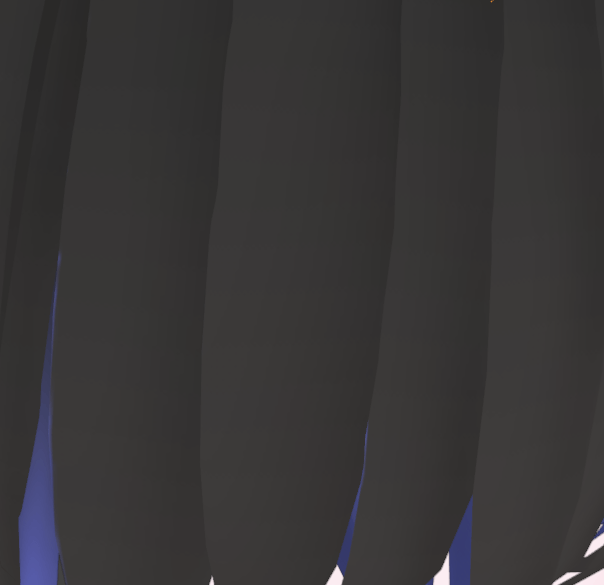
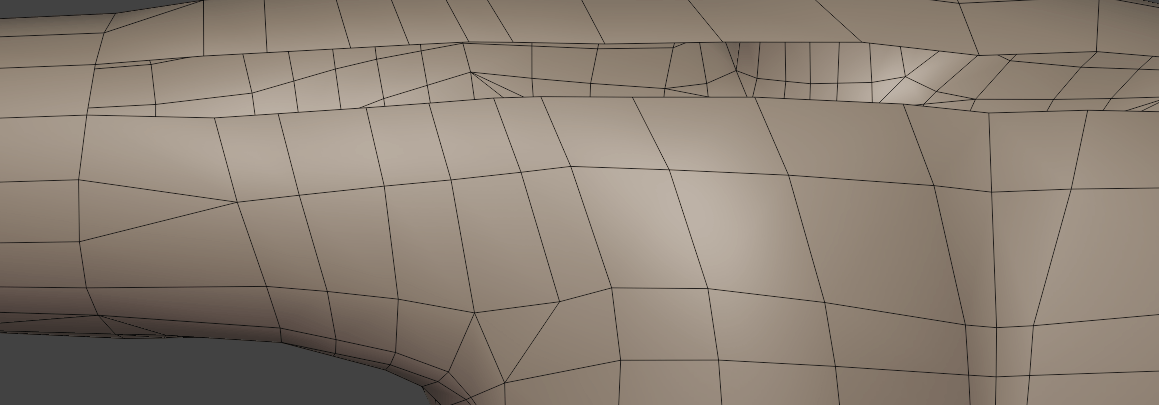
体など曲線を表現するときは、なるべく等間隔になるようトポロジを設定した方がいい。
球体とか作る時、ポリ数が多いのも大事だけど等間隔にポリ割されてるのも大事
Blenderのウィンドウのヘッダー部分クリックで分割ウィンドウ削除できる close area
分割部の間を右クリックで、ウィンドウを分割してUVマップや3Dビューを見れる
HDRP Sample
クオリティの高い3DCG
こういう三角割からもとのループカットに戻すときは、辺選択からVキーで辺を切り裂くと楽そう
ウェイトペイントモードで、Alt+Rで回転リセットできる。
クロスシミュレーションとTポーズは相性悪めかも。上の服はAポーズの方がいい
このアドオン良さげ
lineartモディファイアでラインを引ける。
カメラの見てるほうにしかライン作成されないので、カメラを作る必要あり
膝が尖がる原因
>の字になってるから。コの字にしたい