Kotlin + Spring Boot 3 + Springdoc-openapi で OpenAPI ドキュメントを作成する
概要
本記事では、Spring Boot のアノテーションから OpenAPI のドキュメントを生成するライブラリ Springdoc-openapi を Kotlin で実践します。
プロジェクトへ導入
本項ではプロジェクトへの導入方法を以下の手順で説明します。
- Spring Initializr でプロジェクトを作成
- build.gradle.kts の設定
Spring Initializr でプロジェクトを作成
まずは、Spring Initializr で Spring Boot プロジェクトを作成します。
本記事では以下の内容で作成しました。
| 項目 | 内容 | 補足 |
|---|---|---|
| Project | Gradle Kotlin | |
| Language | Kotlin | |
| Spring Boot | 3.2.2 | 時期によって選択できるバージョンが変わります。3 系のスナップショットでない方を選んでください。 |
| Artifact | springdoc-openapi-genapi-doc | |
| Name | springdoc-openapi-genapi-doc | Artifact を入力したら自動で更新されます |
| Description | Demo project for Spring Boot | デフォルトのままです |
| Java | 17 | |
| Dependencies | Spring Web |
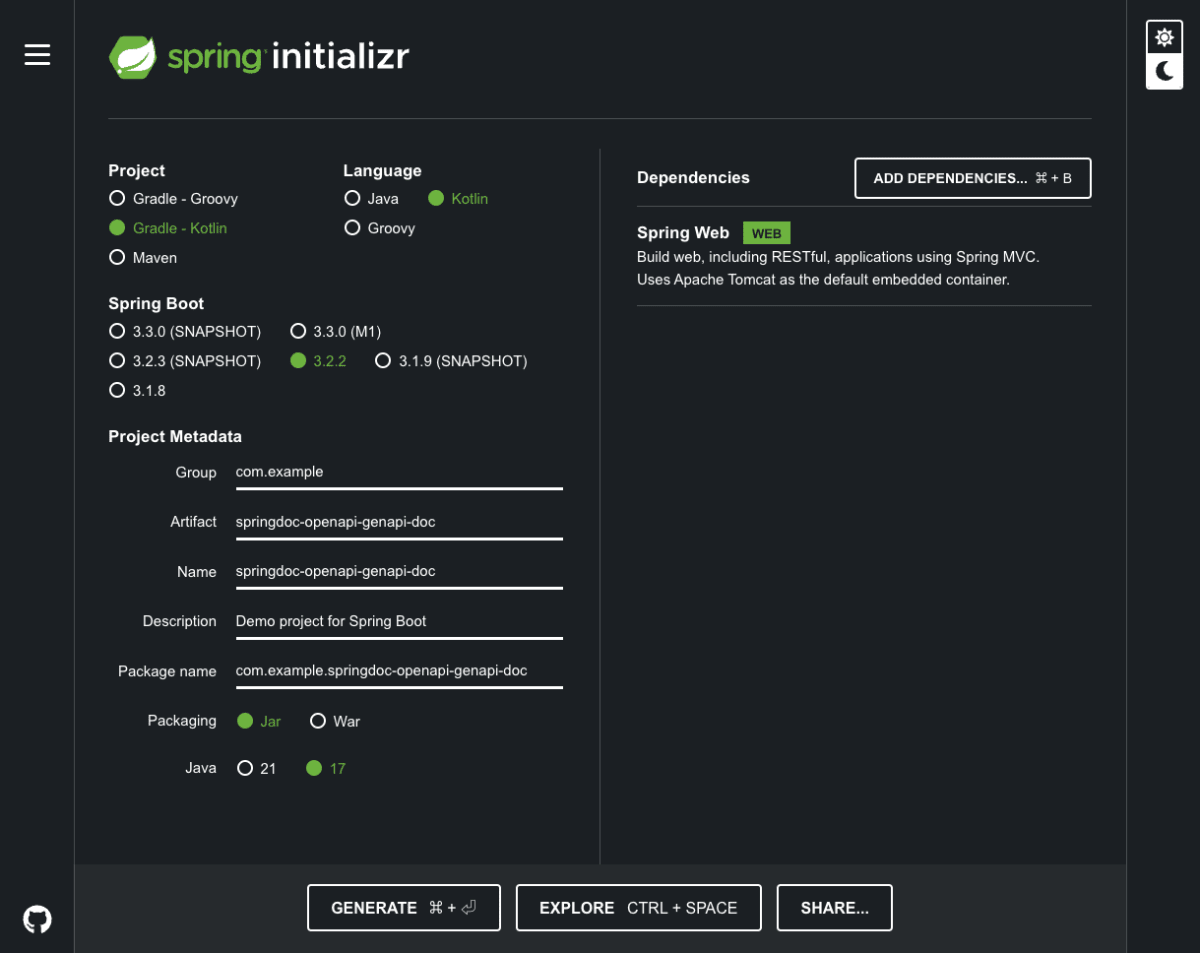
Spring Initilizar 入力後
以下に入力済みの Spring Initializr のリンクを記載します。
作成したアプリケーションを適当なディレクトリに写して unzip してください。
build.gradle.kts の設定
プロジェクトを開いて、インデックスの作成を終えたら、build.gradle.kts を編集します。
具体的には、build.gradle.kts に SpringDoc の plugin と dependencies を記述します。
下記の例では、validation を有効化するため、Spring Boot Starter Validation も記載しています。
plugins {
 	// 略
	/**
	 * springdoc
	 *
	 * URL
	 * - https://springdoc.org/
	 * Main 用途
	 * - OpenAPI 仕様に基づいたドキュメントを生成する
	 * Sub 用途
	 * - なし
	 * 概要
	 * コードから OpenAPI 仕様に基づいたドキュメントの生成ライブラリ
	 */
	id("org.springdoc.openapi-gradle-plugin") version "1.8.0"
}

dependencies {
 	// 略
	/**
	 * Spring Boot Starter Validation
	 *
	 * MavenCentral
	 * - https://mvnrepository.com/artifact/org.springframework.boot/spring-boot-starter-validation
	 * Main用途
	 * - コントローラーのバリデーションのために利用する
	 * Sub用途
	 * - 無し
	 * 概要
	 * - Validation を実装した際に、本ライブラリがなければ、バリデーションが動作しない
	 */
	implementation("org.springframework.boot:spring-boot-starter-validation")
}
また、dependencies に以下を記入します。この内容は SpringDoc を CLI から生成するために必要です。
dependencies {
 	// 略
	/**
	 * springdoc の gradle 拡張
	 *
	 * 概要
	 * - CLI から springdoc を利用して OpenAPI を 生成する
	 */
	implementation("org.springdoc:springdoc-openapi-starter-webmvc-ui:2.3.0")
}
最後に、openapi.yaml を生成するコマンドを記述します。
上から順番に以下の内容になっています。
- http://localhost:8080/v3/api-docs.yaml の yaml ファイルから
- build/springdoc ディレクトリに
- openapi.yaml という名前で作成する
openApi {
	apiDocsUrl.set("http://localhost:8080/v3/api-docs.yaml")
	outputDir.set(project.layout.buildDirectory.dir("springdoc"))
	outputFileName.set("openapi.yaml")
}
以上の設定から以下のコマンドで build/springdoc/openapi.yaml に生成できます。
しかし、すでにファイルが存在するか、キャッシュが存在していると、上書きされません。
そのため筆者は、rm build/springdoc/openapi.yaml で削除して逐次実行しています。
特筆しなければ毎回削除してから実行していると考えてください。
./gradlew generateOpenApiDocs
また、SpringBoot アプリケーションを起動した状態だと、http://localhost:8080/swagger-ui/index.html に Swagger UI で表示できます。
アノテーションの記述方法
本項では、SpringBoot のサンプルアプリケーションで具体的なアノテーションの記述方法を記載します。
DB とは接続しませんが、「新規記事を作成するエンドポイントを持つ Web API」という設定のコードを作成します。
完成したサンプルコードは以下に記載しています。
アノテーションの記述方法は以下の swagger-api の GitHub に記載されています。
本記事では基本的な部分の説明に注力し、OpenAPIDefinition、Operation、Media アノテーションのみ取り扱います。
OpenAPIDefinition アノテーション
OpenAPIDefinition アノテーションは OpenAPI の定義について記述するアノテーションです。
具体的には以下のようなアノテーションが含まれています。
- @OpenAPIDefinition
- @Info
- @License
下記のように、OpenAPIDefinition によって、API 名、ライセンス、サーバ情報などを取得できます。
以下のように、@SpringBootApplication を付与するクラスに@OpenAPIDefinition アノテーションを記述します。
今回の例では Server アノテーションが記述されていますが、Server アノテーション自体は後述する Operation アノテーションに含まれています。
/**
 * SpringdocOpenapiGenApidocApplication
 */
@SpringBootApplication
@OpenAPIDefinition(
    info = Info(
        title = "API Title",
        version = "0.0",
        description = "My API",
        license = License(name = "Apache 2.0", url = "http://sample"),
        contact = Contact(url = "http://sample.com", name = "sample", email = "sample@sample.com")
    ),
    servers = [
        Server(
            description = "ローカルサーバーの説明です",
            url = "http://localhost:8080",
        ),
        Server(
            description = "事前環境サーバーの説明です",
            url = "http://stg:8080",
        ),
        Server(
            description = "本番環境サーバーの説明です",
            url = "http://prod:8080",
        ),
    ],
)
class SpringdocOpenapiGenApidocApplication
Operation アノテーション・Media アノテーション
続いて、Operation アノテーションと Meida アノテーションについて説明します。
リクエストボディ、レスポンスボディ、コントローラなどに記述し、メソッドごとの API 定義・サンプルや OpenAPI のタグの設定をします。
Operation アノテーションには以下のアノテーションなどが含まれます。
メソッドの定義やリクエストパラメータ、レスポンスの定義などを設定します。
Media アノテーションには以下のアノテーションなどが含まれます。
@Schema アノテーションはフィールドの説明や必須かどうかを説明したり、@ApiResponse アノテーションと組み合わせてレスポンスのスキーマ定義やサンプルを表示します。
それぞれ、リクエストボディ、レスポンスボディ、コントローラの例を記述します。
リクエストボディ
次の例は、新規記事作成リクエストボディの data class です。
@Schema アノテーションが必須かどうかや説明を記述しています。
/**
 * 新規記事作成のリクエストモデル
 *
 * @property article
 */
data class NewArticleRequest(
    @field:Valid
    @field:NotNull
    @Schema(required = true, description = "記事を作成する時のリクエスト")
    @field:JsonProperty("article", required = true) val article: NewArticle? = null
)
/**
 * NewArticle
 *
 * 新規記事のモデル
 *
 * @property title タイトル
 * @property description 説明
 * @property body 本文
 */
data class NewArticle(
    @field:Size(max = 32)
    @field:NotBlank
    @Schema(example = "new-article-title", required = true, description = "新規記事のタイトル")
    @field:JsonProperty("title", required = true) val title: String? = null,

    @field:Size(max = 1024)
    @field:NotBlank
    @Schema(example = "new-article-description", required = true, description = "新規記事の説明")
    @field:JsonProperty("description", required = true) val description: String? = null,

    @field:Size(max = 2048)
    @field:NotBlank
    @Schema(example = "new-article-body", required = true, description = "新規記事の説明")
    @field:JsonProperty("body", required = true) val body: String? = null,
)
レスポンスボディ
以下は、新規記事作成のレスポンスボディです。
レスポンスボディもリクエストボディと基本的には同様でフィールドにスキーマを定義します。
/**
 * 単一記事のレスポンスモデル
 *
 * @property article
 */
data class SingleArticleResponse(
    @field:Valid
    @Schema(required = true, description = "新規記事")
    @field:JsonProperty("article", required = true) val article: Article
)
/**
 * Article
 *
 * 記事のモデル
 *
 * @property slug スラッグ
 * @property title タイトル
 * @property description 説明
 * @property body 本文
 */
data class Article(
    @get:Size(max = 32)
    @Schema(example = "article-slug", required = true, description = "")
    @field:JsonProperty("slug", required = true) val slug: String,

    @get:Size(max = 64)
    @Schema(example = "article-title", required = true, description = "")
    @field:JsonProperty("title", required = true) val title: String,

    @get:Size(max = 1024)
    @Schema(example = "article-description", required = true, description = "")
    @field:JsonProperty("description", required = true) val description: String,

    @get:Size(max = 4096)
    @Schema(example = "article-body", required = true, description = "")
    @field:JsonProperty("body", required = true) val body: String
)
以下はエラーレスポンスを返すときの data class です。
/**
 * GenericErrorModel
 *
 * エラーレスポンスを返す時に利用するモデル
 *
 * @property errors
 */
data class GenericErrorModel(
    @field:Valid
    @Schema(required = true, description = "")
    @field:JsonProperty("errors", required = true) val errors: GenericErrorModelErrors
)
/**
 * GenericErrorModelErrors
 *
 * エラーレスポンスの詳細を記述するモデル
 *
 * @property body エラーの詳細
 */
data class GenericErrorModelErrors(
    @Schema(required = true, description = "")
    @field:JsonProperty("body", required = true) val body: List<String>
)
コントローラ
最後にコントローラについて説明します。
基本的な SpringBoot のアノテーションに加えて、SpringDoc のアノテーションも記述しています。
具体的には Operation アノテーション、Tag アノテーション、Content アノテーション、Schema アノテーションなどを利用しています。
Tag アノテーションで openapi.yaml の生成時にタグによるグルーピングをします。
Operation アノテーションで、メソッドごとの説明を記述したり、レスポンスのスキーマは具体例を記述できます。
/**
 * SpringDoc のサンプルアプリ用 ArticleController
 */
@RestController
@Tag(name = "articles", description = "記事に関するエンドポイント")
@Validated
class ArticleController {
    /**
     * 記事作成エンドポイント
     *
     * @param newArticleRequest
     * @return
     */
    @Operation(
        summary = "記事作成",
        operationId = "createArticle",
        description = "記事を作成します。",
        responses = [
            ApiResponse(
                responseCode = "201",
                description = "OK",
                content = [
                    Content(
                        schema = Schema(implementation = SingleArticleResponse::class),
                        examples = [
                            ExampleObject(
                                name = "OK",
                                value = """
                                {
                                    "article": {
                                        "slug": "new-slug",
                                        "title": "new-title",
                                        "body": "new-body",
                                        "description": "new-description"
                                    }
                                }
                            """
                            )
                        ]
                    )
                ]
            ),
            ApiResponse(
                responseCode = "400",
                description = "Validation Error",
                content = [
                    Content(
                        schema = Schema(implementation = GenericErrorModel::class),
                        examples = [
                            ExampleObject(
                                name = "ValidationError",
                                value = """
                                    {
                                        "errors": {
                                            "body": [
                                                "article.titleは0文字以上32文字以下です",
                                                "article.bodyは必須です"
                                            ]
                                        }
                                    }
                                """
                            )
                        ]
                    )
                ]
            ),
            ApiResponse(
                responseCode = "409",
                description = "Already Exists",
                content = [
                    Content(
                        schema = Schema(implementation = GenericErrorModel::class),
                        examples = [
                            ExampleObject(
                                name = "AlreadyExists",
                                value = """
                                    {
                                        "errors": {
                                            "body": [
                                                "記事はすでに存在しています"
                                            ]
                                        }
                                    }
                                """
                            )
                        ]
                    )
                ]
            )
        ]
    )
    @PostMapping(
        value = ["/articles"],
        produces = [MediaType.APPLICATION_JSON_VALUE],
        consumes = [MediaType.APPLICATION_JSON_VALUE],
    )
    fun createArticle(
        @Parameter(
            description = "新規記事作成",
            required = true
        )
        // Sample プロジェクトのため、Suppress を利用。本番環境では削除する
        @Valid @RequestBody @Suppress("UnusedParameter") newArticleRequest: NewArticleRequest,
    ): ResponseEntity<SingleArticleResponse> {
        return ResponseEntity(
            SingleArticleResponse(
                article = Article(
                    slug = "new-slug",
                    title = "new-title",
                    body = "new-body",
                    description = "new-description"
                )
            ),
            HttpStatus.OK
        )
    }

    /**
     * 記事作成エンドポイントに発生した例外を表現するクラス
     *
     * @property error エラー
     */
    data class CreateArticleErrorException(val error: Error) : Throwable()

    /**
     * 記事作成エンドポイントの例外をハンドリングする関数
     *
     * @param e
     * @return
     */
    @ExceptionHandler(CreateArticleErrorException::class)
    fun onCreateArticleErrorException(e: CreateArticleErrorException): ResponseEntity<GenericErrorModel> {
        // Sample プロジェクトのため、AlreadyExists 以外は BadRequest としてエラーレスポンスを返している
        if (e.error.toString() == "AlreadyExists") {
            return ResponseEntity(
                GenericErrorModel(
                    errors = GenericErrorModelErrors(
                        body = listOf(e.error.toString())
                    )
                ),
                HttpStatus.CONFLICT
            )
        }
        return ResponseEntity(
            GenericErrorModel(
                errors = GenericErrorModelErrors(
                    body = listOf(e.error.toString())
                )
            ),
            HttpStatus.BAD_REQUEST
        )
    }
}
生成結果
以上の内容を踏まえて、openapi.yaml を生成します。
SpringBoot アプリケーションを起動して、http://localhost:8080/swagger-ui/index.html を参照すると、以下の画像のように表示されます。
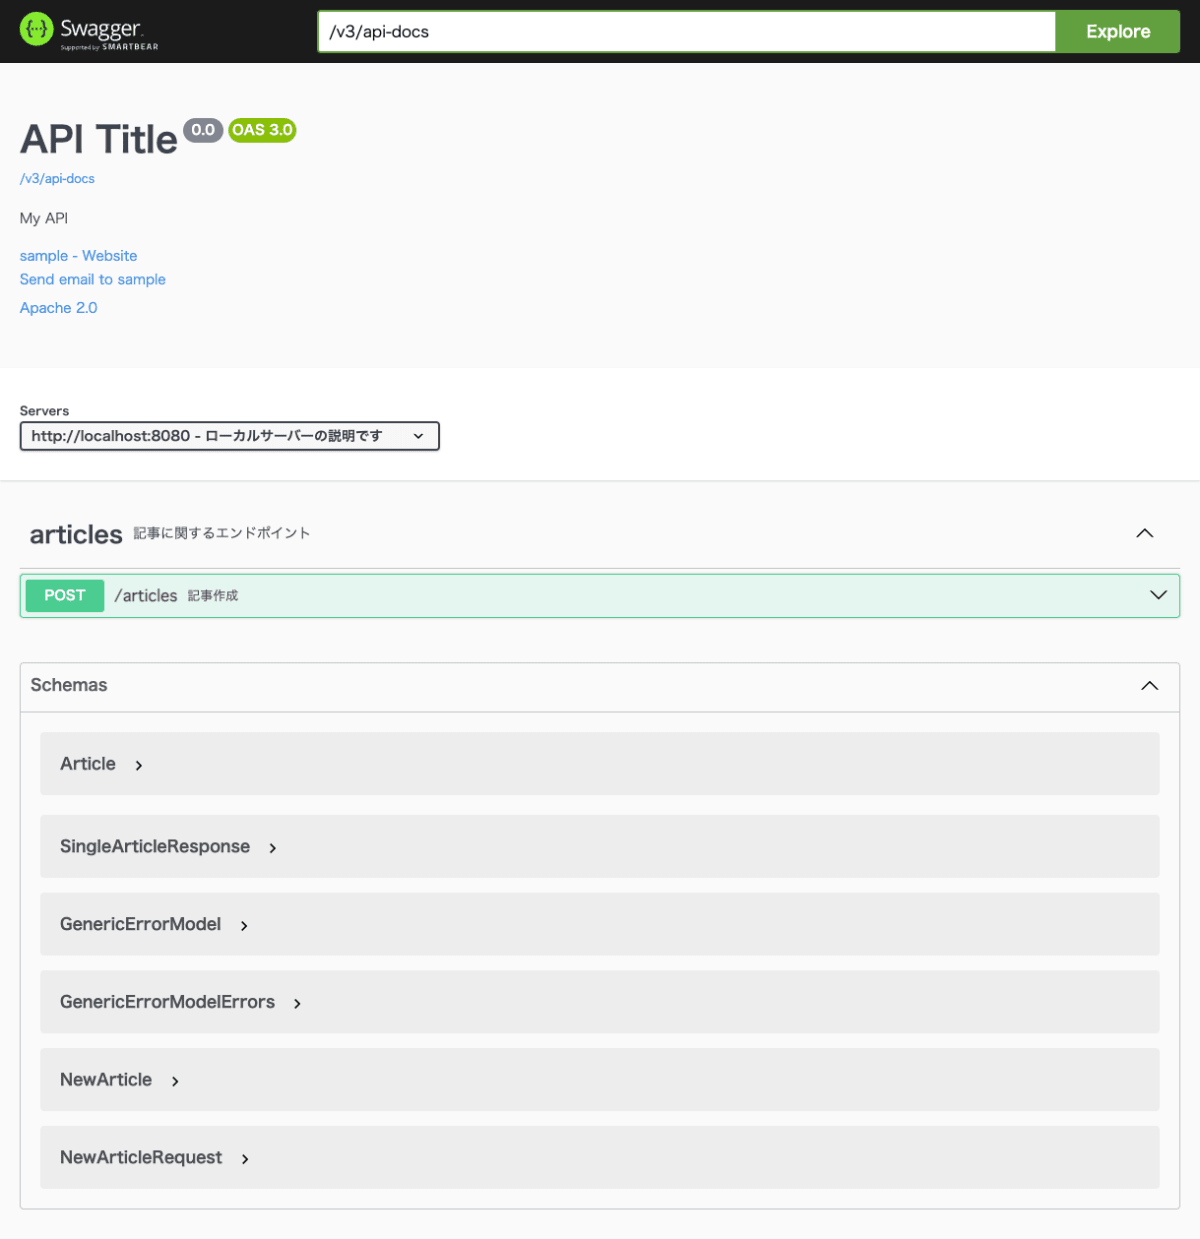
Swagger UI
CLI から yaml ファイルを生成したい場合は以下のコマンドを実行します。
./gradlew generateOpenApiDocs
build/springdoc/openapi.yaml にファイルが生成され、結果は下記の折りたたみの通りです。
生成結果。
openapi: 3.0.1
info:
  title: API Title
  description: My API
  contact:
    name: sample
    url: http://sample.com
    email: sample@sample.com
  license:
    name: Apache 2.0
    url: http://sample
  version: "0.0"
servers:
  - url: http://localhost:8080
    description: ローカルサーバーの説明です
  - url: http://stg:8080
    description: 事前環境サーバーの説明です
  - url: http://prod:8080
    description: 本番環境サーバーの説明です
tags:
  - name: articles
    description: 記事に関するエンドポイント
paths:
  /articles:
    post:
      tags:
        - articles
      summary: 記事作成
      description: 記事を作成します。
      operationId: createArticle
      requestBody:
        content:
          application/json:
            schema:
              $ref: "#/components/schemas/NewArticleRequest"
        required: true
      responses:
        "201":
          description: OK
          content:
            application/json:
              schema:
                $ref: "#/components/schemas/SingleArticleResponse"
              examples:
                OK:
                  description: OK
                  value:
                    article:
                      slug: new-slug
                      title: new-title
                      body: new-body
                      description: new-description
        "400":
          description: Validation Error
          content:
            application/json:
              schema:
                $ref: "#/components/schemas/GenericErrorModel"
              examples:
                ValidationError:
                  description: ValidationError
                  value:
                    errors:
                      body:
                        - article.titleは0文字以上32文字以下です
                        - article.bodyは必須です
        "409":
          description: Already Exists
          content:
            application/json:
              schema:
                $ref: "#/components/schemas/GenericErrorModel"
              examples:
                AlreadyExists:
                  description: AlreadyExists
                  value:
                    errors:
                      body:
                        - 記事はすでに存在しています
components:
  schemas:
    Article:
      required:
        - body
        - description
        - slug
        - title
      type: object
      properties:
        slug:
          maxLength: 32
          minLength: 0
          type: string
          example: article-slug
        title:
          maxLength: 64
          minLength: 0
          type: string
          example: article-title
        description:
          maxLength: 1024
          minLength: 0
          type: string
          example: article-description
        body:
          maxLength: 4096
          minLength: 0
          type: string
          example: article-body
      description: 新規記事
    SingleArticleResponse:
      required:
        - article
      type: object
      properties:
        article:
          $ref: "#/components/schemas/Article"
    GenericErrorModel:
      required:
        - errors
      type: object
      properties:
        errors:
          $ref: "#/components/schemas/GenericErrorModelErrors"
    GenericErrorModelErrors:
      required:
        - body
      type: object
      properties:
        body:
          type: array
          items:
            type: string
    NewArticle:
      required:
        - body
        - description
        - title
      type: object
      properties:
        title:
          maxLength: 32
          minLength: 0
          type: string
          description: 新規記事のタイトル
          example: new-article-title
        description:
          maxLength: 1024
          minLength: 0
          type: string
          description: 新規記事の説明
          example: new-article-description
        body:
          maxLength: 2048
          minLength: 0
          type: string
          description: 新規記事の説明
          example: new-article-body
      description: 記事を作成する時のリクエスト
    NewArticleRequest:
      required:
        - article
      type: object
      properties:
        article:
          $ref: "#/components/schemas/NewArticle"
      description: 新規記事作成
参考
Discussion