ローカル環境でKubernetesのGateway APIを試してみる
概要
今回は、ローカルでKubernetes(K8s)環境を構築可能なminikubeを使ってGateway APIを試してみます。ローカルでGateway APIを試すには、OSSのKongを使います。
Gateway APIとは
k8sでは、Ingressリソースを使ってL7の負荷分散を行います。Google Kubernetes Engine (GKE)の場合、Ingressリソースを作成すると、Cloud Load Balancing (L7)が自動的に作成されます。しかし、Ingressリソースでは、トラフィックルーティングの設定とロードバランサの設定が同じリソース内で行われるため、インフラ管理者とアプリケーション開発者の役割分担が曖昧になります。
そこで、役割分担を明確にしたGateway APIが登場しました。Gateway APIはk8s公式のAPIとして開発が進められています。Gateway APIでは、トラフィックルーティングの設定とロードバランサの設定が別々のリソースで行われるため、インフラ管理者とアプリケーション開発者の役割を明確に分離することができます。

Gateway APIにおける役割分担(https://gateway-api.sigs.k8s.io/ より引用)
Gateway APIでは、3つの役割に分担し、それぞれの役割に応じて触れるリソースがことなります。
-
役割: インフラ管理者
- リソース: GatewayClass
- コントローラの指定
- コントローラのパラメータ情報
- リソース: GatewayClass
-
役割: クラスタ管理者
- リソース: Gateway
- ドメイン
- TLS証明書
- リスナー
- リソース: Gateway
-
役割: アプリケーション開発者
- リソース: xRoute
- ルーティングサービス
- バックエンドサービスの指定
- リソース: xRoute
Gateway APIを利用するためには、Gateway APIに対応したコントローラをインストールする必要があります。Gateway APIに対応したコントローラを提供しているプロジェクトは、以下のリンクから確認できます。2024年7月時点では、EKSはAlpha、GKEはGAと、各パブリッククラウドの対応状況に差があります。
Gateway APIを試す際にはパブリッククラウドが選択肢の一つとして考えられますが、料金面を気にする方も多いでしょう。そこで今回は、OSSのKongが提供するコントローラを使って、ローカル環境でGateway APIを試してみようと思います。ちなみに、Kongの対応状況はGAです。
今回の構成
今回は、以下のような構成をローカル環境に作成します。
- infra-ns: インフラリソースを格納するNamespace
- store-ns: storeのアプリケーションリソースを格納するNamespace
- site-ns: siteのアプリケーションリソースを格納するNamespace
Namespaceを跨いだ構成が可能なGateway APIの特徴を確認します。
store-nsでは、メンテナンス中を想定しており、HTTPヘッダーにdeveloper: trueが付与されている場合は、リリース予定のページに事前アクセスできるように設定します。それ以外のトラフィックはメンテナンスページに流します。
なお、各K8s Serviceに紐づくアプリケーションは、個別のコンテナイメージを用意するのは手間がかかるため、パブリックなコンテナイメージを使用します。

今回作成するGateway APIを用いた構成
Gateway APIの導入と構成の構築
minikubeにGateway APIの環境を作成していきます。
Kongのドキュメントを参考に進めていきます。
0. 前提
- minikubeがすでにローカル環境に導入済みであること
- Helmが使えること
1. minikubeのctxを取得
> kubectx minikube
Switched to context "minikube".
2. minikubeにGateway APIを導入
> kubectl apply -f https://github.com/kubernetes-sigs/gateway-api/releases/download/v1.1.0/standard-install.yaml
3. Kongを導入
 > helm repo add kong https://charts.konghq.com
 > helm repo update
 > helm install kong kong/ingress -n kong --create-namespace
4. 各Namespaceを作成
namespace.yamlを作成し、適用します。
> kubectl apply -f namespace.yaml
namespace.yaml
apiVersion: v1
kind: Namespace
metadata:
  name: infra-ns
  labels:
    shared-gateway-access: "true"
---
apiVersion: v1
kind: Namespace
metadata:
  name: site-ns
  labels:
    shared-gateway-access: "true"
---
apiVersion: v1
kind: Namespace
metadata:
  name: store-ns
  labels:
    shared-gateway-access: "true"
5. GatewayClassリソースとinfra-ns内のリソースを作成
GatewayClassは、クラスタ全体に適用されるため、Namespaceの指定は行いません。
Gatewayは、infra-nsを指定します。gateway.yamlを作成し、適用します。
      # Namespaceを跨いだアクセスを許可する
      allowedRoutes:
        namespaces:
          from: Selector
          selector:
            matchLabels:
              shared-gateway-access: "true"
> kubectl apply -f gateway.yaml
gateway.yaml
apiVersion: gateway.networking.k8s.io/v1
kind: GatewayClass
metadata:
  name: poc-gatewayclass
  annotations:
    konghq.com/gatewayclass-unmanaged: "true"
spec:
  controllerName: konghq.com/kic-gateway-controller
---
apiVersion: gateway.networking.k8s.io/v1
kind: Gateway
metadata:
  name: poc-gateway
  # infra-nsを指定
  namespace: infra-ns
spec:
  # GatewayClassを指定
  gatewayClassName: poc-gatewayclass
  listeners:
    - protocol: HTTP
      port: 80
      name: http-listener
      # Namespaceを跨いだアクセスを許可する
      allowedRoutes:
        namespaces:
          from: Selector
          selector:
            matchLabels:
              shared-gateway-access: "true"
6. store-ns内のリソースを作成
メンテナンス用のページ表示をさせるため、sorry-page.yamlを作成し、適用します。
> kubectl apply -f sorry-page.yaml
sorry-page.yaml
apiVersion: v1
kind: Service
metadata:
  name: sorry-page-svc
  namespace: store-ns
spec:
  ports:
    - port: 80
      targetPort: 8080
  selector:
    app: sorry-page
  type: ClusterIP
---
apiVersion: apps/v1
kind: Deployment
metadata:
  name: sorry-page-deploy
  namespace: store-ns
spec:
  replicas: 1
  selector:
    matchLabels:
      app: sorry-page
  template:
    metadata:
      labels:
        app: sorry-page
    spec:
      containers:
        - name: hello-app
          image: us-docker.pkg.dev/google-samples/containers/gke/hello-app:1.0
          ports:
            - containerPort: 8080
リリース予定のページを表示させるため、store-release.yamlを作成し、適用します。
> kubectl apply -f store-release.yaml
store-release.yaml
apiVersion: v1
kind: Service
metadata:
  name: store-release-svc
  namespace: store-ns
spec:
  ports:
    - port: 80
      targetPort: 80
  selector:
    app: store-release
  type: ClusterIP
---
apiVersion: apps/v1
kind: Deployment
metadata:
  name: store-release-deploy
  namespace: store-ns
spec:
  replicas: 1
  selector:
    matchLabels:
      app: store-release
  template:
    metadata:
      labels:
        app: store-release
    spec:
      containers:
        - name: apache
          image: httpd:latest
          ports:
            - containerPort: 80
メンテナンス用のページとリリース予定のページを束ねるHTTPRouteを作成し、適用します。
> kubectl apply -f route.yaml
    # HTTPヘッダでdeveloper: trueが指定された場合のみ、リクエストを受け付ける
    - matches:
        - headers:
            - name: developer
              value: "true"
          path:
            type: Exact
            value: /store
      backendRefs:
        - name: store-release-svc
          port: 80
route.yaml
apiVersion: gateway.networking.k8s.io/v1
kind: HTTPRoute
metadata:
  name: poc-route-store
  namespace: store-ns
  annotations:
    konghq.com/strip-path: "true"
spec:
  parentRefs:
    # Gatewayのリソース名を指定
    - name: poc-gateway
      # GatewayのNamespaceを指定
      namespace: infra-ns
  rules:
    - matches:
        - path:
            type: Exact
            value: /store
      backendRefs:
        - name: sorry-page-svc
          port: 80
    # HTTPヘッダでdeveloper: trueが指定された場合のみ、リクエストを受け付ける
    - matches:
        - headers:
            - name: developer
              value: "true"
          path:
            type: Exact
            value: /store
      backendRefs:
        - name: release-svc
          port: 80
7. site-ns内のリソースを作成
通常公開のページを表示させるため、site.yamlを作成し、適用します。
> kubectl apply -f site.yaml
site.yaml
apiVersion: v1
kind: Service
metadata:
  name: site-svc
  namespace: site-ns
spec:
  ports:
    - port: 80
      targetPort: 80
  selector:
    app: site
  type: ClusterIP
---
apiVersion: apps/v1
kind: Deployment
metadata:
  name: site-deploy
  namespace: site-ns
spec:
  replicas: 1
  selector:
    matchLabels:
      app: site
  template:
    metadata:
      labels:
        app: site
    spec:
      containers:
        - name: nginx
          image: nginx:latest
          ports:
            - containerPort: 80
通常公開のページ用のHTTPRouteを作成し、適用します。
> kubectl apply -f route.yaml
route.yaml
apiVersion: gateway.networking.k8s.io/v1
kind: HTTPRoute
metadata:
  name: poc-route-site
  namespace: site-ns
  annotations:
    konghq.com/strip-path: "true"
spec:
  parentRefs:
    # Gatewayのリソース名を指定
    - name: poc-gateway
      # GatewayのNamespaceを指定
      namespace: infra-ns
  rules:
    - matches:
        - path:
            type: Exact
            value: /site
      backendRefs:
        - name: site-svc
          port: 80
以上で全てのリソースの構築が完了しました。
動作を試してみる
以下のコマンドを使うことで、Gateway APIにアクセスできます。
今回は、httpのリクエストなので、ブラウザからhttp://127.0.0.1:52775にアクセスします。
> minikube service -n kong kong-gateway-proxy
|-----------|--------------------|--------------------|---------------------------|
| NAMESPACE |        NAME        |    TARGET PORT     |            URL            |
|-----------|--------------------|--------------------|---------------------------|
| kong      | kong-gateway-proxy | kong-proxy/80      | http://192.168.49.2:32712 |
|           |                    | kong-proxy-tls/443 | http://192.168.49.2:30140 |
|-----------|--------------------|--------------------|---------------------------|
🏃  kong-gateway-proxy サービス用のトンネルを起動しています。
|-----------|--------------------|-------------|------------------------|
| NAMESPACE |        NAME        | TARGET PORT |          URL           |
|-----------|--------------------|-------------|------------------------|
| kong      | kong-gateway-proxy |             | http://127.0.0.1:52775 |
|           |                    |             | http://127.0.0.1:52776 |
|-----------|--------------------|-------------|------------------------|
[kong kong-gateway-proxy  http://127.0.0.1:52775
http://127.0.0.1:52776]
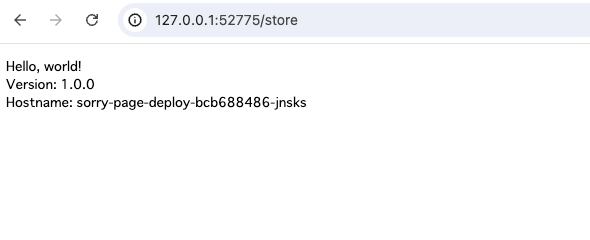
まずは、/storeにアクセスしてみます。
問題なくメンテナンスページと仮定したリソースが表示されています。
次に、HTTPヘッダにdeveloper: trueを付与してアクセスしてみます。(付与には、Chromeの拡張機能を使いました)
問題なくリリース予定のページと仮定したリソースが表示されています。

最後に、/siteにアクセスしてみます。
問題なく通常公開のページと仮定したリソースが表示されています。

まとめ
- minikubeにGateway APIを導入し、Namespaceを跨いだ構成が実現可能であることを確認しました。
- Gateway APIでは、HTTPヘッダの値によってトラフィックを分割可能であることを確認しました。
参考文献
Discussion