Cognitoの外部IdPとして個人用Microsoftアカウントを使う
はじめに
クラウドサービスを利用するアプリケーションでは、外部IdP(Identity Provider)を利用した認証連携が求められるケースが増えています。
この記事では、Amazon Cognito と Microsoft アカウント(Entra ID)を連携し、React アプリからログインできる環境を構築する方法をまとめます。
Cognito のユーザープールを作成
まずは Cognito のユーザープール(およびアプリケーションクライアント)を作成します。
今回は以下のように作成しました。
- アプリケーションタイプは
シングルページアプリケーション (SPA)を選択 - サインイン識別子のオプションは
メールアドレスをチェック - リターンURL はログイン後の戻り先となるアプリケーションのURL。Vite で実装したログインページをローカルで動かすため、ここでは
http://localhost:5173/とします。
作成後に生成される Cognitoドメインを控えておきます。

Azure の設定
次に Azure 側の設定を行います。
サービス一覧から Microsoft Entra ID を選択し、以下の手順でアプリケーションを登録します。
-
アプリの登録(App registrations): 新規にアプリケーションを登録します。
-
サポートされているアカウントの種類で個人用 Microsoft アカウントのみを選択します。 - リダイレクトURLを設定します。プラットフォームの選択は
Web、URLはhttps://{Cognitoドメイン}/oauth2/idpresponseに設定します。

-
-
クライアントIDの確認: 作成したアプリケーションの概要画面で
クライアントIDを確認し、控えます。
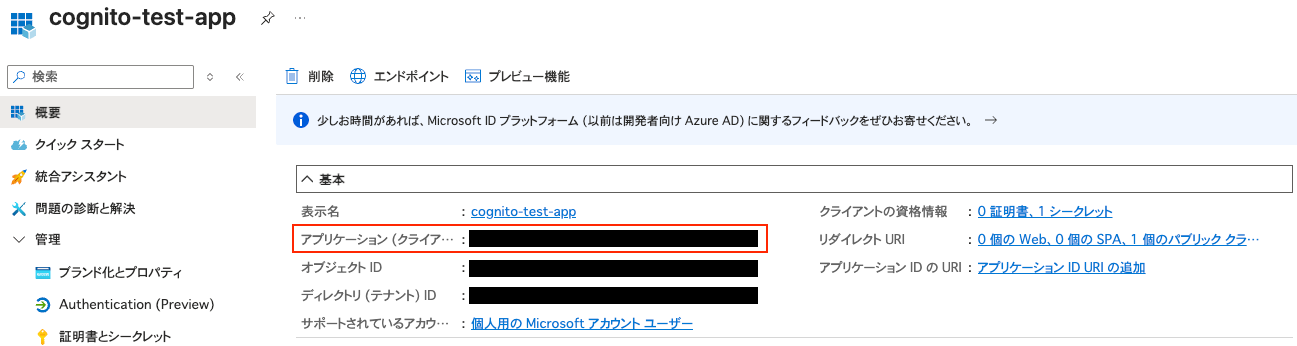
※概要画面の「エンドポイント」は後ほど Cognito で設定します。
-
クライアントシークレットの作成: 作成したアプリケーション内メニューから「証明書とシークレット」を選択し、新しいクライアントシークレットを作成します。作成したクライアントシークレットの
値を控えておきます。

Cognito で外部IdPを作成
Cognitoに戻り、メニューの「ソーシャルプロバイダーと外部プロバイダー」を選択し、アイデンティティプロバイダーを追加します。
-
OpenID Connect (OIDC) の選択:
OpenID Connect (OIDC)を選択します。(個人MicrosoftアカウントではSAMLは使用できません) -
クライアントIDとクライアントシークレットの入力:
-
クライアントID欄に Azure アプリケーション側で確認したクライアントIDを入力します。 -
クライアントシークレット欄に Azure アプリケーション側で作成したクライアントシークレットの値を入力します。
-
-
発行者URLの設定: 発行者URLに
https://login.microsoftonline.com/9188040d-6c67-4c5b-b112-36a304b66dad/v2.0を入力します。-
注意: 個人Microsoftアカウントでの認証時、テナントIDはアプリケーションに関わらず上記の固定URLを使用します。
/consumers/v2.0のような指定はIDトークン照合でエラーになります。

-
注意: 個人Microsoftアカウントでの認証時、テナントIDはアプリケーションに関わらず上記の固定URLを使用します。
-
アプリケーションクライアントの編集: アプリケーションクライアント > ログインページ の編集画面で、作成した IdP を選択します。
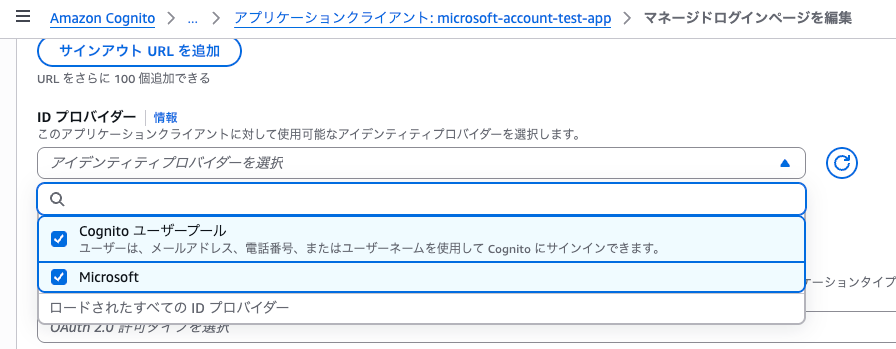
外部IdPの作成が完了したら Cognito のメニューからマネージドログインを選択し、スタイルを作成してアプリケーションクライアントに割り当てておきます。
React でログイン画面を実装
Vite で React プロジェクトを作成し、ログイン画面を実装します。
今回は Cognito の Hosted UI で済ませますが、Amplify ライブラリを使うなどして自前実装のログイン画面を使用することも可能です。
-
プロジェクトの作成:
npm create vite@latest cognito-login-app -- --template react-ts cd cognito-login-app npm install -
ログイン用ライブラリのインストール:
Cognito のアプリケーションクライアントの画面で確認できるサンプルコードをそのまま流用してログイン画面を実装します。npm install oidc-client-ts react-oidc-context --save -
ログイン画面の実装:
Cognito のアプリケーションクライアント設定画面上にあるサンプルコードをもとに実装します。
※client_idなどは実際の値に置き換えてください。-
src/main.tsimport React from "react"; import ReactDOM from "react-dom/client"; import App from "./App"; import { AuthProvider } from "react-oidc-context"; const cognitoAuthConfig = { authority: "https://cognito-idp.us-east-1.amazonaws.com/us-east-1_xxxxxxxxx", client_id: "xxxxxxxxxxxxxxxxxxxxxxxxxx", redirect_uri: "http://localhost:5173/home", response_type: "code", scope: "email openid phone", }; const rootElement = document.getElementById("root"); if (!rootElement) { throw new Error("Root element not found"); } const root = ReactDOM.createRoot(rootElement); root.render( <React.StrictMode> <AuthProvider {...cognitoAuthConfig}> <App /> </AuthProvider> </React.StrictMode> ); -
src/App.tsximport { useAuth } from "react-oidc-context"; function App() { const auth = useAuth(); const signOutRedirect = () => { const clientId = "xxxxxxxxxxxxxxxxxxxxxxxxxx"; const logoutUri = "/"; const cognitoDomain = "https://us-east-xxxxxxxxxx.auth.us-east-1.amazoncognito.com"; window.location.href = `${cognitoDomain}/logout?client_id=${clientId}&logout_uri=${encodeURIComponent( logoutUri )}`; }; if (auth.isLoading) { return <div>Loading...</div>; } if (auth.error) { return <div>Encountering error... {auth.error.message}</div>; } if (auth.isAuthenticated) { return ( <div> <pre> Hello: {auth.user?.profile.email} </pre> <pre> ID Token: {auth.user?.id_token} </pre> <pre> Access Token: {auth.user?.access_token} </pre> <pre> Refresh Token: {auth.user?.refresh_token} </pre> <button type="button" onClick={() => auth.removeUser()}> Sign out </button> </div> ); } return ( <div> <button type="button" onClick={() => auth.signinRedirect()}> Sign in </button> <button type="button" onClick={() => signOutRedirect()}> Sign out </button> </div> ); } export default App;
-
まとめ
以上で、Cognito にユーザープールを作成し、Azure 側でアプリ登録を行ったうえで、外部IdPとして Microsoft アカウントを連携する手順を確認できました。
Amplify ライブラリや独自の UI を組み合わせれば、Hosted UI を使わずに個人用 Microsoft アカウントでのログイン画面の実装も可能です。自分のプロジェクト要件に合わせて、トライしてみてください。
Discussion