Flutterのダイアログを切り出して2回表示を避けよう!
Flutterのダイアログを2重で表示しないようにする
多重実行防止についてコメントで頂いた内容の方がフラグ管理せずに簡潔に同じことが表現できるので、そちらを追記に記載しました!(AsyncCacheを使用)
結論としてはクラス変数、もしくはプロバイダーにフラグを持たせて表示中なのかそうでないのかを判定しているだけです。
準備
まずはflutter create -e testで適当な新規PJを作成します。
main.dartを下記のように書き換えてください。
- MainAppクラスのbuildメソッド内からScaffoldをHomeScreenに切り出し
- HomeScreenクラスのCenterの子供にColumnを指定してボタンを追加
main.dart
import 'package:flutter/material.dart';
import 'package:test/dialog.dart';
void main() {
runApp(const MainApp());
}
class MainApp extends StatelessWidget {
const MainApp({super.key});
Widget build(BuildContext context) {
return const MaterialApp(
home: HomeScreen(),
);
}
}
class HomeScreen extends StatelessWidget {
const HomeScreen({super.key});
Widget build(BuildContext context) {
return Scaffold(
appBar: AppBar(
title: const Text('Flutter Dialog Example'),
),
body: Center(
child: Column(
mainAxisAlignment: MainAxisAlignment.center,
children: [
const Text('Hello World!'),
ElevatedButton(
onPressed: () {
CustomDialog.show(context);
CustomDialog.show(context); // わざと2回呼び出します
},
child: const Text('Show Dialog'),
),
],
),
),
);
}
}
daialog.dartを作成する
ここは本質ではないのでコピペでOKです。
ただダイアログとshow関数はアプリ内で多く使用するかと思います。
なのでWidgetとして切り出しshow関数すらもまとめた方が呼び出し元のViewもスッキリするので切り出しましょう。
使い分けが必要であれば、namedコンストラクタやfactoryコンストラクタなどを組み合わせて引数をとり用途に応じてダイアログの出力を変化させればいいと思います。
もしくはインターフェースか継承、別クラス(あまりおすすめはしない)に分けてもいいかもしれません。
大体の場合、エラー、挙動の結果、通知などくらいの使用用途なのでコンストラクタで十分だと思います。それでキツくなったら、インターフェース→継承→別クラスと検討していきましょう(おすすめ順)
daialog.dart
import 'package:flutter/material.dart';
class CustomDialog extends StatelessWidget {
const CustomDialog({super.key});
static void show(BuildContext context) {
showDialog<void>(
context: context,
builder: (BuildContext context) {
return const CustomDialog();
},
);
}
Widget build(BuildContext context) {
return AlertDialog(
title: const Text('Dialog Title'),
content: const Text('This is the content of the dialog'),
actions: <Widget>[
TextButton(
onPressed: () {
Navigator.of(context).pop();
},
child: const Text('Close'),
),
],
);
}
}
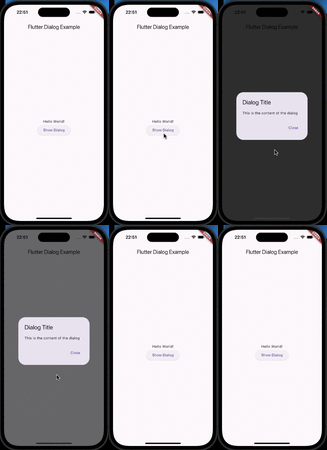
1度しか押してないのに、ダイアログ2回呼び出されているのが確認できましたね。

背景のマスクが濃い黒になっていますが、ダイアログが2重で表示されているため、マスクも2重になり濃くなっています。1度クリックするとマスクが薄くなっているのが
わかると思います。
修正していきましょう。
dialog.dartを修正
ポイントとしては
- クラス変数として_isShowを持たせた。
- show関数に_isShowの状態を見て、ダイアログを表示するか何もしないかを分岐させる
- showメソッドの後ろにthenを呼び出し
- ダイアログが閉じられた場合に呼び出されます。
dialog.dart
import 'package:flutter/material.dart';
class CustomDialog extends StatelessWidget {
const CustomDialog({super.key});
static bool _isShow = false;
static void show(BuildContext context) {
if (!_isShow) {
_isShow = true;
showDialog<void>(
context: context,
builder: (BuildContext context) {
return const CustomDialog();
},
).then((value) {
_isShow = false;
});
}
}
Widget build(BuildContext context) {
return AlertDialog(
title: const Text('Dialog Title'),
content: const Text('This is the content of the dialog'),
actions: <Widget>[
TextButton(
onPressed: () {
Navigator.of(context).pop();
},
child: const Text('Close'),
),
],
);
}
}
肝としては
クラス変数に値を持たせて、インスタンスを跨いで値を保持できる点です。ここはプロバイダーなどに切り出してもいいかもしれませんが、この程度ならクラス内にいたほうが可読性は高いと思います。またプライベートな値にしているので不用意な変更のリスクも少ないです。
_isShow = false;の部分はthenのみで設定した方がいいです。
onPressedで閉じる際に同じことができますが、実装漏れや、onPressedを外部から注入する際にisShowをパブリックにして、分散させるメリットは皆無です。
クラス内に閉じ込めることを優先させましょう。
では確認してみましょう!
ボタンをクリックしてもダイアログは1個しか表示されていないのがわかると思います。

おまけ
プライベートセッターを作成して、bool値をトグル化した例
import 'package:flutter/material.dart';
class CustomDialog extends StatelessWidget {
const CustomDialog({super.key});
static bool _isShow = false;
static void _updateShow() {
_isShow = !_isShow;
}
static void show(BuildContext context) {
if (!_isShow) {
_updateShow();
showDialog<void>(
context: context,
builder: (BuildContext context) {
return const CustomDialog();
},
).then((value) {
_updateShow();
});
}
}
Widget build(BuildContext context) {
return AlertDialog(
title: const Text('Dialog Title'),
content: const Text('This is the content of the dialog'),
actions: <Widget>[
TextButton(
onPressed: () {
Navigator.of(context).pop();
},
child: const Text('Close'),
),
],
);
}
}
以上です!
追記
コメントで頂いたAsyncCacheを利用したやり方
まずはCacheDialogクラスを作成します。
import 'package:flutter/material.dart';
import 'package:async/async.dart';
class CacheDialog extends StatelessWidget {
const CacheDialog({super.key});
// クラス間で参照させるためにstaticとする(riverpodなどで切り出した方が望ましいかも)
static AsyncCache cacheStrategy = AsyncCache.ephemeral();
static void show(BuildContext context) {
cacheStrategy.fetch(
() async {
showDialog<void>(
context: context,
builder: (BuildContext context) {
return const CacheDialog();
},
);
},
);
}
Widget build(BuildContext context) {
return AlertDialog(
title: const Text('Cache Dialog'),
content: const Text('This is the content of the dialog'),
actions: <Widget>[
TextButton(
onPressed: () {
Navigator.of(context).pop();
},
child: const Text('Close'),
),
],
);
}
}
main.dart
import 'package:flutter/material.dart';
import 'package:test/dialog_cache.dart';
import 'package:test/dialog_flag.dart';
void main() {
runApp(const MainApp());
}
class MainApp extends StatelessWidget {
const MainApp({super.key});
Widget build(BuildContext context) {
return const MaterialApp(
home: HomeScreen(),
);
}
}
class HomeScreen extends StatelessWidget {
const HomeScreen({super.key});
Widget build(BuildContext context) {
return Scaffold(
appBar: AppBar(
title: const Text('Flutter Dialog Example'),
),
body: Center(
child: Column(
mainAxisAlignment: MainAxisAlignment.center,
children: [
const Text('Hello World!'),
ElevatedButton(
onPressed: () {
CacheDialog.show(context);// CacheDaialogに変更
CacheDialog.show(context);// 2重呼び出し確認用
},
child: const Text('Async Dialog'),
),
],
),
),
);
}
}
AsyncCacheクラスは非同期関数を実行し、結果を一定期間キャッシュします。
そのため、処理が終わるまで新たな呼び出しに関してキャッシュされたインスタンスを返します。
一定時間内容をキャッシュする場合は
AsyncCache(const Duration(seconds:5));
とすれば5秒間はキャッシュを返してくれます。
実行中のリクエストに関して完了までキャッシュを返したい場合は
AsyncCache.ephemeral();
を使用します。(一時キャッシュは、コールバック関数が同時に最大 1 回しか実行されないことを保証します)
関数呼び出しの際にfetchメソッドを利用してその中に関数を入れてあげれば多重処理の防止が可能になります。
Discussion
別案なのですが、AsyncCacheを使用するはいかがでしょうか?
私的にはこっちの方が好みでよく使ってます!
また、dialogの場合pop(1)などで、特定の戻り値返すみたいなことが結構あるのかなと思っていて、
その場合も考慮されていると嬉しいなと思いました!
ありがとうございます!
AsyncCacheを実際に使ってみました!
めちゃくちゃいいですね✨
フラグ管理等のバグの温床が消えるので今後はこちらをメインで使っていこうと思います!