Xamarin.Forms (Android) に Azure Notification Hubs からタグを活用して Push 通知を送る
はじめに
以下のものを準備
- Visual Studio 2022
- Azure アカウント および サブスクリプション(今回使用するのは無料Tier)
- Google アカウント
iOSは開発者プログラムへの登録が必要そうだったり、エミュレータでの通知配信が怪しいらしいので、とりあえずAndroidのエミュレータで進めることにした
全体像
Xamarin.Androidに対してpush通知を送る場合は、こちらの公式docがガイドしてくれそう。ただ、今回はバックエンドなしのシンプルな構成にしたかったので、以下の通り、Azure Portalをバックエンドと見立ててタグ制御によるテスト配信を行った。

意外と参考文献が少ないもので、以下の方々の記事も参考にさせていただいた。
実装
- VSでXamarin.Formsのプロジェクト作成
- FCMのプロジェクト作成
- Azure Notification Hubs デプロイ & 設定
- Xamarin.Forms (Xamarin.Android) でクライアント側を実装
1. VSでXamarin.Formsのプロジェクト作成
2のステップでFCMプロジェクトを立てる際に、クライアントアプリのパッケージ名が必要となるので、とりあえず、Xamarin.Formsのソリューションを作成する。作成をし終えたら、Xamarin.Androidプロジェクト>Properties>AndroidManifest.xmlの中に記述してある以下の行から、package名をメモしておく。
<manifest xmlns:android="http://schemas.android.com/apk/res/android" android:versionCode="1" android:versionName="1.0" package="com.companyname.pushdemoandroid">
2. FCMのプロジェクト作成
1でメモしたpackage名を使って、こちら の公式docを参考にFCMプロジェクトを作成する。その際、以下の2点に注意しておく。
- google-services.json をダウンロードする
- FCMのサーバキーをメモしておく*
※ 2022/6/16現時点で、FCMのUI変更があったため、Cloud Messaging のレガシーAPIを有効化して、サーバキーを表示する必要がある
3. Azure Notification Hubs デプロイ & 設定
こちらの公式docに沿って、Azure Notification Hubをデプロイする。デプロイが終わったら、FCMのサーバキーをNotification Hubsの設定>Google(GCM/FCM)>APIキーに貼り付け、
以下の3点に注意しておく。
- Azure Notification Hubs の名前をメモしておく
- Auzre Notification Hubs の"管理">アクセスポリシー>DefaultListenSharedAccessSignatureをメモしておく
- 名前空間の"管理">アクセスポリシー>RootManageSharedAccessKeyをメモしておく(省略可; Service Bus Explorerで登録デバイスを閲覧したい場合)
4. Xamarin.Forms (Xamarin.Android) でクライアント側を実装
今回、VS上でクライアント側を実装していくわけだが、追加および編集が必要なファイルは以下の通り。
- 追加
- NuGet package
- google-service.json
- Constants.cs
- 編集
- AndroidManifest.xml
- MainActivitiy.cs
NuGet パッケージをインストール
Android プロジェクトを右クリックして、Manage NuGet Package をクリック。以下のパッケージをインストールする。
- Xamarin.Azure.NotificationHubs.Android(ver 1.1.4.1)
- Xamarin.Firebase.Messaging(ver. 122.0.0)
- Xamarin.GooglePlayServices.Base(ver. 117.6.0)
- Xamarin.Google.Dagger(ver. 2.39.1)
※ .NET 6 フレームワークを対象にしているパッケージをインストールすると、エラーが出たので、各パッケージには、.NET 6よりも前のフレームワークを対象としているバージョンを指定している。
google-service.json の追加
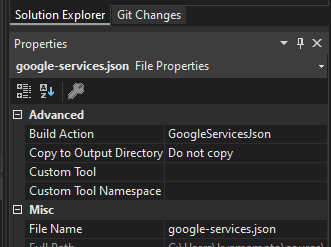
Android プロジェクトを右クリックして、Add>Existing Itemを選択。google-service.jsonを追加する。追加されたgoogle-service.jsonをクリックして、Build ActionをGoogleServicesJsonを選択しておく。この時、選択肢に現れなかった場合は、一旦、VSを再起動してもう一度試してみるとよい。

AndroidManifest.xml を編集
AndroidManifest.xmlを編集して、各種パーミッションを付与。
<?xml version="1.0" encoding="utf-8"?>
<manifest xmlns:android="http://schemas.android.com/apk/res/android" android:versionCode="1" android:versionName="1.0" package="com.companyname.pushdemoandroid">
    <uses-sdk android:minSdkVersion="21" android:targetSdkVersion="31" />

	// ここから追加
	<uses-permission android:name="android.permission.INTERNET" />
	<uses-permission android:name="com.google.android.c2dm.permission.RECEIVE" />
	<uses-permission android:name="android.permission.WAKE_LOCK" />
	<uses-permission android:name="android.permission.GET_ACCOUNTS" />
	// ここまで追加

	<application android:label="PushDemoAndroid.Android" android:theme="@style/MainTheme"></application>

	<uses-permission android:name="android.permission.ACCESS_NETWORK_STATE" />
</manifest>
Constants.cs を作成
Androidプロジェクトを右クリックして、csクラスを作成。以下に示す通り、ステップ3でメモしたAzure Notificaiton Hubsの名前とDefaultListenSharedAccessSignatureを宣言する。
namespace PushDemoAndroid.Droid
{
    public static class Constants
    {
        public const string ListenConnectionString = "<DefaultListenSharedAccessSignatureをここにペースト>";
        public const string NotificationHubName = "<Azure Notificaiton Hubsの名前をここにペースト>";
    }
}
MainActivity.cs を編集
MainActivity.csを開き、以下のライブラリをインポートする。
using Android.App;
using Android.Content.PM;
using Android.Runtime;
using Android.OS;
using Android.Util;
using Android.Gms.Common;
クラス内に以下を追加。
public const string TAG = "MainActivity";
internal static readonly string CHANNEL_ID = "my_notification_channel";
Google Play Service が有効かどうかを確認するために以下のメソッドを追加する。
public bool IsPlayServicesAvailable()
{
    int resultCode = GoogleApiAvailability.Instance.IsGooglePlayServicesAvailable(this);
    if (resultCode != ConnectionResult.Success)
    {
        if (GoogleApiAvailability.Instance.IsUserResolvableError(resultCode))
            Log.Debug(TAG, GoogleApiAvailability.Instance.GetErrorString(resultCode));
        else
        {
            Log.Debug(TAG, "This device is not supported");
            Finish();
        }
        return false;
    }

    Log.Debug(TAG, "Google Play Services is available.");
    return true;
}
Notification Channel を作成するためのメソッドを追加。
private void CreateNotificationChannel()
{
    if (Build.VERSION.SdkInt < BuildVersionCodes.O)
    {
        // Notification channels are new in API 26 (and not a part of the
        // support library). There is no need to create a notification
        // channel on older versions of Android.
        return;
    }

    var channelName = CHANNEL_ID;
    var channelDescription = string.Empty;
    // edit NotificationImportance.Default to High for enabling pop-up notification
    var channel = new NotificationChannel(CHANNEL_ID, channelName, NotificationImportance.High)
    {
        Description = channelDescription
    };

    var notificationManager = (NotificationManager)GetSystemService(NotificationService);
    notificationManager.CreateNotificationChannel(channel);
}
上の2つのメソッドを呼び出すために、OnCreateメソッド内の base.OnCreate(savedInstanceState); の後に以下のコードを追加。
if (Intent.Extras != null)
{
    foreach (var key in Intent.Extras.KeySet())
    {
        if (key != null)
        {
            var value = Intent.Extras.GetString(key);
            Log.Debug(TAG, "Key: {0} Value: {1}", key, value);
        }
    }
}

IsPlayServicesAvailable();
CreateNotificationChannel();
MyFirebaseMessagingService.cs を作成
Androidプロジェクトを右クリックして、csクラスを作成。以下のライブラリをインポートする。
using Android.App;
using Android.Content;
using System;
using System.Collections.Generic;
using System.Linq;
using Android.Util;
using Firebase.Messaging;
using WindowsAzure.Messaging;
using AndroidX.Core.App;
MyFirebaseMessagingServiceクラスは以下のように宣言する。
※ 2022/6/16現在、SDKのアップデートにより、以下のコードだと実行時に java.exe exited with code 1 でエラーが出てしまう。[Service] を Service(Exported = true)] に書き換えると動く。
namespace PushDemoAndroid.Droid
{
    [Service]
    [IntentFilter(new[] { "com.google.firebase.MESSAGING_EVENT" })]
    [IntentFilter(new[] { "com.google.firebase.INSTANCE_ID_EVENT" })]
    public class MyFirebaseMessagingService : FirebaseMessagingService
    {
        ...
    }
}
クラス内に以下を追加。
const string TAG = "MyFirebaseMsgService";
NotificationHub hub;
Push通知を受け取ると呼び出されるOnMessageReceivedメソッドを以下のように追加。
public override void OnMessageReceived(RemoteMessage message)
{
    Log.Debug(TAG, "From: " + message.From);
    if (message.GetNotification() != null)
    {
        //These is how most messages will be received
        Log.Debug(TAG, "Notification Message Body: " + message.GetNotification().Body);
        SendNotification(message.GetNotification().Body);
    }
    else
    {
        //Only used for debugging payloads sent from the Azure portal
        SendNotification(message.Data.Values.First());

    }
}
OnMessageReceivedメソッド内で呼ばれているSendNotificationメソッドを実装する。このメソッド内で、ローカル通知を実装している。.SetContentTitle() を編集することで、通知のタイトルを変更することができる。
void SendNotification(string messageBody)
{
    var intent = new Intent(this, typeof(MainActivity));
    intent.AddFlags(ActivityFlags.ClearTop);
    var pendingIntent = PendingIntent.GetActivity(this, 0, intent, PendingIntentFlags.OneShot);

    var notificationBuilder = new NotificationCompat.Builder(this, MainActivity.CHANNEL_ID);

    // edit Content Title for notification title
    notificationBuilder.SetContentTitle("Push Demo Android")
                .SetSmallIcon(Resource.Drawable.ic_launcher)
                .SetContentText(messageBody)
                .SetAutoCancel(true)
                .SetShowWhen(false)
                .SetContentIntent(pendingIntent);

    var notificationManager = NotificationManager.FromContext(this);

    notificationManager.Notify(0, notificationBuilder.Build());
}
さらに、Azure Notification Hubs にデバイスを登録するメソッドを実装する。
public override void OnNewToken(string token)
{
    Log.Debug(TAG, "FCM token: " + token);
    SendRegistrationToServer(token);
}

void SendRegistrationToServer(string token)
{
    // Register with Notification Hubs
    hub = new NotificationHub(Constants.NotificationHubName,
                                Constants.ListenConnectionString, this);

    var dt = DateTime.Now;
    var timeTag = dt.ToString("HH:mm:ss");

    var carVendor = "";
    var vendorType = "";
    var vendorLocation = "";
    var carGrade = "";
    switch (Convert.ToInt64(dt.Minute) % 10) {
        case 0: case 1: case 2: case 3:
            carVendor = "TOYOTA";
            vendorType = "JapaneseCar";
            vendorLocation = "Aichi";
            carGrade = "20";
            break;
        case 4: case 5: case 6:
            carVendor = "NISSAN";
            vendorType = "JapaneseCar";
            vendorLocation = "Kanagawa";
            carGrade = "15";
            break;
        case 7: case 8: case 9:
            carVendor = "BMW";
            vendorType = "ForeignCar";
            vendorLocation = "Munich";
            carGrade = "10";
            break;
        default:
            carVendor = "tmp1";
            vendorType = "tmp2";
            vendorLocation = "tmp3";
            carGrade = "tmp4";
            break;
    }

    var tags = new List<string>() {timeTag, carVendor, vendorType, vendorLocation, carGrade};
    var regID = hub.Register(token, tags.ToArray()).RegistrationId;

    Log.Debug(TAG, $"Successful registration of ID {regID}");
}
SendRegistrationToServer にて、タグの設定などのロジックを実装している。簡単に説明すると、タイムスタンプ(timeTag)、自動車メーカ名(carVendor)、国産車か外車か(vendorType)、メーカの所在地(vendorLocation)、等級(carGrade)というタグ群をリストに格納して、hub.Register() にて、登録を行っている。
タグ自体は、アプリ起動時に取得したタイムスタンプ(分)を元に行っており、分の1桁目が0~3であれば、1つ目のcase分岐、4~6であれば、2つ目のcase分岐、7~9であれば、3つ目のcase分岐に入って、タグが変数設定されるようにしている。
配信
VSでデバッグ実行を行う。今回は、Pixel 5のエミュレータを使用した。アプリが起動するまで待つ。
Service Bus Explorer によるデバイス登録の確認(省略可)
アプリが起動すると、デバイスが登録されるが、今回は、Service Bus Explorerというツールを使って、覗いてみる。ダウンロードは以下のリンクから。私は、chocolatey経由でインストールを行った。
ステップ3でメモした名前空間の方のアクセスキーを用いて、こちらの Microsoft Japan PaaS チームのブログに沿って、デバイス情報が登録されているかの確認をする。
テスト配信
Azure Portal から Notification Hubs を開き、テスト配信のペインをクリックする。プラットフォームはAndroidを選択し、以下のペイロードを送信する。
{
	"data":{
		"property1":"PUSH TEST !!",
		"property2":42
	}
}
アプリケーションが、フォアグラウンドおよびバックグラウンドのどちらでもプッシュ通知が届くことが確認出来たら成功である。
※ Push通知を受け取れるものの、ポップアップ表示されない場合は、MainActivity.cs > CreateNotificationChannel() の var channel = new NotificationChannel(CHANNEL_ID, channelName, NotificationImportance.High) にて、NotificationImportance.Default ではなく NotificationImportance.High となっていることを確認する。
※ ペイロードに notificaion プロパティを省略した理由については、FCMの公式doc を参照。ちなみに、フォアグラウンドとバックグラウンドでは、アプリ側とシステムトレイ側で処理部が異なるので注意する。
タグを活用した複数エミュレータでのテスト配信
VSをDebugからReleaseに変更して、Build>Archiveからapkファイルを出力する。その後、App Centreにファイルを上げてアプリの配信を行う。Android エミュレータを複数起動し、それぞれにアプリをインストールし、前述までの流れと同じようにPush通知を実行する。
※ apkファイルを出力する際に、署名をつけなければ、インストール際にパースできないエラーが発生するかもしれない。(実際、私の手元では発生した)
タグの指定やタグ式の活用については、デモ動画をYouTubeに上げたので、こちらで確認されたい。Notification Hubsが通知の共通プラットフォームとして動作していることが分かりやすいかと思う。
ちなみに、上のデモ動画は、最近、Microsoft が買収した Clipchamp という動画編集ソフトで1~2時間程で作成したの、こちらもご興味あれば触ってみると良いかもしれない。
Discussion