自分のアウトプットをまとめるサイトを作った話
この記事は mob Advent Calendar 25日目の記事です。最後の記事です!無事完走!
この Zenn もそうですが、ソフトウェアエンジニアの アウトプット先 は数多くあります。たとえば下記のようなものです。
- はてなブログ
- Zenn
- Qiita
- note
複数のプラットフォームに用途をわけて投稿している人も多くいると思います。私自身もそれぞれプラットフォームに色があるので、それによって使い分けてたりします。
使い分ける分にはいいのですが、一箇所でアウトプットを集約したポートフォリオになるサイトをつくりたくなりました。ということで、今回の記事はそれをサクッと作ったという記事になります。
どのようなものを作るか
完成したものは次のようなものです。 リンクはhttps://mob-outputs.vercel.app/ です。

今回の構成はこんな感じにしています。とりあえず数時間でさっくり作りたかったのでこのような形になっています。
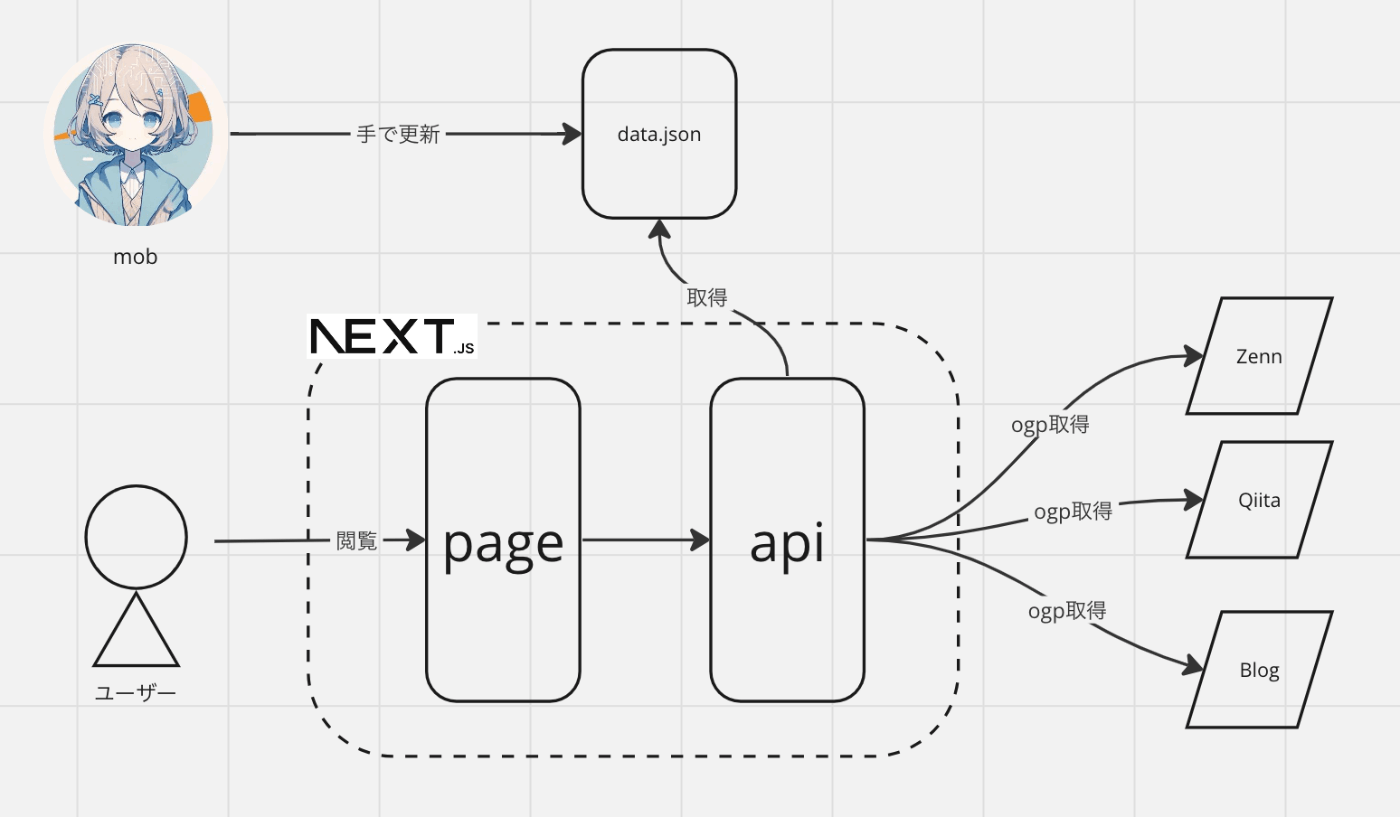
今回はやりませんが、時点で次のような構成にして、

最終的には次のような構成にしようと考えています。

ひとまず第一形態の構築をしていきます。
構築する
プロジェクトの作成
下記コマンドをうって、プロジェクトを作成します。
$ npx create-next-app@latest mob-hub --typescript
tailwindを導入するか途中で聞かれるのですが、 Material UI を使うので No を選びました。作成できたら yarn run dev を叩いて動くか確認します。
mui を導入する
下記を見ながら mui の導入を行います。
api を実装する
下記を public/posts.json 配下に配置します。
{
  "items": [
    {
      "date": "2023/12/24",
      "author": "mob",
      "authoerImage": "https://pbs.twimg.com/profile_images/1724663359180771328/Q2hdF9O5_400x400.jpg",
      "url": "https://zenn.dev/mobdev/articles/11cf0c5c4d86b0"
    },
    {
      "date": "2023/12/23",
      "author": "mob",
      "authoerImage": "https://pbs.twimg.com/profile_images/1724663359180771328/Q2hdF9O5_400x400.jpg",
      "url": "https://zenn.dev/mobdev/articles/cdd6cb1b0f6e70"
    },
    {
      "date": "2023/12/22",
      "author": "mob",
      "authoerImage": "https://pbs.twimg.com/profile_images/1724663359180771328/Q2hdF9O5_400x400.jpg",
      "url": "https://zenn.dev/mobdev/articles/2636047c69ab7a"
    }
  ]
}
api から public にある リソースを取得できるように下記を適当な場所に配置します。自分は src/app/helper/serverPath.ts に配置しました。
import path from "path";
import getConfig from "next/config";

const serverPath = (staticFilePath: string) => {
  return path.join(
    getConfig().serverRuntimeConfig.PROJECT_ROOT,
    staticFilePath
  );
};

export default serverPath;
下記を src/app/api/posts.ts に配置します。 public/posts.json を読み込んでogpイメージを取得して、記事情報のリストを返却しています。 jsdom と node-fetch の追加が必要です。
import type { NextApiRequest, NextApiResponse } from "next";
import fetch from "node-fetch";
import { JSDOM } from "jsdom";
import fs from "fs";
import path from "path";

export default async function handler(
  req: NextApiRequest,
  res: NextApiResponse
) {
  try {
    const filePath = path.join(process.cwd(), "public", "posts.json");
    const jsonData = fs.readFileSync(filePath, "utf-8");
    const posts = JSON.parse(jsonData).items;

    const results = await Promise.all(
      posts.map(async (post: any) => {
        const response = await fetch(post.url);
        const dom = new JSDOM(await response.text());
        const document = dom.window.document;

        const ogImageUrl =
          document
            .querySelector('meta[property="og:image"]')
            ?.getAttribute("content") || "";
        const ogTitle =
          document
            .querySelector('meta[property="og:title"]')
            ?.getAttribute("content") || "";

        return {
          url: post.url,
          author: post.author,
          authorImage: post.authorImage,
          image: ogImageUrl,
          title: ogTitle,
          date: post.date,
        };
      })
    );

    res.status(200).json({ posts: results });
  } catch (error) {
    res.status(500).json({ error: "エラーが発生しました" });
  }
}
ui を実装する
今のところは別の画面がないのと、さくっと作りきりたいので、特にコンポーネントを分けずに作りきります。
上部に AppBar が配置されており、api の結果である post のリストを Card にしてグリッドで配置しました。
"use client";
import React, { useEffect, useState } from "react";
import {
Card,
CardActionArea,
CardMedia,
CardContent,
Typography,
AppBar,
Toolbar,
Grid,
Avatar,
Box,
} from "@mui/material";
interface Post {
url: string;
image: string;
title: string;
author: string;
authorImage: string;
date: string;
}
export default function Home() {
const [posts, setPosts] = useState<Post[]>([]);
useEffect(() => {
fetch("api/posts")
.then((response) => response.json())
.then((data) => setPosts(data.posts));
}, []);
return (
<>
<AppBar style={{ background: "#121212" }}>
<Toolbar>
<Avatar
alt="mob"
src="https://pbs.twimg.com/profile_images/1724663359180771328/Q2hdF9O5_400x400.jpg"
/>
<Typography style={{ marginLeft: 16, fontFamily: "Nova Square" }}>
Mob Hub
</Typography>
</Toolbar>
</AppBar>
<main style={{ padding: "100px 16px 16px 16px" }}>
<Grid container spacing={2}>
<Grid item xs={12} sm={6} md={4} key="start">
<Typography variant="h1" style={{ fontFamily: "Nova Square" }}>
Mob's Outputs
</Typography>
</Grid>
{posts.map((post, index) => (
<Grid item xs={12} sm={6} md={4} key={index}>
<Card style={{ marginBottom: 16 }}>
<CardActionArea href={post.url}>
<CardMedia
component="img"
style={{
objectFit: "cover",
}}
image={post.image}
/>
</CardActionArea>
<CardContent style={{ padding: 16 }}>
<Box
style={{
display: "flex",
alignItems: "center",
marginBottom: 16,
}}
>
<Avatar alt={post.author} src={post.authorImage} />
<Box style={{ marginLeft: 4 }}>
<Typography>{post.author}</Typography>
<Typography color="text.secondary">
{post.date}
</Typography>
</Box>
</Box>
<CardActionArea href={post.url}>
<Typography gutterBottom component="div">
{post.title}
</Typography>
</CardActionArea>
</CardContent>
</Card>
</Grid>
))}
</Grid>
</main>
</>
);
}
Nova Square というフォントが好きなので、 src/pages/_documents.tsx を作って、フォントを使えるようにしています。
import Document, {
  Html,
  Head,
  Main,
  NextScript,
  DocumentContext,
} from "next/document";

class MyDocument extends Document {
  static async getInitialProps(ctx: DocumentContext) {
    const initialProps = await Document.getInitialProps(ctx);
    return { ...initialProps };
  }

  render() {
    return (
      <Html lang="ja">
        <Head>
          <link
            href="https://fonts.googleapis.com/css2?family=Nova+Square&display=swap"
            rel="stylesheet"
          />
        </Head>
        <body>
          <Main />
          <NextScript />
        </body>
      </Html>
    );
  }
}

export default MyDocument;
deployする
あとは Vercel にログインしてDeployします。

これで無事デプロイすることができました!
まとめ
今回はなるべく少ない技術でサクッと作ることを意識しました。 cursor などの AI搭載エディタなどのお陰もあり、数時間でここまで作り切ることができました。
冒頭で話したように、まだ最終形態にはなっていないので、アウトプットしながら徐々に手を入れて進化させていきたいと思います。
Discussion