📝
AWS IoT のハンズオンレベルの内容を CDK からやってみた
AWS IoT のハンズオンレベルの内容を CloudShell からやってみた
上記の CDK バージョンです。
前提
- 開発環境は Cloud9 (Amazon Linux 2023)
1. CDK プロジェクト作成
$ mkdir -p ~/.npm-global
$ npm config set prefix '~/.npm-global'
$ echo 'export PATH=~/.npm-global/bin:$PATH' >> ~/.bashrc
$ source ~/.bashrc
$ npm install -g typescript
$ mkdir iot-cdk-project
$ cd iot-cdk-project
$ cdk init app --language typescript
2. CDK ファイル作成
lib/iot-cdk-project-stack.ts
import * as cdk from 'aws-cdk-lib';
import { Construct } from 'constructs';
import * as iot from 'aws-cdk-lib/aws-iot';
import * as lambda from 'aws-cdk-lib/aws-lambda';
import * as iam from 'aws-cdk-lib/aws-iam';
import * as cr from 'aws-cdk-lib/custom-resources';
import * as path from 'path';

export class IotCdkProjectStack extends cdk.Stack {
  constructor(scope: Construct, id: string, props?: cdk.StackProps) {
    super(scope, id, props);

    // Thing(仮想デバイス)を作成
    const thing = new iot.CfnThing(this, 'MyTestThing', {
      thingName: 'MyTestThing'
    });

    // Lambda関数を作成(証明書作成用)
    const certFunction = new lambda.Function(this, 'CertificateFunction', {
      runtime: lambda.Runtime.PYTHON_3_11,
      handler: 'index.handler',
      code: lambda.Code.fromAsset(path.join(__dirname, '../lambda/iot-certificate')),
      timeout: cdk.Duration.minutes(5),
    });

    // Lambda関数にIoTとSecrets Managerの権限を付与
    certFunction.addToRolePolicy(new iam.PolicyStatement({
      actions: [
        'iot:CreateKeysAndCertificate',
        'iot:DeleteCertificate',
        'iot:UpdateCertificate',
        'iot:DescribeCertificate'
      ],
      resources: ['*']
    }));

    certFunction.addToRolePolicy(new iam.PolicyStatement({
      actions: [
        'secretsmanager:CreateSecret',
        'secretsmanager:DeleteSecret',
        'secretsmanager:GetSecretValue'
      ],
      resources: ['*']
    }));

    // Custom Resourceプロバイダーを作成
    const provider = new cr.Provider(this, 'CertificateProvider', {
      onEventHandler: certFunction,
    });

    // Custom Resourceで証明書を作成
    const certificate = new cdk.CustomResource(this, 'IoTCertificate', {
      serviceToken: provider.serviceToken,
      properties: {
        SecretName: 'iot-device-certificate'
      }
    });

    // 証明書をThingにアタッチ
    const thingAttachment = new iot.CfnThingPrincipalAttachment(this, 'ThingCertAttachment', {
      thingName: thing.thingName!,
      principal: certificate.getAttString('CertificateArn'),
    });
    thingAttachment.node.addDependency(certificate);

    // IoT ポリシーを作成
    const policy = new iot.CfnPolicy(this, 'MyTestPolicy', {
      policyName: 'MyTestPolicy',
      policyDocument: {
        Version: '2012-10-17',
        Statement: [
          {
            Effect: 'Allow',
            Action: [
              'iot:Connect',
              'iot:Publish',
              'iot:Subscribe',
              'iot:Receive'
            ],
            Resource: '*'
          }
        ]
      }
    });

    // ポリシーを証明書にアタッチ
    const policyAttachment = new iot.CfnPolicyPrincipalAttachment(this, 'PolicyCertAttachment', {
      policyName: policy.policyName!,
      principal: certificate.getAttString('CertificateArn'),
    });
    policyAttachment.node.addDependency(certificate);

    // 出力: Thing 名
    new cdk.CfnOutput(this, 'ThingName', {
      value: thing.thingName!,
      description: 'IoT Thing Name'
    });

    // 出力: 証明書ARN
    new cdk.CfnOutput(this, 'CertificateArn', {
      value: certificate.getAttString('CertificateArn'),
      description: 'Certificate ARN'
    });

    // 出力: 証明書ID
    new cdk.CfnOutput(this, 'CertificateId', {
      value: certificate.getAttString('CertificateId'),
      description: 'Certificate ID'
    });

    // 出力: Secrets Manager のシークレット名
    new cdk.CfnOutput(this, 'SecretName', {
      value: certificate.getAttString('SecretName'),
      description: 'Secret name containing certificate and private key'
    });

    // 出力: IoT エンドポイント取得コマンド
    new cdk.CfnOutput(this, 'IoTEndpointCommand', {
      value: 'aws iot describe-endpoint --endpoint-type iot:Data-ATS',
      description: 'Command to get IoT Endpoint'
    });
  }
}
3. カスタムリソース用 Lambda 関数作成
証明書と秘密鍵を生成して Secrets Manager に保存するための Lambda 関数です。
$ mkdir -p lambda/iot-certificate
lambda/iot-certificate/index.py
import json
import boto3

iot = boto3.client('iot')
secretsmanager = boto3.client('secretsmanager')

def handler(event, context):
    print(f"Event: {json.dumps(event)}")

    request_type = event['RequestType']
    props = event['ResourceProperties']

    if request_type == 'Create':
        # 証明書と秘密鍵を作成
        response = iot.create_keys_and_certificate(setAsActive=True)

        certificate_arn = response['certificateArn']
        certificate_id = response['certificateId']
        certificate_pem = response['certificatePem']
        private_key = response['keyPair']['PrivateKey']

        # 秘密鍵をSecrets Managerに保存
        secret_name = props.get('SecretName', f'iot-private-key-{certificate_id}')
        secretsmanager.create_secret(
            Name=secret_name,
            SecretString=json.dumps({
                'certificateArn': certificate_arn,
                'certificateId': certificate_id,
                'certificatePem': certificate_pem,
                'privateKey': private_key
            })
        )

        # PhysicalResourceId と Data を返す
        return {
            'PhysicalResourceId': certificate_id,
            'Data': {
                'CertificateArn': certificate_arn,
                'CertificateId': certificate_id,
                'CertificatePem': certificate_pem,
                'SecretName': secret_name
            }
        }

    elif request_type == 'Delete':
        # PhysicalResourceId から証明書IDを取得
        certificate_id = event['PhysicalResourceId']

        try:
            # 証明書を非アクティブ化
            iot.update_certificate(
                certificateId=certificate_id,
                newStatus='INACTIVE'
            )

            # 証明書を削除
            iot.delete_certificate(certificateId=certificate_id)
            print(f"Deleted certificate: {certificate_id}")
        except Exception as e:
            print(f"Certificate deletion error (may not exist): {e}")

        # Secretを削除
        secret_name = props.get('SecretName', f'iot-private-key-{certificate_id}')
        try:
            secretsmanager.delete_secret(
                SecretId=secret_name,
                ForceDeleteWithoutRecovery=True
            )
            print(f"Deleted secret: {secret_name}")
        except Exception as e:
            print(f"Secret deletion error (may not exist): {e}")

        return {
            'PhysicalResourceId': certificate_id
        }

    else:  # Update
        return {
            'PhysicalResourceId': event['PhysicalResourceId']
        }
4. デプロイ
$ cdk synth
$ cdk deploy
5 分ほどでデプロイ完了します。
5. 証明書ファイルを作成
$ mkdir -p certificates
$ cd certificates

# 証明書PEMを抽出
$ aws secretsmanager get-secret-value \
--secret-id iot-device-certificate \
--query SecretString --output text | jq -r '.certificatePem' > device.pem.crt

# 秘密鍵を抽出
$ aws secretsmanager get-secret-value \
--secret-id iot-device-certificate \
--query SecretString --output text | jq -r '.privateKey' > private.pem.key

# Amazon Root CA 証明書をダウンロード
$ curl -O https://www.amazontrust.com/repository/AmazonRootCA1.pem
6. MQTT クライアントスクリプトの作成
$ pip3 install paho-mqtt

# IoT エンドポイントを取得
$ aws iot describe-endpoint --endpoint-type iot:Data-ATS
YOUR_ENDPOINT_HERE を IoT エンドポイントの値に置換します。
iot-cdk-project/certificates/publish.py
import paho.mqtt.client as mqtt
import ssl
import json
import time
import sys

endpoint = "YOUR_ENDPOINT_HERE"
port = 8883
topic = "test/topic"

ca_path = "AmazonRootCA1.pem"
cert_path = "device.pem.crt"
key_path = "private.pem.key"

def on_connect(client, userdata, flags, rc):
    if rc == 0:
        print("Connected successfully!")
    else:
        print(f"Connection failed with code {rc}")

def on_publish(client, userdata, mid):
    print(f"Message {mid} published")

def on_log(client, userdata, level, buf):
    print(f"Log: {buf}")

client = mqtt.Client()
client.on_connect = on_connect
client.on_publish = on_publish
client.on_log = on_log

client.tls_set(ca_certs=ca_path,
               certfile=cert_path,
               keyfile=key_path,
               tls_version=ssl.PROTOCOL_TLSv1_2)

try:
    print(f"Connecting to {endpoint}:{port}...")
    client.connect(endpoint, port, 60)
    client.loop_start()

    count = 1
    while True:
        message = {
            "message": f"Hello from CDK! ({count})",
            "timestamp": time.time()
        }
        result = client.publish(topic, json.dumps(message), qos=1)
        result.wait_for_publish()
        print(f"[{count}] Published to {topic}: {message}")
        count += 1
        time.sleep(2)

except KeyboardInterrupt:
    print("\nStopped by user")
except Exception as e:
    print(f"Error: {e}")
finally:
    client.loop_stop()
    client.disconnect()
7. 動作確認
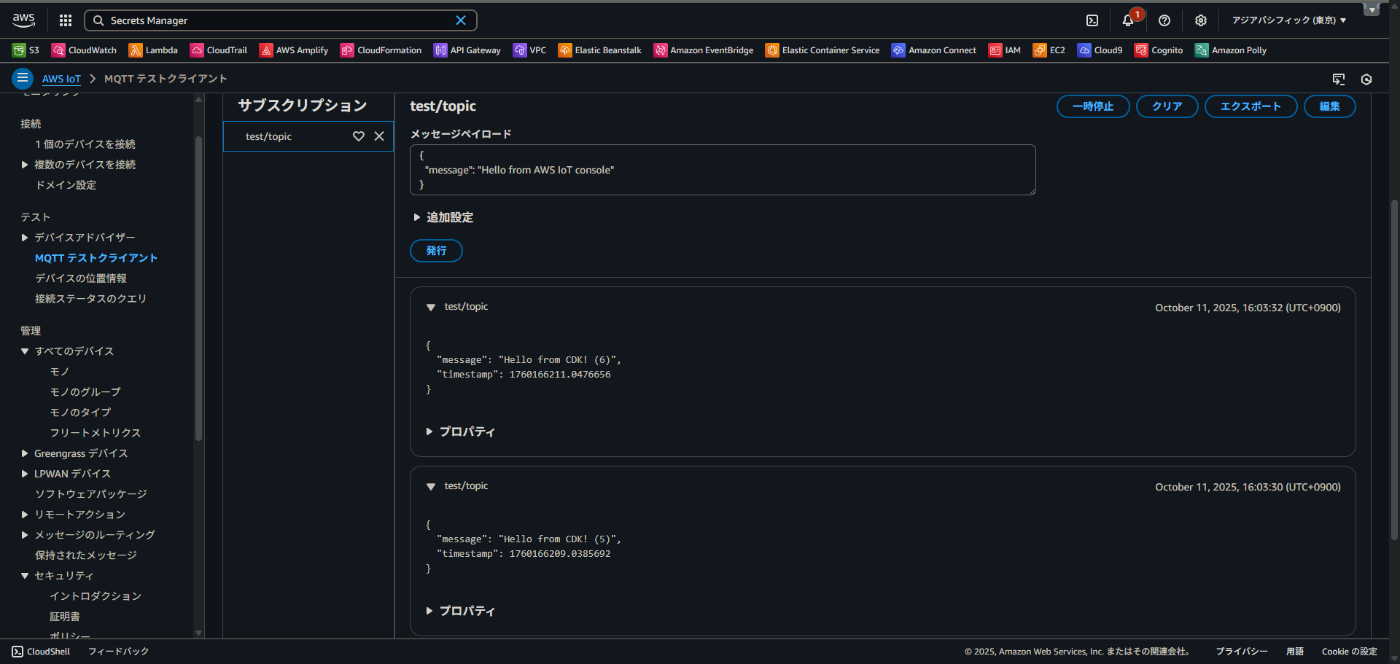
スクリプトを実行して IoT Core の MQTT テストクライアントのコンソールで確認します。
$ python3 publish.py
IoT Core の MQTT テストクライアントのコンソールで test/topic をサブスクライブして以下のメッセージを受信できれば成功です。
{
  "message": "Hello from CDK! (6)",
  "timestamp": 1760166211.0476656
}
まとめ
今回は AWS IoT のハンズオンレベルの内容を CDK からやってみました。
どなたかの参考になれば幸いです。
Discussion