Next.js 14で静的サイトのプロジェクトをつくる


概要
Next.js 14が GA されたので、自分のホームページ作成がてら試してみる。
この記事では、以下の手順を記載する
- Next.js 14 のプロジェクトの作成
- Static HTML Export の設定
- Firebase Hosting プロジェクトの作成
- CI/CD の設定(Hosting の Preview 環境構築及び、Deploy の自動化)
利用技術
- PF: Firebase
- FW: Next.js@14
- Lang: TypeScript
前提
nodejs の v20.9.0(2023/10/29 時点の LTS 版最新)をインストールしておく。
※ 私は fnm を使ってます。
yarn も global に入れとく。
npm i -g yarn
手順
project 作成
yarn create next-app
以下の設定
✔ What is your project named? … <project-name>
✔ Would you like to use TypeScript? … Yes
✔ Would you like to use ESLint? … Yes
✔ Would you like to use Tailwind CSS? … Yes
✔ Would you like to use `src/` directory? … Yes
✔ Would you like to use App Router? (recommended) … Yes
✔ Would you like to customize the default import alias (@/*)? … Yes
✔ What import alias would you like configured? … @/*
(前はカレントディレクトリをプロジェクトルートにできたと思うんだけどできなくなったのかな...)
プロジェクトを作成したら、以下のコマンドが正常に動くか確認しておく。
yarn dev
yarn build
yarn start
yarn lint
問題なく動作したらココまでを commit しておく。
コードの秩序を保つ設定
-
コードの秩序を保つために prettier と lint の設定を入れておく。
-
husky と lint-staged で commit 前に検知・修正を行う。
必要な pkg のインストール
yarn add -D eslint-config-prettier eslint-plugin-prettier prettier husky lint-staged
ちと古いかも
husky の設定
コマンドの実行
npx husky-init
ファイルの修正
#!/usr/bin/env sh
. "$(dirname -- "$0")/_/husky.sh"

npx lint-staged
lint-stage の設定
package.json に以下の設定を追加
// 略
  "lint-staged": {
    "src/**/*.{ts,tsx}": [
      "eslint --fix",
      "git add"
    ]
  }
// 略
.eslintrc.json の修正
ココらへんは好み
{
  "extends": [
    "next/core-web-vitals",
    "prettier",
    "plugin:prettier/recommended",
    "plugin:react/recommended"
  ],
  "rules": {
    "prettier/prettier": "error",
    "react/prop-types": "off",
    "react/react-in-jsx-scope": "off",
    "react-hooks/exhaustive-deps": "warn",
    "no-param-reassign": [
      "error",
      {
        "props": true,
        "ignorePropertyModificationsFor": ["state"]
      }
    ],
    "no-image-element": "off",
    "@next/next/no-img-element": "off"
  },
  "ignorePatterns": [
    "**/__tests__/*.ts",
    "**/*.test.ts(x)",
    "**/__mocks__/*.ts",
    "next-env.d.ts"],
  "settings": {
    "react": {
      "version": "detect"
    }
  }
}
.prettierrc の設定
これも好み
{
  "tabWidth": 2,
  "printWidth": 100,
  "trailingComma": "none",
  "semi": false,
  "singleQuote": true,
  "arrowParens": "avoid"
}
ここまでできたらエディタや pre-commit 時の code format が効くか確認する。
問題なければ、commit する。
Static HTML Export の設定
next.config.js に以下の設定を入れる。
/** @type {import('next').NextConfig} */
const nextConfig = {
  output: 'export' // これがnext exportの設定
}

module.exports = nextConfig
next.config.js の修正が終わったら以下のコマンドを実行して動作確認をする。
yarn build
out/ に正常に静的ファイルが出力されていることを確認する。
Firebase の設定
準備
まず global に firebase-tools をインストールしておく。
npm i -g firebase-tools
firebase にログインしておく
firebase login
Firebase プロジェクトの作成
firebase init
init のオプションは以下を選択
 Hosting:
 Configure files for Firebase Hosting and (optionally) set up GitHub Action deploys
詳細オプションは以下
? What do you want to use as your public directory? out
? Configure as a single-page app (rewrite all urls to /index.html)? No
? Set up automatic builds and deploys with GitHub? Yes
? File out/404.html already exists. Overwrite? No
i  Skipping write of out/404.html
? File out/index.html already exists. Overwrite? No
i  Skipping write of out/index.html
Github の認証が入るので対応する。
Github の Repository 及び Actions に関する設定を聞かれるので答える。
? For which GitHub repository would you like to set up a GitHub workflow? (format: user/repository) <org>/<repo-name>
? What script should be run before every deploy? yarn && yarn build
? Set up automatic deployment to your site's live channel when a PR is merged? Yes
? What is the name of the GitHub branch associated with your site's live channel? main
init コマンドが正常に終了すると、以下のファイルが生成される。
-
.firebaserc- Firebase の Project との紐づけをする
-
.github/workflows/firebase-hosting-merge.yml- main ブランチにマージしたときのジョブ
- firebase hosting にデプロイされる
-
.github/workflows/firebase-hosting-pull-request.yml- PR を作成したときのジョブ
- firebase hosting の preview 環境にデプロイされる
-
firebase.json- Firebase の Project 設定
- 今回のケースでは hosting の設定のみ
この修正差分で PR を作成し、CI/CD の動作確認をする。
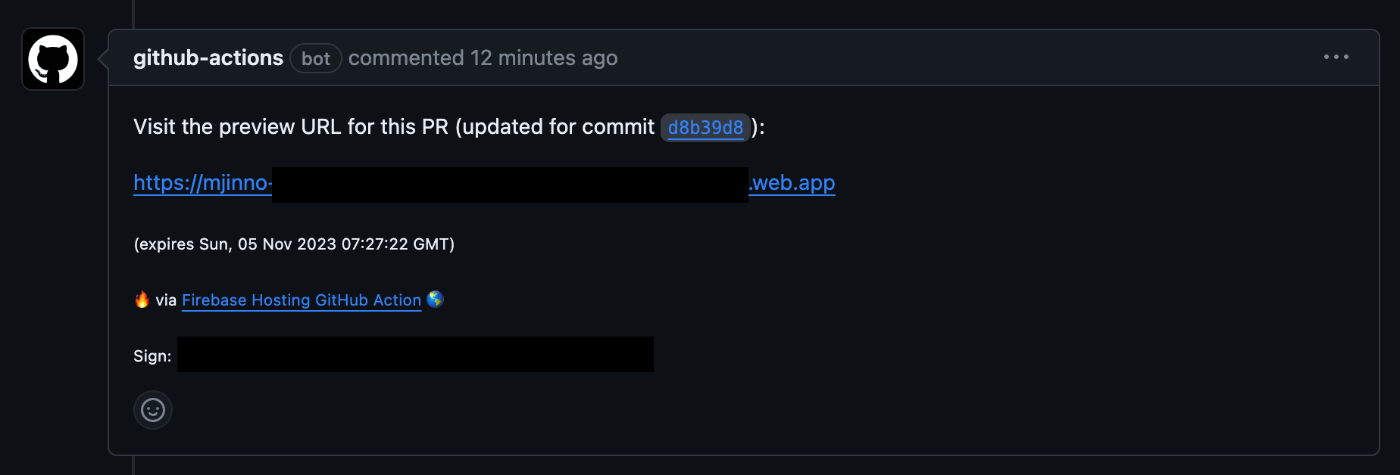
PR ジョブがうまく動作すると以下のようにプレビュー環境が構築される。
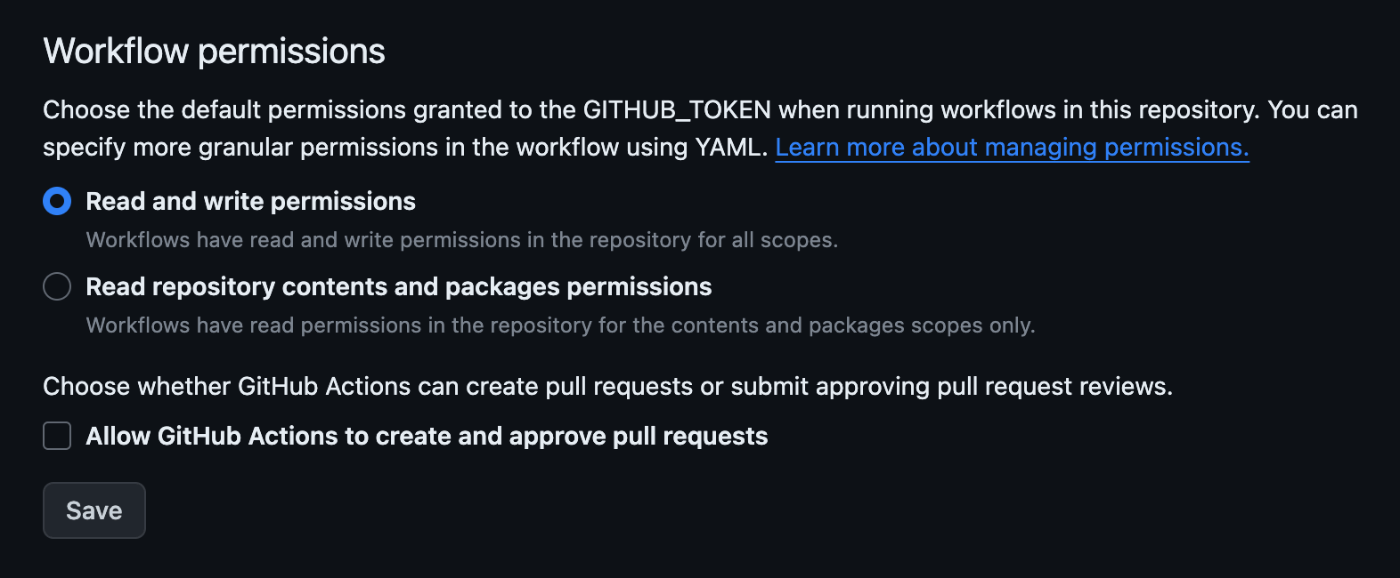
※ リポジトリの Github Actions の設定が以下のようになっていないと、ジョブが失敗する。
対象リポジトリの Setting > Actions > General > Workflow permissions
最後に PR をマージして Deploy ジョブが正常に動作することを確認する。
https://<project-id>.firebaseapp.com
まとめ
これでコードを書けば自動でプレビュー環境構築とデプロイができるようになった。
新しいシステムを構築するときは、この手順のようにビルドパイプラインから作ることを心がけると開発体験的に幸せになれる。
※ こういう設定は後から入れるほうが大変
次回の記事では、Storybook や Jest の設定をいれて、PR 時に自動テストが走るようにする。(ココまでできれば、品質の悪いコードを main ブランチに入れにくくなる)
firebase init コマンドがかなり進化してて、Github Actions の workflow を自動で作ってくれるのはとても便利。
Discussion