AI/ChatGPTでプロダクトは作れるのか?やっていき〜①シンプルTODOリスト〜
ラピッドプロトタイピング×AIの可能性を探るため、実験する一貫の1つ目。
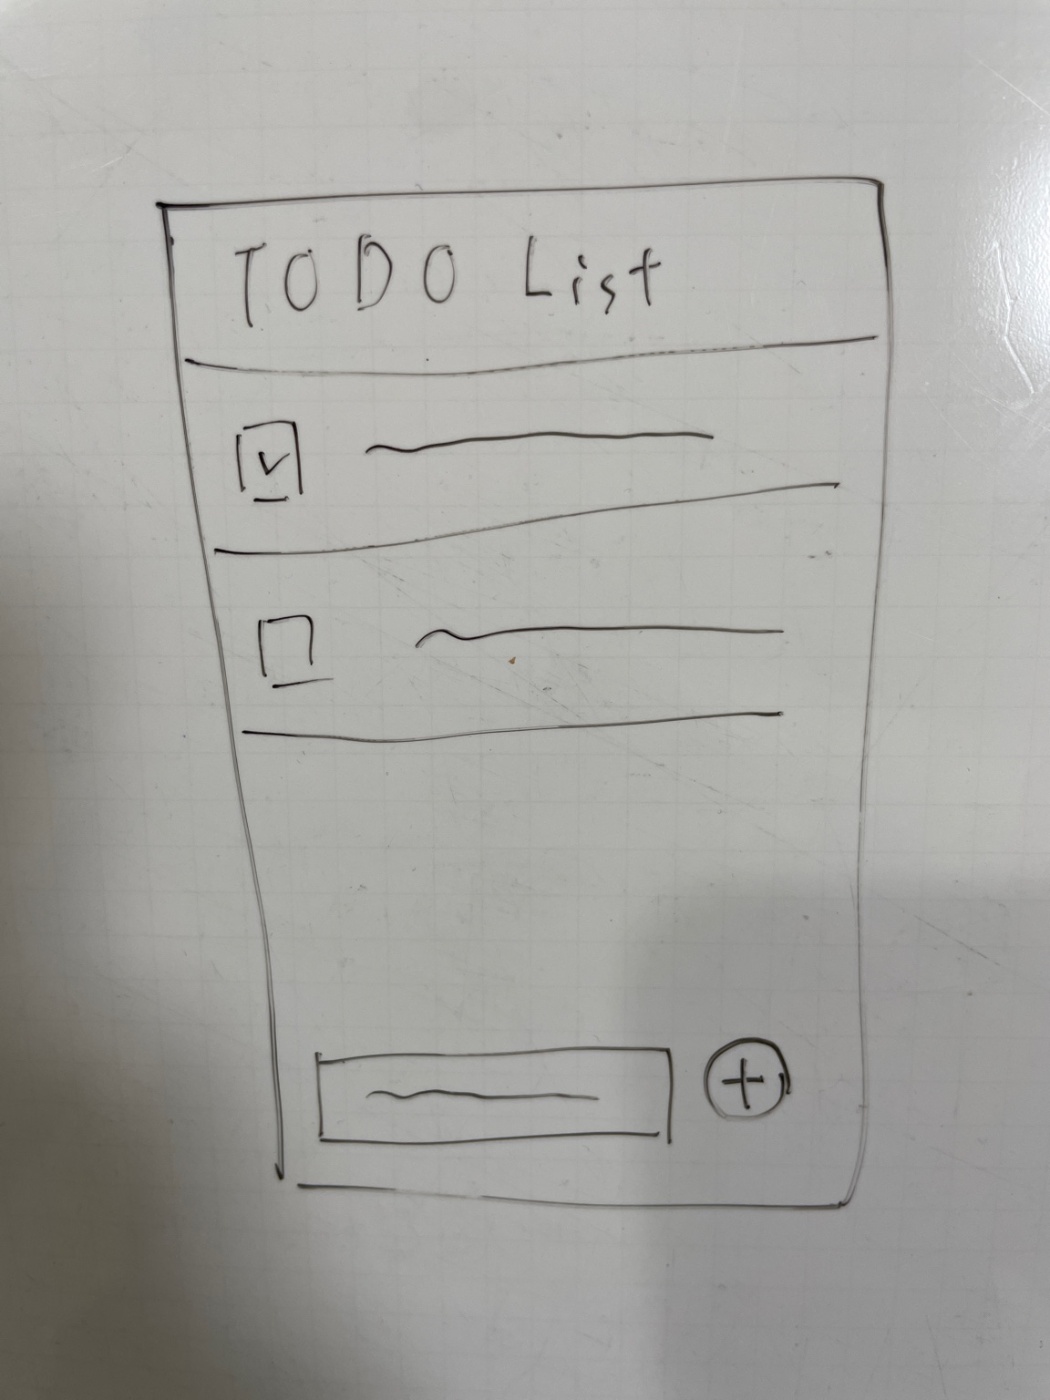
シンプルなTODOアプリを、コーディングなしで作る。
ラフお絵かきのこれを
ここまで持っていく
最終成果物↓
こんな感じのプロンプトで作った。
まずはこんな感じ。基本英語でやり取りしていきます。
(画像と一緒に) This is app UI image. Simple todo App.
アプリのUIイメージです。シンプルなTodoアプリです。
↓回答

あなたは、ホワイトボードに手書きで描いたようなシンプルなTODOアプリのインターフェースの画像を共有した。このインターフェースには、「TODOリスト」と書かれたヘッダーといくつかのリスト項目があり、タスクを完了したものとしてマークするためのチェックボックスがある。新しいタスクを追加するためのものと思われる「+」記号のボタンもある。このデザインについて、改善案やデジタル導入戦略など、具体的な支援が必要な場合は、遠慮なくお尋ねください!
次にこんな感じに聞く。
I would like to create this application and make it widely available.
This app will allow me to do the following
- See a list of TODO titles.
- Each TODO item can be toggled between uncompleted or completed status by tapping the checkbox.
- For a TODO item, you can add a new TODO item by entering its title in the input field and pressing the + button.
Please show us hands-on instructions on what we need to do to create an app with this kind of functionality, in a way that is easy to understand and step-by-step for beginners.
私はこのアプリケーションを作成し、広く利用できるようにしたいと考えています。
このアプリでできることは以下の通りです。
- TODOタイトルのリストを見る。
- 各TODO項目は、チェックボックスをタップすることで、未完了と完了のステータスを切り替えることができます。
- TODO項目に対して、入力フィールドにタイトルを入力し、+ボタンを押すことで、新しいTODO項目を追加できる。
このような機能を持ったアプリを作るにはどうすればいいのか、初心者にもわかりやすく、ステップバイステップでハンズオンの手順を教えてください。
回答長いがこんな感じ。
Creating a simple to-do application involves several steps, including designing the user interface, programming the functionality, and deploying the app for others to use. I'll guide you through the process using web technologies like HTML, CSS, and JavaScript, which are widely used, beginner-friendly, and deployable on a variety of platforms.
(シンプルなToDoアプリケーションを作成するには、ユーザーインターフェイスの設計、機能のプログラミング、他の人が使えるようにアプリをデプロイするなどのいくつかのステップが必要です。HTML、CSS、JavaScriptのような、広く使われていて初心者にもやさしく、さまざまなプラットフォームでデプロイ可能なウェブ・テクノロジーを使って、このプロセスをご案内します。)
Step 1: Designing the User Interface
First, you'll need to create the HTML structure of your app. Here's a basic outline using HTML:
(ステップ1:ユーザーインターフェースの設計
まず、アプリのHTML構造を作成する必要があります。ここでは、HTMLを使った基本的なアウトラインを示します:)
<!DOCTYPE html>
<html lang="en">
<head>
    <meta charset="UTF-8">
    <meta name="viewport" content="width=device-width, initial-scale=1.0">
    <title>Simple To-Do App</title>
    <style>
        /* We will add CSS here */
    </style>
</head>
<body>
    <div id="app">
        <h1>TODO List</h1>
        <ul id="todo-list">
            <!-- To-Do items will go here -->
        </ul>
        <input type="text" id="new-todo-title" placeholder="Add a new task">
        <button id="add-todo">+</button>
    </div>
    <script>
        // We will add JavaScript here
    </script>
</body>
</html>
Step 2: Adding Style with CSS
Inside the <style> tag, add some CSS to make your app look better:
(ステップ2:CSSでスタイルを追加する
<style>タグの中に、アプリの見栄えを良くするためのCSSを追加します:)
body {
    font-family: 'Arial', sans-serif;
    margin: 0;
    padding: 20px;
    background-color: #f4f4f4;
}

#app {
    max-width: 400px;
    margin: auto;
    background: white;
    padding: 20px;
    border-radius: 8px;
    box-shadow: 0 0 10px rgba(0, 0, 0, 0.1);
}

#todo-list {
    list-style: none;
    padding: 0;
}

#todo-list li {
    padding: 10px;
    border-bottom: 1px solid #ddd;
}

#new-todo-title {
    padding: 10px;
    width: calc(100% - 22px);
    margin-bottom: 10px;
}

#add-todo {
    width: 100%;
    padding: 10px;
    background-color: #5cb85c;
    color: white;
    border: none;
    border-radius: 4px;
}
Step 3: Adding Functionality with JavaScript
Inside the <script> tag, you'll add JavaScript to handle creating new to-dos, toggling their completed status, and updating the display. Here's a basic JavaScript to get you started:
(ステップ3:JavaScriptで機能を追加する
<script>タグの中に、新しいToDoの作成、完了ステータスの切り替え、表示の更新を処理するJavaScriptを追加します。ここでは、基本的なJavaScriptを紹介します:)
document.addEventListener('DOMContentLoaded', function() {
    const addButton = document.getElementById('add-todo');
    const newTodoTitle = document.getElementById('new-todo-title');
    const todoList = document.getElementById('todo-list');

    addButton.addEventListener('click', function() {
        const title = newTodoTitle.value.trim();
        if (title) {
            addTodo(title);
            newTodoTitle.value = '';
        }
    });

    function addTodo(title) {
        const listItem = document.createElement('li');
        const checkbox = document.createElement('input');
        checkbox.type = 'checkbox';
        checkbox.addEventListener('change', toggleTodo);

        const span = document.createElement('span');
        span.textContent = title;

        listItem.appendChild(checkbox);
        listItem.appendChild(span);
        todoList.appendChild(listItem);
    }

    function toggleTodo(event) {
        const listItem = event.target.parentElement;
        if (event.target.checked) {
            listItem.classList.add('completed');
        } else {
            listItem.classList.remove('completed');
        }
    }
});
Step 4: Testing Your App
You can test your app by opening the HTML file in a web browser. Create, toggle, and view your to-dos to ensure everything is working.
(ステップ4:アプリのテスト
ウェブブラウザでHTMLファイルを開くと、アプリをテストできます。ToDoを作成、切り替え、表示して、すべてが機能していることを確認してください。)
Step 5: Deploying Your App
Once your app works to your satisfaction, you can deploy it. As a beginner, the easiest way to do this is by using platforms like GitHub Pages or Netlify, which offer free hosting for simple web apps.
(ステップ5:アプリのデプロイ
満足のいくアプリができたら、デプロイしましょう。初心者のうちは、GitHub PagesやNetlifyのようなプラットフォームを使うのが一番簡単です。)
Create a repository on GitHub and push your code there.
Use GitHub Pages to deploy your app directly from your GitHub repository.
Alternatively, connect your GitHub repository to Netlify and deploy from there.
Additional Steps
As you become more comfortable with these technologies, consider the following enhancements:
Saving the to-do list to local storage so that it persists between sessions.
Adding the ability to edit or delete tasks.
Improving the user interface with frameworks like Bootstrap or Materialize.
Learning a JavaScript framework like React, Vue, or Angular for more advanced features.
This is a very basic outline. Real-world app development involves more, such as dealing with user accounts, storing data on a server, and handling different device sizes and platforms. However, this guide should help you create a simple web-based to-do app and get you started on the path to more complex applications.
(GitHub にリポジトリを作成し、そこにコードをプッシュします。
GitHub Pages を使って GitHub リポジトリから直接アプリをデプロイしましょう。
または、GitHub リポジトリを Netlify に接続し、そこからデプロイします。
追加のステップ
これらの技術に慣れてきたら、以下の拡張を検討してみてください:
ToDoリストをローカルストレージに保存し、セッション間で持続できるようにする。
タスクの編集や削除機能の追加。
BootstrapやMaterializeのようなフレームワークを使ったユーザーインターフェイスの改善。
より高度な機能のために、React、Vue、AngularのようなJavaScriptフレームワークを学ぶ。
これは非常に基本的な概要だ。実際のアプリ開発では、ユーザーアカウントの扱い、サーバーへのデータ保存、さまざまなデバイスサイズやプラットフォームへの対応など、さらに多くのことが必要になります。しかし、このガイドはシンプルなウェブベースのToDoアプリを作成し、より複雑なアプリケーションへの道を歩み始めるのに役立つはずだ。)
出てきたコード内容を以下の感じにコピペすると動く。
こんな感じに聞くとハンズオン手順ぽくもしてくれる。
Thank you!
Please show us the hands-on procedure, taking into account the steps to prepare the execution environment to be able to run what you have presented.
(ありがとうございます!
ご紹介いただいたものを実行できるように、実行環境を準備する手順を考慮したハンズオンの手順を教えてください。)
↓回答
Certainly! To begin, you'll need to set up a development environment on your computer where you can write and test your code. Here's a step-by-step guide to setting up a basic environment and running the to-do app:
(確かに!まずは、コードを書いたりテストしたりできる開発環境をコンピュータにセットアップする必要がある。ここでは、基本的な環境をセットアップし、ToDoアプリを実行するためのステップ・バイ・ステップ・ガイドを紹介する:)
Step 1: Set Up Your Development Environment
Text Editor: Download and install a text editor specifically designed for coding, like Visual Studio Code (VS Code), Sublime Text, or Atom. These editors provide features such as syntax highlighting and code formatting that will help you write code more easily.
(ステップ1:開発環境のセットアップ
テキストエディタ: Visual Studio Code(VS Code)、Sublime Text、Atomなど、コーディング専用のテキストエディタをダウンロードしてインストールする。これらのエディタには、シンタックスハイライトやコードフォーマットなどの機能があり、より簡単にコードを書くことができます。)
Web Browser: Ensure you have a modern web browser such as Google Chrome, Mozilla Firefox, or Microsoft Edge. These browsers come with Developer Tools that are essential for testing and debugging web applications.
(ウェブブラウザ Google Chrome、Mozilla Firefox、Microsoft Edgeなどの最新のウェブブラウザを使用していることを確認してください。これらのブラウザには、ウェブアプリケーションのテストやデバッグに不可欠なデベロッパーツールが付属しています。)
Local Server (Optional): For most basic projects, you can open your HTML files directly in a web browser. However, if you want a more realistic environment that simulates a server, you can use a simple HTTP server. For instance, if you have Python installed, you can run a simple HTTP server directly in the directory of your project.
(ローカルサーバー(オプション): ほとんどの基本的なプロジェクトでは、HTMLファイルをウェブブラウザで直接開くことができます。しかし、サーバーをシミュレートしたより現実的な環境が必要な場合は、シンプルなHTTPサーバーを使うことができます。例えば、Pythonがインストールされていれば、プロジェクトのディレクトリで直接シンプルなHTTPサーバーを実行することができます。
)
Step 2: Create Your Project Files
Create a New Directory: Create a new folder on your computer where you will keep your project files.
Create Your HTML File: Open your text editor and create a new file named index.html. Copy and paste the HTML structure I provided into this file.
Create Your CSS and JavaScript Files: Although you can write CSS and JavaScript directly in the HTML file, it’s a good practice to separate them into their own files. Create two new files in the same directory: style.css for your CSS and script.js for your JavaScript.
Link CSS and JavaScript: In your index.html file, link to the CSS and JavaScript files by adding the following lines in the <head> for CSS and before the closing </body> tag for JavaScript:
(ステップ2:プロジェクトファイルの作成
新しいディレクトリを作成します: プロジェクト・ファイルを保存する新しいフォルダをコンピュータ上に作成します。
HTMLファイルの作成:テキストエディタを開き、index.htmlという名前のファイルを新規作成します。このファイルに、私が提供したHTML構造をコピー&ペーストしてください。
CSSとJavaScriptファイルを作成します: HTMLファイルに直接CSSとJavaScriptを書くこともできますが、それぞれのファイルに分けるのがよい方法です。同じディレクトリに、CSS用のstyle.cssとJavaScript用のscript.jsの2つの新しいファイルを作成します。
CSSとJavaScriptをリンクさせます: index.htmlファイルで、CSSの場合は<head>の中に、JavaScriptの場合は</body>タグを閉じる前に以下の行を追加して、CSSとJavaScriptのファイルにリンクします:
)
<!-- Inside the <head> -->
<link rel="stylesheet" href="style.css">

<!-- Before the closing </body> -->
<script src="script.js"></script>
Step 3: Write Your Code
Write HTML: Write your HTML code in the index.html file.
Style with CSS: Write your CSS code in the style.css file.
Program with JavaScript: Write your JavaScript code in the script.js file.
(ステップ3:コードを書く
HTMLを書く: index.htmlファイルにHTMLコードを記述します。
CSSでスタイルを設定します: CSSコードをstyle.cssファイルに記述します。
JavaScriptでプログラムする: script.jsファイルにJavaScriptのコードを記述します。)
Step 4: Test Your Application
Open the HTML File: Open your index.html file in your web browser. You should see the basic structure of your to-do app.
Use Developer Tools: Right-click on the page and select “Inspect” or “Developer Tools” to open the tools panel. You can use the "Console" tab to see any JavaScript logs or errors, which is useful for debugging.
Make Changes and Refresh: As you make changes to your HTML, CSS, or JavaScript files, save them and refresh the browser to see the updates.
(ステップ4:アプリケーションのテスト
HTMLファイルを開く:ウェブブラウザでindex.htmlファイルを開いてください。ToDoアプリの基本構造が表示されるはずです。
デベロッパーツールを使う: ページを右クリックし、"Inspect "または "Developer Tools "を選択してツールパネルを開きます。コンソール」タブでJavaScriptのログやエラーを見ることができ、デバッグに便利です。
変更と更新 HTML、CSS、JavaScriptファイルに変更を加えたら、それを保存し、ブラウザを更新して更新を確認します。)
Step 5: Run a Local Server (Optional)
If you are using a local server:
Navigate to Your Project: Open a command prompt or terminal and navigate to your project directory.
Start the Server: If you have Python installed, you can start a server with one of the following commands, depending on your Python version:
Python 2.x: python -m SimpleHTTPServer
Python 3.x: python -m http.server
Open in Browser: Open your web browser and go to http://localhost:8000. You should see your to-do app running.
(ステップ5:ローカルサーバーの実行(オプション)
ローカルサーバーを使用する場合
プロジェクトに移動します: コマンドプロンプトまたはターミナルを開き、プロジェクトのディレクトリに移動します。
サーバを起動します: Pythonがインストールされていれば、Pythonのバージョンに応じて以下のコマンドのいずれかでサーバーを起動できます:
Python 2.x: python -m SimpleHTTPServer
Python 3.x: python -m http.server
ブラウザで開く: ウェブブラウザを開き、http://localhost:8000。ToDoアプリが動いているのが見えるはずです。)
Step 6: Continue Developing
As you build out your application, you can continuously test and refine your code. If you run into any issues or errors, use the Developer Tools to troubleshoot and debug.
(ステップ6:開発を続ける
アプリケーションを作り上げながら、コードを継続的にテストし、改良していくことができます。問題やエラーが発生した場合は、デベロッパーツールを使ってトラブルシューティングとデバッグを行ってください。)
Step 7: Deployment
Once you're ready to share your app with the world, follow the deployment instructions previously mentioned to get your app live on the web.
By following these steps, you'll have set up a local development environment, created the necessary files, and written the initial code for your to-do app. You can now continue to expand on this foundation, adding more features and refining the app as you learn.
(ステップ7: デプロイメント
アプリを世界と共有する準備ができたら、前述のデプロイ手順に従ってアプリをウェブ上で公開しましょう。
これらのステップに従うことで、ローカルの開発環境をセットアップし、必要なファイルを作成し、ToDoアプリの初期コードを書くことができます。あとは、この基礎の上にさらに機能を追加し、学習しながらアプリを改良していくことができます。)
なんてことをやっている内にtldrawさんがお絵かきからUI・アプリを作るサービスを公開。
進化がとんでもないですね。
誰もがなんでも作ることのできる時代はもうすぐ目の前に…