【Kotlin】Android Kotlin Fundamentalsをやってみた:Lesson1
Lesson1:Build your first app
Lesson1-0:Install Android Studio
Android Studioをインストールする(既にインストールしていたのでスキップ)
Lesson1-1:Get started
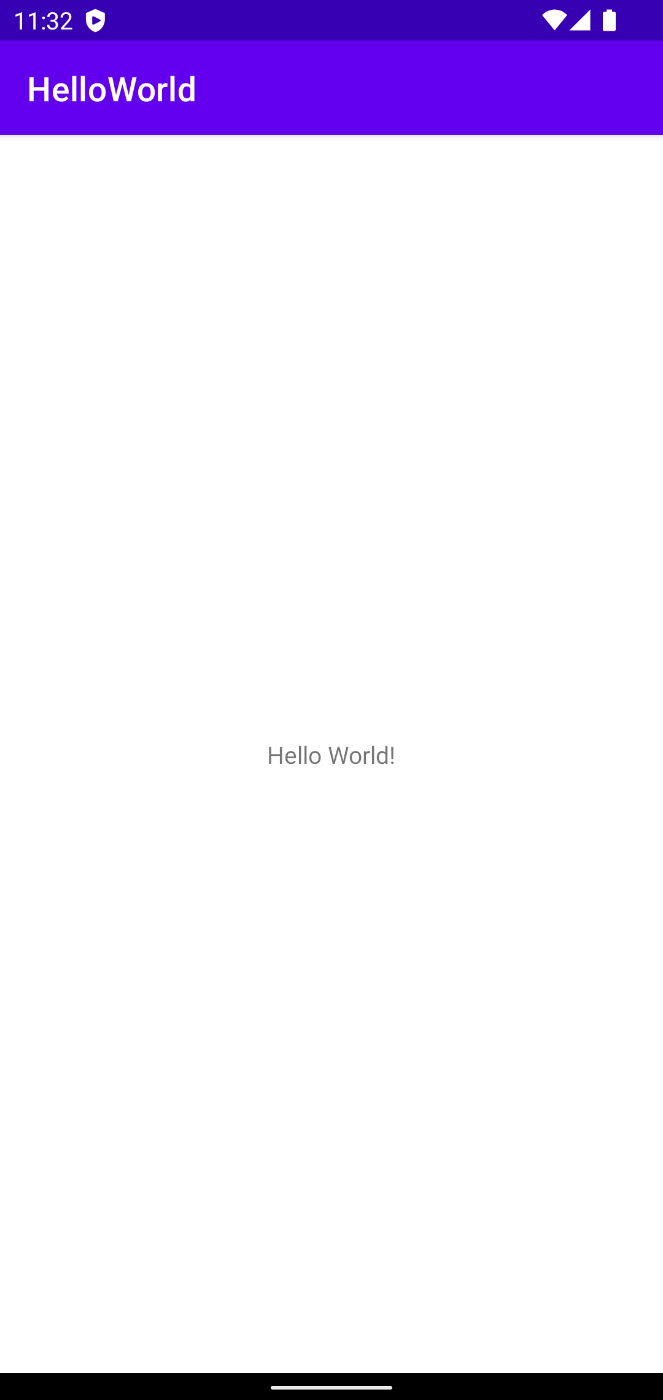
HelloWorldプロジェクトの作成
projectについて
Android Studio ウィンドウの左側にある垂直タブ列にある。
フォルダについて
appフォルダ内にmanifests・java・generatedJava・resフォルダがある
- java:Android アプリの主要な Kotlin コードが含まれている
- generatedJava:Android Studio がアプリをビルドするときに生成するファイルが含まれている
resフォルダについて
resフォルダにはリソース(アプリで使用される静的コンテンツ)が含まれる。
リソースには画像、テキスト文字列、画面レイアウト、スタイル、および 16 進数の色や標準寸法などの値が含まれる。
- activity_main.xml:MainActivityのレイアウトを作成する
manifests フォルダーと AndroidManifest について
manifestsフォルダーには、アプリに関する重要な情報を Android システムに提供するファイルが含まれてい
る
- AndroidManifest.xml:アプリを実行するために Android システムが必要とする記述が含まれている
<activity android:name=".MainActivity">
   <intent-filter>
       <action android:name="android.intent.action.MAIN"/>

       <category android:name="android.intent.category.LAUNCHER"/>
   </intent-filter>
</activity>
<action>と<category>はユーザーがランチャーアイコンをクリックしたときにアプリを起動する場所を伝えている。
また、AndroidManifest.xmlはアプリに必要なアクセス許可を定義する場所でもある。アクセス許可には電話の連絡先を読み取る、インターネット経由でデータを送信する、デバイスのカメラなどのハードウェアにアクセスするなどが含まれる。
Gradle Scriptsフォルダについて
ドメイン固有の言語を使用してアプリのプロジェクト構造、構成、および依存関係を記述するビルド自動化システム。
アプリをコンパイルして実行すると、実行中の Gradle ビルドに関する情報が表示される。
課題
- Android Studioで新しいプロジェクトの作成
- 「Hello World」を「Happy Birthday to」に変更
宿題
- app_nameをMy Dice Rollerに変更
Lesson1-2:Anatomy of Basic Android Project
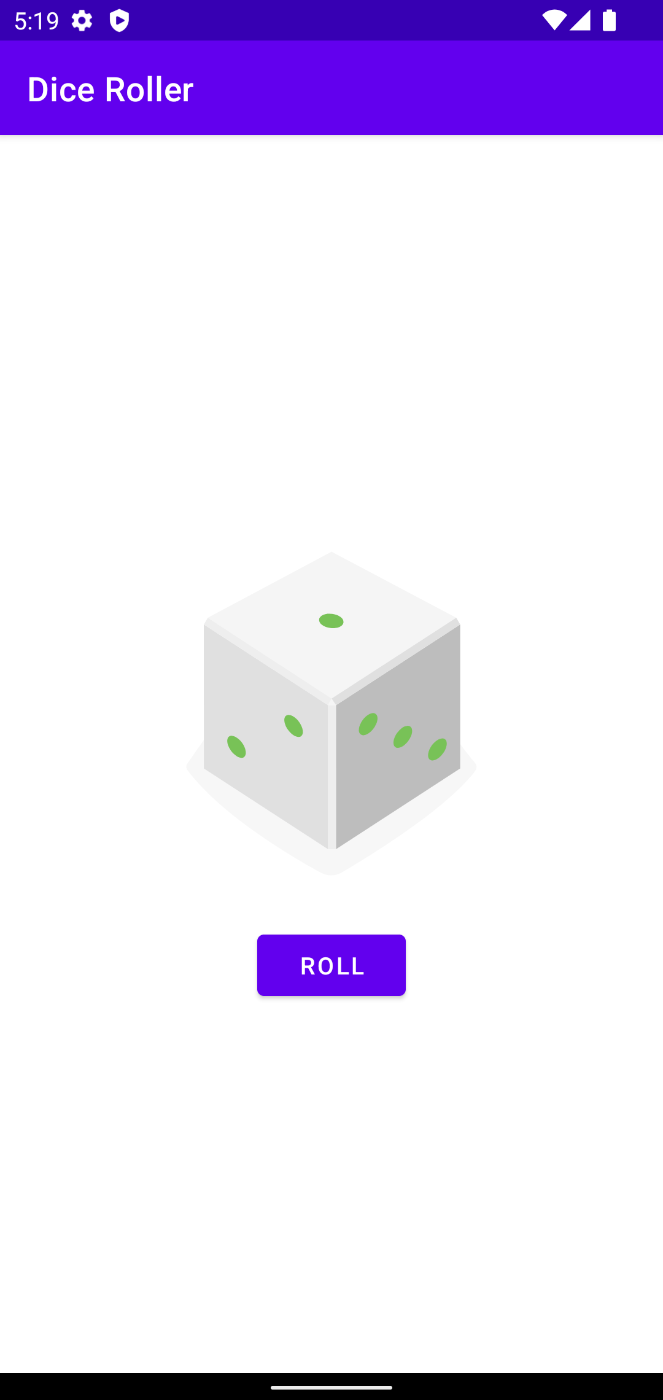
DiceRollerアプリの作成
ビューとスタイルの配置

<?xml version="1.0" encoding="utf-8"?>
<LinearLayout
    xmlns:android="http://schemas.android.com/apk/res/android"
    xmlns:tools="http://schemas.android.com/tools"
    android:layout_width="match_parent"
    android:layout_height="wrap_content"
    android:orientation="vertical"
    android:layout_gravity="center_vertical"
    tools:context=".MainActivity">

    <TextView
        android:layout_width="wrap_content"
        android:layout_height="wrap_content"
        android:layout_gravity="center_horizontal"
        android:textSize="30sp"
        android:text="Hello World!" />

    <Button
        android:id="@+id/roll_button"
        android:layout_width="wrap_content"
        android:layout_height="wrap_content"
        android:layout_gravity="center_horizontal"
        android:text="@string/roll_label"/>

</LinearLayout>
ボタンをクリックしてトーストを表示させる
class MainActivity : AppCompatActivity() {
  override fun onCreate(savedInstanceState: Bundle?) {
    super.onCreate(savedInstanceState)
    setContentView(R.layout.activity_main)

    val rollButton: Button = findViewById(R.id.roll_button);
    rollButton.setOnClickListener{rollDice()};
  }

  private fun rollDice() {
    Toast.makeText(this, "button clicked", Toast.LENGTH_LONG).show()
  }
}
ボタンをクリックしたらTextViewを変更する
TextViewにidを付与する
<TextView
        android:id="@+id/result_text"
        android:layout_width="wrap_content"
        android:layout_height="wrap_content"
        android:layout_gravity="center_horizontal"
        android:textSize="30sp"
        android:text="Hello World!" />
メソッドにTextViewを変更する処理を追加
private fun rollDice() {
    val resultText: TextView = findViewById(R.id.result_text)
    resultText.text = "Dice Rolled!"
    Toast.makeText(this, "button clicked", Toast.LENGTH_LONG).show()
  }
乱数を表示させる
private fun rollDice() {
    val resultText: TextView = findViewById(R.id.result_text)
    val randomInt = (1..6).random()
    resultText.text = randomInt.toString()
    Toast.makeText(this, "button clicked", Toast.LENGTH_LONG).show()
  }
Lesson1-2:課題
Count Upボタンを追加し、TextViewがHello Worldの場合は1に、数字の場合は6までカウントアップできるようにする。
<LinearLayout
    xmlns:android="http://schemas.android.com/apk/res/android"
    xmlns:tools="http://schemas.android.com/tools"
    android:layout_width="match_parent"
    android:layout_height="wrap_content"
    android:orientation="vertical"
    android:layout_gravity="center_vertical"
    tools:context=".MainActivity">

    <TextView
        android:id="@+id/result_text"
        android:layout_width="wrap_content"
        android:layout_height="wrap_content"
        android:layout_gravity="center_horizontal"
        android:textSize="30sp"
        android:text="Hello World!" />

    <Button
        android:id="@+id/roll_button"
        android:layout_width="wrap_content"
        android:layout_height="wrap_content"
        android:layout_gravity="center_horizontal"
        android:text="@string/roll_label"/>

    <Button
        android:id="@+id/countup_button"
        android:layout_width="wrap_content"
        android:layout_height="wrap_content"
        android:layout_gravity="center_horizontal"
        android:text="@string/countup_label"/>

</LinearLayout>
<resources>
    <string name="app_name">Dice Roller</string>
    <string name="roll_label">Roll</string>
    <string name="countup_label">Count Up</string>
</resources>
class MainActivity : AppCompatActivity() {
  override fun onCreate(savedInstanceState: Bundle?) {
    super.onCreate(savedInstanceState)
    setContentView(R.layout.activity_main)

    val rollButton: Button = findViewById(R.id.roll_button);
    rollButton.setOnClickListener{rollDice()};

    val countUpButton: Button = findViewById(R.id.countup_button)
    countUpButton.setOnClickListener{countUp()}
  }

  private fun rollDice() {
    val resultText: TextView = findViewById(R.id.result_text)
    val randomInt = (1..6).random()
    resultText.text = randomInt.toString()
  }

  private fun countUp() {
    val resultText: TextView = findViewById(R.id.result_text)

    if (resultText.text == "Hello World!") {
      resultText.text = "1"
    } else {
      var resultInt = resultText.text.toString().toInt()
      if (resultInt < 6) {
        resultInt++
        resultText.text = resultInt.toString()
      }
    }
  }
}
Lesson1-3:Image resources and compatibility
サイコロの画像を追加し、ROLLボタンを押すと色々な目のサイコロを出すようにする
<LinearLayout
    xmlns:android="http://schemas.android.com/apk/res/android"
    xmlns:tools="http://schemas.android.com/tools"
    android:layout_width="match_parent"
    android:layout_height="wrap_content"
    android:orientation="vertical"
    android:layout_gravity="center_vertical"
    tools:context=".MainActivity">

    <ImageView
        android:id="@+id/dice_image"
        android:layout_width="wrap_content"
        android:layout_height="wrap_content"
        android:layout_gravity="center_horizontal"
        android:src="@drawable/dice_1" />

    <Button
        android:id="@+id/roll_button"
        android:layout_width="wrap_content"
        android:layout_height="wrap_content"
        android:layout_gravity="center_horizontal"
        android:text="@string/roll_label"/>

</LinearLayout>
サイコロの画像を表示するメソッドを追加
private fun rollDice() {
    val randomInt = (1..6).random()
    val diceImage: ImageView = findViewById(R.id.dice_image)
    val drawableResource = when (randomInt) {
      1 -> R.drawable.dice_1
      2 -> R.drawable.dice_2
      3 -> R.drawable.dice_3
      4 -> R.drawable.dice_4
      5 -> R.drawable.dice_5
      else -> R.drawable.dice_6
    }
    diceImage.setImageResource(drawableResource)
  }
パフォーマンスを高めるため、ボタンを押すたびにfindViewById()しないで、onCreate()内でfindViewById()する
class MainActivity : AppCompatActivity() {
  lateinit var diceImage: ImageView

  override fun onCreate(savedInstanceState: Bundle?) {
    super.onCreate(savedInstanceState)
    setContentView(R.layout.activity_main)

    diceImage = findViewById(R.id.dice_image)
  }

  private fun rollDice() {
    val randomInt = (1..6).random()
    val drawableResource = when (randomInt) {
      1 -> R.drawable.dice_1
      2 -> R.drawable.dice_2
      3 -> R.drawable.dice_3
      4 -> R.drawable.dice_4
      5 -> R.drawable.dice_5
      else -> R.drawable.dice_6
    }
    diceImage.setImageResource(drawableResource)
  }
}
ベクター画像はPNG画像よりも軽いため、アプリのサイズが小さくなる。
サイコロを2つ並べてランダムに表示させる
class MainActivity : AppCompatActivity() {
  lateinit var diceImage: ImageView
  lateinit var diceImage2: ImageView

  override fun onCreate(savedInstanceState: Bundle?) {
    super.onCreate(savedInstanceState)
    setContentView(R.layout.activity_main)

    val rollButton: Button = findViewById(R.id.roll_button);
    rollButton.setOnClickListener{rollDice()};

    diceImage = findViewById(R.id.dice_image)
    diceImage2 = findViewById(R.id.dice_image2)
  }

  private fun rollDice() {
    diceImage.setImageResource(getRandomDiceImage())
    diceImage2.setImageResource(getRandomDiceImage())
  }

  private fun getRandomDiceImage(): Int {
    val randomInt = (1..6).random()

    return when (randomInt) {
      1 -> R.drawable.dice_1
      2 -> R.drawable.dice_2
      3 -> R.drawable.dice_3
      4 -> R.drawable.dice_4
      5 -> R.drawable.dice_5
      else -> R.drawable.dice_6
    }
  }
}
Lesson1-4:Learn to help yourself
ランチャーアイコンの変更
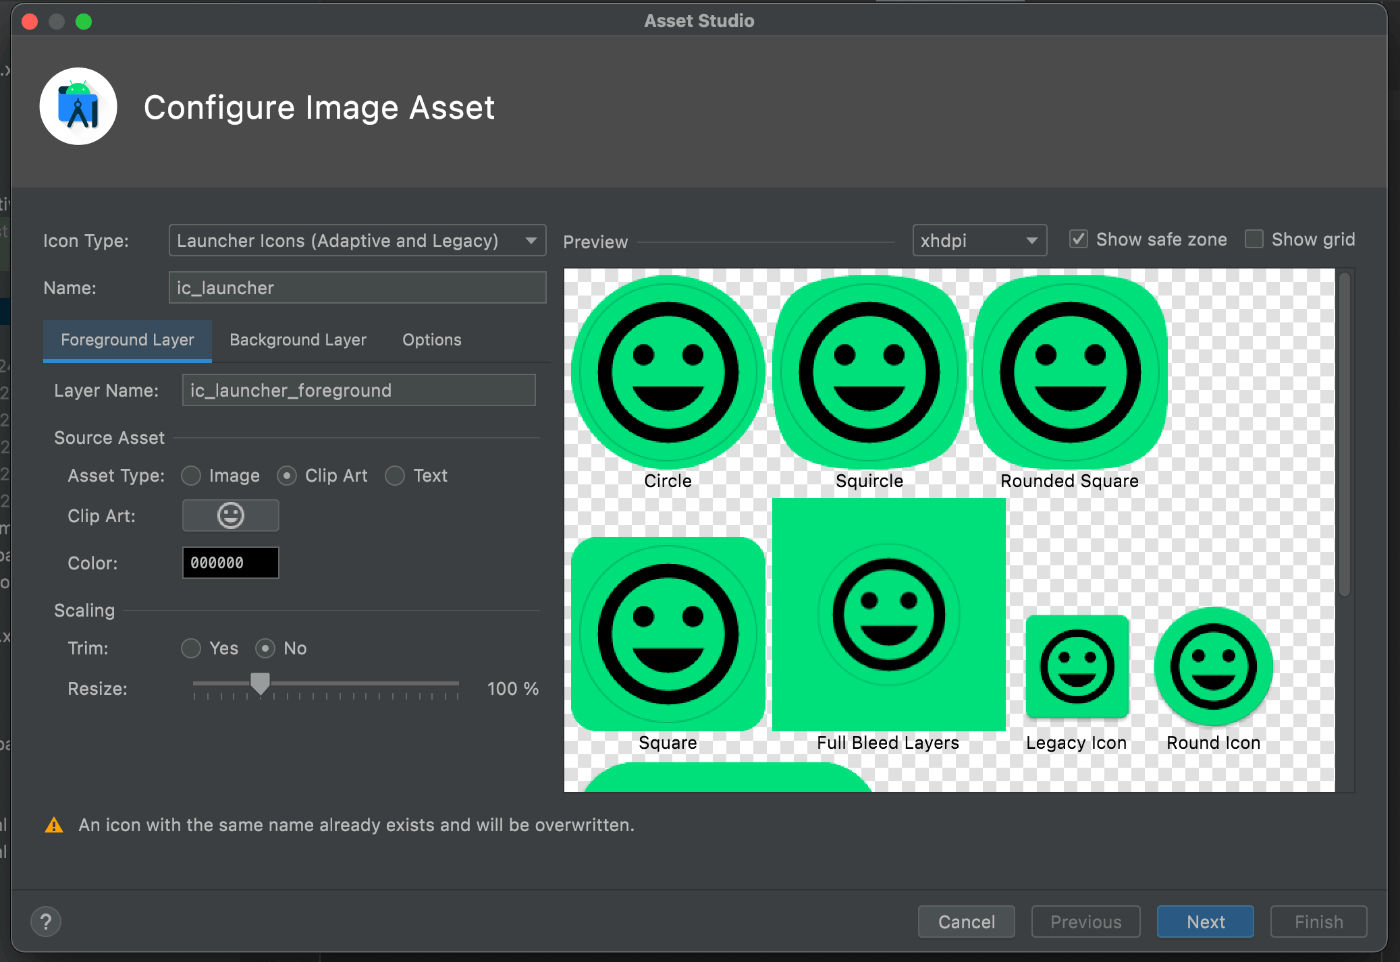
- resフォルダーを右クリックしてNew→Image Assetを押す
- Foreground layerとBackgroundLayerでアイコン・色を設定する
- 次へ→完了ボタンを押す