【Flutter】Deep Linkを実装してみた
はじめに
ディープリンクとは「ユーザーをモバイルアプリの特定の画面や位置に直接導くリンク」のことです。
現在携わっている案件でFirebase Dynamic Linksをディープリンクの実装手段として採用する予定だったのですが、2025年8月25日にサービスが終了してしまうのでiOSではUniversal Linksを、AndroidではApp Linksを用いることになりました。Universal LinksとApp Linksの設定について下記に記載しています。
Universal Linksの設定
Flutterのドキュメントを基に設定していきます。
1.FlutterDeepLinkingEnabledをtrueにする
まずXcodeを立ち上げ、ios/Runner.xcworkspaceファイルを開きます。
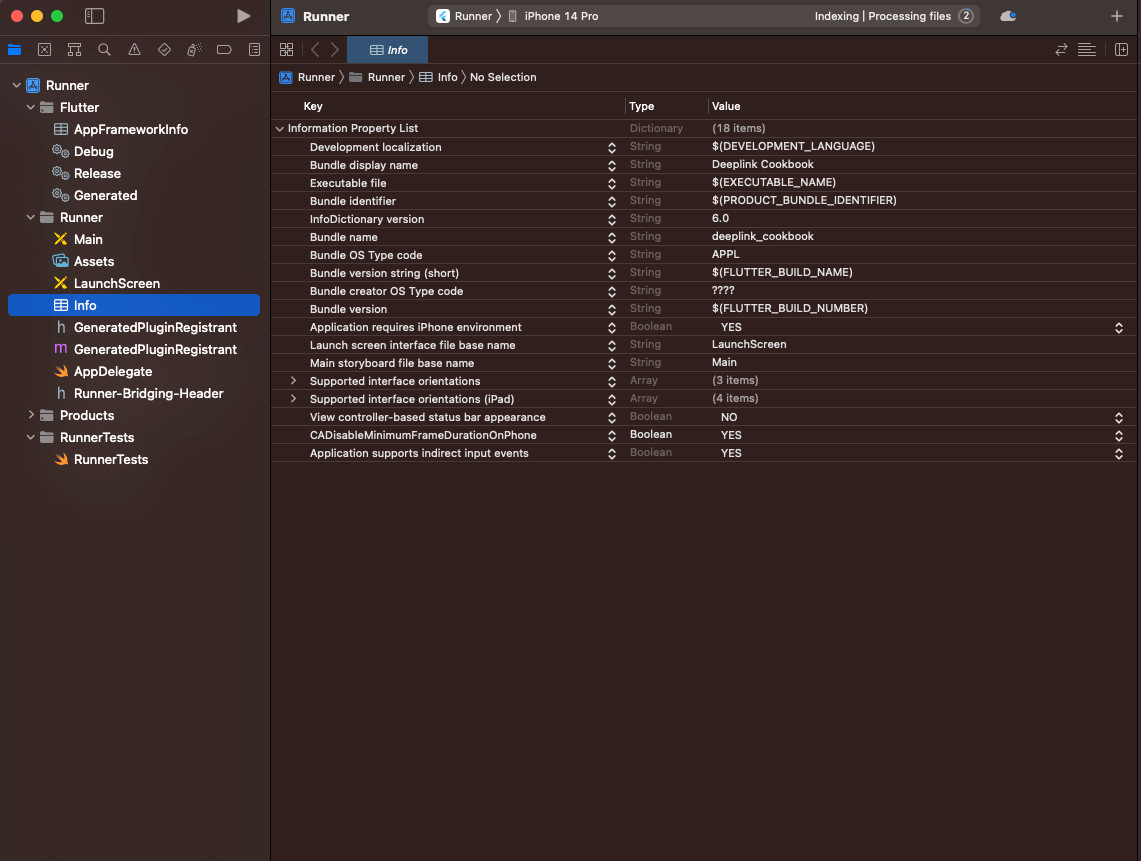
ios/Runnerフォルダ内のInfo Plistファイルを開きます。開くとKey・Type・Valueが並んでいると思うのですが、新しく行を追加しKeyはFlutterDeepLinkingEnabled・TypeはBoolean・ValueはTrueとなるように設定します。

2.ドメインを登録する
トップレベルのRunnerをクリックし、その中にあるSigning & Capabilitiesを開くと+ Capabilityボタンがあるのでそれをクリックします。
モーダルが開くのでそこからAssociated Domainsを選択します。
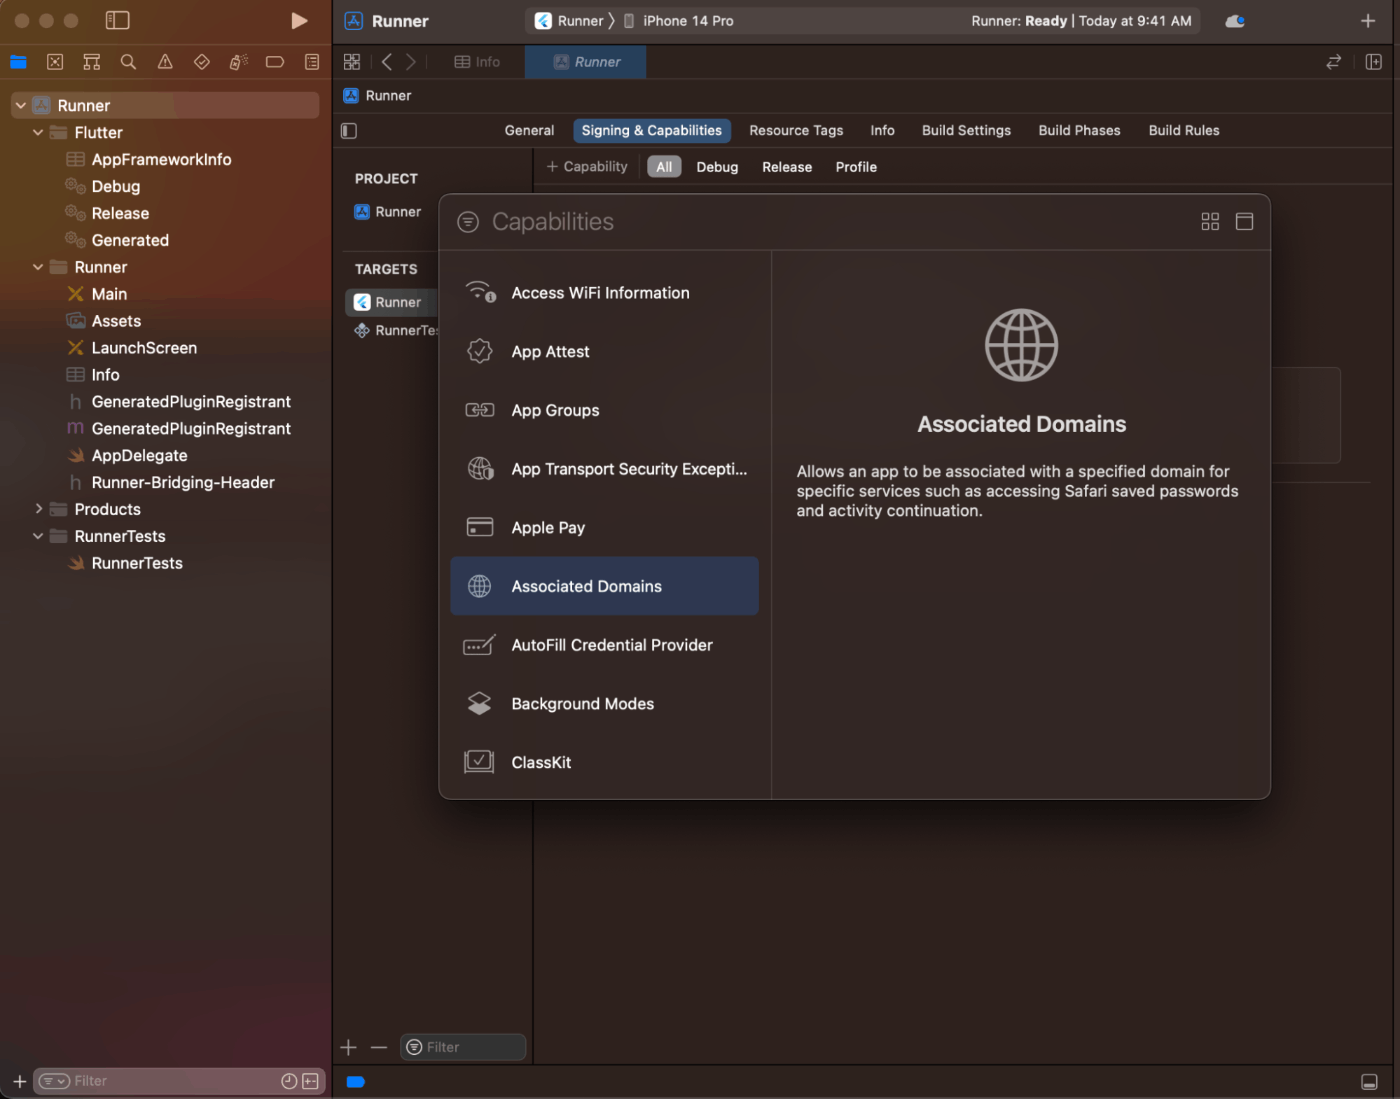
Associated Domainsを検索する
選択するとAssociated DomainsにDomainsという入力フォームがあるので、そこに登録したいドメイン名を入力します。applinks:<web domain>という形で入力しましょう。

example.comというドメインの場合はapplinks:example.comと入力する
3.apple-app-site-associationを作成し、サーバーに設置する
apple-app-site-associationというファイルを作成し、サーバーに設置する必要があります。
apple-app-site-associationとは、ブラウザの代わりのどのiOSアプリケーションを開くかをモバイルブラウザに伝えるためのファイルです。
下記のような形で入力していきます。appIDは <team id>.<bundle id>という風にteam IDとbundle idを組み合わせたものを入力します。環境ごとに設定する必要がある場合は、ディープリンクの設定が必要な環境の数だけ入力してください。
pathsフィールドは許可されるユニバーサルリンクを指定します。["*"]にするとすべてのパスをFlutterアプリケーションにリダイレクトします。必要であればpathsの値をアプリに適した設定に変更してください。
{
  "applinks": {
      "apps": [],
      "details": [
      {
        "appID": "S8QB4VV633.com.example.deeplinkCookbook",
        "paths": ["*"]
      }
    ]
  }
}
設定が完了したら、サーバーの<webdomain>/.well-known/apple-app-site-associationというURLで設置します。
4.動作確認する
最後にちゃんと設定できているかを確認します。
ドキュメントに書いているように、go_routerを使って下記のようにルーティングの処理を書いている場合、
import 'package:flutter/material.dart';
import 'package:go_router/go_router.dart';

 void main() => runApp(MaterialApp.router(routerConfig: router));

 /// This handles '/' and '/details'.
 final router = GoRouter(
   routes: [
     GoRoute(
       path: '/',
       builder: (_, __) => Scaffold(
         appBar: AppBar(title: const Text('Home Screen')),
       ),
       routes: [
         GoRoute(
           path: 'details',
           builder: (_, __) => Scaffold(
             appBar: AppBar(title: const Text('Details Screen')),
           ),
         ),
       ],
     ),
   ],
 );
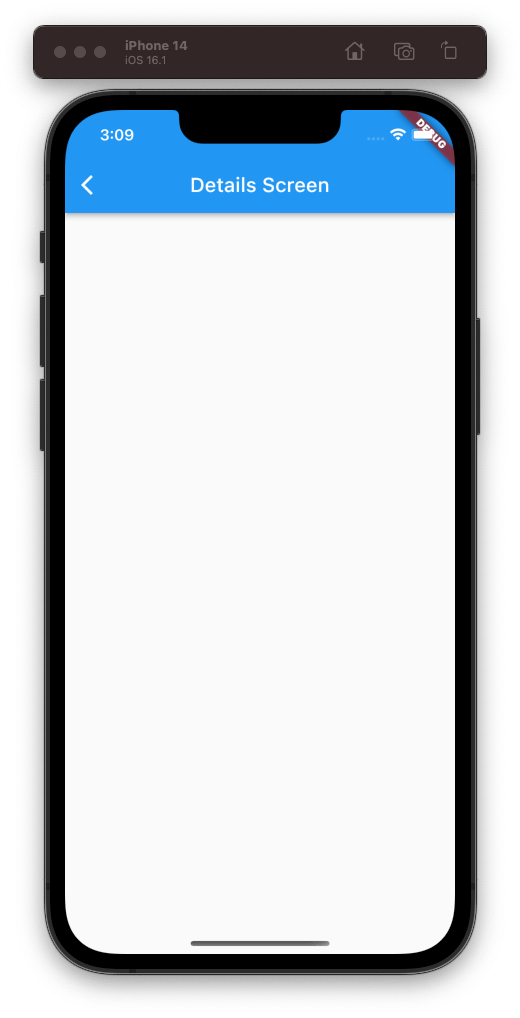
下記のコマンドを叩くとAppBarにDetails Screenと書かれた画面に遷移するはずです。
$ xcrun simctl openurl booted https://<web domain>/details
App Linksの設定
次はAndroidのApp Linksの設定です。こちらもドキュメントを基に進めていきます。
1.AndroidManifest.xmlを修正する
android/app/src/main/AndroidManifest.xml ファイルを開き、activityタグ内に、以下のmeta-dataタグとintent-filterタグを追加します。
example.comの部分は設定に必要なドメインに変更してください。
<meta-data android:name="flutter_deeplinking_enabled" android:value="true" />
 <intent-filter android:autoVerify="true">
     <action android:name="android.intent.action.VIEW" />
     <category android:name="android.intent.category.DEFAULT" />
     <category android:name="android.intent.category.BROWSABLE" />
     <data android:scheme="http" android:host="example.com" />
     <data android:scheme="https" />
 </intent-filter>
私は環境ごとにドメインを変更したかったので、android/app/build.gradle内に下記のように環境でドメインを変更し、android:host="@string/host_name"としました。
defaultConfig {
  resValue "string", "host_name", (dartEnvironmentVariables.FLAVOR == 'production' ? "sample.com" : "hoge.com")
}
2.assetlinks.jsonを作成し、サーバーに設置する
assetlinks.jsonというファイルを作成し、サーバーに設置する必要があります。
assetlinks.jsonとは、ブラウザの代わりのどのAndroidアプリケーションを開くかをモバイルブラウザに伝えるためのファイルです。設定にはアプリのパッケージ名とAPKビルドに使用する署名キーのsha26フィンガープリントが必要です。
sha26フィンガープリントはGoogle Play Console内にあるアプリをクリックし、設定 > アプリの署名を開くと確認できます。
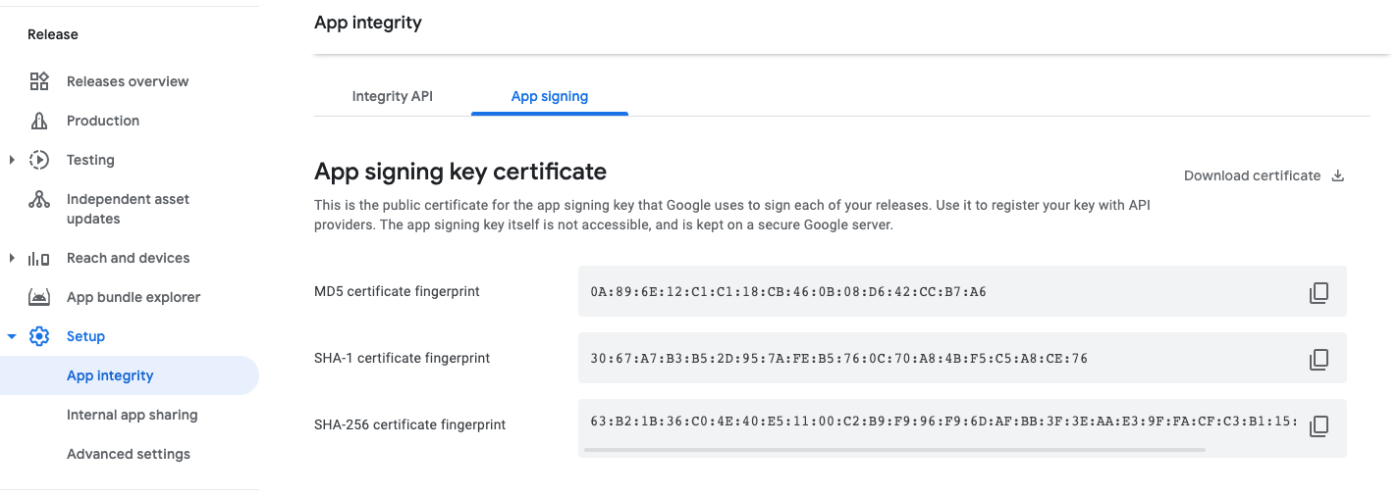
ちなみに一番下までスクロールするとDigital Asset Links JSONというのがあるのですが、そこにassetlinks.jsonの設定に必要なコードをコピーすることができます。環境ごとに設定する必要がある場合は、ディープリンクの設定が必要な環境の数だけ入力してください。
[{
  "relation": ["delegate_permission/common.handle_all_urls"],
  "target": {
    "namespace": "android_app",
    "package_name": "com.example.deeplink_cookbook",
    "sha256_cert_fingerprints":
    ["FF:2A:CF:7B:DD:CC:F1:03:3E:E8:B2:27:7C:A2:E3:3C:DE:13:DB:AC:8E:EB:3A:B9:72:A1:0E:26:8A:F5:EC:AF"]
  }
}]
設定が完了したら、サーバーの<webdomain>/.well-known/assetlinks.jsonというURLで設置してください。
3.動作確認する
iOSと同様に最後にちゃんと設定できているか動作確認しましょう。下記のようにコマンドを叩きアプリの開きたいページに遷移できたら成功です。
$ adb shell 'am start -a android.intent.action.VIEW \
    -c android.intent.category.BROWSABLE \
    -d "http://<web-domain>/details"' \
    <package name>
ライブラリを使用してリンクを取得する
ライブラリを使用してリンクを取得する方法です。今回はapp_linksを使ってみました。
まずはライブラリをインストールし、
$ flutter pub add app_links
下記のように設定するとリンクを取得することができます。
class SamplePage extends StatefulWidget {
const SamplePage({super.key});
State<SamplePage> createState() => _SamplePageState();
}
class _SamplePageState extends State<SamplePage> {
void initState() {
super.initState();
initDynamicLinks();
}
Future<void> initDynamicLinks() async {
final appLinks = AppLinks();
appLinks.uriLinkStream.listen((uri) {
print('url:$uri');
}).onError((error) {
print('onLink error');
print(error.message);
});
}
Widget build(BuildContext context) {
return const Placeholder();
}
}
まとめ
ディープリンクの設定をしてみて、最初iOSでうまく動作せずエラーも出なかったので原因を見つけるのに時間がかかってしまいました(Provisioning Profileが最新のものでなかったのが原因っぽい😭)。
設定自体はそこまで難しくはなかったのですが、一度ハマると解決するのに時間がかかってしまう可能性があるので、次実装する時は今回ハマったところを思い出してスムーズに実装できるようにしたいです。
Discussion
app_linksを使用してリンクを取得するパターンですが、FlutterデフォルトのディープリンクハンドラをOFFにするために、android/app/src/main/AndroidManifest.xmlでflutter_deeplinking_enabledをfalseにしたほうが良くはないでしょうか?
参照元: https://docs.flutter.dev/cookbook/navigation/set-up-app-links