🚅
5分で完了!Amazon Linux 2023にCloudWatch Agentを簡単にセットアップしよう
時間がないので、早速Amazon Linux 2023にCloudwatch Agentをインストールして設定しましょう!
いそげ!いそげ!
前提条件
- もちろんですが、起動するEC2インスタンスのAMIは
Amazon Linux 2023(AL 2023)を選択します。 - Cloudwatch Agentのインストールは
AWS Systems Manager Session Managerで行います。 - EC2インスタンスのインスタンスプロフィールに以下のAWSマネージドポリシーをアタッチします。
1. Cloudwatch Agent インストール
sudo dnf -y install amazon-cloudwatch-agent
Last metadata expiration check: 2:40:14 ago on Thu Mar  7 10:32:50 2024.
Dependencies resolved.
===================================================================================================================================================================================================================
 Package                                                   Architecture                              Version                                                   Repository                                     Size
===================================================================================================================================================================================================================
Installing:
 amazon-cloudwatch-agent                                   aarch64                                   1.300032.3-1.amzn2023                                     amazonlinux                                    87 M

Transaction Summary
===================================================================================================================================================================================================================
Install  1 Package

Total download size: 87 M
Installed size: 348 M
Is this ok [y/N]: y
Downloading Packages:
amazon-cloudwatch-agent-1.300032.3-1.amzn2023.aarch64.rpm                                                                                                                           61 MB/s |  87 MB     00:01
-------------------------------------------------------------------------------------------------------------------------------------------------------------------------------------------------------------------
Total

...(中略)...
2. ウィザードを利用した設定
sudo /opt/aws/amazon-cloudwatch-agent/bin/amazon-cloudwatch-agent-config-wizard
================================================================
= Welcome to the Amazon CloudWatch Agent Configuration Manager =
=                                                              =
= CloudWatch Agent allows you to collect metrics and logs from =
= your host and send them to CloudWatch. Additional CloudWatch =
= charges may apply.                                           =
================================================================
On which OS are you planning to use the agent?
1. linux
2. windows
3. darwin
default choice: [1]:

Trying to fetch the default region based on ec2 metadata...
I! imds retry client will retry 1 timesAre you using EC2 or On-Premises hosts?
1. EC2
2. On-Premises
default choice: [1]:

Which user are you planning to run the agent?
1. cwagent
2. root
3. others
default choice: [1]:
2
Do you want to turn on StatsD daemon?
1. yes
2. no
default choice: [1]:
2
Do you want to monitor metrics from CollectD? WARNING: CollectD must be installed or the Agent will fail to start
1. yes
2. no
default choice: [1]:
2
Do you want to monitor any host metrics? e.g. CPU, memory, etc.
1. yes
2. no
default choice: [1]:

Do you want to monitor cpu metrics per core?
1. yes
2. no
default choice: [1]:

Do you want to add ec2 dimensions (ImageId, InstanceId, InstanceType, AutoScalingGroupName) into all of your metrics if the info is available?
1. yes
2. no
default choice: [1]:

Do you want to aggregate ec2 dimensions (InstanceId)?
1. yes
2. no
default choice: [1]:

Would you like to collect your metrics at high resolution (sub-minute resolution)? This enables sub-minute resolution for all metrics, but you can customize for specific metrics in the output json file.
1. 1s
2. 10s
3. 30s
4. 60s
default choice: [4]:

Which default metrics config do you want?
1. Basic
2. Standard
3. Advanced
4. None
default choice: [1]:

Current config as follows:
{
        "agent": {
                "metrics_collection_interval": 60,
                "run_as_user": "root"
        },
        "metrics": {
                "aggregation_dimensions": [
                        [
                                "InstanceId"
                        ]
                ],
                "append_dimensions": {
                        "AutoScalingGroupName": "${aws:AutoScalingGroupName}",
                        "ImageId": "${aws:ImageId}",
                        "InstanceId": "${aws:InstanceId}",
                        "InstanceType": "${aws:InstanceType}"
                },
                "metrics_collected": {
                        "disk": {
                                "measurement": [
                                        "used_percent"
                                ],
                                "metrics_collection_interval": 60,
                                "resources": [
                                        "*"
                                ]
                        },
                        "mem": {
                                "measurement": [
                                        "mem_used_percent"
                                ],
                                "metrics_collection_interval": 60
                        }
                }
        }
}
Are you satisfied with the above config? Note: it can be manually customized after the wizard completes to add additional items.
1. yes
2. no
default choice: [1]:

Do you have any existing CloudWatch Log Agent (http://docs.aws.amazon.com/AmazonCloudWatch/latest/logs/AgentReference.html) configuration file to import for migration?
1. yes
2. no
default choice: [2]:
2
Do you want to monitor any log files?
1. yes
2. no
default choice: [1]:
2
Do you want the CloudWatch agent to also retrieve X-ray traces?
1. yes
2. no
default choice: [1]:
2
Existing config JSON identified and copied to:  /opt/aws/amazon-cloudwatch-agent/etc/backup-configs
Saved config file to /opt/aws/amazon-cloudwatch-agent/bin/config.json successfully.
Current config as follows:
{
        "agent": {
                "metrics_collection_interval": 60,
                "run_as_user": "root"
        },
        "metrics": {
                "aggregation_dimensions": [
                        [
                                "InstanceId"
                        ]
                ],
                "append_dimensions": {
                        "AutoScalingGroupName": "${aws:AutoScalingGroupName}",
                        "ImageId": "${aws:ImageId}",
                        "InstanceId": "${aws:InstanceId}",
                        "InstanceType": "${aws:InstanceType}"
                },
                "metrics_collected": {
                        "disk": {
                                "measurement": [
                                        "used_percent"
                                ],
                                "metrics_collection_interval": 60,
                                "resources": [
                                        "*"
                                ]
                        },
                        "mem": {
                                "measurement": [
                                        "mem_used_percent"
                                ],
                                "metrics_collection_interval": 60
                        }
                }
        }
}
Please check the above content of the config.
The config file is also located at /opt/aws/amazon-cloudwatch-agent/bin/config.json.
Edit it manually if needed.
Do you want to store the config in the SSM parameter store?
1. yes
2. no
default choice: [1]:
2
Program exits now.
pwd
/opt/aws/amazon-cloudwatch-agent/bin
ls -la
total 355876
drwxr-xr-x. 2 root root     16384 Mar  7 13:14 .
drwxr-xr-x. 7 root root       140 Mar  7 13:13 ..
-rw-r--r--. 1 root root        11 Jan 11 17:44 CWAGENT_VERSION
-rwxr-xr-x. 1 root root 122174568 Jan 11 17:44 amazon-cloudwatch-agent
-rwxr-xr-x. 1 root root  12523688 Jan 11 17:44 amazon-cloudwatch-agent-config-wizard
-rwxr-xr-x. 1 root root     14107 Jan 11 17:44 amazon-cloudwatch-agent-ctl
-rwxr-xr-x. 1 root root  11670168 Jan 11 17:44 config-downloader
-rwxr-xr-x. 1 root root 117382088 Jan 11 17:44 config-translator
-rw-r--r--. 1 root root       634 Mar  7 13:16 config.json <-------------- これです
-rwxr-xr-x. 1 root root 100616360 Jan 11 17:44 start-amazon-cloudwatch-agent
3. EC2インスタンスでCloudWatch Agentを起動
sudo /opt/aws/amazon-cloudwatch-agent/bin/amazon-cloudwatch-agent-ctl -a fetch-config -m ec2 -s -c file:/opt/aws/amazon-cloudwatch-agent/bin/config.json
sudo /opt/aws/amazon-cloudwatch-agent/bin/amazon-cloudwatch-agent-ctl
設定ファイル、Parameter Store パラメータ、またはエージェントのデフォルト設定を指定できるamazon-cloudwatch-agent-ctlCloudWatchスクリプトを実行する。
-a fetch-config
CloudWatch Agentは最新バージョンのCloudWatch Agent設定ファイルをロードします。
-m ec2
ec2を指定すると、これはEC2ホスト上であることを示します。
-s
CloudWatch Agentを開始します。
-c file:/opt/aws/amazon-cloudwatch-agent/bin/config.json
エージェント設定ファイルへのパスを指定します。ウィザードで作成した場合はconfig.jsonになり、手動で作成した場合は amazon-cloudwatch-agent.jsonになる場合があります。
4. Cloudwatch Agent 起動&ステータス確認
sudo systemctl start amazon-cloudwatch-agent.service
sudo systemctl status amazon-cloudwatch-agent
● amazon-cloudwatch-agent.service - Amazon CloudWatch Agent
     Loaded: loaded (/etc/systemd/system/amazon-cloudwatch-agent.service; enabled; preset: disabled)
     Active: active (running) since Thu 2024-03-07 13:19:49 UTC; 59s ago
   Main PID: 30326 (amazon-cloudwat)
      Tasks: 7 (limit: 629145)
     Memory: 32.8M
        CPU: 386ms
     CGroup: /system.slice/amazon-cloudwatch-agent.service

...(中略)...
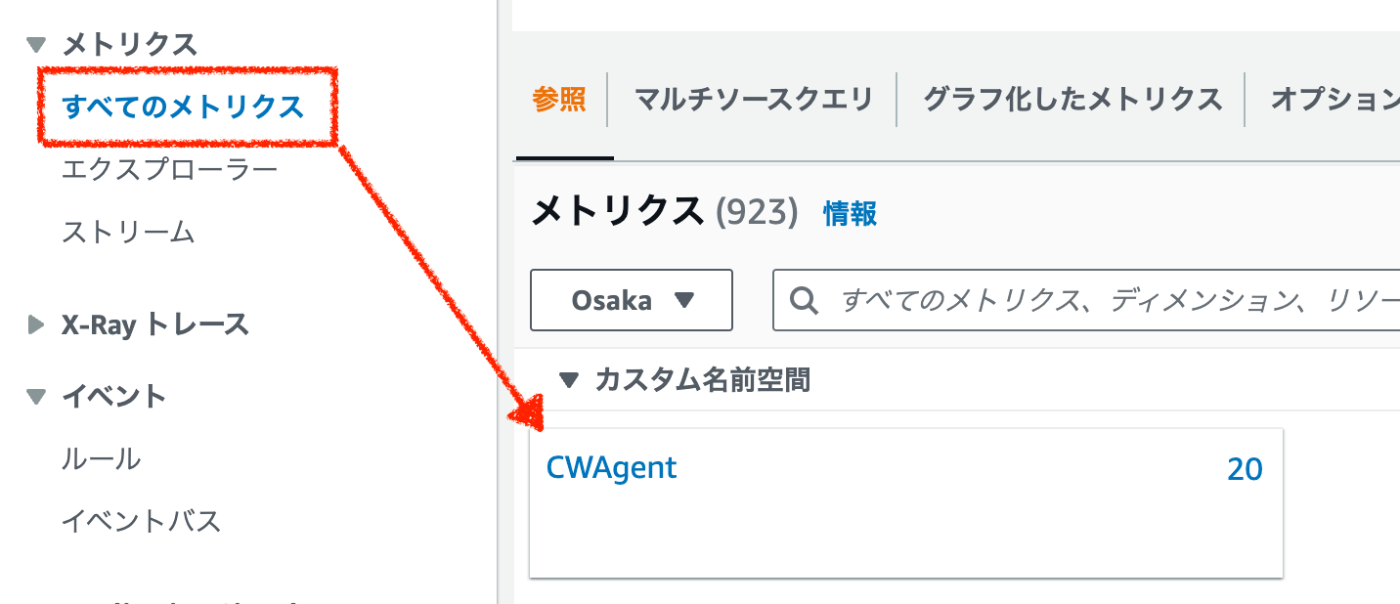
5. CloudWatchコンソールでの確認

メトリクスにCloudWatch Agent(CWAgent)が追加されたことが確認できました!
やった!
Discussion