3秒まとめ
- container-useで Docker コンテナ内にコーディングエージェントの実行環境を独立して作成可能
- 複数のエージェントを並列実行してローカルで安全に開発環境を管理できる
- MCP経由で Claude Code、Cursor、goose などから簡単に操作可能
- Git worktreeよりもクリーンで管理しやすい環境分離を実現
どんな人向けの記事?
- ローカルで複数のコーディングエージェントを並列実行したい方
- Dockerコンテナ内で安全にAI開発環境を管理したい方
- Claude Code、Cursor、gooseなどのMCP対応クライアントを使っている方
- Git worktreeの代替手法を探している方
概要
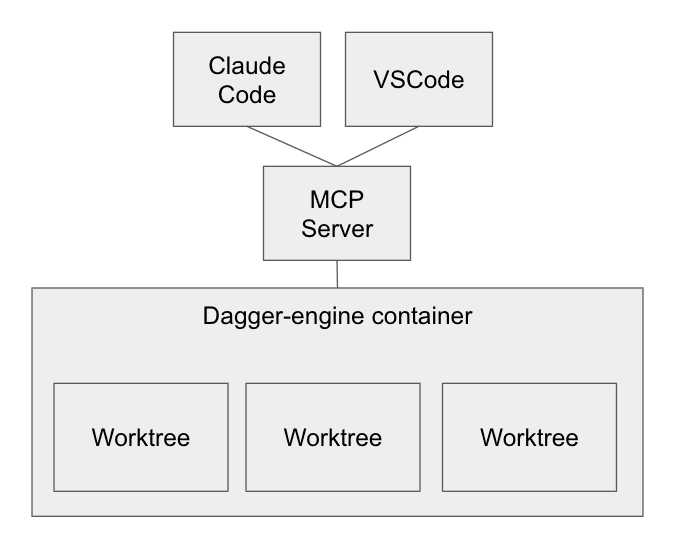
Docker の創業者の 1 人が、特定のワークツリーをコンテナ内に配置してコーディングエージェントを動作させるツール「container-use」を開発しました。
2025 年 5 月頃には Git worktree を駆使してローカルで複数のコーディングエージェントの環境を作る手法が紹介されていましたが、個人的には ghq を使ったリポジトリ管理にそぐわないため、あまり注目していませんでした。
理想的には、Docker コンテナ内で独立した環境を構築することで、ローカルで複数のコーディングエージェントを並行実行できるようにしたいと考えていました。
そんな中、container-use がリリースされました。まさに求めていた機能だったので、早速試してみることにしました。
container-use の動作概念図
インストール
まず、GitHub から container-use のリポジトリをクローンします。
❯ ghq get git@github.com:dagger/container-use.git
     clone ssh://git@github.com/dagger/container-use.git -> /Users/yuki.matsukura/ghq/github.com/dagger/container-use
       git clone --recursive ssh://git@github.com/dagger/container-use.git /Users/yuki.matsukura/ghq/github.com/dagger/container-use
Cloning into '/Users/yuki.matsukura/ghq/github.com/dagger/container-use'...
remote: Enumerating objects: 735, done.
remote: Counting objects: 100% (144/144), done.
remote: Compressing objects: 100% (50/50), done.
remote: Total 735 (delta 129), reused 94 (delta 93), pack-reused 591 (from 2)
Receiving objects: 100% (735/735), 40.55 MiB | 8.85 MiB/s, done.
Resolving deltas: 100% (514/514), done.
❯ cd ~/ghq/github.com/dagger/container-use
cuコマンド経由で利用するようなので、cuコマンドをビルドします。
❯ make
[+] Building 30.2s (11/11) FINISHED
 => [internal] load build definition from Dockerfile
 => => transferring dockerfile: 396B
 => [internal] load metadata for docker.io/library/golang:latest
 => [auth] library/golang:pull token for registry-1.docker.io
 => [internal] load .dockerignore
 => => transferring context: 120B
 => [builder 1/4] FROM docker.io/library/golang:latest@sha256:db5d0afbfb4ab648af2393b92e87eaae9ad5e01132803d80caef91b5752d289c
 => => resolve docker.io/library/golang:latest@sha256:db5d0afbfb4ab648af2393b92e87eaae9ad5e01132803d80caef91b5752d289c
 => => sha256:db5d0afbfb4ab648af2393b92e87eaae9ad5e01132803d80caef91b5752d289c 9.74kB / 9.74kB
 => => sha256:f692138c53fd540f6d19fe65e259d0d1b681776d15187c50ab566297acf28227 2.32kB / 2.32kB
 => => sha256:1a12b4ea7c0ce04aa0e98be0a8c9942162bac71426f734fe6d3bf988bc9e2627 48.33MB / 48.33MB
 => => sha256:280bbe393e788ced1dcb033580604b24de083601624337be66b3ec31781dae40 23.55MB / 23.55MB
 => => sha256:9cd4095bdf35388c48f7b567b9a331abc514c2791a8beb35cd1558fb10d91285 2.82kB / 2.82kB
 => => sha256:1f4f297e4f699ae0f384d5cc1ea42065f58a115aa0a634d427cbb186f91cb4d0 64.36MB / 64.36MB
 => => sha256:90e45158653cee17fd0433bb95f654076603c1dace770784457d1f08ffc1f1bd 86.41MB / 86.41MB
 => => extracting sha256:1a12b4ea7c0ce04aa0e98be0a8c9942162bac71426f734fe6d3bf988bc9e2627
 => => sha256:f244882bda0eb70b1153262e9054d1f8801651888a3a6fc5a828db420391040e 75.23MB / 75.23MB
 => => sha256:d08d494a376b9ba066591a0d5e15795ecaa4ca7b89566facd3b70f93b58f9cfa 126B / 126B
 => => sha256:4f4fb700ef54461cfa02571ae0db9a0dc1e0cdb5577484a6d75e68dc38e8acc1 32B / 32B
 => => extracting sha256:280bbe393e788ced1dcb033580604b24de083601624337be66b3ec31781dae40
 => => extracting sha256:1f4f297e4f699ae0f384d5cc1ea42065f58a115aa0a634d427cbb186f91cb4d0
 => => extracting sha256:90e45158653cee17fd0433bb95f654076603c1dace770784457d1f08ffc1f1bd
 => => extracting sha256:f244882bda0eb70b1153262e9054d1f8801651888a3a6fc5a828db420391040e
 => => extracting sha256:d08d494a376b9ba066591a0d5e15795ecaa4ca7b89566facd3b70f93b58f9cfa
 => => extracting sha256:4f4fb700ef54461cfa02571ae0db9a0dc1e0cdb5577484a6d75e68dc38e8acc1
 => [internal] load build context
 => => transferring context: 88.43kB
 => [builder 2/4] WORKDIR /w
 => [builder 3/4] COPY . .
 => [builder 4/4] RUN --mount=type=cache,target=/go/pkg/mod --mount=type=cache,target=/root/.cache/go-build go build -o /tmp/cu ./cmd/cu
 => [stage-1 1/1] COPY --from=builder /tmp/cu .
 => exporting to client directory
 => => copying files 21.24MB

View build details: docker-desktop://dashboard/build/desktop-linux/desktop-linux/wv9ddwk3l0o7bxmjts2g1cvfm
cu
cu コマンドをインストールします。
❯ make install && hash -r

[+] Building 0.9s (10/10) FINISHED
 => [internal] load build definition from Dockerfile
 => => transferring dockerfile: 396B
 => [internal] load metadata for docker.io/library/golang:latest
 => [internal] load .dockerignore
 => => transferring context: 120B
 => [builder 1/4] FROM docker.io/library/golang:latest@sha256:db5d0afbfb4ab648af2393b92e87eaae9ad5e01132803d80caef91b5752d289c
 => [internal] load build context
 => => transferring context: 1.33kB
 => CACHED [builder 2/4] WORKDIR /w
 => CACHED [builder 3/4] COPY . .
 => CACHED [builder 4/4] RUN --mount=type=cache,target=/go/pkg/mod --mount=type=cache,target=/root/.cache/go-build go build -o /tmp/cu ./cmd/cu
 => CACHED [stage-1 1/1] COPY --from=builder /tmp/cu .
 => exporting to client directory
 => => copying files 21.24MB

View build details: docker-desktop://dashboard/build/desktop-linux/desktop-linux/kdbpvxlq88med5tenxc9cyib6
cu
Installing cu to /Users/yuki.matsukura/.asdf/shims...
asdfによってツールのバージョンを管理しているので、cuは~/.asdf/shims/cuにインストールされました。
使ってみる
MCP経由で操作できるので、MCPに対応しているクライアントからであれば何でも利用可能です。
今回はClaude Code経由で実行してみます。
Claude Codeに設定を追加
MCPサーバの設定を追加します。CLIから1発で登録できます。
❯ npx @anthropic-ai/claude-code mcp add container-use -- /Users/yuki.matsukura/.asdf/shims/cu stdio
Added stdio MCP server container-use with command: /Users/yuki.matsukura/.asdf/shims/ stdio to local config
上記のコマンドを実行すると、 以下のセクションが、~/.claude.json へ追加されました。
"/Users/yuki.matsukura/ghq/github.com/matsubo/cu-test": {
  "allowedTools": [],
  "history": [
    {
      "display": "/mcp ",
      "pastedContents": {}
    },
    {
      "display": "create a simple flask app\n",
      "pastedContents": {}
    }
  ],
  "dontCrawlDirectory": false,
  "mcpContextUris": [],
  "mcpServers": {
    "container-use": {
      "type": "stdio",
      "command": "/Users/yuki.matsukura/.asdf/shims/cu",
      "args": [
        "stdio"
      ],
      "env": {}
    }
  },
  "enabledMcpjsonServers": [],
  "disabledMcpjsonServers": [],
  "hasTrustDialogAccepted": true,
  "projectOnboardingSeenCount": 0,
  "hasClaudeMdExternalIncludesApproved": false,
  "hasClaudeMdExternalIncludesWarningShown": false,
  "hasCompletedProjectOnboarding": true,
  "lastCost": 0.00041280000000000006,
  "lastAPIDuration": 2617,
  "lastDuration": 26041,
  "lastLinesAdded": 0,
  "lastLinesRemoved": 0,
  "lastTotalInputTokens": 331,
  "lastTotalOutputTokens": 37,
  "lastTotalCacheCreationInputTokens": 0,
  "lastTotalCacheReadInputTokens": 0,
  "lastSessionId": "877e8c9c-315a-4f4c-8a7e-xxxxxxxxxx"
}
CLAUDE.mdに、container-use上で実装を行わせるための指示を追記します(存在していない場合は新規作成します)。
❯ curl https://raw.githubusercontent.com/dagger/container-use/main/rules/agent.md >> CLAUDE.md
container-useを使う前提として、
Gitリポジトリ上で最低1つのコミットが存在している前提で始めなければいけないという要件があります。
今回はテスト用に作ったディレクトリなので、以下のように適当に初期化しておきます。
git init
git commit -m 'init' CLAUDE.md
Claude Code経由で実行
サンプルにあった以下のプロンプトで、超簡単なPythonのWebアプリを作ってみます。
create a simple flask app
新規でプロジェクト用のディレクトリを作成し、claudeコマンドを実行して初期化した後、以下のようにclaudeコマンドの標準入力へプロンプトを流し込みます。
❯ curl https://raw.githubusercontent.com/dagger/container-use/refs/heads/main/examples/hello_world.md | claude
以下のような出力が出て処理が進みます。
途中で何度か実装方針の確認のためにインタラクションが求められます。
╭──────────────────────────────────────────────────────────────╮
│ ✻ Welcome to Claude Code!                                    │
│                                                              │
│   /help for help, /status for your current setup             │
│                                                              │
│   cwd: /Users/yuki.matsukura/ghq/github.com/matsubo/cu-test  │
╰──────────────────────────────────────────────────────────────╯


 ※ Tip: Run claude --continue or claude --resume to resume a conversation

> create a simple flask app

⏺ I'll create a simple Flask app using the environment. Let me set up the development environment first.

⏺ container-use:environment_open (MCP)(source: "/Users/yuki.matsukura/ghq/github.com/matsubo/cu-test", name: "flask-app", explanation: "Creating a development environment for a simple Flask application")
  ⎿  {
       "id": "flask-app/fast-guppy",
       "base_image": "ubuntu:24.04",
       "setup_commands": null,
     … +7 lines (ctrl+r to expand)

⏺ container-use:environment_update (MCP)(environment_id: "flask-app/fast-guppy", base_image: "python:3.11-slim", setup_commands: ["pip install flask"], instructions: "python Flask development environment with Flask installed", secrets: [], explanation: "Setting up Python environment with Flask for web development")
  ⎿  {
       "id": "flask-app/fast-guppy",
       "base_image": "python:3.11-slim",
       "setup_commands": [
     … +9 lines (ctrl+r to expand)

⏺ container-use:environment_file_write (MCP)(environment_id: "flask-app/fast-guppy", target_file: "app.py", contents: "from flask import Flask\n\napp = Flask(__name__)\n\n@app.route('/')\ndef hello_world():\n    return 'Hello, World!'\n\n@app.route('/about')\ndef about():\n    return 'This is a simple Flask application!'\n\nif __name__ == '__main__':\n
                                            app.run(debug=True, host='0.0.0.0', port=5000)", explanation: "Creating the main Flask application file with basic routes")

╭────────────────────────────────────────────────────────────────────────────────────────────────────────────────────────────────────────────────────────────────────────────────────────────────────────────────────────────────────────────────────────────────────────────────────────────────────────────────────────────────────────────────────────────────────────────────────────╮
│ Tool use                                                                                                                                                                                                                                                                                                                                                                               │
│                                                                                                                                                                                                                                                                                                                                                                                        │
│   container-use:environment_file_write(environment_id: "flask-app/fast-guppy", target_file: "app.py", contents: "from flask import Flask\n\napp = Flask(__name__)\n\n@app.route('/')\ndef hello_world():\n    return 'Hello, World!'\n\n@app.route('/about')\ndef about():\n    return 'This is a simple Flask application!'\n\nif __name__ == '__main__':\n    app.run(debug=True,    │
│   host='0.0.0.0', port=5000)", explanation: "Creating the main Flask application file with basic routes") (MCP)                                                                                                                                                                                                                                                                        │
│   Write the contents of a file.                                                                                                                                                                                                                                                                                                                                                        │
│                                                                                                                                                                                                                                                                                                                                                                                        │
│ Do you want to proceed?                                                                                                                                                                                                                                                                                                                                                                │
│ ❯ 1. Yes                                                                                                                                                                                                                                                                                                                                                                               │
│   2. Yes, and don't ask again for container-use:environment_file_write commands in /Users/yuki.matsukura/ghq/github.com/matsubo/cu-test                                                                                                                                                                                                                                                │
│   3. No, and tell Claude what to do differently (esc)                                                                                                                                                                                                                                                                                                                                  │
│                                                                                                                                                                                                                                                                                                                                                                                        │
╰────────────────────────────────────────────────────────────────────────────────────────────────────────────────────────────────────────────────────────────────────────────────────────────────────────────────────────────────────────────────────────────────────────────────────────────────────────────────────────────────────────────────────────────────────────────────────────╯
コードが完成すると以下のメッセージが出てきました。
⏺ Created a simple Flask app! The application is now running at http://127.0.0.1:5192

  The app includes:
  - A home route at / that returns "Hello, World!"
  - An about route at /about with basic information

  To view your work: git checkout flask-app/fast-guppy
指定されたURLにアクセスすると以下の表示が出てきました。
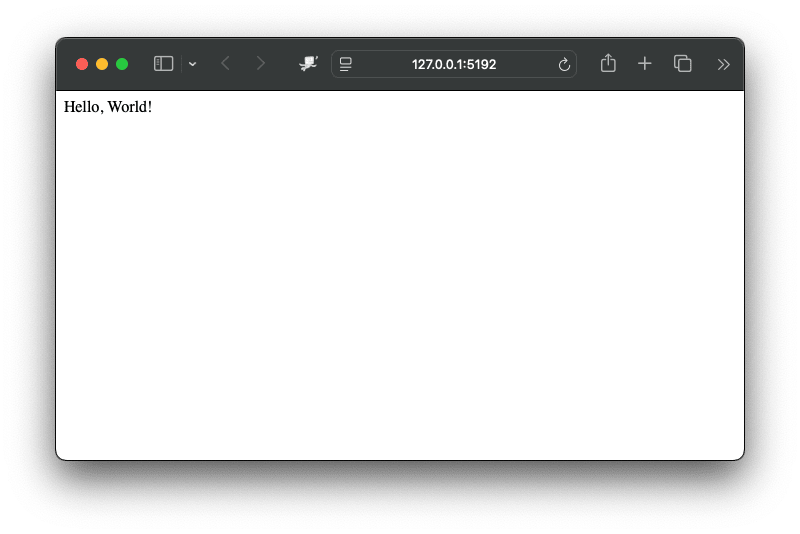
なんと簡単なアプリのコードが実装され、プレビュー用のサーバも立ち上がった状態です!
動作状態を確認する
どうやって実現しているのか軽く調べて見るために5192番ポートはどのプログラムが使っているのか調べてみます。
❯ lsof -i :5192
COMMAND     PID           USER   FD   TYPE             DEVICE SIZE/OFF NODE NAME
dagger-0. 93633 yuki.matsukura    9u  IPv6 0x5e0f6ca282acbd35      0t0  TCP *:aol-2 (LISTEN)
dagger-0. 93633 yuki.matsukura   19u  IPv6 0x27afabb4da99321a      0t0  TCP [::127.0.0.1]:aol-2->[::127.0.0.1]:49823 (CLOSED)
dagger-0. 93633 yuki.matsukura   22u  IPv6 0x3591df621981b1a0      0t0  TCP [::127.0.0.1]:aol-2->[::127.0.0.1]:49834 (CLOSED)
dagger-0. 93633 yuki.matsukura   25u  IPv6 0x5869ccfc590c9e6b      0t0  TCP [::127.0.0.1]:aol-2->[::127.0.0.1]:50072 (CLOSED)
dagger-0. 93633 yuki.matsukura   27u  IPv6 0x1d1e9ef498d1fd1f      0t0  TCP [::127.0.0.1]:aol-2->[::127.0.0.1]:50077 (CLOSED)
dagger-0. 93633 yuki.matsukura   28u  IPv6 0x54ecff8288d4bfbb      0t0  TCP [::127.0.0.1]:aol-2->[::127.0.0.1]:53232 (CLOSED)
dagger-0. 93633 yuki.matsukura   29u  IPv6 0x538b2f4cfbc2347f      0t0  TCP localhost:aol-2->localhost:54005 (CLOSE_WAIT)
dagger-0. 93633 yuki.matsukura   30u  IPv6 0xbe8b89781820e36c      0t0  TCP localhost:aol-2->localhost:54023 (CLOSE_WAIT)
dagger-0. 93633 yuki.matsukura   31u  IPv6 0x97cc532cfede2ef1      0t0  TCP localhost:aol-2->localhost:54029 (CLOSE_WAIT)
dagger-0. 93633 yuki.matsukura   32u  IPv6 0xda67712e4db968cd      0t0  TCP localhost:aol-2->localhost:54033 (CLOSE_WAIT)
dagger-0. 93633 yuki.matsukura   33u  IPv6 0xa63d580e5b1ab14a      0t0  TCP localhost:aol-2->localhost:54622 (CLOSE_WAIT)
MCP Serverっぽいプロセスが立ち上がっています。
❯ ps axu|grep dagger-0|grep -v grep
yuki.matsukura   93633   0.2  0.1 411972208  49168 s015  S+    5:13PM   0:05.77 /Users/yuki.matsukura/Library/Caches/dagger/dagger-0.18.9 session --label dagger.io/sdk.name:go --label dagger.io/sdk.version:0.18.9
コンテナは1つだけしか立ち上がらないようです。LLMの実行中もモニタリングしていましたが1つだけでした。
❯ docker ps
CONTAINER ID   IMAGE                               COMMAND                  CREATED          STATUS          PORTS                    NAMES
6bd9e55c455e   registry.dagger.io/engine:v0.18.9   "dagger-entrypoint.s…"   12 minutes ago   Up 12 minutes                            dagger-engine-v0.18.9
このコンテナの中で、開発環境のコードの実行をプレビューするためのプロセスが立ち上がっていることがわかります。
❯ docker exec -it 6bd9 ps axu
PID   USER     TIME  COMMAND
    1 root      0:51 /usr/local/bin/dagger-engine --config /etc/dagger/engine.toml --debug
   52 root      0:00 /usr/sbin/dnsmasq --keep-in-foreground --log-facility=- --log-debug -u root --conf-file=/var/run/containers/cni/dnsname/dagger/dnsmasq.conf
 1343 root      0:00 buildctl dial-stdio
 1353 root      0:00 buildctl dial-stdio
 1363 root      0:00 buildctl dial-stdio
 1476 root      0:00 buildctl dial-stdio
 1536 root      0:00 /usr/local/bin/runc --log /var/lib/dagger/worker/executor/runc-log.json --log-format json run --bundle /var/lib/dagger/worker/executor/vworhos7now5ohy2fu91ulocj --keep vworhos7now5ohy2fu91ulocj
 1548 root      0:00 /.init sh -c python app.py
 1563 root      0:00 sh -c python app.py
 1564 root      0:00 python app.py
 1565 root      0:00 /usr/local/bin/python app.py
 1619 root      0:00 /usr/local/bin/runc --log /var/lib/dagger/worker/executor/runc-log.json --log-format json run --bundle /var/lib/dagger/worker/executor/y5fwt2a2auf01ig0x8j4tu6qg --keep y5fwt2a2auf01ig0x8j4tu6qg
 1634 root      0:00 /.init sh -c python app.py
 1647 root      0:00 sh -c python app.py
 1648 root      0:00 python app.py
 1649 root      0:00 /usr/local/bin/python app.py
 1833 root      0:00 /usr/local/bin/runc --log /var/lib/dagger/worker/executor/runc-log.json --log-format json run --bundle /var/lib/dagger/worker/executor/joafz8klnzs7cyq5au6qoqxxr --keep joafz8klnzs7cyq5au6qoqxxr
 1846 root      0:00 /.init sh -c uvicorn main:app --host 0.0.0.0 --port 8000
 1860 root      0:00 sh -c uvicorn main:app --host 0.0.0.0 --port 8000
 1861 root      0:00 {uvicorn} /usr/local/bin/python3.11 /usr/local/bin/uvicorn main:app --host 0.0.0.0 --port 8000
 1915 root      0:00 /usr/local/bin/runc --log /var/lib/dagger/worker/executor/runc-log.json --log-format json run --bundle /var/lib/dagger/worker/executor/4prsmjji1quxzpulajwnrwofy --keep 4prsmjji1quxzpulajwnrwofy
 1930 root      0:00 /.init sh -c uvicorn main:app --host 0.0.0.0 --port 8000
 1944 root      0:00 sh -c uvicorn main:app --host 0.0.0.0 --port 8000
 1945 root      0:00 {uvicorn} /usr/local/bin/python3.11 /usr/local/bin/uvicorn main:app --host 0.0.0.0 --port 8000
 1966 root      0:00 ps axu

What's next:
    Try Docker Debug for seamless, persistent debugging tools in any container or image → docker debug 6bd9
    Learn more at https://docs.docker.com/go/debug-cli/
tig --all コマンドでリビジョングラフを確認してみると、勝手にブランチが作られて、自分の名前でコミットが3つ積まれていました。

一応ステップごとにコミットを分けてブランチを生やして実装を行ってくれるようです。
cu watchコマンドでcontainer-useの動作状態を見られるとのことなのでコマンドを実行してみましたが、どうやら裏ではGit logコマンドを1秒おきに実行しているだけのようです。

並列で複数のコーディングエージェントを動かしてみる
サンプルにあったプロンプトを使ってみます。
2つのアプリの実装を指示するプロンプトです。
Create 2 variations of a simple hello world app using Flask and FastAPI. each in their own environment. Give me the URL of each app
上記のプロンプトをClaude Codeに渡します。
何度も確認が求められます。1度の質問ごとにコミットが積まれていく感じなので、1つ作ってコミットして質問することを繰り返しています。
❯ curl https://raw.githubusercontent.com/dagger/container-use/refs/heads/main/examples/parallel.md | claude
% Total % Received % Xferd Average Speed Time Time Time Current
Dload Upload Total Spent Left Speed
100 132 100 132 0 0 279 0 --:--:-- --:--:-- --:--:-- 279
╭──────────────────────────────────────────────────────────────╮
│ ✻ Welcome to Claude Code! │
│ │
│ /help for help, /status for your current setup │
│ │
│ cwd: /Users/yuki.matsukura/ghq/github.com/matsubo/cu-test │
╰──────────────────────────────────────────────────────────────╯
※ Tip: Create custom slash commands by adding .md files to .claude/commands/ in your project or ~/.claude/commands/ for commands that work in any project
> Create 2 variations of a simple hello world app using Flask and FastAPI. each in their own environment. Give me the URL of each app
⏺ I'll create two simple hello world apps - one using Flask and one using FastAPI, each in their own environment.
⎿ ☐ Create Flask hello world app in its own environment
☐ Create FastAPI hello world app in its own environment
☐ Start both apps and provide URLs to user
⎿ ☐ Create Flask hello world app in its own environment
☐ Create FastAPI hello world app in its own environment
☐ Start both apps and provide URLs to user
⏺ container-use:environment_open (MCP)(source: "/Users/yuki.matsukura/ghq/github.com/matsubo/cu-test", name: "flask-hello-world", explanation: "Creating environment for Flask hello world app")
⎿ {
"id": "flask-hello-world/relaxed-tarpon",
"base_image": "ubuntu:24.04",
"setup_commands": null,
… +7 lines (ctrl+r to expand)
⏺ container-use:environment_update (MCP)(environment_id: "flask-hello-world/relaxed-tarpon", explanation: "Setting up Python environment with Flask for hello world app", base_image: "python:3.11-slim", instructions: "This environment contains a simple Flask hello world application. Use 'python app.py' to run the Flask server.", setup_commands: ["pip install flask"],
secrets: [])
⎿ {
"id": "flask-hello-world/relaxed-tarpon",
"base_image": "python:3.11-slim",
"setup_commands": [
… +9 lines (ctrl+r to expand)
⏺ container-use:environment_file_write (MCP)(environment_id: "flask-hello-world/relaxed-tarpon", target_file: "app.py", explanation: "Creating Flask hello world application", contents: "from flask import Flask\n\napp = Flask(__name__)\n\n@app.route('/')\ndef hello_world():\n return 'Hello, World! This is a Flask app.'\n\nif __name__ == '__main__':\n
app.run(host='0.0.0.0', port=5000, debug=True)")
⎿ file app.py written successfully, changes pushed to container-use/flask-hello-world/relaxed-tarpon
⏺ container-use:environment_run_cmd (MCP)(environment_id: "flask-hello-world/relaxed-tarpon", command: "python app.py", background: true, ports: [5000], explanation: "Starting Flask hello world app in background")
⎿ Command started in the background. Endpoints are {"5000":{"internal":"mlr2r7877less:5000","external":"127.0.0.1:5727"}}
Any changes to the container workdir (/workdir) WILL NOT be committed to container-use/flask-hello-world/relaxed-tarpon
Background commands are unaffected by filesystem and any other kind of changes. You need to start a new command for changes to take effect.
⎿ ☒ Create Flask hello world app in its own environment
☐ Create FastAPI hello world app in its own environment
☐ Start both apps and provide URLs to user
⏺ container-use:environment_open (MCP)(source: "/Users/yuki.matsukura/ghq/github.com/matsubo/cu-test", name: "fastapi-hello-world", explanation: "Creating environment for FastAPI hello world app")
⎿ {
"id": "fastapi-hello-world/champion-satyr",
"base_image": "ubuntu:24.04",
"setup_commands": null,
… +7 lines (ctrl+r to expand)
⏺ container-use:environment_update (MCP)(environment_id: "fastapi-hello-world/champion-satyr", explanation: "Setting up Python environment with FastAPI for hello world app", base_image: "python:3.11-slim", instructions: "This environment contains a simple FastAPI hello world application. Use 'uvicorn main:app --host 0.0.0.0 --port 8000' to run the FastAPI server.",
setup_commands: ["pip install fastapi uvicorn"], secrets: [])
⎿ {
"id": "fastapi-hello-world/champion-satyr",
"base_image": "python:3.11-slim",
"setup_commands": [
… +9 lines (ctrl+r to expand)
⏺ container-use:environment_file_write (MCP)(environment_id: "fastapi-hello-world/champion-satyr", target_file: "main.py", explanation: "Creating FastAPI hello world application", contents: "from fastapi import FastAPI\n\napp = FastAPI()\n\n@app.get(\"/\")\ndef read_root():\n return {\"message\": \"Hello, World! This is a FastAPI app.\"}")
⎿ file main.py written successfully, changes pushed to container-use/fastapi-hello-world/champion-satyr
⏺ container-use:environment_run_cmd (MCP)(environment_id: "fastapi-hello-world/champion-satyr", command: "uvicorn main:app --host 0.0.0.0 --port 8000", background: true, ports: [8000], explanation: "Starting FastAPI hello world app in background")
⎿ Command started in the background. Endpoints are {"8000":{"internal":"4abousts0jpik:8000","external":"127.0.0.1:5033"}}
Any changes to the container workdir (/workdir) WILL NOT be committed to container-use/fastapi-hello-world/champion-satyr
Background commands are unaffected by filesystem and any other kind of changes. You need to start a new command for changes to take effect.
⎿ ☒ Create Flask hello world app in its own environment
☒ Create FastAPI hello world app in its own environment
☒ Start both apps and provide URLs to user
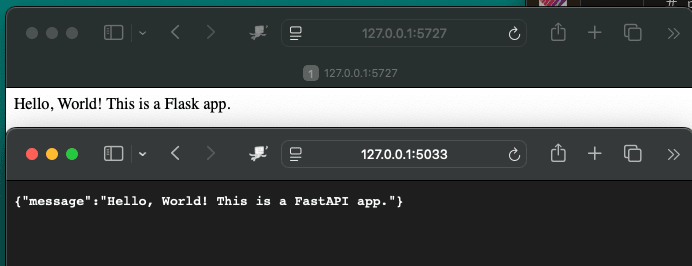
⏺ Both hello world apps are now running! Here are the URLs:
Flask App: http://127.0.0.1:5727
FastAPI App: http://127.0.0.1:5033
To view the code for each app:
- Flask: git checkout flask-hello-world/relaxed-tarpon
- FastAPI: git checkout fastapi-hello-world/champion-satyr
完成しました。
それぞれのURLが表示されるのでアクセスしてみました。
ブランチは以下のような感じに作られました。

よく確認してみると、リモートブランチに作られています。
ということは、リモートブランチはどこに指定されているのか確認してみます。
❯ grep 'remote "container-use"'  .git/config -A 2
[remote "container-use"]
        url = /Users/yuki.matsukura/.config/container-use/repos/cu-test
        fetch = +refs/heads/*:refs/remotes/container-use/*
なんと、ホームディレクトリの.config ディレクトリ以下に保存されています。このリモートリポジトリは環境を作成するたびに肥大化していくため、定期的な管理が必要です。現在のところ環境を削除する専用のコマンドは提供されていないため、不要になった環境のデータは手動で削除する必要があります。
まとめ
container-use を使って並列で複数のコーディングエージェントを動かすことが可能になったので、手元で複数のエージェントを並行で安全に動作させて実行できるようになりました。
GitHub Actions で Claude Code を実行すると Actions の稼働時間を消費してしまうので、ローカルで動かせるエージェントはローカルで動かすことでコスト削減できます。
今まではきれいに並列でコーディングエージェントを動かす方法がありませんでしたが、container-use によってコンテナ内に閉じた個別に独立した環境でエージェントが実装を進められるようになります。
(自分で作ろうかなと思っていたら、ちょうどリリースされました)。

Discussion