【Rails / Flutter】Rails API をバックエンド、 Flutter をフロントエンドとする構成を作る Part2
前回に引き続き、 Rails をバックエンドに、 Flutter をフロントエンドにした構成を作ってみたいと思います。
インフラ構成に Terraform を使い、 API 通信には GraphQL を採用し、これまで単体の勉強しかしたことがなかったものを組み合わせてみることにしました。
さっそく、始めましょう!
1. DBのセットアップ
gem のインストール
まず、必要な gem をインストールします。 Gemfileに以下の行を追加します。
gem 'ridgepole', '~> 2.0.0' # 必須ではないが、DBマイグレーションに便利なので利用
ジェムをインストールします。
docker-compose run web bundle install
ridgepole のセットアップ
Schemafile.rb を作成し、スキーマ定義を書いていきます。
# frozen_string_literal: true

create_table "habits", charset: "utf8mb4", collation: "utf8mb4_bin", force: :cascade do |t|
  t.string :name,         null: false, default: ""
  t.string :description,               default: ""

  t.datetime :created_at, null: false, precision: 6
  t.datetime :updated_at, null: false, precision: 6

  t.index :updated_at, name: "index_habits_on_updated_at"
end
ridgepole apply を使ってデータベースのマイグレーションをします。
docker-compose run web ridgepole -c config/database.yml --apply -f db/Schemafile.rb
モデルの設定
class Habit < ApplicationRecord
  validates :name, presence: true
  validates :description, presence: true
end
これで習慣を扱う Habit モデルが用意できました。
2. Rails 側で GraphQL を導入
GraphQL のセットアップ
まず、 Rails アプリケーションに GraphQL を導入します。
graphql 関連ジェムをインストールするために Gemfile に以下の行を追加します。
gem 'graphql', '~> 2.3.5'

group :development do
  gem 'graphiql-rails'
  gem 'sprockets-rails'
end
次に、以下のコマンドを実行してジェムをインストールします。
docker-compose run web bundle install
GraphQL スキーマの作成
次に、GraphQL スキーマを作成します。
以下のコマンドを実行して、GraphQL スキーマを生成します。
docker-compose run web rails generate graphql:install
これにより、 GraphQL スキーマファイルが生成されます。
次に、モデルと対応するタイプを作成します。
今回は、習慣を管理するアプリケーションを例に Habit モデル作ります。
docker-compose run web rails generate graphql:object Habit
生成された app/graphql/types/habit_type.rb ファイルを以下のように編集します。
# frozen_string_literal: true

module Types
  class HabitType < Types::BaseObject
    field :id, ID, null: false
    field :name, String, null: false
    field :description, String
    field :created_at, GraphQL::Types::ISO8601DateTime, null: false
    field :updated_at, GraphQL::Types::ISO8601DateTime, null: false
  end
end
GraphQL クエリの作成
次に、習慣一覧を取得するためのクエリを作成します。
app/graphql/types/query_type.rb ファイルを以下のように編集します。
# frozen_string_literal: true

module Types
  class QueryType < Types::BaseObject
    # すべてのHabitsを取得
    # {
    #   habits(userId: 1) {
    #     id
    #     name
    #     description
    #   }
    # }
    field :habits, [Types::HabitType], null: false

    def habits()
      Habit.all.order(:updated_at)
    end
  end
end
GraphQL エンドポイントの用意
GraphqlController を作成します。
# frozen_string_literal: true

class GraphqlController < ApplicationController
  # If accessing from outside this domain, nullify the session
  # This allows for outside API access while preventing CSRF attacks,
  # but you'll have to authenticate your user separately
  # protect_from_forgery with: :null_session

  def execute
    variables = prepare_variables(params[:variables])
    query = params[:query]
    operation_name = params[:operationName]
    context = {
      request: request
    }
    result = AppSchema.execute(query, variables: variables, context: context, operation_name: operation_name)
    render json: result
  rescue StandardError => e
    raise e unless Rails.env.development?
    handle_error_in_development(e)
  end

  private

  # Handle variables in form data, JSON body, or a blank value
  def prepare_variables(variables_param)
    case variables_param
    when String
      if variables_param.present?
        JSON.parse(variables_param) || {}
      else
        {}
      end
    when Hash
      variables_param
    when ActionController::Parameters
      variables_param.to_unsafe_hash # GraphQL-Ruby will validate name and type of incoming variables.
    when nil
      {}
    else
      raise ArgumentError, "Unexpected parameter: #{variables_param}"
    end
  end

  def handle_error_in_development(e)
    logger.error e.message
    logger.error e.backtrace.join("\n")

    render json: { errors: [{ message: e.message, backtrace: e.backtrace }], data: {} }, status: 500
  end
end
ルーティングも設定します。
post "/graphql", to: "graphql#execute"
これで /graphql に対して、クエリやミューテーションが実行できるようになりました!
GraphiQL の設定
開発環境で GraphQL をテストするために、 GraphiQL を設定します。
config/routes.rb ファイルに以下の行を追加します。
if Rails.env.development?
  mount GraphiQL::Rails::Engine, at: "/graphiql", graphql_path: "/graphql"
end
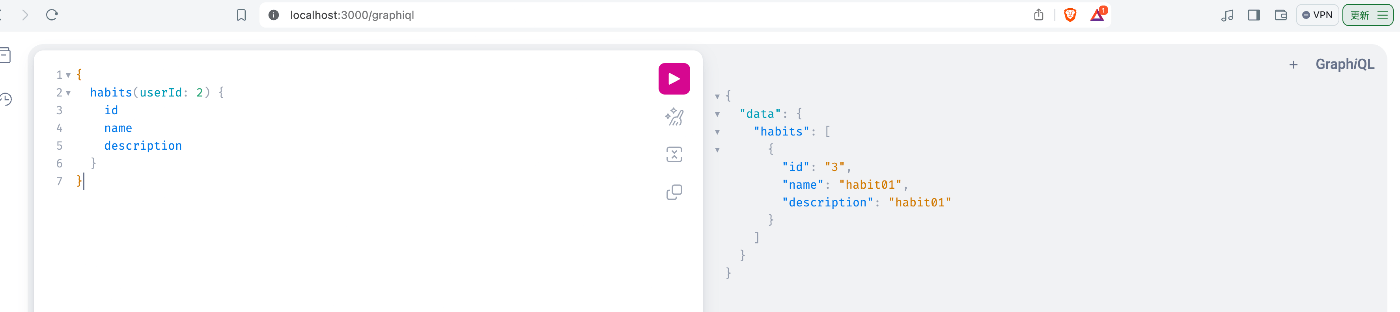
これで、http://localhost:3000/graphiql から GraphiQL インターフェースにアクセスできるようになります。
GraphiQL は左の枠にクエリやミューテーションを入力すると、右に結果が出力されます。
わざわざ curl や外部ツールを使わなくていいので便利ですね。
3. Flutter プロジェクトの作成
Flutter のインストール方法
まず最初に、Flutter をインストールします。各プラットフォームに対応したインストールガイドに従ってください。
- Windows: Flutter for Windows
- Mac: Flutter for Mac
- Linux: Flutter for Linux
新規 Flutter プロジェクトの作成
次に、新しい Flutter プロジェクトを作成します。ターミナルを開き、以下のコマンドを実行してください。
flutter create my_flutter_app
cd my_flutter_app
これで、新しい Flutter プロジェクトが作成されました。次に、GraphQL クライアントの設定を行います。
4. GraphQL クライアントの設定
Flutter で GraphQL クライアントを使用するためのパッケージインストール
Flutter で GraphQL クライアントを使用するために、graphql_flutter パッケージをインストールします。
pubspec.yaml ファイルに以下の依存関係を追加します。
graphql_flutter: ^5.1.2
次に、以下のコマンドを実行してパッケージをインストールします。
flutter pub get
GraphQL クライアントの設定
次に、lib/main.dart ファイルを開き、 GraphQL クライアントの設定を行います。
import 'package:flutter/material.dart';
import 'package:graphql_flutter/graphql_flutter.dart';
void main() async {
final HttpLink httpLink = HttpLink(
'http://<your-rails-api-url>/graphql',
);
ValueNotifier<GraphQLClient> client = ValueNotifier(
GraphQLClient(
link: httpLink,
cache: GraphQLCache(store: InMemoryStore()),
),
);
runApp(MyApp(client: client));
}
class MyApp extends StatelessWidget {
final ValueNotifier<GraphQLClient> client;
MyApp({required this.client});
Widget build(BuildContext context) {
return GraphQLProvider(
client: client,
child: MaterialApp(
title: 'Flutter GraphQL Demo',
theme: ThemeData(
primarySwatch: Colors.blue,
),
home: HomeScreen(),
),
);
}
}
class HomeScreen extends StatelessWidget {
Widget build(BuildContext context) {
return Scaffold(
appBar: AppBar(
title: Text('Flutter GraphQL Demo'),
),
body: Center(
child: Text('Hello World'),
),
);
}
}
これで、GraphQL クライアントの基本設定が完了しました。
5. GraphQLクエリを搭載したページの作成
画面レイアウトの作成
HomeScreen を別ファイルに切り出して lib/home_screen.dart を作成し、以下のコードを追加します。
import 'package:flutter/material.dart';
import 'package:graphql_flutter/graphql_flutter.dart';
class HomeScreen extends StatelessWidget {
const HomeScreen({super.key});
Widget build(BuildContext context) {
String fetchHabits = r"""
query FetchHabits() {
habits() {
id
name
description
}
}
""";
return Scaffold(
appBar: AppBar(
title: const Text('習慣トラッカー'),
backgroundColor: Colors.blue[800],
),
body: Query(
options: QueryOptions(
document: gql(fetchHabits),
),
builder: (QueryResult result, {FetchMore? fetchMore, refetch}) {
if (result.hasException) {
// エラーが発生した場合にエラーメッセージを表示
print(result.exception.toString());
return const Center(child: Text("何らかの理由で Habit の取得に失敗しました。"));
}
if (result.isLoading) {
// ロード中はインジケータを表示
return const Center(child: CircularProgressIndicator());
}
// データを取得し、habits リストが空かどうかをチェック
List habits = result.data != null && result.data!['habits'] != null ? result.data!['habits'] : [];
if (habits.isEmpty) {
// データが空の場合は、適切なメッセージを表示
return const Center(child: Text('データが見つかりませんでした'));
}
// データが存在する場合は、ListViewを表示
return ListView.builder(
itemCount: habits.length,
itemBuilder: (context, index) {
final habit = habits[index];
return HabitCard(habit: habit);
},
);
},
),
);
}
}
class HabitCard extends StatelessWidget {
final dynamic habit;
const HabitCard({super.key, required this.habit});
Widget build(BuildContext context) {
return Card(
margin: const EdgeInsets.all(8),
shape: RoundedRectangleBorder(borderRadius: BorderRadius.circular(10)),
child: ListTile(
leading: CircleAvatar(
backgroundColor: Colors.blue[100],
child: Icon(Icons.run_circle, color: Colors.blue[800]),
),
title: Text(habit['name']),
subtitle: const Text('Day 10 of 1'),
trailing: Checkbox(
value: false,
onChanged: (bool? value) {
// 必要に応じて何かしら処理
},
),
onTap: () {
// 必要に応じて何かしら処理
},
),
);
}
}
これで、基本的な画面レイアウトが完成しました。
6. Rails API との接続と動作確認
作成した Rails API との接続設定
前回の記事で作成した Rails API のエンドポイントを使用して、 Flutter アプリからデータを取得します。HttpLink の URL を、実際の Rails API の URL に置き換えます。
データ取得と表示の確認
Flutter アプリを起動し、記事一覧が正しく取得されて表示されることを確認します。
クエリが正常に動作している場合、リストビューに記事のタイトルと内容が表示されます。

7. まとめと次のステップ
この記事では、 Flutter アプリを作成し、 GraphQL を使用して Rails API バックエンドと接続する方法を紹介しました。
次の記事では、 GraphQL ミューテーションを使った、ユーザー登録などを実装していこうと思います!
Discussion