[React入門]公式『Reactの流儀』を実装してみる
はじめに
React公式のMain Conceptを一通り読んだので、最終章の『Reactの流儀』を私なりに実装してみました。
つくるもの
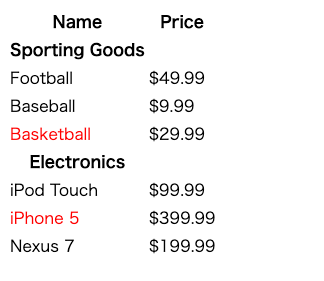
以下のようなシンプルな在庫リストを作成していきます。実装のステップについては公式に分かりやすい説明があるのでそちらを参照してください。

カテゴリ行・商品行を作成する
さっそく作っていきます。環境としてブラウザ上で試せるCodePenを利用します。
<div id="root"></div>
const data = [
  {category: "Sporting Goods", price: "$49.99", stocked: true, name: "Football"},
  {category: "Sporting Goods", price: "$9.99", stocked: true, name: "Baseball"},
  {category: "Sporting Goods", price: "$29.99", stocked: false, name: "Basketball"},
  {category: "Electronics", price: "$99.99", stocked: true, name: "iPod Touch"},
  {category: "Electronics", price: "$399.99", stocked: false, name: "iPhone 5"},
  {category: "Electronics", price: "$199.99", stocked: true, name: "Nexus 7"}
];

function CategoryRow(props) {
  return (
    <tr>
      <th>{props.category}</th>
    </tr>
  );
}

function ProductRow(props) {
  return (
    <tr>
      <td>{props.name}</td>
      <td>{props.price}</td>
    </tr>
  );
}

ReactDOM.render(
  <CategoryRow category={data[0].category} />,
  // <ProductRow name={data[0].name} price={data[0].price} />,
  document.getElementById('root')
);
Reactコンポーネントの記述方法としてはクラスコンポーネントと関数コンポーネントの2通りありますが、今回は関数コンポーネントを利用してみます。
親コンポーネントからカテゴリ名や商品名がわたってくる想定でpropsから必要なデータを取り出して描画する関数を作成し、renderメソッドで描画されることを確認します。
なお、商品行については在庫がないものは赤文字にするようなのでpropsに在庫情報を追加して文字色を変えるよう修正してみます。
function ProductRow(props) {
  const name = props.stock ? props.name : <span style={{color: "red"}}>{props.name}</span>
  return (
    <tr>
      <td>{name}</td>
      <td>{props.price}</td>
    </tr>
  );
}

ReactDOM.render(
  // <CategoryRow category={data[0].category} />,
  <ProductRow name={data[2].name} price={data[2].price} stock={data[2].stocked} />,
  document.getElementById('root')
);
商品テーブルを作成する
次に、カテゴリ行・商品行を包む商品テーブルを作成していきます。
function Table(props) {
  const productRows = props.products.map((product) => <ProductRow name={product.name} price={product.price} stock={product.stocked} />);
  return (
    <table>
      <tr>
        <th>Name</th>
        <th>Price</th>
      </tr>
      <CategoryRow category={props.products[0].category} />
      {productRows}
    </table>
  );
}

ReactDOM.render(
  <Table products={data}/>,
  document.getElementById('root')
);
いったんカテゴリは最初の1つだけ描画してみます。現時点のものはこんな感じ。

あとはカテゴリの変わり目でカテゴリ行を入れたいですがスマートな書き方が思いつかず。仕方がないので愚直に書いていきます。
function Table(props) {
  let rows = [];
  let prevCategory = '';
  props.products.forEach((product) => {
    if (product.category !== prevCategory){
      rows.push(<CategoryRow category={product.category} />);
      prevCategory = product.category;
    }
    rows.push(<ProductRow name={product.name} price={product.price} stock={product.stocked} />);
  });
  return (
    <table>
      <tr>
        <th>Name</th>
        <th>Price</th>
      </tr>
      {rows}
    </table>
  );
}
これでstaticな商品テーブルが完成しました!

検索バーを作成する
検索バーを作成していきましょう。
class SearchBar extends React.Component {
  constructor(props) {
    super(props);
  }

  render() {
    return (
      <form>
        <input type="text" placeholder="Search..." />
        <div>
          <input type="checkbox" />
          <span>Only show products in stock</span>
        </div>
      </form>
    );
  }
}

ReactDOM.render(
  <SearchBar />,
  // <Table products={data}/>,
  document.getElementById('root')
);
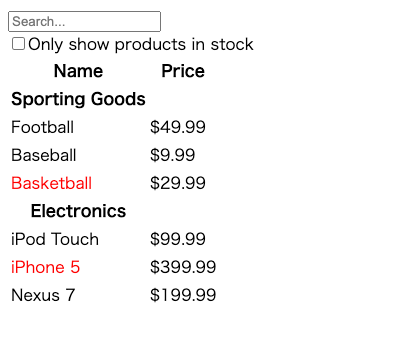
まずはstaticな検索バーを作成しました。検索バーはユーザーの入力を保持するstateをもつ必要があるのでクラスコンポーネントを利用します。
HTMLの機能でこのままでもユーザーの入力を受け付けることはできますが、Reactコンポーネントのstateで管理(制御されたコンポーネント)するため、handleInputやhandleCheckを実装しています。
class SearchBar extends React.Component {
  constructor(props) {
    super(props);
    this.state = {input: "", checked: false};
    this.handleInput = this.handleInput.bind(this);
    this.handleCheck = this.handleCheck.bind(this);
  }

  handleInput(e) {
    this.setState({
      input: e.target.value
    });
  }

  handleCheck(e) {
    this.setState({
      checked: e.target.checked
    });
  }

  render() {
    return (
      <form>
        <input type="text" placeholder="Search..." value={this.state.input} onChange={this.handleInput} />
        <div>
          <input type="checkbox" checked={this.state.checked} onChange={this.handleCheck} />
          <span>Only show products in stock</span>
        </div>
      </form>
    );
  }
}
在庫テーブルを作成する
では上記のコンポーネントを組み合わせて在庫テーブルを作成します。
検索バーのstateはリフトアップして在庫テーブルで保持し、検索バーはstateを利用しないよう変更します。
class SearchBar extends React.Component {
  constructor(props) {
    super(props);
    this.handleInput = this.handleInput.bind(this);
    this.handleCheck = this.handleCheck.bind(this);
  }

  handleInput(e) {
    this.props.handleInput(e.target.value);
  }

  handleCheck(e) {
    this.props.handleCheck(e.target.checked);
  }

  render() {
    return (
      <form>
        <input type="text" placeholder="Search..." value={this.props.filterText} onChange={this.handleInput} />
        <div>
          <input type="checkbox" checked={this.props.showOnlyStocked} onChange={this.handleCheck} />
          <span>Only show products in stock</span>
        </div>
      </form>
    );
  }
}

class StockTable extends React.Component {
  constructor(props) {
    super(props);
    this.state = {filterText: "", showOnlyStocked: false};
    this.handleInput = this.handleInput.bind(this);
    this.handleCheck = this.handleCheck.bind(this);
  }

  handleInput(input) {
    this.setState({
      filterText: input
    });
  }

  handleCheck(checked) {
    this.setState({
      showOnlyStocked: checked
    });
  }

  render() {
    return (
      <div>
        <SearchBar filterText={this.state.filterText} showOnlyStocked={this.state.showOnlyStocked} handleInput={this.handleInput} handleCheck={this.handleCheck} />
        <Table products={data} />
      </div>
    );
  }
}

ReactDOM.render(
  <StockTable />,
  document.getElementById('root')
);
商品テーブルにstateを反映する
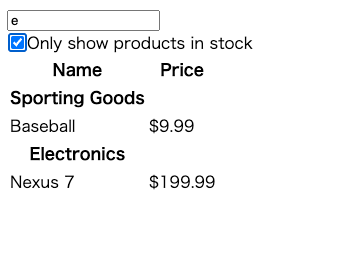
最後に、在庫テーブルで管理するstateをつかって商品テーブルの描画をdynamicにしていきます。
function Table(props) {
  let rows = [];
  let prevCategory = '';
  const stockFiltered = props.showOnlyStocked ? props.products.filter(product => product.stocked) : props.products;
  stockFiltered.filter((product) => product.name.toLowerCase().includes(props.filterText.toLowerCase())).forEach((product) => {
    if (product.category !== prevCategory){
      rows.push(<CategoryRow category={product.category} />);
      prevCategory = product.category;
    }
    rows.push(<ProductRow name={product.name} price={product.price} stock={product.stocked} />);
  });

  return (
    <table>
      <tr>
        <th>Name</th>
        <th>Price</th>
      </tr>
      {rows}
    </table>
  );
}

class StockTable extends React.Component {
  constructor(props) {
    super(props);
    this.state = {filterText: "", showOnlyStocked: false};
    this.handleInput = this.handleInput.bind(this);
    this.handleCheck = this.handleCheck.bind(this);
  }

  handleInput(input) {
    this.setState({
      filterText: input
    });
  }

  handleCheck(checked) {
    this.setState({
      showOnlyStocked: checked
    });
  }

  render() {
    return (
      <div>
        <SearchBar filterText={this.state.filterText} showOnlyStocked={this.state.showOnlyStocked} handleInput={this.handleInput} handleCheck={this.handleCheck} />
        <Table products={this.props.data} filterText={this.state.filterText} showOnlyStocked={this.state.showOnlyStocked} />
      </div>
    );
  }
}

ReactDOM.render(
  <StockTable data={data} />,
  document.getElementById('root')
);
完成です!
state, propsというReactの基本をしっかり抑えられるチュートリアルになっていると感じました!


最終的なコード(CodePen)
<div id="root"></div>
const data = [
  {category: "Sporting Goods", price: "$49.99", stocked: true, name: "Football"},
  {category: "Sporting Goods", price: "$9.99", stocked: true, name: "Baseball"},
  {category: "Sporting Goods", price: "$29.99", stocked: false, name: "Basketball"},
  {category: "Electronics", price: "$99.99", stocked: true, name: "iPod Touch"},
  {category: "Electronics", price: "$399.99", stocked: false, name: "iPhone 5"},
  {category: "Electronics", price: "$199.99", stocked: true, name: "Nexus 7"}
];

function CategoryRow(props) {
  return (
    <tr>
      <th>{props.category}</th>
    </tr>
  );
}

function ProductRow(props) {
  const name = props.stock ? props.name : <span style={{color: "red"}}>{props.name}</span>
  return (
    <tr>
      <td>{name}</td>
      <td>{props.price}</td>
    </tr>
  );
}

function Table(props) {
  let rows = [];
  let prevCategory = '';
  const stockFiltered = props.showOnlyStocked ? props.products.filter(product => product.stocked) : props.products;
  stockFiltered.filter((product) => product.name.toLowerCase().includes(props.filterText.toLowerCase())).forEach((product) => {
    if (product.category !== prevCategory){
      rows.push(<CategoryRow category={product.category} />);
      prevCategory = product.category;
    }
    rows.push(<ProductRow name={product.name} price={product.price} stock={product.stocked} />);
  });

  return (
    <table>
      <tr>
        <th>Name</th>
        <th>Price</th>
      </tr>
      {rows}
    </table>
  );
}

class SearchBar extends React.Component {
  constructor(props) {
    super(props);
    this.handleInput = this.handleInput.bind(this);
    this.handleCheck = this.handleCheck.bind(this);
  }

  handleInput(e) {
    this.props.handleInput(e.target.value);
  }

  handleCheck(e) {
    this.props.handleCheck(e.target.checked);
  }

  render() {
    return (
      <form>
        <input type="text" placeholder="Search..." value={this.props.filterText} onChange={this.handleInput} />
        <div>
          <input type="checkbox" checked={this.props.showOnlyStocked} onChange={this.handleCheck} />
          <span>Only show products in stock</span>
        </div>
      </form>
    );
  }
}

class StockTable extends React.Component {
  constructor(props) {
    super(props);
    this.state = {filterText: "", showOnlyStocked: false};
    this.handleInput = this.handleInput.bind(this);
    this.handleCheck = this.handleCheck.bind(this);
  }

  handleInput(input) {
    this.setState({
      filterText: input
    });
  }

  handleCheck(checked) {
    this.setState({
      showOnlyStocked: checked
    });
  }

  render() {
    return (
      <div>
        <SearchBar filterText={this.state.filterText} showOnlyStocked={this.state.showOnlyStocked} handleInput={this.handleInput} handleCheck={this.handleCheck} />
        <Table products={this.props.data} filterText={this.state.filterText} showOnlyStocked={this.state.showOnlyStocked} />
      </div>
    );
  }
}

ReactDOM.render(
  <StockTable data={data} />,
  document.getElementById('root')
);
Discussion