RDBしか知らない奴がBigQueryを触ってみた
RDBしか知らない奴がBigQueryを触ってみた
RDBしか知らない奴がBigQueryを触った際のメモ
メモなので正確性はない。
基本的に公式ページとGoogle BigQuery:The Definitive Guideを参考にしている。
手っ取り早く要点を掴む本としてはGoogle BigQuery:The Definitive Guideが一番マシに感じた。
しかしながら、2019年11月発売 2020年6月に最終更新なため、それ以降の情報は入っていない。
一旦本に目を通してReleaseノートで重要そうなものを閲覧するのが良さそう。
随時更新予定(型の話はまとめておいた方が良さそうなのであとでかく)
ML関係については実験コストが高いので保留。
基本的なこと
BigQueryはデータ分析に使用する。
トランザクションはあることはあるが、それが主目的ではないので、RDBではできるのに〜とか泣き言を言わないこと。
重要な概念として列指向で、分散処理をしている。分散処理なので、大きなテーブルでも簡単に集計ができる。
Google BigQuery:The Definitive Guide.の「Figure6-1. The simplified path that a query request takes through the BigQuery system」によると以下のように動いているらしい
アニメーションGIF 10秒更新
進化が早いのでどの程度正しいかは不明。
ただ、clientライブラリで何かが動いている場合は、裏でRESTAPI経由でこの辺りを触っていることを意識する必要はある。
テーブルの作成方法
クライアントライブラリからの作成
create_tableメソッドを利用してテーブルを作成する。
裏ではPOST https://bigquery.googleapis.com/bigquery/v2/projects/{projectId}/datasets/{datasetId}/tablesが実行されている。
サンプルコード
import logging
from google.cloud import bigquery
import os
os.environ['GOOGLE_APPLICATION_CREDENTIALS'] = './mytestproject_key.json'

# ログレベルをDEBUGに設定
# 裏で実行しているAPIを観測できる
logging.basicConfig(level=logging.DEBUG)

# BigQueryクライアントのログを取得するためのロガーを作成
logger = logging.getLogger('google.cloud.bigquery')
logger.setLevel(logging.DEBUG)

# コンソールにログを出力するためのハンドラーを追加
console_handler = logging.StreamHandler()
console_handler.setLevel(logging.DEBUG)

# ロガーにハンドラーを追加
logger.addHandler(console_handler)

# BigQueryクライアントの初期化
client = bigquery.Client()

# 使用するデータセットIDとテーブルID
dataset_id = 'mydataset'
table_id = 'customers'
project_id = 'mytestproject-422808'  # あなたのプロジェクトID
table_name = f"{project_id}.{dataset_id}.{table_id}"
schema = [
    bigquery.SchemaField("customer_id", "INTEGER", mode="REQUIRED"),
    bigquery.SchemaField("name", "STRING", mode="REQUIRED"),
    bigquery.SchemaField("age", "INTEGER", mode="REQUIRED"),
]
table = bigquery.Table(table_name, schema=schema)
table.clustering_fields = ["customer_id"]
table = client.create_table(table)

print(
    "Created clustered table {}.{}.{}".format(
        table.project, table.dataset_id, table.table_id
    )
)
DDLによる作成
CREATE文を使用してテーブルを作成する。
CREATE TABLE `mytestproject-422808.mydataset.customers`
(
  customer_id INT64 NOT NULL,
  name STRING NOT NULL,
  age INT64 NOT NULL
)
CLUSTER BY customer_id;
別テーブルをもとにテーブルを作成する
同じ構造を持つ空のテーブルを作成可能
CREATE TABLE `mytestproject-422808.mydataset.tmpKeyUsers`
LIKE `mytestproject-422808.mydataset.KeyUsers`;
テーブル名の変更
テーブル名の変更も可能だが、PrimaryKeyなどがついている場合は失敗する
ALTER TABLE mytestproject-422808.mydataset.Test RENAME TO TestRenamed;
作成済みのテーブルからCREATE 文を取得する方法
INFORMATION_SCHEMA.TABLESのDDL列を確認することで、CREATE文を確認できる。
SELECT
 *
FROM
  `mydataset.INFORMATION_SCHEMA.TABLES`;
これを利用することで、テスト環境などの構築が容易になる。
パーティションを使用したテーブルの分割
パーティションを使用することでテーブルを分割することが可能である。
パーティションを分割することでクエリ時に処理する範囲を制限することができ、コストと速度を向上させることができる。
以下ではevent_tsを日付ごとに分割した例になる。
CREATE TABLE `mytestproject-422808.mydataset.logs`
(
  event_ts DATETIME NOT NULL,
  message STRING NOT NULL
)
PARTITION BY DATE(event_ts)
このテーブルに以下のデータを投入したとする。
INSERT INTO `mytestproject-422808.mydataset.logs`
VALUES
  ("2024-01-01 05:34:34", "test1"),
  ("2024-01-01 06:34:34", "test1"),
  ("2024-01-02 05:34:34", "test1"),
  ("2024-01-03 05:34:34", "test1"),
  ("2024-01-04 05:34:34", "test1"),
  ("2024-01-05 05:35:34", "test1");
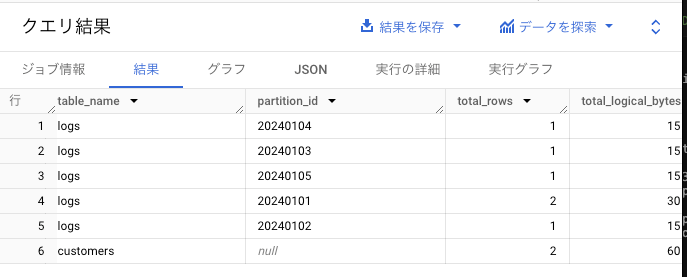
このデータがどのように割り振られているかをINFORMATION_SCHEMA.PARTITIONSで確認できる。
SELECT *
FROM
  `mytestproject-422808.mydataset.INFORMATION_SCHEMA.PARTITIONS`
この例では2024-01-01に2件格納されていて、他は1件になっている。
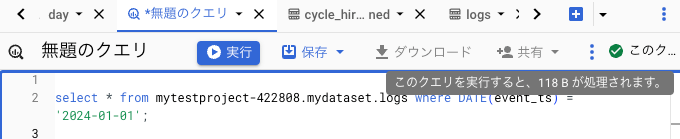
では各日付に大量にデータを挿入した後にBigQueryStudioを使用して検索をしてみる。
何も制限しない場合は、430KBのデータになるが、

event_tsで絞った時は118Bとなる。
さて、日付をパーティションキーにした場合に日付が増えるごとにパーティションが増えていくことになる。
当然、上限は存在し、2024/8時点で一度に更新できる数は4,000,トータルで10,000が上限となる。
つまり、このテーブルは数十年後に以下のようなエラーが発生することになる。
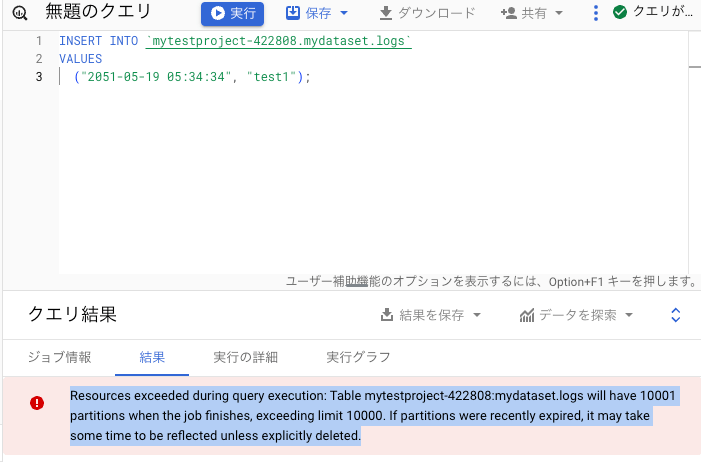
この場合の対策としてはパーティションの数が10,000以下になるようにデータを削除する。
以下のように古いデータを削除して、挿入することで、新しい日付のレコードを追加することができる。
delete from mytestproject-422808.mydataset.logs where DATE(event_ts) = '2024-01-01';
insert into mytestproject-422808.mydataset.logs values(
  '2051-05-19 05:34:34', "test1"
);
パーティションの有効期限
partition_expiration_daysを指定することでパーティションの有効期限を指定できる。
以下の例では1000日後に作成されたパーティションは削除され、上限を超えないような運用が可能になる。
CREATE TABLE `mytestproject-422808.mydataset.logs_expiration_days`
(
  event_ts DATETIME NOT NULL,
  message STRING NOT NULL
)
PARTITION BY DATE(event_ts)
OPTIONS(partition_expiration_days=1000)
テーブルのクラスター化
ユーザが指定したクラスターキーでテーブルをクラスター化可能。
データをソートされた形で保存するため、ソートやクラスターキーによる速度が向上する。
テーブルを作成する際に、CLUSTER BYを指定することでクラスターキーを指定できる。
CREATE TABLE `mytestproject-422808.mydataset.customers`
(
  customer_id INT64 NOT NULL,
  name STRING NOT NULL,
  age INT64 NOT NULL
)
CLUSTER BY customer_id;
主キーと外部キー
2023年のアップデートで主キーと外部キーがサポートされている。
これらは結合のパフォーマンスを向上させることが期待できますが、通常のRDBと違い主キーの制約や外部キー制約として動くものではない。
つまり、外部キーに存在しない値を入れてもエラーにはならない。
CREATE TABLE時にPRIMARY KEYと FOREGIN KEYを使用することで主キーと外部キーを定義できる。
CREATE TABLE `mytestproject-422808.mydataset.KeyUsers`
(
  userId INT64 NOT NULL,
  name STRING NOT NULL,
  PRIMARY KEY(userId) NOT ENFORCED
);
CREATE TABLE `mytestproject-422808.mydataset.KeyPositions`
(
  userId INT64 NOT NULL,
  positionName STRING NOT NULL,
  FOREIGN KEY(userId) references mydataset.KeyUsers(userId) NOT ENFORCED
)
データの追加方法
アップロードapiを使用する
指定した辞書を指定のテーブルにアップロードする。
load_table_from_jsonを使用することで実現可能。
以下のサンプルではAPI アップロードを実行したのちに、Job APIを実行して結果を取得している。
サンプコード
import logging
from google.cloud import bigquery
import os
os.environ['GOOGLE_APPLICATION_CREDENTIALS'] = './mytestproject_key.json'

# ログレベルをDEBUGに設定
# 裏で実行しているAPIを観測できる
logging.basicConfig(level=logging.DEBUG)

# BigQueryクライアントのログを取得するためのロガーを作成
logger = logging.getLogger('google.cloud.bigquery')
logger.setLevel(logging.DEBUG)

# コンソールにログを出力するためのハンドラーを追加
console_handler = logging.StreamHandler()
console_handler.setLevel(logging.DEBUG)

# ロガーにハンドラーを追加
logger.addHandler(console_handler)

# BigQueryクライアントの初期化
client = bigquery.Client()

# 使用するデータセットIDとテーブルID
dataset_id = 'mydataset'
table_id = 'customers'
project_id = 'mytestproject-422808'  # あなたのプロジェクトID

# 完全なテーブル参照
table_name = f"{project_id}.{dataset_id}.{table_id}"
table_obj = client.get_table(table_name)
print('table_obj', table_obj.schema)
job_config = bigquery.LoadJobConfig(
    source_format=bigquery.SourceFormat.NEWLINE_DELIMITED_JSON,
    schema=table_obj.schema,
    write_disposition=bigquery.WriteDisposition.WRITE_APPEND,  # 追記モード
)
load_job = client.load_table_from_json(
  [
    {
        'customer_id': 1,
        'name': '山田太郎',
        'age': 17
    },
    {
        'customer_id': 2,
        'name': '山田次郎',
        'age': 35
    },
  ],
  table_name,
  job_config=job_config
)
# ジョブの完了を待機
load_job.result()
実行ログ
DEBUG:urllib3.connectionpool:https://bigquery.googleapis.com:443 "GET /bigquery/v2/projects/mytestproject-422808/datasets/mydataset/tables/customers?prettyPrint=false HTTP/11" 200 None
table_obj [SchemaField('customer_id', 'INTEGER', 'NULLABLE', None, None, (), None), SchemaField('name', 'STRING', 'NULLABLE', None, None, (), None), SchemaField('age', 'INTEGER', 'NULLABLE', None, None, (), None)]
DEBUG:urllib3.connectionpool:https://bigquery.googleapis.com:443 "POST /upload/bigquery/v2/projects/mytestproject-422808/jobs?uploadType=multipart HTTP/11" 200 1475
DEBUG:urllib3.connectionpool:https://bigquery.googleapis.com:443 "GET /bigquery/v2/projects/mytestproject-422808/jobs/96e90efc-2747-4837-a0e1-d0f1e882fe06?projection=full&location=asia-northeast1&prettyPrint=false HTTP/11" 200 None
DEBUG:google.api_core.retry:Retrying due to , sleeping 0.9s ...
DEBUG:urllib3.connectionpool:https://bigquery.googleapis.com:443 "GET /bigquery/v2/projects/mytestproject-422808/jobs/96e90efc-2747-4837-a0e1-d0f1e882fe06?projection=full&location=asia-northeast1&prettyPrint=false HTTP/11" 200 None
DEBUG:google.api_core.retry:Retrying due to , sleeping 0.0s ...
DEBUG:urllib3.connectionpool:https://bigquery.googleapis.com:443 "GET /bigquery/v2/projects/mytestproject-422808/jobs/96e90efc-2747-4837-a0e1-d0f1e882fe06?projection=full&location=asia-northeast1&prettyPrint=false HTTP/11" 200 None
DEBUG:google.api_core.retry:Retrying due to , sleeping 1.0s ...
DEBUG:urllib3.connectionpool:https://bigquery.googleapis.com:443 "GET /bigquery/v2/projects/mytestproject-422808/jobs/96e90efc-2747-4837-a0e1-d0f1e882fe06?projection=full&location=asia-northeast1&prettyPrint=false HTTP/11" 200 None
今回はdict型からの読み込み例を取り上げたが、load_table_from_fileなどでファイルからアップロードする場合も裏では同じAPIを実行している。
注意事項
テーブルへのロードの回数は上限があります。1つのテーブルで1500回程度、上記のメソッドで追記を繰り返すと以下のようなエラーが発生します。
google.api_core.exceptions.Forbidden: 403 Quota exceeded: Your table exceeded quota for imports or query appends per table. For more information, see https://cloud.google.com/bigquery/docs/troubleshoot-quotas; reason: quotaExceeded, location: load_job_per_table.long, message: Quota exceeded: Your table exceeded quota for imports or query appends per table. For more information, see https://cloud.google.com/bigquery/docs/troubleshoot-quotas
INSERTクエリーを実行するケース
queryメソッドにSQL文を指定して、データの追記が可能。
例えば、別テーブルのデータを集計した結果を作成することなども容易になる。
サンプルコード
import logging
from google.cloud import bigquery
import os
os.environ['GOOGLE_APPLICATION_CREDENTIALS'] = './mytestproject_key.json'

# ログレベルをDEBUGに設定
# 裏で実行しているAPIを観測できる
logging.basicConfig(level=logging.DEBUG)

# BigQueryクライアントのログを取得するためのロガーを作成
logger = logging.getLogger('google.cloud.bigquery')
logger.setLevel(logging.DEBUG)

# コンソールにログを出力するためのハンドラーを追加
console_handler = logging.StreamHandler()
console_handler.setLevel(logging.DEBUG)

# ロガーにハンドラーを追加
logger.addHandler(console_handler)

# BigQueryクライアントの初期化
client = bigquery.Client()

# 使用するデータセットIDとテーブルID
dataset_id = 'mydataset'
table_id = 'customers'
project_id = 'mytestproject-422808'  # あなたのプロジェクトID

# 完全なテーブル参照
table_name = f"{project_id}.{dataset_id}.{table_id}"
# SQLクエリ
query = f"""
INSERT INTO {table_name} VALUES (100, 'name1', 123)
"""

# クエリの実行
query_job = client.query(query)

# ジョブの完了を待機
query_job.result()
ログ出力
DEBUG:urllib3.connectionpool:https://bigquery.googleapis.com:443 "POST /bigquery/v2/projects/mytestproject-422808/jobs?prettyPrint=false HTTP/11" 200 None
DEBUG:urllib3.connectionpool:https://bigquery.googleapis.com:443 "GET /bigquery/v2/projects/mytestproject-422808/jobs/fe23536f-ce7c-4d51-84c4-3797710a15b5?projection=full&location=asia-northeast1&prettyPrint=false HTTP/11" 200 None
DEBUG:urllib3.connectionpool:https://bigquery.googleapis.com:443 "GET /bigquery/v2/projects/mytestproject-422808/queries/fe23536f-ce7c-4d51-84c4-3797710a15b5?maxResults=0&location=asia-northeast1&prettyPrint=false HTTP/11" 200 None
DEBUG:urllib3.connectionpool:https://bigquery.googleapis.com:443 "GET /bigquery/v2/projects/mytestproject-422808/jobs/fe23536f-ce7c-4d51-84c4-3797710a15b5?projection=full&location=asia-northeast1&prettyPrint=false HTTP/11" 200 None
このINSERTは24 時間の間、最初の 1,500 件の INSERT ステートメントは送信された直後に実行されるが、それを超えると、テーブルに書き込む INSERT ステートメントの同時実行数は 10 件に制限され、上限を超えたものはキューに入れられる。
頻繁に実行する場合はStorage Write API の使用を検討するように記載されている。
ストリーミングAPIを使用する方法
ストリーミングapiを使用することで高速に処理を実行する。その代わり価格が高くなる。
また、ストリーミングAPIで挿入したデータにはいくつかの制約が存在する。
insert_rowsメソッドを使用することで実現可能。
サンプコード
import logging
from google.cloud import bigquery
import os
os.environ['GOOGLE_APPLICATION_CREDENTIALS'] = './mytestproject_key.json'

# ログレベルをDEBUGに設定
# 裏で実行しているAPIを観測できる
logging.basicConfig(level=logging.DEBUG)

# BigQueryクライアントのログを取得するためのロガーを作成
logger = logging.getLogger('google.cloud.bigquery')
logger.setLevel(logging.DEBUG)

# コンソールにログを出力するためのハンドラーを追加
console_handler = logging.StreamHandler()
console_handler.setLevel(logging.DEBUG)

# ロガーにハンドラーを追加
logger.addHandler(console_handler)

# BigQueryクライアントの初期化
client = bigquery.Client()

# 使用するデータセットIDとテーブルID
dataset_id = 'mydataset'
table_id = 'customers'
project_id = 'mytestproject-422808'  # あなたのプロジェクトID

# 完全なテーブル参照
table_name = f"{project_id}.{dataset_id}.{table_id}"
table_obj = client.get_table(table_name)
load_job = client.insert_rows(
  table_obj,
  [
    {
        'customer_id': 1,
        'name': '山田太郎',
        'age': 17
    },
    {
        'customer_id': 2,
        'name': '山田次郎',
        'age': 35
    },
  ]
)
実行ログ
DEBUG:urllib3.connectionpool:https://bigquery.googleapis.com:443 "GET /bigquery/v2/projects/mytestproject-422808/datasets/mydataset/tables/customers?prettyPrint=false HTTP/11" 200 None
DEBUG:urllib3.connectionpool:https://bigquery.googleapis.com:443 "POST /bigquery/v2/projects/mytestproject-422808/datasets/mydataset/tables/customers/insertAll?prettyPrint=false HTTP/11" 200 None
さて、ここでストリーミングAPIを使用して挿入したデータをBigQueryStudioで削除または更新してみル。
delete FROM `mytestproject-422808.mydataset.customers` where 1=1
以下のようなエラーが発生する。
UPDATE or DELETE statement over table mytestproject-422808.mydataset.customers would affect rows in the streaming buffer, which is not supported
これはストリーミング挿入をした場合、その行はストリーミングバッファに一時的に蓄えられて、実際のメタデータなどの更新は即時に完了していないためである。
この期間、SELECTなどをした場合は整合性があるようにふるまうが、DELETEやUPDATEなどの更新処理は行うことができない。
StorageAPIを使用した書き込み
出た当時は色々と問題が報告されていた。
またサンプルコードを見て貰えばわかる通り、かなり使い勝手が悪い。
サンプコード
- レコード用のprotoファイルを用意する。
syntax = "proto2";

message Customer {
  required int64 customer_id = 1;
  required string name = 2;
  required int64 age = 3;
}
- protocを用意して、以下のコマンドを実行する
protoc --python_out=. customers.proto
- 以下のコードでinsertを行う
from google.protobuf import descriptor_pb2

from google.cloud import bigquery_storage_v1
from google.cloud.bigquery_storage_v1 import types, writer

# run:
#   protoc --python_out=. customers.proto
import customers_pb2

def create_row_data(customer_id: int, name: str, age: int):
    row = customers_pb2.Customer()
    row.customer_id = customer_id
    row.name = name
    row.age = age
    return row.SerializeToString()

# 使用するデータセットIDとテーブルID
dataset_id = 'mydataset'
table_id = 'customers'
project_id = 'mytestproject-422808'  # あなたのプロジェクトID


"""Create a write stream, write some sample data, and commit the stream."""
write_client = bigquery_storage_v1.BigQueryWriteClient()
parent = write_client.table_path(project_id, dataset_id, table_id)
write_stream = types.WriteStream()
# When creating the stream, choose the type. Use the PENDING type to wait
# until the stream is committed before it is visible. See:
# https://cloud.google.com/bigquery/docs/reference/storage/rpc/google.cloud.bigquery.storage.v1#google.cloud.bigquery.storage.v1.WriteStream.Type
write_stream.type_ = types.WriteStream.Type.PENDING
write_stream = write_client.create_write_stream(
    parent=parent, write_stream=write_stream
)
stream_name = write_stream.name
# Create a template with fields needed for the first request.
request_template = types.AppendRowsRequest()
# The initial request must contain the stream name.
request_template.write_stream = stream_name
# So that BigQuery knows how to parse the serialized_rows, generate a
# protocol buffer representation of your message descriptor.
proto_schema = types.ProtoSchema()
proto_descriptor = descriptor_pb2.DescriptorProto()
customers_pb2.Customer.DESCRIPTOR.CopyToProto(proto_descriptor)
proto_schema.proto_descriptor = proto_descriptor
proto_data = types.AppendRowsRequest.ProtoData()
proto_data.writer_schema = proto_schema
request_template.proto_rows = proto_data
# Some stream types support an unbounded number of requests. Construct an
# AppendRowsStream to send an arbitrary number of requests to a stream.
append_rows_stream = writer.AppendRowsStream(write_client, request_template)
# Create a batch of row data by appending proto2 serialized bytes to the
# serialized_rows repeated field.
proto_rows = types.ProtoRows()
proto_rows.serialized_rows.append(create_row_data(1001, "Alice", 100))
request = types.AppendRowsRequest()
request.offset = 0
proto_data = types.AppendRowsRequest.ProtoData()
proto_data.rows = proto_rows
request.proto_rows = proto_data
response_future_1 = append_rows_stream.send(request)
print(response_future_1.result())
# Shutdown background threads and close the streaming connection.
append_rows_stream.close()
# A PENDING type stream must be "finalized" before being committed. No new
# records can be written to the stream after this method has been called.
write_client.finalize_write_stream(name=write_stream.name)
# Commit the stream you created earlier.
batch_commit_write_streams_request = types.BatchCommitWriteStreamsRequest()
batch_commit_write_streams_request.parent = parent
batch_commit_write_streams_request.write_streams = [write_stream.name]
write_client.batch_commit_write_streams(batch_commit_write_streams_request)
print(f"Writes to stream: '{write_stream.name}' have been committed.")
データの取得方法
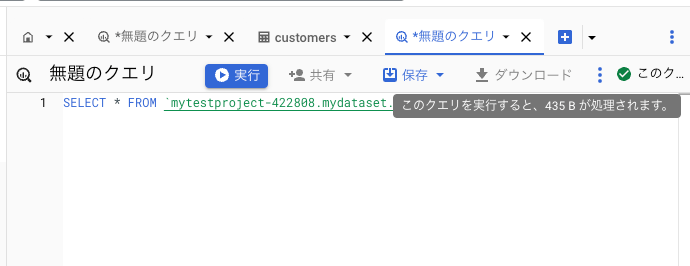
BigQueryからデータを取得する場合、使用するバイト数によって課金されるので、あらかじめどの程度のデータ量になるかを検討すべき。
データ量についてはBigQueryStudioでSQLを入力することで、処理されるデータ量を予測することが可能になっている。
行の一覧取得
list_rowsを使用して特定のテーブルの行の一覧を取得できる。
このメソッドは裏でGET https://bigquery.googleapis.com/bigquery/v2/projects/{projectId}/datasets/{datasetId}/tables/{tableId}/dataを実行している。
サンプルコード
import logging
from google.cloud import bigquery
import os
os.environ['GOOGLE_APPLICATION_CREDENTIALS'] = './mytestproject_key.json'

# ログレベルをDEBUGに設定
# 裏で実行しているAPIを観測できる
logging.basicConfig(level=logging.DEBUG)

# BigQueryクライアントのログを取得するためのロガーを作成
logger = logging.getLogger('google.cloud.bigquery')
logger.setLevel(logging.DEBUG)

# コンソールにログを出力するためのハンドラーを追加
console_handler = logging.StreamHandler()
console_handler.setLevel(logging.DEBUG)

# ロガーにハンドラーを追加
logger.addHandler(console_handler)

# BigQueryクライアントの初期化
client = bigquery.Client()

# 使用するデータセットIDとテーブルID
dataset_id = 'mydataset'
table_id = 'customers'
project_id = 'mytestproject-422808'  # あなたのプロジェクトID

# 完全なテーブル参照
table_ref = f"{project_id}.{dataset_id}.{table_id}"
# 取得する列を指定
selected_fields = [
    bigquery.SchemaField("customer_id", "INTEGER"),
    bigquery.SchemaField("name", "STRING")
]
rows = client.list_rows(table_ref, selected_fields=selected_fields)
# 結果の取得と表示
for row in rows:
    print(row.customer_id, row.name)  # rowはRowオブジェクトで、カラムによってアクセスできます
クエリーを実行するケース
queryメソッドにSQL文を記述してデータの取得が可能。
サンプルコード
import logging
from google.cloud import bigquery
import os
os.environ['GOOGLE_APPLICATION_CREDENTIALS'] = './mytestproject_key.json'

# ログレベルをDEBUGに設定
# 裏で実行しているAPIを観測できる
logging.basicConfig(level=logging.DEBUG)

# BigQueryクライアントのログを取得するためのロガーを作成
logger = logging.getLogger('google.cloud.bigquery')
logger.setLevel(logging.DEBUG)

# コンソールにログを出力するためのハンドラーを追加
console_handler = logging.StreamHandler()
console_handler.setLevel(logging.DEBUG)

# ロガーにハンドラーを追加
logger.addHandler(console_handler)

# BigQueryクライアントの初期化
client = bigquery.Client()

# 使用するデータセットIDとテーブルID
dataset_id = 'mydataset'
table_id = 'customers'
project_id = 'mytestproject-422808'  # あなたのプロジェクトID

# 完全なテーブル参照
table_ref = f"`{project_id}.{dataset_id}.{table_id}`"


# SQLクエリ
query = f"""
SELECT * FROM {table_ref}
"""

# クエリの実行
query_job = client.query(query)

# 結果の取得と表示
for row in query_job:
    print(row.customer_id, row.name, row.age)  # rowはRowオブジェクトで、カラムによってアクセスできます
パラメータを与える場合
クエリーにパラメータを与える場合、queryメソッドにJobConfigを指定することで実現する。
この際、query_parametersにScalarQueryParameterを指定可能。
# SQLクエリ
query = f"""
SELECT * FROM {table_ref} where customer_id = @customer_id
"""
id = 1
job_config = bigquery.job.QueryJobConfig(
    query_parameters=[
        bigquery.ScalarQueryParameter("customer_id", "INTEGER", id)
    ]
)
# クエリの実行
query_job = client.query(query, job_config)
ScalarQueryParameterの代わりにArrayQueryParameterで配列を与えることも可能です。
# SQLクエリ
query = f"""
SELECT * FROM {table_ref} where customer_id in UNNEST(@id_list)
"""
id_list = [1,2]
job_config = bigquery.job.QueryJobConfig(
    query_parameters=[
        bigquery.ArrayQueryParameter("id_list", "INTEGER", id_list)
    ]
)

# クエリの実行
query_job = client.query(query, job_config)
Storage Read APIを利用する場合
BigQuery Storage Read APIを使用することでBigQueryが使用するストレージに高速アクセスが可能となる。
クエリーほどの複雑な条件定義はできないが、selected_filtersで列を、row_restrictionで行をフィルタできる。
サンプルコード
from google.cloud.bigquery_storage import BigQueryReadClient, types


# 使用するデータセットIDとテーブルID
dataset_id = 'mydataset'
table_id = 'customers'
project_id = 'mytestproject-422808'  # あなたのプロジェクトID

client = BigQueryReadClient()
table_path = f"projects/{project_id}/datasets/{dataset_id}/tables/{table_id}"
requested_session = types.ReadSession()
requested_session.table = table_path
requested_session.data_format = types.DataFormat.ARROW
requested_session.read_options.selected_fields = ['customer_id', 'name']
requested_session.read_options.row_restriction = "customer_id in (1)"  # フィルタ条件を指定
parent = f"projects/{project_id}"
session = client.create_read_session(
    parent=parent,
    read_session=requested_session,
    max_stream_count=1,
)
# max_stream_count=1より、配列の0番目の要素を単に指定している
reader = client.read_rows(session.streams[0].name)
rows = reader.rows(session)
for row in rows:
  print(row['customer_id'], row['name'])
クエリとStorage ReadAPIを組み合わせる
クエリーを実行した場合、結果セットは一時テーブルに作成される。
この一時テーブルをStorage Read APIを使用して高速に取得するサンプルを以下に示す。
まず以下のようにgoogle-cloud-bigquery,bigquery storage, pandasをインストールする。
pip install --upgrade google-cloud-bigquery[bqstorage,pandas]
import logging
from google.cloud import bigquery
from google.cloud import bigquery_storage
import os
os.environ['GOOGLE_APPLICATION_CREDENTIALS'] = './mytestproject_key.json'

# BigQueryクライアントの初期化
client = bigquery.Client()

# 使用するデータセットIDとテーブルID
dataset_id = 'mydataset'
table_id = 'customers'
project_id = 'mytestproject-422808'  # あなたのプロジェクトID

# 完全なテーブル参照
table_ref = f"`{project_id}.{dataset_id}.{table_id}`"


# SQLクエリ
query = f"""
SELECT * FROM {table_ref}
"""

# クエリの実行
bqstorage_client = bigquery_storage.BigQueryReadClient()
# 一時テーブルから結果をBigQueryStorageでpandasに格納
df_temp = client.query(query).to_dataframe(bqstorage_client)
print(df_temp)
以下のようにあるので、一時テーブルからの読み取りには料金は発生しない想定である。
Storage Read API の料金の詳細
Storage Read API にはオンデマンド料金モデルがあり、オンデマンド料金では、BigQuery は、処理されたバイト数(読み取りバイト数とも呼ばれる)に基づいて課金します。オンデマンド料金は使用量のみに基づいて計算されます。 読み取りバイト数の無料枠は、請求先アカウントごとに 1 か月あたり 300 TiB です。 一時テーブルからの読み取りの一環としてスキャンされたバイト数 は無料で、300 TiB の無料枠にはカウントされません。 300 TiB の読み取りされた空きバイトは、バイト読み取りコンポーネント上 関連するアウトバウンド データ転送には適用されません。
https://cloud.google.com/bigquery/pricing?hl=ja
トランザクション
BEGIN TRANSACTION後のステートメントをまとめてコミットもしくはロールバックが可能である。
以下のように途中でエラーが発生するとロールバックが発生し、1010、1011のデータの挿入が取り消される。
単純なトランザクションのサンプル
from google.cloud import bigquery
import os
os.environ['GOOGLE_APPLICATION_CREDENTIALS'] = './mytestproject_key.json'

# BigQueryクライアントの初期化
client = bigquery.Client()

# 使用するデータセットIDとテーブルID
dataset_id = 'mydataset'
table_id = 'customers'
project_id = 'mytestproject-422808'  # あなたのプロジェクトID

# 完全なテーブル参照
table_name = f"{project_id}.{dataset_id}.{table_id}"
# SQLクエリ
query = f"""
BEGIN

  BEGIN TRANSACTION;
  INSERT INTO mydataset.customers VALUES (1010, 'xxxxxx', 123);
  INSERT INTO mydataset.customers VALUES (1011, 'xxxxxx', 123);
  -- Trigger an error.
  SELECT 1/0;
  COMMIT TRANSACTION;

EXCEPTION WHEN ERROR THEN
  -- Roll back the transaction inside the exception handler.
  ROLLBACK TRANSACTION;
  SELECT @@error.message;
END;

"""

# クエリの実行
query_job = client.query(query)
# ジョブの完了を待機
rows = query_job.result()
for row in rows:
    print(row)
print(rows)
また、同じセッションであればCOMMITまたはROLLBACKを行うまで、トランザクションは続いている。
同じセッションIDにアクセスするように調整すれば、時間をおいてトランザクションの処理を続けることができる。
1回目のクエリではセッションIDを新規に作成してデータをINSERTする
2回目のクエリでは1回目で作成したsession_idを指定して1回目と同じセッションでCOMMITを行い、SELECTを行う。
1回目〜2回目の間はINSERTしたデータは当該セッション以外では閲覧できない。
このことは以下のサンプルコードで確認できる
トランザクションを開始したセッションを再利用する方法
from google.cloud import bigquery
import os
import time
os.environ['GOOGLE_APPLICATION_CREDENTIALS'] = './mytestproject_key.json'

# BigQueryクライアントの初期化
client = bigquery.Client()


# 使用するデータセットIDとテーブルID
dataset_id = 'mydataset'
table_id = 'customers'
project_id = 'mytestproject-422808'  # あなたのプロジェクトID

# セッションIDの作成
session_id = 'my_session_id'
job_config1 = bigquery.QueryJobConfig(
    create_session = True
)
# 完全なテーブル参照
table_name = f"{project_id}.{dataset_id}.{table_id}"

# クエリの実行1
query1 = f"""
  BEGIN TRANSACTION;
  INSERT INTO mydataset.customers VALUES (1010, 'xxxxxx', 123);
"""
query_job1 = client.query(query1, job_config=job_config1)
session_id = query_job1.session_info.session_id

# ジョブの完了を待機
rows = query_job1.result()
for row in rows:
    print(row)
print(rows)

time.sleep(20)

# クエリの実行2
query2 = f"""
COMMIT TRANSACTION;
select * from mydataset.customers;
"""
job_config2 = bigquery.QueryJobConfig(
    create_session = False,
    connection_properties=[
          bigquery.query.ConnectionProperty(
          key="session_id", value=session_id
      )
    ]
)
query_job2 = client.query(query2, job_config=job_config2)
print(query_job2)

# ジョブの完了を待機
rows = query_job2.result()
for row in rows:
    print(row)
print(rows)
パフォーマンスの問題
- 基本的に使用する列を減らせばコストと速度が上がる。
- 1行づつループで取得するようなことは避ける
- クラスターキーとパーティションキーでデータ量を絞るようにする
- 大きなデータ同士の結合は避ける
- JOINする場合は、主キー、外部キーを検討する
- SQLが全く同じであればキャッシュが効く。この場合はコストはかからない
- 大規模データの場合で近似値で良い場合はCOUNTではなくAPPROX_COUNT_DISTINCTの使用を検討する
- Google Cloud Storageなどを使用する場合は同じリージョンに置く
- StorageReadAPIの使用を検討する
dry-runによる見積もり
JobConfigのdry_runを指定することで実際に起動させずにデータ使用量を見積もれる.
サンプル
from google.cloud import bigquery
import os
os.environ['GOOGLE_APPLICATION_CREDENTIALS'] = './mytestproject_key.json'

# BigQueryクライアントの初期化
client = bigquery.Client()

# 使用するデータセットIDとテーブルID
dataset_id = 'mydataset'
table_id = 'customers'
project_id = 'mytestproject-422808'  # あなたのプロジェクトID

# 完全なテーブル参照
table_ref = f"`{project_id}.{dataset_id}.{table_id}`"


# SQLクエリ
query = f"""
SELECT * FROM {table_ref}
"""

# クエリの実行
config = bigquery.QueryJobConfig(
    dry_run=True
)
query_job = client.query(query, job_config=config)
print("This query will process {} bytes."
                .format(query_job.total_bytes_processed))
ただしこれは常に正確とは限らない。
例えば、クラスタリングされている場合の予測は上限値が表示されて、実際実行した時より過剰に大きく評価されるケースがある。
過去に実行したクエリの確認
次のSQLで過去実行したクエリの処理バイト数が確認できる
SELECT
  creation_time,
  query,
  total_bytes_processed/1024/1024/1024 AS total_gb_processed
FROM
  `region-asia-northeast1`.INFORMATION_SCHEMA.JOBS_BY_PROJECT
WHERE
  state = 'DONE'
  AND creation_time >= TIMESTAMP_SUB(CURRENT_TIMESTAMP(), INTERVAL 30 DAY)
ORDER BY
  creation_time DESC;
エミュレーター
BigQuery Emulatorを使用するとローカルでBigQueryのエミュレータを起動して、実際にBigQueryに接続しなくても動作を確認できる。
全てのAPIをサポートしていないし、いくつかの制限事項が存在する。
以下に簡単にDockerを起動して接続するサンプルを示す。
Docker用の設定ファイル
version: '3.7'
services:

    bq:
        image: ghcr.io/goccy/bigquery-emulator:latest
        ports:
            - "9050:9050"
        volumes:
            - ./testdata:/testdata
        command: "bigquery-emulator --project=test --data-from-yaml=../testdata/data.yaml --log-level=debug"
projects:
- id: test
  datasets:
    - id: mydataset
      tables:
        - id: customers
          columns:
            - name: customer_id
              type: INTEGER
            - name: name
              type: STRING
            - name: age
              type: INTEGER
          data:
            - customer_id: 1
              name: alice
              age: 10
            - customer_id: 2
              name: bob
              age: 12
            - customer_id: 3
              name: bob
              age: 15
以下のようにDocker composeを起動することで、エミュレータが起動してdata.yamlで指定したデータセットが構築される。
docker compose up
その後、Client生成時にapi_endpointにdockerコンテナのエンドポイントを指定することで接続先がエミュレータとなる。
from google.cloud import bigquery


project_id = "test"
client = bigquery.Client(
    project=project_id,
    client_options={
        "api_endpoint": "http://127.0.0.1:9050",
    }
)

table_name = f"{project_id}.mydataset.customers"

query = f'''
SELECT customer_id, name FROM `{table_name}`
'''
result = client.query(query)
for row in result:
    print(row)
ローカルのテストに便利な機能であるが、いくかの制限がある。
- サポートしていないAPIがある。例えば、insert_rowsメソッドは動作するが、load_table_from_jsonが動作しなかったり、truncate tableが動作しなかったりした
- メモリーリークをしているようなので、テスト開始のたびにコンテナの再起動をした方が望ましい
具体的なテストコードなどを書く場合は以下を参照
BigQueryを利用したアプリケーションのローカルテスト
Discussion