コルーチンとジェネレータを追って泥沼へ:半世紀前のプログラミング言語は動くのか!?
目的
このドキュメントはコルーチンとジェネレータについて、そもそもどういったものだったのかを調べ出して泥沼にはまった記録です。
通常は役にたちませんが以下の疑問を持った場合に考えるヒントにはなります。
- ジェネレータとコルーチンの関係は?
- 「かつてのPythonのgenerator functionは、ほとんどcoroutineだが、完全ではない・・・ってどういう意味だってばよ」
- 「完全なcoroutineを使用できるプログラミング言語ってなんなのだ」
- 「先生、JavaScriptのPromiseはcoroutineに入りますか?」
ドキュメントを記載する上でいくつかの実験コードを記載しており、その実験コードは以下のGitHubを参考にしてください。
https://github.com/mima3/test_coroutine
きっかけ
この疑問を持つに至るきっかけはPythonのgeneratorにsend/throwを追加するPEP 342 – Coroutines via Enhanced Generatorsを読んでいる際にあった以下の一文でした。
Python’s generator functions are almost coroutines – but not quite – in that they allow pausing execution to produce a value, but do not provide for values or exceptions to be passed in when execution resumes.
generator functionは、ほとんどcoroutineであるが、完全ではないということは、完全なcoroutineの概念が存在するということになります。
wikipediaによるとcoroutineは「coroutineはいったん処理を中断した後、続きから処理を再開できる」と記載があります。これだけの定義であれば、当時のpythonのgeneratorはcoroutineであるといって問題はなかったはずです。
このドキュメントは、このcoroutine性の違いなるものを整理して一定の納得をするためのものになります。
Pythonにおけるcoroutineとgenerator
最初はGoogle Colabなどで容易に実験できるPythonに絞ってcoroutineとgeneratorの足跡を振り返ります。
Pythonでは先にgeneratorが導入され、generatorの機能を拡張することによりcoroutineが実現し、その後async def/awaitによるcoroutineが実現しました。
PEPでの流れは以下のようになります。
- PEP 255 Simple Generators
- PEP 342 – Coroutines via Enhanced Generators
- PEP 380 – Syntax for Delegating to a Subgenerator
- PEP 3156 – Asynchronous IO Support Rebooted: the “asyncio” Module
- PEP 492 – Coroutines with async and await syntax
PEP 255 Simple Generators
PEP 255 Simple Generatorsでgeneratorが導入されました。
yield式を含む関数をgenerator関数といい、そのgenerator関数が生成するオブジェクトをgenerator iteratorといいます。
注意すべきこととして、Pythonの文脈で単にgeneratorといった場合、generator関数を指すケースもありますし、文脈によってはgenerator iteratorを指すこともあります。
generator関数では実行しただけではgenerator関数の中の処理は実行されず、generator iteratorを作成します。
generator iteratorに対して、nextを実行することでgenerator関数内の中断されていた処理は再開します。
yieldでは処理が中断されて、制御を呼び出し元に返します。
forを使用している場合、nextはループのたびに暗黙的に実行されます。
単純なgeneratorのサンプル
generatorのサンプル
def generator(max):
    print('  start generator function')
    a = 1
    b = 1
    while max > b:
        print("    start yield", b)
        yield b  # ここで中断する
        print("    end yield", b)
        a = b
        b = a + b
    print('exit loop')

print('for loop.')
g = generator(30)
for n in g:
    print("value:", n)

print('next.')
g = generator(30)
try:
    while True:
        print(next(g))
except StopIteration:
    # ジェネレータの生成が尽きた
    pass
finally:
    g.close()
出力結果
for loop.
  start generator function
    start yield 1
value: 1
    end yield 1
    start yield 2
value: 2
    end yield 2
    start yield 4
value: 4
    end yield 4
    start yield 8
value: 8
    end yield 8
    start yield 16
value: 16
    end yield 16
exit loop
next.
  start generator function
    start yield 1
1
    end yield 1
    start yield 2
2
    end yield 2
    start yield 4
4
    end yield 4
    start yield 8
8
    end yield 8
    start yield 16
16
    end yield 16
PEP 342 – Coroutines via Enhanced Generators
PEP 342 – Coroutines via Enhanced Generatorsではgen.send(x) / gen.throw()/gen.close()を導入しました。
また、yieldで評価結果を受け取れるようになりました。呼び出し元がgen.send(42)を行うとx = yieldでxに42を受け取ることができるようになります。
実際の使い方は以下の通りです。
gen.send/throwのサンプル
generator関数へのデータ送信のサンプル
class CustomError(Exception):
    """A custom domain-specific error."""


def generator(v):
    print('  start generator function')
    try:
        while True:
            print("    start yield", v)
            res = yield v  # ここで中断する
            if res:
                v = res
            print("    end yield", v)
            v = v * 2
    except CustomError as e:
        print('    custom except:', e)

g = generator(3)
try:
    print("1回目のnextの開始")
    v = next(g)
    print("1回目のnextの結果", v)
    print("2回目のnext開始")
    v = next(g)
    print("2回目のnextの結果", v)
    print("generatorに100を与えた")
    v = g.send(100)
    print("generatorに100を与えた結果", v)
    print("send後のnext開始")
    v = next(g)
    print("send後のnext結果", v)
    print("例外送出", v)
    g.throw(CustomError('カスタム例外'))
except StopIteration:
    # ジェネレータの生成が尽きた
    pass
finally:
    g.close()
出力結果
1回目のnextの開始
  start generator function
    start yield 3
1回目のnextの結果 3
2回目のnext開始
    end yield 3
    start yield 6
2回目のnextの結果 6
generatorに100を与えた
    end yield 100
    start yield 200
generatorに100を与えた結果 200
send後のnext開始
    end yield 200
    start yield 400
send後のnext結果 400
例外送出 400
    custom except: カスタム例外
PEP 380 – Syntax for Delegating to a Subgenerator
PEP 380 – Syntax for Delegating to a Subgeneratorはyield fromを導入し、別のgenerator=subgeneratorへの委譲を簡潔に記載できるようになりました。
以下のサンプルでは2つのgenerator関数に処理を委譲して結果を取得するサンプルになります。
yield fromのサンプル
サンプルコード
def generator_inner1():
    print('  start generator_inner1 function')
    yield 1
    yield 2
    yield 3
    return 4

def generator_inner2():
    print('  start generator_inner2 function')
    yield 11
    yield 12
    yield 13
    return 14

def generator_outer():
    print('start generator_outer function')
    sub1 = yield from generator_inner1()
    print('  sub generator1 return', sub1)
    sub2 = yield from generator_inner2()
    print('  sub generator2 return', sub2)

for v in generator_outer():
    print("....", v)
出力結果
start generator_outer function
  start generator_inner1 function
.... 1
.... 2
.... 3
  sub generator1 return 4
  start generator_inner2 function
.... 11
.... 12
.... 13
  sub generator2 return 14
PEP 3156 – Asynchronous IO Support Rebooted: the “asyncio” Module
Python3.4でPEP 3156 – Asynchronous IO Support Rebooted: the “asyncio” Moduleに基づく、asyncioが標準ライブラリに追加されました。これにより、非同期I/Oが標準で扱えるようになりました。
この段階では@asyncio.coroutineデコレータとyield fromを用いたgeneratorベースでのcoroutineとされています。
なお、@asyncio.coroutineはPython3.11以降では使用できません。
以下のサンプルはPython3.4で動作する当時の非同期I/Oです。
同期の場合は6秒かかる処理が3秒程度で終わっていることが確認できます。
@asyncio.coroutineのサンプル
import asyncio
import time


@asyncio.coroutine
def test(name, n):
    print("start...", name)
    yield from asyncio.sleep(n)
    print("end...", name)
    return "{}:{}".format(name, n)


@asyncio.coroutine
def main():
    start_time = time.perf_counter()
    result = yield from asyncio.gather(
        test("1番目", 1.0),
        test("2番目", 2.0),
        test("3番目", 3.0),
    )
    print(result)
    print("done in {:.3f}s".format(time.perf_counter() - start_time))


if __name__ == "__main__":
    loop = asyncio.get_event_loop()
    try:
        loop.run_until_complete(main())
    finally:
        loop.close()
出力結果
start... 3番目
start... 2番目
start... 1番目
end... 1番目
end... 2番目
end... 3番目
['1番目:1.0', '2番目:2.0', '3番目:3.0']
done in 3.003s
PEP 492 – Coroutines with async and await syntax
PEP 492 – Coroutines with async and await syntaxでasync def/awaitが導入されました。これにより、coroutineはPython言語のネイティブな機能となり、generatorとは明確に区別されるようになりました。
async def/ awaitのサンプルは以下の通りです。
async def/awaitのサンプル
サンプルコード
import asyncio
import time


async def test(name: str, n: float):
    print("start...", name)
    await asyncio.sleep(n)
    print("end...", name)
    return f"{name}:{n}"


async def main():
    start_time = time.perf_counter()
    result = await asyncio.gather(
        test("1番目", 1.0),
        test("2番目", 2.0),
        test("3番目", 3.0),
    )
    print(result)
    print(f"done in {time.perf_counter() - start_time:.3f}s")


if __name__ == "__main__":
    asyncio.run(main())
出力結果は@asyncio.coroutineのサンプルと同じ
なお、coroutineとgeneratorは明確に区別されるようにはなっていますが、実際のCPythonでのcoroutineオブジェクトを表すPyCoroObjectとgeneratorオブジェクトであるPyGenObjectは極めて近い構造を持っていることが確認できます。
Pythonでのまとめ
Pythonにおける非同期は「generatorの拡張」 → 「generatorベースのcoroutine」 → 「async def/await によるcoroutine」という発展をしました。
ここまでの経緯を振り返っていると「coroutineとgeneratorとは、そもそも一体なんなのだ」という疑問が湧くかと思います。
そもそもcoroutineとgeneratorとは?
そもそもcoroutineとかgeneratorとはどう言う意味であるかを調べてみると、明確に共通見解を出すことが困難であることがわかります。
実際に英語版のcoroutineのwikipediaを確認するとThere is no single precise definition of coroutine. という一文が記載されています。
そのため、ここでは過去の資料をあさって、その時々でどのような意味合いだったかを調べていきます。
最初のcoroutine
多くの資料ではcoroutineの概念はConwayが1958年に生み出したとされています。
ConwayはDesign of a Separable Transition-Diagram Compilerでcoroutineを「特定のマスターがなく、同格の(コンパイルの処理を行う)サブルーチン同士が実行を譲り合いながら入出力をやり取りする自律的な処理単位」と説明しています。
本当に最初なの?
Design of a Separable Transition-Diagram Compilerを読んだ人は、本当にConwayが最初と断言していいのか?という疑問を抱くでしょう。
なぜならば上記の論文には以下の記載があるからです。
To the best of the author's knowledge the coroutine idea was concurrently developed by him and Joel Erdwinn, now of Computer Sciences Corporation.
これはcoroutineというアイディアはJoel Drdwinnという人物にも同時期に考えられていたという記述です。 残念ながら、今現在、彼のアイディアがどういうものだったか現在確認するのは難しいですが、Art of Computer Programming, The: Volume 1: Fundamental Algorithms, 3rd Editionから、その一片を窺い知ることができます。
The word “coroutine” was coined by M. E. Conway in 1958, after he had developed the concept, and he first applied it to the construction of an assembly program. Coroutines were independently studied by J. Erdwinn and J. Merner, at about the same time; they wrote a paper entitled “Bilateral Linkage,” which was not then considered sufficiently interesting to merit publication, and unfortunately no copies of that paper seem to exist today. The first published explanation of the coroutine concept appeared much later in Conway’s article “Design of a Separable Transition-Diagram Compiler,” CACM 6 (1963), 396–408. Actually a primitive form of coroutine linkage had already been noted briefly as a “programming tip” in an early UNIVAC publication [The Programmer 1, 2 (February 1954), 4]. A suitable notation for coroutines in ALGOL-like languages was introduced in Dahl and Nygaard’s SIMULA I [CACM 9 (1966), 671–678], and several excellent examples of coroutines (including replicated coroutines) appear in the book Structured Programming by O.-J. Dahl, E. W. Dijkstra, and C. A. R. Hoare, Chapter 3.
参考:(Art of Computer Programming, The: Volume 1: Fundamental Algorithms, 3rd Editionの「1.4.5. History and Bibliography」)
coroutineはJoel Drdwinnの“Bilateral Linkage,”という論文で執筆されたといわれるアイディアでしたが、残念なことに現存していません。 なお、UNIVACが出版した"The Programmer 1, 2 (February 1954), 4"の“programming tip”としてlinkage coroutinesというアイディアが簡潔に言及されていたとあります。ただ、これも2025年時点では、簡単に閲覧できるものではなさそうです。
そのため、現時点では「coroutineの概念はConwayが生み出したとされている」という説明になります。
最初のgenerator
英語版wikipediaではgeneratorはCLUで初めて登場した旨が記載されています。
この章ではCLUを起点として、generatorの起源を遡ってみます。
なお、結論だけ言うと最も初期に公開されたgeneratorはIPL-Vであると考えられます。
CLUでのgenerator
CLUは1973年から作成されたプログラミング言語です。現在はpcluを使用することで実験が可能です。
今回はDockerコンテナを使用して実験を行いました。
CLUではIteratorsという機能でPythonでのシンプルなgeneratorと同じような実装が可能です。
以下がCLUでのIteratorsを使用したサンプルです。
CLUでのiterator sample
% CLU's iterator sample

from_to = iter(lo, hi: int) yields(int)
    po: stream := stream$primary_output()
    i: int := lo
    while i <= hi do
        stream$putl(po, "  start...yield")
        yield (i)
        stream$putl(po, "  end...yield")
        i := i + 1
    end
end from_to

start_up = proc ()
    po: stream := stream$primary_output()
    stream$putl(po, "start...for")
    for n: int in from_to(1, 5) do
        stream$putl(po, int$unparse(n))
    end
    stream$putl(po, "end...for")
end start_up
出力結果
start...for
  start...yield
1
  end...yield
  start...yield
2
  end...yield
  start...yield
3
  end...yield
  start...yield
4
  end...yield
  start...yield
5
  end...yield
end...for
現在のPythonのシンプルなgeneratorと同じようにyieldの段階で処理が中断されて呼び出し元に制御が移っていることが確認できます。
さて、CLUの歴史が書かれたA history of CLUを確認するとCLUのiteratorがAlphardという言語のgeneratorにインスパイアを受けたことが確認できます。
Iterators were inspired by a construct in Alphard called a "generator" [Shaw 1976, 1977]. We first learned about this in the summer of 1975 when we visited the Alphard group at CMU. We were intrigued by generators because they solved some problems with data abstractions, but we thought they were too complicated. Russ Atkinson designed iterators on the airplane going back to Boston after this meeting and described them in a design note in September 1975 [Atkinson 1975].
- [Shaw, 1976] Shaw, Mary, William Wulf, and Ralph London, Carnegie Mellon University and USC Information Sciences lnsftute Technical Reports, Abstraction and verification in Alphard: Iteration and generators, Aug. 1976.
- [Shaw, 1977] Shaw, Mary, William Wulf, and Ralph London,Abstraction and verification in Alphard: Defining and specifying iteration and generators, Communications of the ACM, 20:8, Aug. 1977
- [Atkinson, 1975] Atkinson, Russell, Toward more general iteration methods in CLU, CLU Design Note 54, Programming Methodology Group, MIT Laboratory for Computer Science, Cambridge, MA, Sept. 19
Alphardでのgenerator
Alphardは1970年代半ば〜後半に提案・設計されたプログラミング言語で、一般向けの実装は存在しないとされています。
Abstraction and verification in Alphard: Defining and specifying iteration and generatorsによると、generator を定義して区間
form upto(lb, ub: integer) extends k: integer =
beginform
  specifications
    inherits (allbut ←);
  function
    &init(u: upto) returns b: boolean,
    &next(u: upto) returns b: boolean;
  implementation
    body &init = (u.k ← u.lb; b ← (u.lb ≤ u.ub));
    body &next = (u.k ← u.k + 1; b ← (u.k ≤ u.ub));
endform
続いて、この generator を用いて1〜10の和を求めるには次のように書きます。
sum ← 0; for j: upto(1, 10) do sum ← sum + j
Alphard が目指す反復については、類似の構成が過去のプログラム言語にも見られます。
We resolve the problem by separating the responsibility for defining the meaning of a loop into three parts: (1) Alphard defines the (fixed) syntax and the broad outline of the semantics. (2) The definition of the abstraction that is controlling the iteration fills in the details of the loop control (in particular, the algorithms for selecting the next element and terminating the loop). (3) The user supplies the loop body. Conventional languages provide only a small fixed number of alternatives (usually one) for the second part of this information. In Alphard it is supplied by the form that defines the abstraction; we say this part of the definition specializes the iteration statement to that abstraction. Related constructs appear in IPL-V as generators [11] and in Lisp as the mapping functions [10, 15].
このため、「Alphardの反復はIPL-Vの generator や Lisp の mapping 関数に通じる発想がある」と位置づけられます。
LISP prehistory - Summer 1956 through Summer 1958.にはLispがIPL系の影響を受けた旨が言及されているので、次はIPL-V の generator を確認します。
IPL-Vのgenerator
IPL-Vは1956年から登場したInformation Processing Languageの第5版です。 このプログラミング様式はアセンブリ言語に近い記述になります。
幸い、Lispで書かれたIPL-Vのエミュレータがあり、一部手を加えることで現在の環境でもIPL-Vのgeneratorの挙動を実験できます。
実験環境については以下を参考にしてください。
https://github.com/mima3/test_coroutine/tree/main/legacy_sample/iplv
INFORMATION PROCESSING LANGUAGE-V MANUALにはgeneratorを使用して、Listの中の項目にテスト用のシンボルが含まれているかをチェックするサンプルが載っています。このルーチンはListにテスト用のシンボルがあれば+、なければ-を返す処理になっています。
| NAME | PQ | SYMB | LINK | COMMENTS |
|---|---|---|---|---|
| J77 | J50 | Put test symbol in W0. | ||
| 10 | 9-10 | 9-10をH0 に入れる | ||
| J100 | Input name of subprocess;name of list already in H0.Execute generator. | |||
| J5 | J30 | Result is H5+ if looked at all symbols in vain; reverse sign. | ||
| 9-10 | 11 | W0 | WO Subprocess: input test symbol. | |
| J2 | J5 | Test; reverse sign to stop generator if find symbol. |
J77 は リスト中の存在チェックを行うルーチンで、その内部で J100 という generator 命令を使います。マニュアル p.187 の J100 の説明は次のとおりです:
J100 GENERATE SYMBOLS FROM LIST (1) FOR SUBPROCESS (0).
The subprocess named (0) is performed successively with each of the symbols of list named (1) as input. The order is the order on the list, starting with the first list cell. H5 is always set + at the start of the subprocess. J100 will move in list (1) if it is on auxiliary.
要するに、与えられたリストの各要素をサブルーチン 9-10 に順に渡して、テスト用のシンボルと一致するか確認する、という流れです。以下は「リスト L1 にテスト用のシンボル A3 が含まれている」場合の処理イメージです。
ケース(L1 に A3 を含む)
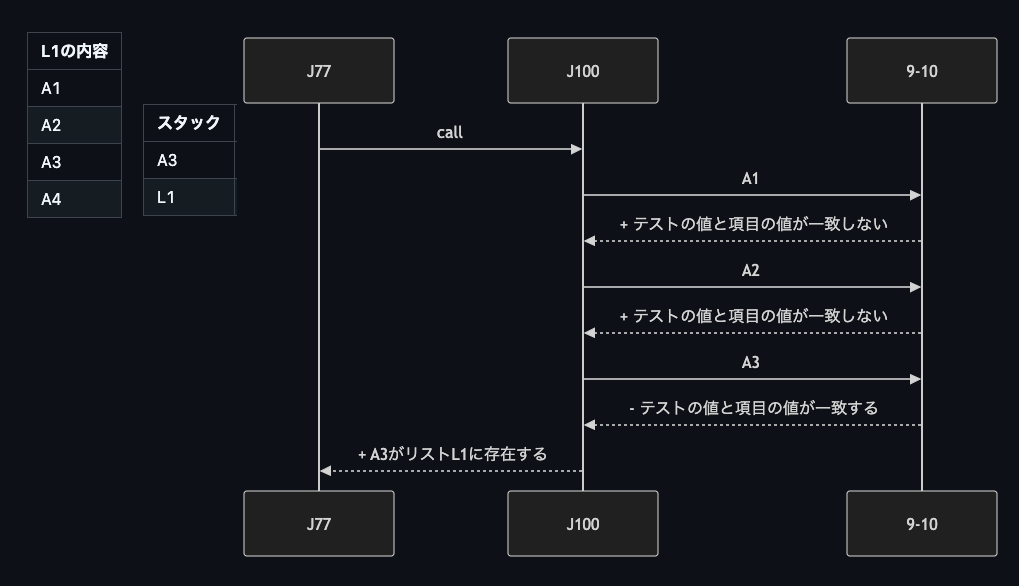
このIPL-Vでのgeneratorの例は実際に動かして確認することができます。
後年のCoroutines : a programming methodology, a language design, and an implementation / by Christopher David Marlinでは、IPL-Vのgeneratorを「(おそらくは)もっと初期に公開されたcoroutineの形態」と評価しています。
このことより、最初期のgeneratorの概念はIPL-Vまで遡ることになると考えられます。
オリジナルのIPL-VのエミュレータにおけるJ100の挙動差
今回の実験ではオリジナルのエミュレーターのJ100の挙動に手を加えています。
J100が呼び出したサブルーチンでH5が-だった場合に処理を続行するか否かです。
オリジナルのエミュレーターは続行しています。
これは前述のマニュアル p.187を読む限りH5で処理を止めるとは明記していないからです。
しかし、同マニュアルのp74のJ100におけるJ100の中身の記述をみるとH5が-だったらJ100は中断するほうが妥当と判断しました。

また、1960年時点のマニュアル P1918-51には「 (it must be + to keep the generator going).」と+でなければ続行できないことが明記されています。

1980年でのcoroutineの整理
1980年までにcoroutineをサポートするといわれるプログラミング言語が色々出てきました。
Coroutines : a programming methodology, a language design, and an implementation / by Christopher David Marlinでは、当時出ていたプログラミング言語のcoroutineの設計の内容を整理し、新しいcoroutineを扱うプログラミング言語、ACL(A Coroutine Language)を実装しました。
残念なことにACLは現存はしていませんが、当時のcoroutineの実態を知るのに、有益な資料になっています。
Marlinはcoroutineの本質的特性を次のようにみなしました。
- ローカルデータの値が呼び出し間で保存される。すなわち、あるcoroutineに制御が入るたび(連続する呼び出しの間)に、そのローカルデータの値は持続する。
- 制御が離れる時点で実行が停止し、のちに再入した地点から再開する。
Marlinは以下のプログラミング言語のcoroutineの機能がどのようになっているかについて言及しています。そのうち、現在、確認が容易なものについて以下に列挙します。
-
Simula 1962〜
- ALGOL60を発展させたプログラミング言語
- 当時もっとも知られた(と思われる)coroutine機能付きのプログラミング言語
-
resume,call,detachで制御する - 実験可能
- SL5
-
CLU 1975〜
- yieldによるイテレータ(ジェネレータ)を実装した初期の言語
- Simula, Alpahard, Lispなどの影響をうけている
- A history of CLU
- 実験可能
2004年と2009年でのcoroutineの整理
2004年まで時代が進みますが、主流言語にはcoroutineの機能は欠けていたとされます。
そのような時代背景の時にcoroutineの復権を目的とするレポートが発表されました。このレポートは多少の手直しがされて2009年にANA LUCIA DE MOURAとROBERTO IERUSALIMSCHYがRevisiting coroutinesとして発表します。
Mouraの論文ではcoroutineには統一的な見解が欠如していることが、主流言語にコルーチン機能が欠けている理由のひとつであるとしました。
Marlinが述べた本質的特性だけではなく、coroutine機能を区別する三つの主要な論点を挙げました。
- 制御移譲機構(対称か非対称か)
- coroutineがファーストクラスオブジェクトか?
- coroutineがスタックフルであるか?
制御移譲機構
制御移譲機構によりcoroutineは以下の2つに分類できます。
- symmetric(対称) coroutine
- asymmetric(非対称) coroutine
symmetric coroutineは単一の制御委譲操作によって、coroutine同士が相手を指定して制御を委譲できます。
asymmetric coroutineはcoroutineを起動/再開するための操作と、coroutineを中断するための操作を提供します。中断した場合、中断すると制御はそのcoroutineを最後に再開した側に返します。semi-symmetric(半対称) coroutineあるいはsemi(半) coroutineとも呼ばれることがあります。
asymmetric coroutineはこの戻り規則のため呼び出し側に従属しているとみなせます。
Simulaの場合
SimulaはDetach+Resumeでsymmetric coroutine、Detach+Callでasymmetric coroutineの両方を扱えます。
Cimを使用してSimulaのコンパイルが可能です。
実験環境で動作確認ができます。
Simulaの制御移譲機構の実験
symmetric coroutineの例:
BEGIN
   REF(PROC_1) p1; REF(PROC_2) p2;

   CLASS PROC_1;
   BEGIN
      OutText("  Proc1 a"); OutImage;
      Detach;
      OutText("  Proc1 b"); OutImage;
      Resume(p2);
      OutText("  Proc1 c"); OutImage;
   END;

   CLASS PROC_2;
   BEGIN
      OutText("  Proc2 a"); OutImage;
      Detach;
      OutText("  Proc2 b"); OutImage;
      Detach;
      OutText("  Proc2 c"); OutImage;
   END;


   OutText("NEW... "); OutImage;
   p1 :- NEW PROC_1;  p2 :- NEW PROC_2;
   OutText("RESUME(p1)... "); OutImage;
   Resume(p1);
   OutText("END"); OutImage;
END;
実験結果
Resume(p2)のあとに呼び出し元に戻らないことが確認できます。
NEW...
  Proc1 a
  Proc2 a
RESUME(p1)...
  Proc1 b
  Proc2 b
END
asymmetric coroutineの例:
BEGIN
   REF(PROC_1) p1; REF(PROC_2) p2;

   CLASS PROC_1;
   BEGIN
      OutText("  Proc1 a"); OutImage;
      Detach;
      OutText("  Proc1 b"); OutImage;
      CALL(p2);
      OutText("  Proc1 c"); OutImage;
   END;

   CLASS PROC_2;
   BEGIN
      OutText("  Proc2 a"); OutImage;
      Detach;
      OutText("  Proc2 b"); OutImage;
      Detach;
      OutText("  Proc2 c"); OutImage;
   END;


   OutText("NEW... "); OutImage;
   p1 :- NEW PROC_1;  p2 :- NEW PROC_2;
   OutText("RESUME(p1)... "); OutImage;
   Resume(p1);
   OutText("END"); OutImage;
END;
実験結果
Call(p2)のあとに呼び出し元に戻ることが確認できます。
NEW...
  Proc1 a
  Proc2 a
RESUME(p1)...
  Proc1 b
  Proc2 b
  Proc1 c
END
Pythonの場合
Pythonのgeneratorはasymmetric coroutineとして扱えます。
coroutineを起動/再開するための操作はnext/send、中断させるための操作はyieldになります。
非同期処理のawaitもasymmetric coroutineとして扱えます。
呼び出し側でのawaitは自分を一時停止しつつ、相手のcoroutineを起動/再開させます。
coroutine内のawaitは中断の役割をもっています。
たとえば、Taskを使用している場合では制御はイベントループに戻り、別のタスクが動きます。
少なくとも、あるcoroutine の内部から任意の別の coroutine を直接指定して再開させることはできません。
Rubyの場合
RubyのFiberクラスではresume-yieldを使用したasymmetric coroutineとtransferでsymmetric coroutineの両方を扱えます。
rubyの制御移譲機構の実験
resume-yieldの例
# 2) async/await 風:Fiber+簡易スケジューラ
def worker(name, delay_ms)
  Fiber.new do
    puts "#{name}: start"
    3.times do |i|
      puts "  #{name}: step #{i + 1}... start"
      Fiber.yield [:sleep, delay_ms / 1000.0]
      puts "  #{name}: step #{i + 1}... end"
    end
    puts "#{name}: done"
    :done
  end
end

def run(*fibers)
  queue = fibers.map { |f| [f, Time.now] }
  until queue.empty?
    queue.sort_by! { |(_, t)| t }
    fib, wake = queue.shift
    now = Time.now
    sleep(wake - now) if wake > now
    result = fib.resume
    if result.is_a?(Array)
      cmd, sec = result
      queue << [fib, Time.now + sec] if cmd == :sleep
    end
  end
  puts "all done"
end

puts "\n== Fiber-based coroutine demo =="
a = worker("A", 150)
b = worker("B", 120)
run(a, b)
transferの例
# symmetric_transfer.rb
# Ruby 3.x でそのまま実行可(docker-compose の ruby:3.3-alpine でもOK)

main = Fiber.current  # ルート(メイン)Fiber

# B:Aから値を受け取り、値を1増やしてAへ返す。一定回数でメインへ戻って終了。
b = Fiber.new do |msg|
  a_fiber, n = msg  # 最初は [相手Fiber, 値] で呼ばれる

  loop do
    puts "  [B] got #{n}"
    n += 1
    if n > 10
      puts "  [B] limit reached -> transfer to main"
      main.transfer(:b_done)     # ★ 呼び出し元(A)には戻さず、明示的にメインへ
    else
      # 相手(A)へ “直接” 制御とデータを渡す(対称)
      msg = a_fiber.transfer([Fiber.current, n])
      a_fiber, n = msg
    end
  end
end

# A:1 から始めて B に渡し、B から戻ってきた次の値で続行
a = Fiber.new do |b_fiber|
  me = Fiber.current
  n  = 1

  loop do
    puts "[A] send #{n} -> B"
    # B へ “直接” 制御移譲。戻りは B が transfer してきたときだけ。
    b_fiber, n = b_fiber.transfer([me, n])
    puts "[A] got from [B] #{n}"
  end
end

puts "== symmetric coroutine (Fiber#transfer) demo =="
# キックオフ:A を開始し、最初の引数として B を渡す
result = a.transfer(b)

puts "main got: #{result.inspect}"
# => :b_done が出力され、A は最後に B に渡した位置で停止したまま(対称コルーチンでは
#    「自動では」戻ってこないのが肝)。必要ならここで a.transfer(...) して続きを実行できます。
coroutineがファーストクラスオブジェクトか?
coroutineをファーストクラスオブジェクトとして提供しているかどうかの分類です。
第一級(first-class)オブジェクトのfirst-classな要素としては以下の通りです。
- 変数によって命名できる。
- 手続きに引数として渡すことができる。
- 手続きの結果として返すことができる。
- データ構造に含めることができる
参考: Structure and Interpretation of Computer Programs p102
coroutineが利用可能な現代のプログラミング言語では、coroutineはファーストクラスオブジェクトであることが多いです。Pythonの場合、generatorもcoroutineもファーストクラスオブジェクトです。RubyのFiberも同じです。
過去のプログラミング言語については、Simulaはファーストクラスcoroutineです。
CLUのイテレーターはcoroutineでありますが、ファーストクラスcoroutineではありません。
CLUのイテレータはfor文と組みでしか使えません。
たとえば、以下のような実装はできません。
% not valid in CLU
% CLU's iterator sample

from_to = iter(lo, hi: int) yields(int)
    po: stream := stream$primary_output()
    i: int := lo
    while i <= hi do
        stream$putl(po, "  start...yield")
        yield (i)
        stream$putl(po, "  end...yield")
        i := i + 1
    end
end from_to

it := from_to(1, 5);      % コンパイルエラー
% c  := next(it);         % 「次を手で取る」APIも無い
coroutineがスタックフルであるか?
スタックフルなcoroutineは入れ子になった呼び出しの深いところからでも中断でき、再開時は正確な地点でおこなえます。
SimulaやRubyはスタックフルなcoroutineですが、Pythonはスタックレスなcoroutineになります。
Python:呼び出しの深いところでは中断できない
import asyncio

async def leaf_async():
    print("leaf_async: before await")
    await asyncio.sleep(0)          # ← ここで中断したい
    print("leaf_async: after await")

def middle_sync():
    # 非 async 関数なので await できない(= ここからは中断できない)
    return leaf_async()             # ただの "coroutine object" を返すだけ

async def outer_async():
    print("outer_async: start")
    coro = middle_sync()            # ← ここで初めて “自分が” await する必要がある
    await coro                      # ← awaitしないと leaf の中断は効かない
    print("outer_async: end")

asyncio.run(outer_async())
Ruby:入れ子になった呼び出しの深いところでも中断できる例
# stackful_fiber_nested.rb
def leaf(n)
  puts "    leaf(#{n}) before yield"
  Fiber.yield n                # ← 深いフレームから一発でサスペンド
  puts "    leaf(#{n}) after yield"
end

def mid2(n)
  puts "  mid2 -> leaf"
  leaf(n)                      # ← mid2 は “配管” 不要(普通のメソッド)
  puts "  mid2 after leaf"
end

def mid1(n)
  puts " mid1 -> mid2"
  mid2(n)                      # ← ここも配管不要
  puts " mid1 after mid2"
end

f = Fiber.new do
  puts "fiber: start"
  2.times { |i| mid1(i) }      # 0 と 1 で2回、leaf の中で yield
  puts "fiber: done"
  :done
end

puts "== stackful Fiber demo =="
p f.resume     # => 0   (leaf(0) の yield で停止)
puts "-- resume --"
p f.resume     # => 1   (leaf(0) の続き→mid2/ mid1 を経て次の leaf(1) で停止)
puts "-- resume --"
p f.resume     # => :done (leaf(1) の続き→終了)
Full Coroutines
Mouraの論文では「ファーストクラス」かつ「スタックフル」なコルーチンをFull Coroutineとしました。
この条件のうちどれかが欠けると、協調的マルチタスクが難しいと述べています。
さて、実際にはPythonをはじめ、多くのスタックレスといわれるcoroutineのプログラミング言語でも、非同期I/Oを実現し協調的マルチタスクは行われています。
この論文の前提として既存の同期ライブラリをそのまま混ぜても中断できるようにするという前提がありました。
しかし、Pythonをはじめとして、スタックレスのプログラム言語において、スタックフルではないことが、大きな問題にはなっていないと思います。
なぜならば、非ブロッキングI/Oが提供されていたり、ブロッキング箇所を別スレッドで動かすことで回避することができるためです。
まとめ
さて簡単にgeneratorとcoroutineの足跡を振り返りました。
では冒頭の疑問に戻ってみましょう。
- ジェネレータとコルーチンの関係は?
- 「かつてのPythonのgenerator functionは、ほとんどcoroutineだが、完全ではない・・・ってどういう意味だってばよ」
- 「完全なcoroutineを使用できるプログラミング言語ってなんなのだ」
- 「先生、JavaScriptのPromiseはcoroutineに入りますか?」
ジェネレータとコルーチンの関係についてはgeneratorはcoroutineの一種であるとCoroutines : a programming methodology, a language design, and an implementation / by Christopher David Marlinに明記されています。
残りの疑問については、すべてcoroutineの定義によります。
今現在、Pythonがサポートしているcoroutineにしても、asymmetric coroutine、ファーストクラスオブジェクトではありますが、スタックレスであるので、Full Coroutinesの定義からははずれます。そのため、"完全"なcoroutineではないという意見もなりたちます。
完全なcoroutineとは一体なんなんだという話になると、RubyのFiberはasymmetricとsymmetricの両方のスタイルのcoroutineが使え、それがファーストクラスオブジェクトでスタックフルなので、Full Coroutinesに分類されます。これは、多くの定義においてcoroutineと判断されるでしょう。
同じく、PHPのFibersもfull coroutineに該当します。ただ、Rubyとちがってtransferが提供されていないようなので Full Asymmetric Coroutinesとなります。(Mouraの論文ではasymmetricとsymmetricの違いは重要視してませんでした)
「JavaScriptのPromiseはcoroutineと言えるか?」ですが、Promise単体では停止・再開ができるわけではないので、coroutineとは言えません。
async+await、もしくはPromise+awaitであれば、停止・再開になるのでcoroutineと言えます。
この調査により、一応は自分自身の出した疑問には納得がいったかと思います。
Discussion