WebDriver と Selenium を再入門:歴史と内部動作を理解する(CDP/BiDi)
はじめに
ブラウザの自動操作を行う場合にWebDriverを使うケースがあります。
WebDriverは例えば「ブラウザの操作を行いウェブドキュメント内のDOM要素を検出・操作をしたい時」の、プラットフォームや言語に依存しないインターフェイスを提供します。
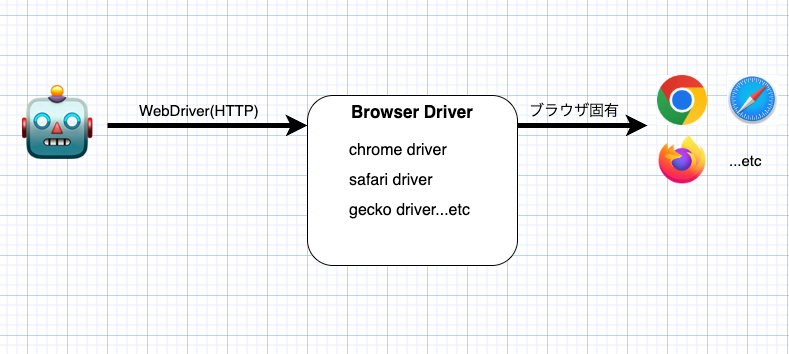
ブラウザ非依存の WebDriver が提供するインターフェイスを介して、クライアントから送られたコマンドがブラウザ固有のプロトコルに変換され、ブラウザの操作などが行われます。
この記事では、WebDriverの歴史を見返すと共に、それらが裏でどのように動作しているかを振り返ることを目的としています。
この記事は Selenium や CDP などの自動操作の使い方を説明するものではありません。最低限、SeleniumなりPuppeteerなりでブラウザの自動操作を行った読者を対象としています。
WebDriverとSeleniumの歴史
初期のSelenium
Seleniumは2004年ごろから開発されていました。その頃、Seleniumは現在のWebDriverとは別の方法でブラウザの自動化を行っていました。
当時のSelenium1.xではブラウザのプロキシサーバーとしてSeleniumServerを動かし、JavaScriptを挿入することで自動操作の仕組みを作成しました。

Selenium Serverは以下の役割を果たします。
- プロキシサーバーとして動き、ページにSelenium Coreを埋め込む役割
- テストコードからのコマンドを受け取る役割
- Selenium Coreに対してコマンドを受け渡し、その結果を取得する役割
動きとしては以下の通りです。
- Selenium Serverはプロキシサーバーとしてブラウザのリクエストを仲介するようにする
- Selenium ServerはSelenium Coreのコードをページに埋め込む
- テストコード側はSelenium Serverに対してコマンドを送る
- Selenium Serverはそのコマンドを保持しておく。
- ブラウザ内の Selenium Core が Selenium Server をポーリングし、Selenium Server に新しいコマンドがあればそれを受け取る。
- Selenium CoreはJavaScript上でコマンドを処理して、その結果をSelenium Serverに通知する。
- Selenium Serverは処理されたコマンドの結果をテストコード側に返す。
このシステム構成をみてわかるとおり、複雑で低速になりがちな仕組みになっています。
参考:
- The Architecture of Open Source Applications (Volume 1) Selenium WebDriver
16.1. History - Selenium RC (Selenium 1) The original version of Selenium
-
Selenium Core 1.0.1のコード
- 埋め込まれるコード
- selenium-remoterunner.js: Selenium Serverとの通信処理
- /selenium-executionloop.js: ポーリングを行っている箇所
- Selenium Server 1.0.1のコード
Seleniumと統合前のWebDriver
Selenium1.xと同時期に、別のブラウザ自動化フレームワーク、WebDriverという名前のツールの開発が進められていました。そのWebDriverの初期コードは2007年初頭にリリースされました。
当時のSeleniumは次のような問題を抱えていました。
- JavaScript ベースの実装によるブラウザ制約
- IE では JavaScript から
<input type="file">の値を書き換えられない
- IE では JavaScript から
- API が巨大化し複雑になった
WebDriverはSeleniumとは異なるアプローチで同じ問題を解決しようとしました。
WebDriverは、ブラウザ内で実行されるJavaScriptアプリケーションではなく、ブラウザを制御するのに最も適切な仕組みを選んで利用する方針を取りました。

初期のWebDriverでは、その「ブラウザを制御するのに最も適切な仕組み」として、ブラウザごとに次のような方式を採用していました。
- Internet Explorer
- Firefox
- XPCOMでブラウザを操作するアドオンを作成しFirefoxに埋め込む
- JsonWireProtocolを介してアドオンを操作する
WebDriverのwikiやソースコードを提供していたサイトは閉鎖され、当時のコードやアーキテクチャを確認することが難しくなっています。
webarchiveのwebdriver wiki(webarchive)や、selenium 2.xの最初期のコードから、その挙動を予測するだけとなります。
参考:
- Google Open Source Blog-Introducing WebDriver
- webdriver wiki(webarchive)
- How the InternetExplorerDriver Works(webarchive)
- FirefoxDriver Interals
- The Architecture of Open Source Applications (Volume 1) Selenium WebDriver
16.6. The Remote Driver, and the Firefox Driver in Particular, 16.7. The IE Driver
SeleniumとWebDriverの統合とW3Cによる標準化
2009年8月にはSeleniumとWebDriverの統合は始まりました。
2009年12月には統合版の最初の公開(alpha1)がリリースされて、その1年半後の2011年7月に安定版がリリースされました。
同じ頃、Browser Testing and Tools Working Group CharterでWeb Driver API の標準仕様を作る動きが開始されました。
初期のドラフトでは、JsonWireProtocolを参考につくられていました。そして2018年にはW3C勧告となりました。
この頃にはJsonWireProtocolとは大きく変更されています。
この標準化により、ブラウザごとにバラバラだった WebDriver 実装のコア部分が標準化され、挙動が大きく揃えられました。もちろん標準化にない機能についてはブラウザ固有の領域がありますし、仕様の解釈違い、歴史的経緯による後方互換のための挙動のズレは存在します。それでも、当初のカオスな状態だった状況は整理されて冒頭の図のような状況になりました。
この頃には、WebDriverは特定のツールを表す名前ではなく、自動操作をするためのインターフェイスの名前を表すようになりました。
W3C準拠までの苦労
W3Cに準拠しましょうというのは言葉にすると楽ですが、実際には、やれといわれてすぐできるものではありませんでした。
Seleniumが完全にW3C準拠したのはSelenium4で安定版の候補(RC)は2021年になります。
Selenium3xの頃は、ブラウザドライバの応答に合わせて、JsonWireを使用するか、W3C準拠にするかを切り替えて動かしていました。
Selenium3のProtocolHandshake::createSessionでは、W3C準拠のレスポンスでなければ、JsonWireのレスポンスとみなすというような処理をしています。 このような処理の一端から後方互換とW3C準拠の並立の苦労が伺い知ることができるかと思います。
当然、Selenium側だけでなく、ブラウザドライバ側も同じような苦労がありました。
たとえばchromedriverには2016年頃にセッション時開始時のcapabilityフラグによってW3C準拠か従来のJSON Wireに切り替わるオプションが追加されました。このフラグは2019年にW3C準拠がデフォルトの挙動となったとはいえ、まだchromedriverのコードに残ってはいます(w3c_compliantフラグ 2025/11時点)。
WebDriver BiDiの誕生
いままで説明したWebDriverはHTTP 上のリクエスト/レスポンス を前提とした通信モデルでした。
クライアントは「要素をクリックする」「URL に遷移する」といったコマンドを HTTP リクエストとして送り、ブラウザはその結果をレスポンスとして返します。
この方式は通信の主導権は常にクライアント側にあり、ブラウザ側からの任意のタイミングでのイベントプッシュすることができません。
そのため、たとえば次のようなユースケースでは扱いづらさがありました。
- console.logの発生イベントの監視
- ネットワークデータの受信監視
- ダイアログが開かれた時の監視
こうしたニーズに対しては、Chrome DevTools Protocol(CDP)では、WebSocket を使用して実現するようになっていきました。
しかし、CDP はブラウザ固有のプロトコルであり全てのブラウザで使用できるようなものではありませんでした。そうしたギャップを埋めるために2020 年から双方向 WebDriverのプロトコルであるWebDriver BiDiの制定の作業が始まりました。
2022 年時点でChrome/ChromeDriver 106 と Firefox 102 の両方で、WebDriver BiDi 標準のサポートがリリースされています。

現時点でどのブラウザがWebDriver BiDiを対応しているかについては Can I use? 上で確認が可能です。
2025/11時点でSafariは未対応
参考
ブラウザドライバーの変化の流れ
標準化の流れのなかWebDriverのインターフェイスとブラウザ固有のインターフェイスの仲介をおこなうブラウザドライバーもその形を大きく変更していく必要がありました。
たとえば、当初はdllや拡張機能として提供されていた機能は独立した実行可能ファイルとして提供されるようになりました。
- Internet Explorer
- Seleniumとの合流前:
- DLLとして動作してJNIでJavaと接続しCOMでIEを操作をする。
- Selenium2.0正式リリースの頃(2011):
- EXEとして独立した実行ファイルでHTTPリクエストを受けてCOMで操作を行う
- 2017年頃
- Seleniumとの合流前:
- Microsoft Edge
- 2015年〜
- 2020年〜
- Edge自体がChromiumベースのものに変更されたためEdgeのブラウザドライバも変更
- Chrome
- Selenium2.0αの頃(2009):
- npchromedriverというNPAPIベースの拡張機能として提供されていた
- Selenium2.0正式リリースの頃(2011):
- chromedriverという実行可能ファイルで提供されていた
- 2016年頃
- 2019年〜:
- 2022年〜:
- Selenium2.0αの頃(2009):
- Firefox
- ~2016 年ごろ(Firefox 47 まで):
- Selenium 製 FirefoxDriver 拡張機能(XPI)+ XPCOM
- 2016 年ごろ以降(Firefox 48~):
- 実行可能ファイル形式のgeckodriver
- 2022 年ごろ~
- Firefox で WebDriver BiDiのサポートが入り始めた
- ~2016 年ごろ(Firefox 47 まで):
- Safari
- 2012 年ごろ~:
- Selenium 2.xでSafariDriverが提供されるようになる。
- Safari 拡張機能を使用して自動操作を行う
- 2016年〜
- /usr/bin/safaridriverが配布されるようになる
- 内部実装については確認できない
- 2012 年ごろ~:
実験を通じたWebDriverの裏側
ここではクラシックなWebDriverとWebDriver BiDiの操作を実際のブラウザを使用して行います。
この実験を通してWebDriverの裏で何が起きているかを確認します。
実験で行う操作内容は以下の通りです。
クラシックなWebDriverの操作
- zennのトップページを開く
- 検索に「test」と入力してEnterを押す
- 記事の一覧を標準出力する
WebDriver BiDiの操作
- Log entry added eventsページを開く
- 「Click me for console logs」ボタンを押す
- Consoleに「Hello World!」と表示されていることを確認する
Chrome
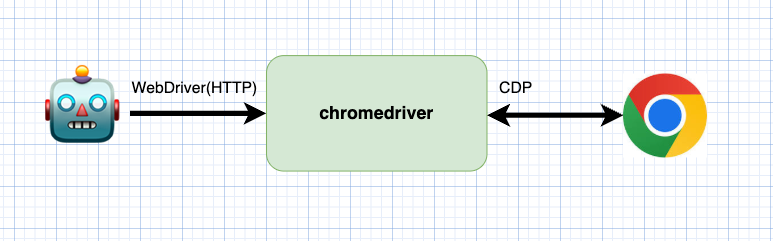
ChromeはChrome DevTools Protocol という機能が提供しており、要素の操作やデバッグ機能の多くがこのプロトコル経由で操作が可能になっています。
chromedriverは裏でCDPを実行して自動操作を行なっています。
Chrome DevTools Protocolを直接使用した自動操作の例
まずはCDPを使用してブラウザを自動操作する方法を確認します。
CDPを直接操作する場合は,--remote-debugging-portフラグでデバッグ用のポートを指定してChromeを起動する必要があります。
"/Applications/Google Chrome.app/Contents/MacOS/Google Chrome"   \
  --remote-debugging-port=9222  \
  --user-data-dir=/tmp/chrome-devtools-profile  \
  --no-first-run  \
  --remote-allow-origins="*"  \
  --new-window
このポートに対してwebsocketで接続することでChromeの自動操作が可能になります。
クラシックなWebDriverの操作に相当するCDPの例
まずはクラシックなWebDriverに相当する操作を確認します。
CDPを直接操作したサンプル
import sys
import json
import time
import subprocess
import urllib.request

# pip install websocket-client
import websocket

"""
前提条件:
以下のコマンドでchromeを起動済み
"/Applications/Google Chrome.app/Contents/MacOS/Google Chrome"   \
  --remote-debugging-port=9222  \
  --user-data-dir=/tmp/chrome-devtools-profile  \
  --no-first-run  \
  --remote-allow-origins="*"  \
  --new-window
"""

cdp_socket = None  # type: websocket.WebSocket
cdp_id = 0


def send_cdp_command(id_: int, method: str, params: dict | None):
    """Send-CdpCommand 相当"""
    global cdp_socket
    if params is None:
        params = {}

    payload = {
        "id": id_,
        "method": method,
        "params": params,
    }
    text = json.dumps(payload)
    cdp_socket.send(text)


def receive_cdp_message_for_id(expected_id: int) -> dict:
    """Receive-CdpMessageForId 相当"""
    global cdp_socket

    while True:
        msg = cdp_socket.recv()
        #通知イベント等で壊れた JSON が来るかもしれないので try-catch 相当
        try:
            data = json.loads(msg)
        except json.JSONDecodeError:
            continue

        if isinstance(data, dict) and data.get("id") == expected_id:
            return data
        # id が違う通知 (Page.loadEventFired など) は無視してループ継続


def invoke_cdp(method: str, params: dict | None = None) -> dict:
    """Invoke-Cdp 相当: コマンド送ってレスポンス待つ"""
    global cdp_id
    cdp_id += 1
    id_ = cdp_id
    send_cdp_command(id_, method, params)
    return receive_cdp_message_for_id(id_)


def connect_cdp():
    """Connect-Cdp 相当: /json/list から WebSocket URL を引いて接続"""
    global cdp_socket, cdp_id

    with urllib.request.urlopen("http://localhost:9222/json/list") as resp:
        targets = json.load(resp)

    if not targets:
        raise RuntimeError("CDP target が見つかりませんでした。Chrome が起動しているか確認してください。")

    ws_url = targets[0]["webSocketDebuggerUrl"]
    cdp_socket = websocket.create_connection(ws_url)

    cdp_id = 0


def get_element_center(model: dict) -> tuple[float, float]:
    """Get-ElementCenter 相当: BoxModel から要素中央の座標を計算"""
    content = model.get("content", [])
    xs: list[float] = []
    ys: list[float] = []

    # [x0, y0, x1, y1, ...] を偶数/奇数インデックスで分割
    for i in range(0, len(content), 2):
        xs.append(float(content[i]))
        ys.append(float(content[i + 1]))

    cx = sum(xs) / len(xs) if xs else 0.0
    cy = sum(ys) / len(ys) if ys else 0.0
    return cx, cy


def invoke_cdp_click_by_selector(selector: str):
    """Invoke-CdpClickBySelector 相当: セレクタ指定でクリック"""
    # DOM.getDocument
    doc = invoke_cdp("DOM.getDocument", {})
    root_id = doc["result"]["root"]["nodeId"]

    # DOM.querySelector
    q = invoke_cdp("DOM.querySelector", {
        "nodeId": root_id,
        "selector": selector,
    })
    node_id = q["result"].get("nodeId")
    if not node_id:
        raise RuntimeError(f"Selector '{selector}' に一致する要素がありません。")

    # DOM.getBoxModel
    box = invoke_cdp("DOM.getBoxModel", {"nodeId": node_id})
    model = box["result"]["model"]
    cx, cy = get_element_center(model)

    # mousePressed
    invoke_cdp("Input.dispatchMouseEvent", {
        "type": "mousePressed",
        "x": cx,
        "y": cy,
        "button": "left",
        "clickCount": 1,
    })

    # mouseReleased
    invoke_cdp("Input.dispatchMouseEvent", {
        "type": "mouseReleased",
        "x": cx,
        "y": cy,
        "button": "left",
        "clickCount": 1,
    })


def wait_cdp_element_by_selector(selector: str, timeout_ms: int = 10_000, interval_ms: int = 250):
    """Wait-CdpElementBySelector 相当: セレクタで要素が現れるまで待機"""
    deadline = time.time() + timeout_ms / 1000.0

    while time.time() < deadline:
        doc = invoke_cdp("DOM.getDocument", {})
        root_id = doc["result"]["root"]["nodeId"]

        q = invoke_cdp("DOM.querySelector", {
            "nodeId": root_id,
            "selector": selector,
        })

        if q["result"].get("nodeId"):
            return True

        time.sleep(interval_ms / 1000.0)

    raise TimeoutError(f"Timeout: Selector '{selector}' が見つかりませんでした。")


def send_cdp_text(text: str):
    """Send-CdpText 相当: フォーカスされた要素にテキストを挿入"""
    invoke_cdp("Input.insertText", {"text": text})


def send_cdp_enter():
    """Send-CdpEnter 相当: Enter キー送信"""
    # keyDown
    invoke_cdp("Input.dispatchKeyEvent", {
        "type": "keyDown",
        "key": "Enter",
        "code": "Enter",
        "windowsVirtualKeyCode": 13,
        "nativeVirtualKeyCode": 13,
        "text": "\r",
    })

    # keyUp
    invoke_cdp("Input.dispatchKeyEvent", {
        "type": "keyUp",
        "key": "Enter",
        "code": "Enter",
        "windowsVirtualKeyCode": 13,
        "nativeVirtualKeyCode": 13,
        "text": "\r",
    })


def wait_cdp_text(text: str, timeout_ms: int = 10_000, interval_ms: int = 300):
    """Wait-CdpText 相当: body.innerText に指定テキストが出るまで待つ"""
    deadline = time.time() + timeout_ms / 1000.0

    while time.time() < deadline:
        # document.body.innerText.includes("...") を評価
        expr = f"document.body.innerText.includes({json.dumps(text)})"
        r = invoke_cdp("Runtime.evaluate", {
            "expression": expr,
            "returnByValue": True,
        })

        if r["result"]["result"].get("value") is True:
            print(f"Text '{text}' detected.")
            return True

        time.sleep(interval_ms / 1000.0)

    raise TimeoutError(f"Timeout waiting for text '{text}'")


def main():
    global cdp_socket

    try:

        # CDP 接続
        connect_cdp()

        # STEP 1: navigate https://zenn.dev/
        invoke_cdp("Page.navigate", {"url": "https://zenn.dev/"})

        # 表示を待つ
        wait_cdp_element_by_selector("#header-search path")

        # STEP 2: click 検索アイコン (#header-search)
        invoke_cdp_click_by_selector("#header-search")

        # STEP 3: waitForElement strong (人気のトピック)
        wait_cdp_text("人気のトピック")

        # STEP 4: click 入力フォーム (#input-search-form)
        invoke_cdp_click_by_selector("#input-search-form")

        # STEP 5: change value -> "test"
        send_cdp_text("test")
        send_cdp_enter()

        # STEP 6: 検索結果で article タグを待つ
        wait_cdp_element_by_selector("article")

        # 記事タイトル一覧を JS で取得
        js = """
Array.from(document.querySelectorAll("[class*='ArticleListItem_title']"))
    .map(x => x.innerText)
"""
        r = invoke_cdp("Runtime.evaluate", {
            "expression": js,
            "returnByValue": True,
        })

        titles = r["result"]["result"]["value"]
        if isinstance(titles, list):
            for t in titles:
                print(t)
        else:
            print("結果形式が想定外です:", titles)

    finally:
        # CDP WebSocket を閉じる
        if cdp_socket is not None:
            try:
                cdp_socket.close()
            except Exception:
                pass


if __name__ == "__main__":
    try:
        main()
    except KeyboardInterrupt:
        sys.exit(1)
CDPを使用するには、http://localhost:9222/json/listにアクセスしてwebSocketDebuggerUrlを取得します。
取得したwebSocketDebuggerUrlに対してwebsocketを通じて通信を行います。
def connect_cdp():
    """Connect-Cdp 相当: /json/list から WebSocket URL を引いて接続"""
    global cdp_socket, cdp_id

    with urllib.request.urlopen("http://localhost:9222/json/list") as resp:
        targets = json.load(resp)

    if not targets:
        raise RuntimeError("CDP target が見つかりませんでした。")

    ws_url = targets[0]["webSocketDebuggerUrl"]
    cdp_socket = websocket.create_connection(ws_url)

    cdp_id = 0
    invoke_cdp("Page.enable", {})
    invoke_cdp("DOM.enable", {})
websocketが接続されたのち、次のCDPのコマンドを使用してブラウザ操作を実施します。
- Page.navigateでページを遷移
- 以下のコマンドを使用して特定のセレクタが表示されるまで待つ
-
Input.dispatchMouseEventを使用してクリックを再現する
- マウスの移動、マウスボタンを押す、マウスボタン離すを再現する
- Input.insertTextで文字入力
- Input.dispatchKeyEventでEnterKeyの再現
- Runtime.evaluateでJavaScriptを埋め込んで記事の一覧を取得
WebDriver BiDiの操作に相当するCDPの例
WebDriver Bidiの操作に相当する「コンソールログの出力をキャプチャする」という操作の場合は、そのキャプチャ結果の通知が非同期に行われるため前述のサンプルのような同期的な実装をすることができません。
ここでは、受信処理をおこなうスレッドを作成しておき、CDPからの受信をキューにたくわけるような修正を行なってブラウザの操作とコンソールログの出力キャプチャを実現しています。
CDPを直接操作したコンソールログのキャプチャ・サンプル
import json
import threading
import time
import queue

import requests
import websocket

CDP_HTTP = "http://localhost:9222"
TARGET_URL = "https://www.selenium.dev/selenium/web/bidi/logEntryAdded.html"


class CDPClient:
    def __init__(self, ws_url: str):
        self.ws = websocket.create_connection(ws_url)
        self._id = 0
        self._pending: dict[int, queue.Queue] = {}
        self._event_handlers: dict[str, list] = {}
        self._lock = threading.Lock()
        self._receiver_thread = threading.Thread(
            target=self._recv_loop, daemon=True
        )
        self._receiver_thread.start()

    def _next_id(self) -> int:
        with self._lock:
            self._id += 1
            return self._id

    def send(self, method: str, params: dict | None = None) -> dict:
        """
        CDP メソッドを送信し、同期的に result を待つ。
        """
        msg_id = self._next_id()
        payload = {"id": msg_id, "method": method}
        if params is not None:
            payload["params"] = params
        q_res: queue.Queue = queue.Queue()
        self._pending[msg_id] = q_res
        self.ws.send(json.dumps(payload))
        result = q_res.get()  # result が入るまで待機
        return result

    def add_event_listener(self, method: str, handler):
        """
        CDP イベントを購読する。
        """
        self._event_handlers.setdefault(method, []).append(handler)

    def _recv_loop(self):
        while True:
            try:
                raw = self.ws.recv()
            except websocket.WebSocketConnectionClosedException:
                break
            msg = json.loads(raw)

            # レスポンス
            if "id" in msg:
                q_res = self._pending.pop(msg["id"], None)
                if q_res is not None:
                    q_res.put(msg.get("result", {}))
                    continue

            # イベント
            method = msg.get("method")
            if method and method in self._event_handlers:
                params = msg.get("params", {})
                for h in list(self._event_handlers[method]):
                    try:
                        h(params)
                    except Exception:
                        pass

    def close(self):
        self.ws.close()


def get_ws_url() -> str:
    tabs = requests.get(f"{CDP_HTTP}/json/list").json()
    # すでに開いているタブがあればそれを使う。なければ /json/new で作るなど。
    if not tabs:
        new_tab = requests.get(f"{CDP_HTTP}/json/new").json()
        return new_tab["webSocketDebuggerUrl"]
    return tabs[0]["webSocketDebuggerUrl"]


def click_element_by_selector(client: CDPClient, css_selector: str):
    """
    DOM.querySelector + DOM.getBoxModel + Input.dispatchMouseEvent で
    セレクタにマッチする要素を実際にクリックする。
    """
    # DOM ツリー有効化
    client.send("DOM.enable")

    # ドキュメントの root node
    doc = client.send("DOM.getDocument")
    root_node_id = doc["root"]["nodeId"]

    # セレクタで要素を取得
    res = client.send(
        "DOM.querySelector",
        {"nodeId": root_node_id, "selector": css_selector},
    )
    node_id = res.get("nodeId")
    if not node_id:
        raise RuntimeError(f"Element not found: {css_selector}")

    # 要素の box model を取得
    box = client.send("DOM.getBoxModel", {"nodeId": node_id})
    model = box.get("model")
    if not model or "content" not in model:
        raise RuntimeError("No box model for element")

    # content は [x1, y1, x2, y2, x3, y3, x4, y4]
    content = model["content"]
    xs = content[0::2]
    ys = content[1::2]
    x = sum(xs) / len(xs)
    y = sum(ys) / len(ys)

    # マウス移動 → 押下 → 離す でクリック
    client.send(
        "Input.dispatchMouseEvent",
        {"type": "mouseMoved", "x": x, "y": y, "button": "none"},
    )
    client.send(
        "Input.dispatchMouseEvent",
        {
            "type": "mousePressed",
            "x": x,
            "y": y,
            "button": "left",
            "clickCount": 1,
        },
    )
    client.send(
        "Input.dispatchMouseEvent",
        {
            "type": "mouseReleased",
            "x": x,
            "y": y,
            "button": "left",
            "clickCount": 1,
        },
    )

def wait_for_element_by_selector(
    client: CDPClient,
    selector: str,
    timeout: float = 10.0,
    interval: float = 0.25,
) -> int:
    """
    DOM.getDocument + DOM.querySelector を使って、
    CSS セレクタにマッチする要素が現れるまで待つ。

    見つかったら nodeId を返し、見つからなければ TimeoutError を投げる。
    """
    deadline = time.monotonic() + timeout

    # DOM は一度 enable しておけば OK(呼び出し側でやっているなら省略可)
    client.send("DOM.enable")

    while time.monotonic() < deadline:
        doc = client.send("DOM.getDocument")
        root_id = doc["root"]["nodeId"]

        res = client.send(
            "DOM.querySelector",
            {"nodeId": root_id, "selector": selector},
        )
        node_id = res.get("nodeId")
        if node_id:
            return node_id

        time.sleep(interval)

    raise TimeoutError(f"Timeout: selector '{selector}' が見つかりませんでした。")

def main():
    ws_url = get_ws_url()
    client = CDPClient(ws_url)

    # Page / Runtime 有効化
    client.send("Page.enable")
    client.send("Runtime.enable")

    # console.log イベントを拾う
    log_entries: list[str] = []
    done = {"flag": False}

    def on_console(params: dict):
        args = params.get("args", [])
        texts = []
        for arg in args:
            # CDP の consoleAPICalled の引数
            if "value" in arg:
                texts.append(str(arg["value"]))
            elif "description" in arg:
                texts.append(str(arg["description"]))
        msg = " ".join(texts)
        log_entries.append(msg)
        print("console.log:", msg)
        done["flag"] = True

    client.add_event_listener("Runtime.consoleAPICalled", on_console)

    # 対象ページに遷移
    client.send("Page.navigate", {"url": TARGET_URL})

    # 待機
    wait_for_element_by_selector(client, "#consoleLog")

    # ★ここで CDP でちゃんとクリックする(Runtime.evaluate 不使用)
    click_element_by_selector(client, "#consoleLog")

    # ログが来るまで最大 5 秒待つ
    for _ in range(50):
        if done["flag"]:
            break
        time.sleep(0.1)

    client.close()


if __name__ == "__main__":
    main()
コンソールログのキャプチャを行う際には以下のCDPコマンドを実行しておく必要があります。
これにより、CDPからの受信データにRuntime.consoleAPICalledイベントが含まれるようになります。
chromedriverを直接操作
次にchromedriverを使用したクラシックなWebDriverとWebDriver BiDiの確認を行います。
chromedriverは裏でCDPを操作して、WebDriverのインターフェイスでブラウザを操作します。
この実験を行う場合、事前にchromedriverを起動する必要があります。
chromedriver --port=64921
chromedriverのログを詳しくみたい場合は--log-levelと--log-pathを指定することで詳細のログがファイルに出力されるようになります。
chromedriver --port=64921 --log-level=ALL --log-path=./chromedriver.log
chromedriverによるクラシックなWebDriverの操作
chromedriverを起動するとW3C WebDriverで定義されているエンドポイントが使用できるようになります。
このエンドポイントにアクセスすると、そのエンドポイントに応じた操作をCDPを用いて行います。
たとえばクリック操作はWebDriverのElement ClickコマンドがCDPのdispatchMouseEventコマンドで再現されていることがchromedriverのコードから読み取れます。
1.WebDriverのElement ClickがExecuteClickElementで実行されることが確認できます。
chromedriver/server/http_handler.cc
      CommandMapping(kPost, "session/:sessionId/element/:id/click",
                     WrapToCommand("ClickElement",
                                   base::BindRepeating(&ExecuteClickElement))),
2.ExecuteClickElementでCDPのdispatchMouseEventを使用してマウスの移動、ボタンを押す、ボタンを離すの一連の動作を再現していることが確認できます。
chromedriver/element_commands.cc
Status ExecuteClickElement(Session* session,
                           WebView* web_view,
                           const std::string& element_id,
                           const base::Value::Dict& params,
                           std::unique_ptr<base::Value>* value) {
// 略
  std::vector<MouseEvent> events;
  events.emplace_back(kMovedMouseEventType, kNoneMouseButton,
                      relative_location.x, relative_location.y,
                      session->sticky_modifiers, 0, 0);
  events.emplace_back(kPressedMouseEventType, kLeftMouseButton,
                      relative_location.x, relative_location.y,
                      session->sticky_modifiers, 0, 1);
  events.emplace_back(kReleasedMouseEventType, kLeftMouseButton,
                      relative_location.x, relative_location.y,
                      session->sticky_modifiers, 1, 1);
  status = containing_web_view->DispatchMouseEvents(
      events, session->GetCurrentFrameId(), false);
  // kTargetDetached could be a side effect of the click.
  if (status.IsOk() || status.code() == kTargetDetached) {
    session->mouse_position = absolute_location;
  }
  return status;
}
ではchromedriverを操作したブラウザの操作例のサンプルを確認してみます。
chromedriver直接操作によるChromeのWebDriver(クラシック)の操作サンプル
from __future__ import annotations

import time
import requests

# 事前に chromedriver --port=64921 などで起動しておく
DRIVER_URL = "http://localhost:64921"


# ---- WebDriver HTTP ラッパ ----

def new_session() -> str:
    resp = requests.post(
        f"{DRIVER_URL}/session",
        json={
            "capabilities": {
                "firstMatch": [
                    {
                        "browserName": "chrome",
                        "goog:chromeOptions": {
                            "binary": "/Applications/Google Chrome.app/Contents/MacOS/Google Chrome",
                            "args": [],
                        }
                    }
                ],
            }
        },
    )
    resp.raise_for_status()
    data = resp.json()
    print("post session", data)
    return data["value"]["sessionId"]  # ChromeDriver はここに入れて返す


def navigate(session_id: str, url: str) -> None:
    resp = requests.post(
        f"{DRIVER_URL}/session/{session_id}/url",
        json={"url": url},
    )
    resp.raise_for_status()


def _extract_element_id(elem_obj: dict) -> str:
    # W3C WebDriver の element key
    return elem_obj["element-6066-11e4-a52e-4f735466cecf"]


def find_element(session_id: str, using: str, value: str) -> str:
    resp = requests.post(
        f"{DRIVER_URL}/session/{session_id}/element",
        json={"using": using, "value": value},
    )
    data = resp.json()

    # 失敗時は {"value": {"error": "no such element", ...}} の形式
    if "error" in data.get("value", {}):
        raise RuntimeError(data["value"])

    elem = data["value"]
    return _extract_element_id(elem)


def find_elements(session_id: str, using: str, value: str) -> list[str]:
    resp = requests.post(
        f"{DRIVER_URL}/session/{session_id}/elements",
        json={"using": using, "value": value},
    )
    data = resp.json()
    if "error" in data.get("value", {}):
        raise RuntimeError(data["value"])

    elems = data["value"]
    return [_extract_element_id(e) for e in elems]


def click(session_id: str, element_id: str) -> None:
    resp = requests.post(
        f"{DRIVER_URL}/session/{session_id}/element/{element_id}/click",
        json={},
    )
    resp.raise_for_status()


def get_text(session_id: str, element_id: str) -> str:
    resp = requests.get(
        f"{DRIVER_URL}/session/{session_id}/element/{element_id}/text"
    )
    resp.raise_for_status()
    return resp.json()["value"]


def is_displayed(session_id: str, element_id: str) -> bool:
    # GET /element/{id}/displayed
    resp = requests.get(
        f"{DRIVER_URL}/session/{session_id}/element/{element_id}/displayed"
    )
    resp.raise_for_status()
    return bool(resp.json()["value"])


def get_active_element(session_id: str) -> str:
    # GET /element/active
    resp = requests.get(f"{DRIVER_URL}/session/{session_id}/element/active")
    resp.raise_for_status()
    data = resp.json()
    if "error" in data.get("value", {}):
        raise RuntimeError(data["value"])
    return _extract_element_id(data["value"])


def send_keys(session_id: str, element_id: str, text: str) -> None:
    # W3C: Element Send Keys
    resp = requests.post(
        f"{DRIVER_URL}/session/{session_id}/element/{element_id}/value",
        json={"text": text},
    )
    resp.raise_for_status()


# ---- WebDriverWait 相当の「待ち」 ----

def wait_for_presence(session_id: str, using: str, value: str, timeout: float = 10.0) -> str:
    """
    Selenium: presence_of_element_located 相当
    """
    end = time.time() + timeout
    last_err: Exception | None = None

    while time.time() < end:
        try:
            return find_element(session_id, using, value)
        except Exception as e:  # no such element 等
            last_err = e
            time.sleep(0.25)  # WebDriverWait の poll_frequency 的なもの

    raise TimeoutError(f"presence timeout: {using}={value}") from last_err


def wait_for_visibility(session_id: str, using: str, value: str, timeout: float = 10.0) -> str:
    """
    Selenium: visibility_of_element_located 相当
    (presence を取ったあと GET /displayed で可視かどうかを見る)
    """
    end = time.time() + timeout
    last_err: Exception | None = None

    while time.time() < end:
        try:
            elem_id = find_element(session_id, using, value)
            if is_displayed(session_id, elem_id):
                return elem_id
        except Exception as e:
            last_err = e

        time.sleep(0.25)

    raise TimeoutError(f"visibility timeout: {using}={value}") from last_err


def wait_for_clickable(session_id: str, using: str, value: str, timeout: float = 10.0) -> str:
    """
    Selenium: element_to_be_clickable 相当
    単純化して「visibility + displayed」で代用。
    本家も「visible & enabled & click が投げられる」みたいな条件。
    """
    # ここでは visibility チェックだけを行う(enabled 判定などを足してもよい)
    return wait_for_visibility(session_id, using, value, timeout=timeout)


# ---- メイン処理:元の Selenium コードの HTTP 版 ----

def main() -> None:
    session_id = new_session()
    try:
        # STEP 1: navigate https://zenn.dev/
        navigate(session_id, "https://zenn.dev/")

        # STEP 2: 検索アイコン (#header-search) が出るまで待ってクリック
        header_search_id = wait_for_clickable(
            session_id, "css selector", "#header-search", timeout=10.0
        )
        click(session_id, header_search_id)

        # STEP 3: "人気のトピック" が表示されるまで待つ
        _popular_topic_id = wait_for_visibility(
            session_id,
            "xpath",
            "//*[text()='人気のトピック']",
            timeout=10.0,
        )

        # STEP 4: 入力フォーム (#input-search-form) をクリック
        input_form_id = wait_for_clickable(
            session_id,
            "css selector",
            "#input-search-form",
            timeout=10.0,
        )
        click(session_id, input_form_id)

        # STEP 5: "test" と入力して Enter
        #   Selenium 版と同様に「アクティブ要素」に対して送る
        active_id = get_active_element(session_id)
        # Enter は WebDriver の特殊キーで '\uE007'
        send_keys(session_id, active_id, "test\uE007")

        # STEP 6: 検索結果で article タグを待つ
        _any_article_id = wait_for_presence(
            session_id,
            "css selector",
            "article",
            timeout=10.0,
        )

        # 記事タイトル一覧を取得
        title_ids = find_elements(
            session_id, "css selector", "[class*='ArticleListItem_title']"
        )

        titles: list[str] = []
        for eid in title_ids:
            text = get_text(session_id, eid).strip()
            if text:
                titles.append(text)

        if titles:
            for t in titles:
                print(t)
        else:
            print("記事タイトルが取得できませんでした。")

    finally:
        # セッション終了
        requests.delete(f"{DRIVER_URL}/session/{session_id}")


if __name__ == "__main__":
    main()
やっていることとしてはエンドポイントをHTTPで叩いているだけです。
HTTP経由でアクセスした裏でCDPのコマンドが動作して、ブラウザの自動操作を実現することになります。
chromedriverによるWebDriver BiDiの操作
chromedriverはWebDriver BiDiのサポートもしていますが、その実現方法はクラシックなものより複雑になっています。

chromedriverはchromium-bidiというJavaScriptのライブラリを使用してCDPとBiDi間を変換します。
chromedriverはchromium-bidiをコンパイルしたmapper.jsをRuntime.evaluateコマンドを使用して埋め込みます。
mapper.jsは以下のグローバル関数をwindowオブジェクトに追加します。
- onBidiMessage
- chromedriverからmapper.jsにRuntime.evaluateを使用してデータ送信
- window.sendBidiResponse
- mapper.jsで実行することでRuntime.bindingCalledを介してchromedriverに通知される
chromedriverは上記のJavaScriptの関数と連携してCDPとBiDiを変換を実現することになります。
- mapper.jsで実行することでRuntime.bindingCalledを介してchromedriverに通知される
以下のサンプルはchromedriverでWebDriver BiDiを使用するサンプルになります。
chromedriver直接操作によるChromeのWebDriver BiDiの操作サンプル
import requests
import json
import websocket
import time
import threading


class WebSocket:
    def __init__(self, ws_url: str, on_console=None):
        # タイムアウトをつけておくと recv が永遠に固まりにくい
        self.ws = websocket.create_connection(ws_url, timeout=10)
        self._stop_event = threading.Event()
        self._on_console = on_console

        self._receiver_thread = threading.Thread(
            target=self._recv_loop,
            daemon=True,
        )
        self._receiver_thread.start()

    def _recv_loop(self):
        # log.entryAdded を購読
        msg_id = 1
        self.ws.send(json.dumps({
            "id": msg_id,
            "method": "session.subscribe",
            "params": {
                "events": ["log.entryAdded"],
                # 特定のタブに限定したい場合:
                # "contexts": [context_id],
            }
        }))
        print(">> subscribe log.entryAdded")

        while not self._stop_event.is_set():
            try:
                raw = self.ws.recv()
            except websocket.WebSocketConnectionClosedException:
                # close() 済みなどで切断されたら終了
                print("WebSocket closed, exiting recv loop")
                break
            except Exception as e:
                # 簡易エラー処理でよいという前提なのでログだけ
                print(f"WebSocket recv error: {e}")
                break

            if not raw:
                continue

            try:
                msg = json.loads(raw)
            except json.JSONDecodeError:
                print(f"Invalid JSON: {raw!r}")
                continue

            # イベントは "method" フィールドを持つ
            if msg.get("method") == "log.entryAdded":
                p = msg.get("params", {})

                # コールバックがあればそちらに渡す
                if self._on_console is not None:
                    try:
                        self._on_console(p)
                    except Exception as e:
                        # コールバック側の例外は潰しておく
                        print(f"on_console handler error: {e}")
                else:
                    # コールバック未指定なら標準出力に出すだけ
                    log_type = p.get("type")        # 'console' / 'javascript' など
                    level = p.get("level")          # 'info', 'error', ...
                    method = p.get("method")        # 'log', 'error', 'warn', ...
                    text = p.get("text")            # 'Hello, world!'
                    args = p.get("args", [])        # console.log の引数配列

                    print(
                        f"[log.entryAdded] "
                        f"type={log_type} level={level} "
                        f"method={method} text={text!r} args={args!r}"
                    )

    def close(self):
        # まずループ側に「終われ」と伝える
        self._stop_event.set()
        try:
            self.ws.close()
        except Exception:
            pass
        # 念のためスレッド終了を待つ(デーモンスレッドだが綺麗に閉じる)
        if self._receiver_thread.is_alive():
            self._receiver_thread.join(timeout=2)


CD_PORT = 64921


log_entries = []


def on_console(params: dict):
    args = params.get("args", [])
    texts = []
    for arg in args:
        # BiDi の console 引数
        if "value" in arg:
            texts.append(str(arg["value"]))
        elif "description" in arg:
            texts.append(str(arg["description"]))
    msg = " ".join(texts) or params.get("text", "")
    log_entries.append(msg)
    print(f"[on_console] {msg!r}")

session_url = f"http://127.0.0.1:{CD_PORT}/session"
resp = requests.post(session_url, json={
    "capabilities": {
        "firstMatch": [
            {
                "browserName": "chrome",
                "goog:chromeOptions": {
                    "binary": "/Applications/Google Chrome.app/Contents/MacOS/Google Chrome",
                    "args": [],
                },
                "webSocketUrl": True,
            }
        ]
    }
})
resp.raise_for_status()
data = resp.json()
print("session create response:", data)

cap = data["value"]["capabilities"]
ws_url = cap["webSocketUrl"]   # 例: ws://localhost:28501/session/xxxx
session_id = data["value"]["sessionId"]
base = f"http://127.0.0.1:{CD_PORT}/session/{session_id}"

ws = None
try:
    ws = WebSocket(ws_url, on_console=on_console)
    print("session_id:", session_id)

    # 現在のタブのURLを変更
    r = requests.post(
        f"{base}/url",
        json={"url": "https://www.selenium.dev/selenium/web/bidi/logEntryAdded.html"}
    )
    print("url", r.status_code, r.text)

    # 要素検索(CSSセレクタ)
    r = requests.post(
        f"{base}/element",
        json={
            "using": "css selector",
            "value": "#consoleLog"
        }
    )
    print("element:", r.status_code, r.json())
    res_value = r.json()["value"]
    elem_id = list(res_value.keys())[0]
    elem_value = res_value[elem_id]
    print("element id:", elem_id, elem_value)

    # クリック
    r = requests.post(
        f"{base}/element/{elem_value}/click",
        json={}
    )
    print("click:", r.status_code, r.text)

    # ログが飛んでくるのを少し待つ
    time.sleep(1.0)
    print("log_entries:", log_entries)

finally:
    # 終了処理:WebSocket → セッション削除の順で
    if ws is not None:
        ws.close()
    try:
        requests.delete(f"{base}")
    except Exception as e:
        print(f"delete session error: {e}")
WebDriver BiDiを使用する時は、セッション作成時のcapabilitiesにwebSocketUrlを付与します。
session_url = f"http://127.0.0.1:{CD_PORT}/session"
resp = requests.post(session_url, json={
    "capabilities": {
        "firstMatch": [
            {
                "browserName": "chrome",
                "goog:chromeOptions": {
                    "binary": "/Applications/Google Chrome.app/Contents/MacOS/Google Chrome",
                    "args": [],
                },
                "webSocketUrl": True,
            }
        ]
    }
})
以下のレスポンスでwebSocketUrlが取得されます。
{
  "value": {
    "capabilities": {
      // 略
      "webSocketUrl": "ws://127.0.0.1:64921/session/3cd3d268e56207260cf4017302853c83",
      // 略
    },
    "sessionId": "3cd3d268e56207260cf4017302853c83"
  }
取得したwebSocketUrlに対してwebsocketで接続後、session.subscribeを送信してコンソールログのイベントを受信するようにします。
        self.ws.send(json.dumps({
            "id": msg_id,
            "method": "session.subscribe",
            "params": {
                "events": ["log.entryAdded"],
                # 特定のタブに限定したい場合:
                # "contexts": [context_id],
            }
        }))
その後、log.entryAddedのメッセージ受信をスレッド上のループで監視します。
        while not self._stop_event.is_set():
            try:
                raw = self.ws.recv()
# 略
            # イベントは "method" フィールドを持つ
            if msg.get("method") == "log.entryAdded":
                p = msg.get("params", {})

                # コールバックがあればそちらに渡す
Seleniumでchrome操作の実験
CDPやchromedriverの操作を今まで行いましたが、seleniumはその操作を隠蔽してブラウザの操作をシンプルにしてくれます。
クラシックなWebDriverの操作
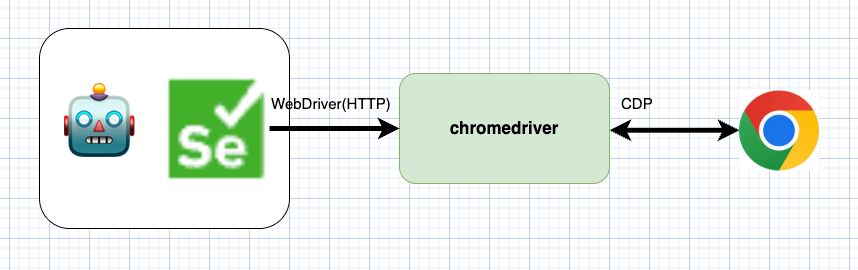
以下はseleniumのサンプルになります。実装がシンプルになっていることが確認できるかと思います。
SeleniumによるChromeのWebDriver(クラシック)の操作サンプル
from __future__ import annotations

from selenium import webdriver
from selenium.webdriver.chrome.options import Options
from selenium.webdriver.common.by import By
from selenium.webdriver.common.keys import Keys
from selenium.webdriver.support.ui import WebDriverWait
from selenium.webdriver.support import expected_conditions as EC


def main() -> None:
    options = Options()
    options.binary_location = "/Applications/Google Chrome.app/Contents/MacOS/Google Chrome"
    driver = webdriver.Chrome(options=options)

    wait = WebDriverWait(driver, 10)

    try:
        # STEP 1: navigate https://zenn.dev/
        # Playwright の page.goto(..., wait_until="networkidle") 相当
        driver.get("https://zenn.dev/")

        # STEP 2: 検索アイコン (#header-search) が出るまで待ってクリック
        search_icon = wait.until(
            EC.element_to_be_clickable((By.CSS_SELECTOR, "#header-search"))
        )
        search_icon.click()

        # STEP 3: "人気のトピック" が表示されるまで待つ
        wait.until(
            EC.visibility_of_element_located(
                (By.XPATH, "//*[text()='人気のトピック']")
            )
        )

        # STEP 4: 入力フォーム (#input-search-form) をクリック
        input_form = wait.until(
            EC.element_to_be_clickable((By.CSS_SELECTOR, "#input-search-form"))
        )
        input_form.click()

        # STEP 5: "test" と入力して Enter
        #   実際のフォーカスは内部の <input> にいるはずなので、
        #   active_element に送るほうが素直
        active = driver.switch_to.active_element
        active.send_keys("test", Keys.ENTER)

        # STEP 6: 検索結果で article タグを待つ
        wait.until(EC.presence_of_element_located((By.CSS_SELECTOR, "article")))

        # 記事タイトル一覧を取得
        #   Playwright 版と同じセレクタ [class*='ArticleListItem_title']
        title_elems = driver.find_elements(By.CSS_SELECTOR, "[class*='ArticleListItem_title']")
        titles = [e.text for e in title_elems if e.text.strip()]

        if titles:
            for t in titles:
                print(t)
        else:
            print("記事タイトルが取得できませんでした。")

    finally:
        driver.quit()


if __name__ == "__main__":
    main()
WebDriver BiDiの操作

SeleniumでWebDriver BiDiを使用する場合はドライバーのオプションの「enable_bidi」をつける必要があります。
SeleniumによるChromeのWebDriver BiDiの操作サンプル
from selenium import webdriver
from selenium.webdriver.chrome.options import Options
from selenium.webdriver.common.by import By
from selenium.webdriver.support.wait import WebDriverWait

# BiDi を有効化
options = Options()
options.enable_bidi = True  # = options.set_capability("webSocketUrl", True) と同等の指定

driver = webdriver.Chrome(options=options)

try:
    driver.get("https://www.selenium.dev/selenium/web/bidi/logEntryAdded.html")

    log_entries = []

    # ★ポイント2: BiDi の script ドメイン経由でハンドラ登録
    #   以後、console.log などが発生すると log_entries.append(...) が呼ばれる
    driver.script.add_console_message_handler(log_entries.append)
    print("driver.script", driver.script)
    print("driver.script.conn.execute", driver.script.conn.execute)
    print("driver.script.conn.url", driver.script.conn.url)

    # ページ上のボタンをクリックすると console.log('Hello, world!') が実行される
    driver.find_element(By.ID, "consoleLog").click()

    # ログが届くまで待つ
    WebDriverWait(driver, 5).until(lambda _: log_entries)

    # BiDi で受け取ったログを確認
    for entry in log_entries:
        print("console.log:", entry.text)
finally:
    driver.quit()
Firefox
Firefoxは2つの自動操作の仕組みを持っています。
- Marionette
- WebDriver BiDi
Marionette は geckodriver によって利用され、クラシックなWebDriverの動作をサポートします。
一方、FirefoxのWebDriver BiDiはブラウザドライバーを介さずにwebsocketで通信を行い操作が可能です。(注1)
また、一時期、Firefox で CDP が使用できましたが、2024年末にCDPのサポートは終了のアナウンスがありました。
(注1): WebDriver BiDiによる操作自体はwebsocketのアドレスを知っていれば可能ですが、通常はgeckodriver経由で、セッション確立する際にwebsocketのアドレスを取得する必要があります。
Marionette経由のFirefoxの操作例
Marionetteはgeckodriver経由で使用されるケースが多いですが、直接使用することも可能です。
以下のように--marionetteと--marionette-portを指定してFirefoxを起動します。
例
/Users/ユーザー名/.cache/selenium/firefox/mac64/145.0.1/Firefox.app/Contents/MacOS/firefox --marionette --marionette-port 2828
marionette-driverライブラリを使用することでFirefoxのmarionetteポート経由で直接操作が可能です。
marionetteでのFirefox操作例
from marionette_driver.marionette import Marionette
from marionette_driver import By, keys
from marionette_driver.errors import NoSuchElementException
import time

def wait_element_by_selector(
    client: Marionette,
    selector: str,
    timeout_ms: int = 10_000,
    interval_ms: int = 250,
):
    """
    CDP の wait_cdp_element_by_selector と同等:
    CSS セレクタで要素が見つかるまで待って WebElement を返す
    """
    deadline = time.time() + timeout_ms / 1000.0

    while time.time() < deadline:
        try:
            el = client.find_element(By.CSS_SELECTOR, selector)
            return el
        except NoSuchElementException:
            time.sleep(interval_ms / 1000.0)

    raise TimeoutError(f"Timeout: Selector '{selector}' が見つかりませんでした。")

def wait_text(
    client: Marionette,
    text: str,
    timeout_ms: int = 10_000,
    interval_ms: int = 300,
):
    """
    CDP の wait_cdp_text と同等:
    document.body.innerText に指定文字列が現れるまで待機
    """
    deadline = time.time() + timeout_ms / 1000.0

    while time.time() < deadline:
        found = client.execute_script(
            "return document.body && document.body.innerText.includes(arguments[0]);",
            script_args=[text],
        )
        if found:
            print(f"Text '{text}' detected.")
            return True

        time.sleep(interval_ms / 1000.0)

    raise TimeoutError(f"Timeout waiting for text '{text}'")

def main():
    # ★ Firefox 本体の Marionette に直で接続(geckodriver なし)
    m = Marionette(host="127.0.0.1", port=2828)
    m.start_session()
    print(m.client)

    # ページ遷移
    m.navigate("https://zenn.dev/")

    # 表示をまつ
    wait_element_by_selector(m, "#header-search path")

    # 検索ボタンを押す
    btn = m.find_element("id", "header-search")
    btn.click()

    # 人気のトピック が表示されるまでまつ
    wait_text(m, "人気のトピック")

    # キーワード入力を押す
    btn = m.find_element("id", "input-search-form")
    btn.click()

    # 入力フォームを取得
    input_el = m.find_element("id", "input-search-form")

    # "test" 入力 → Enter
    input_el.send_keys("test")
    input_el.send_keys(keys.Keys.ENTER)

    # <article>が表示されるまで待機
    wait_element_by_selector(m, "article")

    # 記事タイトル一覧を JS で取得
    js = """
return (Array.from(document.querySelectorAll("[class*='ArticleListItem_title']"))
    .map(x => x.innerText));
"""
    titles = m.execute_script(js)
    if isinstance(titles, list):
        for t in titles:
            print(t)
    else:
        print("結果形式が想定外です:", titles)

if __name__ == "__main__":
    main()
WebDriver BiDiを経由のFirefoxの操作
Firefoxの自動操作でWebDriver BiDiを使用する場合には--remote-debugging-portでポートを指定する必要があります。
例:
/Users/ユーザー/.cache/selenium/firefox/mac64/145.0.1/Firefox.app/Contents/MacOS/firefox --remote-debugging-port 51328 --remote-allow-hosts localhost -foreground -no-remote
上記のコマンドでFirefoxを起動した場合、ws://127.0.0.1:51328/sessionにwebsocketで接続することでWebDriver BiDiを使用した操作が可能になります。
WebDriver BiDiでのFirefox操作例
import json
import threading
import time
import queue

import websocket  # pip install websocket-client


BIDI_WS_URL = "ws://127.0.0.1:51328/session"
TARGET_URL = "https://www.selenium.dev/selenium/web/bidi/logEntryAdded.html"


class BiDiClient:
    def __init__(self, ws_url: str):
        # ★ Origin ヘッダを送ると Firefox Remote Agent に拒否されるので suppress_origin=True
        self.ws = websocket.create_connection(ws_url, suppress_origin=True)
        self._id = 0
        self._lock = threading.Lock()
        self._pending: dict[int, queue.Queue] = {}
        self._handlers: dict[str, list] = {}

        self._receiver_thread = threading.Thread(
            target=self._recv_loop,
            daemon=True,
        )
        self._receiver_thread.start()

    def _next_id(self) -> int:
        with self._lock:
            self._id += 1
            return self._id

    def send_command(self, method: str, params: dict | None = None) -> dict:
        msg_id = self._next_id()
        payload = {"id": msg_id, "method": method}
        if params is not None:
            payload["params"] = params

        q: queue.Queue = queue.Queue()
        self._pending[msg_id] = q
        self.ws.send(json.dumps(payload))
        # Firefox 側のレスポンス (success/error) 丸ごと受け取る
        res = q.get()
        return res

    def add_event_listener(self, method: str, handler):
        self._handlers.setdefault(method, []).append(handler)

    def _recv_loop(self):
        while True:
            try:
                raw = self.ws.recv()
            except websocket.WebSocketConnectionClosedException:
                break
            if not raw:
                print('.....exit')
                return
            msg = json.loads(raw)

            # コマンド応答
            if "id" in msg:
                q = self._pending.pop(msg["id"], None)
                if q is not None:
                    # Firefox の BiDi 返信: { "type": "success", "id":..., "result": {...} }
                    q.put(msg.get("result", msg.get("error", {})))
                continue

            # イベント: { "type": "event", "method": "...", "params": {...} }
            m = msg.get("method")
            if m and m in self._handlers:
                params = msg.get("params", {})
                for h in list(self._handlers[m]):
                    try:
                        h(params)
                    except Exception:
                        pass

    def close(self):
        try:
            self.ws.close()
        except Exception:
            pass


def find_context_id(bidi: BiDiClient) -> str:
    res = bidi.send_command("browsingContext.getTree", {"maxDepth": 1})
    ctxs = res.get("contexts", [])
    if not ctxs:
        raise RuntimeError("No browsingContext found")
    return ctxs[0]["context"]


def navigate(bidi: BiDiClient, context_id: str, url: str):
    bidi.send_command("browsingContext.navigate", {
        "context": context_id,
        "url": url,
        "wait": "complete",
    })


def locate_node_by_css(bidi: BiDiClient, context_id: str, css: str) -> dict:
    res = bidi.send_command("browsingContext.locateNodes", {
        "context": context_id,
        "locator": {"type": "css", "value": css},
        "maxNodeCount": 1,
        "serializationOptions": {
            "maxDomDepth": 0,
            "maxObjectDepth": 0,
            "includeShadowTree": "none",
        },
    })
    nodes = res.get("nodes", [])
    if not nodes:
        raise RuntimeError(f"Element not found: {css}")
    return nodes[0]


def node_to_element_origin(node_remote: dict) -> dict:
    shared_ref: dict = {}
    if node_remote.get("sharedId") is not None:
        shared_ref["sharedId"] = node_remote["sharedId"]
    elif node_remote.get("handle") is not None:
        shared_ref["handle"] = node_remote["handle"]
    else:
        raise RuntimeError("NodeRemoteValue has neither sharedId nor handle")

    return {
        "type": "element",
        "element": shared_ref,
    }


def click_element(bidi: BiDiClient, context_id: str, element_origin: dict):
    bidi.send_command("input.performActions", {
        "context": context_id,
        "actions": [
            {
                "type": "pointer",
                "id": "mouse",
                "parameters": {"pointerType": "mouse"},
                "actions": [
                    {
                        "type": "pointerMove",
                        "duration": 0,
                        "origin": element_origin,
                        "x": 0,
                        "y": 0,
                    },
                    {"type": "pointerDown", "button": 0},
                    {"type": "pointerUp", "button": 0},
                ],
            }
        ],
    })


def main():
    bidi = BiDiClient(BIDI_WS_URL)

    try:
        # 1. BiDi セッション開始
        session_res = bidi.send_command("session.new", {
            "capabilities": {"alwaysMatch": {}}
        })
        print("session.new:", session_res)

        # 2. console.log を購読
        bidi.send_command("session.subscribe", {
            "events": ["log.entryAdded"],
        })

        log_entries: list[str] = []
        done = {"flag": False}

        def on_log(params: dict):
            entry = params.get("entry", params)
            text = entry.get("text")
            log_entries.append(text)
            print("[log.entryAdded]", text)
            done["flag"] = True

        bidi.add_event_listener("log.entryAdded", on_log)

        # 3. 既存タブの browsingContext を1つ拾う
        context_id = find_context_id(bidi)
        print("context:", context_id)

        # 4. ページ遷移
        navigate(bidi, context_id, TARGET_URL)

        # 5. 要素 locate → click(script.evaluate は使わない)
        node = locate_node_by_css(bidi, context_id, "#consoleLog")
        origin = node_to_element_origin(node)
        click_element(bidi, context_id, origin)

        # 6. console.log が飛んでくるのを少し待つ
        for _ in range(50):
            if done["flag"]:
                break
            time.sleep(0.1)

        print("log_entries:", log_entries)

        # 一応セッションを閉じるなら
        bidi.send_command("session.end", {})

    finally:
        bidi.close()


if __name__ == "__main__":
    main()
geckodriverを経由のFirefoxの操作例
Marionetteを直接操作せずに、geckodriverを使用することでWebDriverとMarionette間の変換を行いFirefoxを動作させることができます。
まずgeckodriverを事前に起動しておきます。
/usr/local/bin/geckodriver --port 4444
gekodriverを使用する場合、chromedriverで行ったクラシックなWebDriverの操作サンプルの流用可能です。
接続先情報とcapabilitiesの設定を変更することでFirefoxの自動操作になります。
DRIVER_URL = "http://localhost:4444"


# ---- WebDriver HTTP ラッパ ----

def new_session() -> str:
    resp = requests.post(
        f"{DRIVER_URL}/session",
        json={
            "capabilities": {
                "firstMatch": [
                    {
                        "browserName": "firefox",
                        #"goog:chromeOptions": {
                        #    "binary": "/Applications/Google Chrome.app/Contents/MacOS/Google Chrome",
                        #    "args": [],
                        #}
                        "moz:firefoxOptions": {
                            # ★ Firefox 本体のパスを明示
                            "binary": "/Users/ユーザー/.cache/selenium/firefox/mac64/145.0.1/Firefox.app/Contents/MacOS/firefox",
                            "args": [],
                        },
                    }
                ]
            }
        },
    )
geckodriverからWebDriver BiDiを使用する場合はセッション作成時のcapabilitiesにwebSocketUrlフラグを付与します。
def new_session() -> str:
    resp = requests.post(
        f"{DRIVER_URL}/session",
        json={
            "capabilities": {
                "firstMatch": [
                    {
                        "browserName": "firefox",
                        "moz:firefoxOptions": {
                            # ★ Firefox 本体のパスを明示
                            "binary": "/Users/ユーザ/.cache/selenium/firefox/mac64/145.0.1/Firefox.app/Contents/MacOS/firefox",
                            "args": [],
                        },
                        "webSocketUrl": True,
                    },
                ]
            }
        },
    )
このレスポンスにwebSocketUrlがあるので、WebDriver BiDiを経由のFirefoxの操作で使用したコードのBIDI_WS_URLを置き換えて実行すればWebDriver BiDiを経由した操作が可能になります。
この時の geckodriver の役割は、Firefox を起動して WebDriver セッションを確立し、WebDriver BiDi 用 WebSocket の URL を取得してクライアントに伝えることです。
実際の websocket 通信は、クライアントと Firefox の間で行われます。
Seleniumのケース
Chromeで使用していたコードを流用可能です。
FirefoxをSeleniumで使用するケースではwebdriver.Firefoxに置き換えてください。
options = Options()
options.enable_bidi = True
driver = webdriver.Firefox(options=options)
他ツールのブラウザ自動化方法
ここでは他のブラウザ自動化ツールがどのようにしてブラウザを自動操作しているかを簡単に確認してみます。
-
Puppeteer
- JavaScriptライブラリ
- Chrome
- デフォルトはCDP / オプションでWebDriver BiDi
- Firefox
- WebDriver BiDi
- PlayWright
- Cypress
これらのツールではWebDriver自体は使っていませんが、ブラウザドライバーが裏でやっていることや、初期のSeleniumのようなJavaScriptの埋め込み方法を使用して実現していることがわかるかと思います。
まとめ
今回はWebDriverとSeleniumの歴史の確認と、それが裏側でどのように動作しているかを確認しました。
Seleniumで簡単にできていることの裏側で、なにが起きているかの一端が確認できたかと思います。
これを知ることで今後新しいブラウザの自動操作ツールがでてきても、裏でなにが起きているかを想像することは容易になるかと思います。
Discussion