🔧
Next.jsとFirebase Authenticationでパスワード再設定ページを実装する
はじめに
今回はFirebase Authenticationを使用して、カスタマイズしたパスワード再設定画面を実装する方法を解説します。
実装
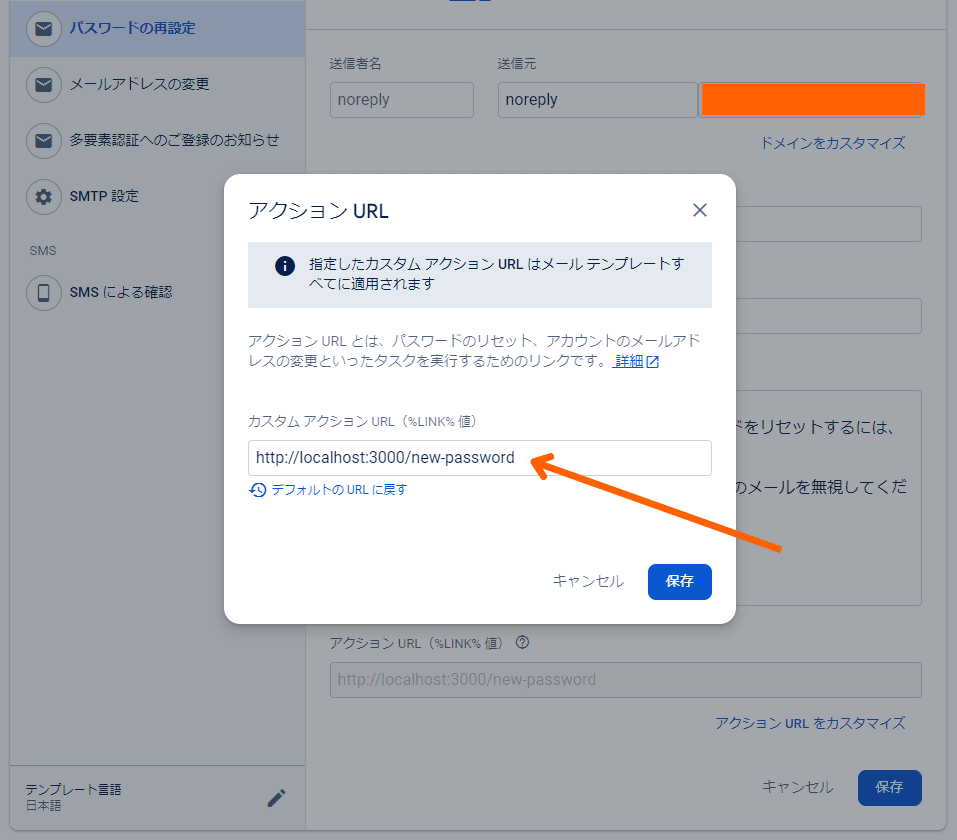
1. アクションURLの設定
「Authentication」→「テンプレート」→「パスワードの再設定」→「アクションURLをカスタマイズ」からアクションURLを設定します。
今回はhttp://localhost:3000/new-passwordと設定します。

メール再設定用メールの本文のリンクが以下のように変更されます。
http://localhost:3000/new-password?apiKey=AIzaSyAz-b8dPOGoy9BRLbzIXlO-SyxO_D6fisw&mode=resetPassword&oobCode=wkuDXmOlX0AqLWYmF2WYQSr7EnwnO8errjT3aXsK43QAAAGRJgUzXA&lang=ja
2. パスワード再設定用のメール送信ページ作成
const PasswordReset = () => {
  const [email, setEmail] = useState("");

  const handleSubmit = async (e: any) => {
    e.preventDefault();
    const actionCodeSettings = {
      // パスワード再設定後のリダイレクト URL
      url: "http://localhost:3000/",
    };
    try {
      await sendPasswordResetEmail(auth, email, actionCodeSettings);
      setEmail("");
    } catch (error) {
      console.error(error);
    }
  };

  return (
    ...略
    );
};
コード全体
password-reset/page.tsx
import { auth } from '@/lib/firebase';
import { sendPasswordResetEmail } from 'firebase/auth';
import { useState } from 'react';

const PasswordReset = () => {
  const [email, setEmail] = useState("");

  const handleSubmit = async (e: any) => {
    e.preventDefault();
    const actionCodeSettings = {
      // パスワード再設定後のリダイレクト URL
      url: "http://localhost:3000/",
    };
    try {
      await sendPasswordResetEmail(auth, email, actionCodeSettings);
      setEmail("");
    } catch (error) {
      console.error(error);
    }
  };

  return (
    <div className="bg-gray-100 min-h-screen flex items-center justify-center">
      <div className="w-full max-w-md mx-auto mt-8 p-6 bg-white rounded-lg shadow-md">
        <h2 className="text-2xl font-bold mb-6 text-center font-noto-sans">
          パスワードリセット
        </h2>
        <form onSubmit={handleSubmit} className="space-y-4">
          <div>
            <label
              htmlFor="email"
              className="block mb-2 text-sm font-medium text-gray-700 font-noto-sans"
            >
              メールアドレス
            </label>
            <input
              type="email"
              id="email"
              name="email"
              required
              className="w-full px-3 py-2 border border-gray-300 rounded-md focus:outline-none focus:ring-2 focus:ring-blue-500"
              placeholder="example@example.com"
              value={email}
              onChange={(e) => setEmail(e.target.value)}
            />
          </div>
          <button
            type="submit"
            className="w-full bg-blue-500 text-white font-bold py-2 px-4 rounded-md hover:bg-blue-600 transition duration-300 font-noto-sans disabled:opacity-50 disabled:cursor-not-allowed"
          >
            リセットリンクを送信
          </button>
        </form>
      </div>
    </div>
  );
};

export default PasswordReset;
sendPasswordResetEmail関数を使用して再設定用メールを送信します。
await sendPasswordResetEmail(auth, email, actionCodeSettings);
第三引数として、actionCodeSettings を設定することができます。
この設定により、パスワード再設定後にリダイレクトしたいURLを指定できます。
const actionCodeSettings = {
  url: "http://localhost:3000/",
};
この設定を行うと、パスワードリセットメールに continueUrl が含まれるようになります。
http://localhost:3000/new-password?apiKey=AIzaSyAz-b8dPOGoy9BRLbzIXlO-SyxO_D6fisw&mode=resetPassword&oobCode=wkuDXmOlX0AqLWYmF2WYQSr7EnwnO8errjT3aXsK43QAAAGRJgUzXA&continueUrl=http://localhost:3000/&lang=ja
3. パスワード再設定ページ作成
const NewPassword = () => {
  const router = useRouter();
  const searchParams = useSearchParams();
  const oobCode = searchParams.get("oobCode"); // トークンを検証を取得
  const continueUrl = searchParams.get("continueUrl"); // 処理後にリダイレクトするURL

  const [isCodeValid, setIsCodeValid] = useState(false); // コードが有効かどうか
  const [isSuccess, setIsSuccess] = useState(false);
  const [password, setPassword] = useState("");

  useEffect(() => {
    (async function () {
      try {
        if (oobCode) {
          // トークンを検証
          await verifyPasswordResetCode(auth, oobCode);
          setIsCodeValid(true);
        }
      } catch (error: any) {
        console.error(error);
      }
    })();
  }, [oobCode]);

  const handleSubmit = async (e: any) => {
    e.preventDefault();
    try {
      // 新しいパスワードでパスワードリセットを確定
      await confirmPasswordReset(auth, oobCode!, password);
      setIsSuccess(true);
    } catch (error) {
      console.error(error);
    }
  };

  const handleContinue = () => {
    if (continueUrl) {
      // 指定されたURLにリダイレクト
      router.push(continueUrl);
    }
  };

  return (
   ...略
  );
};
コード全体
new-password/page.tsx
import { confirmPasswordReset, verifyPasswordResetCode } from 'firebase/auth';
import { useRouter, useSearchParams } from 'next/navigation';
import { useEffect, useState } from 'react';
import { auth } from '@/lib/firebase';

const NewPassword = () => {
  const router = useRouter();
  const searchParams = useSearchParams();
  const oobCode = searchParams.get("oobCode"); // トークンを検証を取得
  const continueUrl = searchParams.get("continueUrl"); // 処理後にリダイレクトするURL

  const [isCodeValid, setIsCodeValid] = useState(false); // コードが有効かどうか
  const [isSuccess, setIsSuccess] = useState(false);
  const [password, setPassword] = useState("");

  useEffect(() => {
    (async function () {
      try {
        if (oobCode) {
          // トークンを検証
          await verifyPasswordResetCode(auth, oobCode);
          setIsCodeValid(true);
        }
      } catch (error: any) {
        console.error(error);
      }
    })();
  }, [oobCode]);

  const handleSubmit = async (e: any) => {
    e.preventDefault();
    try {
      // 新しいパスワードでパスワードリセットを確定
      await confirmPasswordReset(auth, oobCode!, password);
      setIsSuccess(true);
    } catch (error) {
      console.error(error);
    }
  };

  const handleContinue = () => {
    if (continueUrl) {
      // 指定されたURLにリダイレクト
      router.push(continueUrl);
    }
  };

  return (
    <div className="flex items-center justify-center min-h-screen bg-gray-100 font-sans">
      <div className="w-full max-w-lg p-8 bg-white rounded-lg shadow-md">
        {isSuccess ? (
          // パスワードが正常に変更できた場合のUI
          <div className="text-center">
            <h2 className="text-2xl font-bold mb-4">
              パスワードを変更しました
            </h2>
            <p className="mb-4">
              新しいパスワードでログインできるようになりました
            </p>
            <button
              onClick={handleContinue}
              className="bg-blue-500 hover:bg-blue-700 text-white font-bold py-2 px-4 rounded"
            >
              続行
            </button>
          </div>
        ) : !isCodeValid ? (
          // リンクが無効または期限切れの場合のUI
          <>
            <h2 className="text-2xl font-bold mb-4">
              パスワードの再設定をもう一度お試しください
            </h2>
            <div className="text-center">
              パスワードの再設定のリクエストの期限が切れたか、リンクがすでに使用されています
            </div>
          </>
        ) : (
          // パスワード入力画面のUI
          <>
            <h2 className="text-2xl font-bold mb-6 text-center text-gray-800">
              パスワードの再設定
            </h2>
            <form onSubmit={handleSubmit} className="flex flex-col gap-6">
              <div>
                <label
                  htmlFor="new-password"
                  className="block text-sm font-medium text-gray-700 mb-1"
                >
                  新しいパスワード
                </label>
                <div className="relative">
                  <input
                    type="password"
                    id="email"
                    name="email"
                    className="box-border w-full p-2 border border-gray-300 rounded-md outline-none transition-shadow focus:ring-2 focus:ring-blue-500"
                    placeholder="新しいパスワード"
                    value={password}
                    onChange={(e) => setPassword(e.target.value)}
                  />
                </div>
              </div>
              <button
                type="submit"
                className="box-border w-full p-2 border border-gray-300 rounded-md bg-blue-600 text-white font-semibold transition-colors cursor-pointer hover:bg-blue-900"
              >
                パスワードを変更
              </button>
            </form>
          </>
        )}
      </div>
    </div>
  );
};

export default NewPassword;
verifyPasswordResetCode 関数を使用してトークンを検証します。トークンはURLのパラメータの oobCode に含まれるため、searchParams.get("oobCode") を使用してトークンを取得します。
const searchParams = useSearchParams();
const oobCode = searchParams.get("oobCode");

useEffect(() => {
  (async function () {
    try {
      if (oobCode) {
        // トークンを検証
        await verifyPasswordResetCode(auth, oobCode);
        setIsCodeValid(true);
      }
    } catch (error: any) {
      console.error(error);
    }
  })();
}, [oobCode]);
confirmPasswordReset関数に oobcode を渡して新しいパスワードを登録します。
const handleSubmit = async (e: any) => {
  e.preventDefault();
  try {
    // 新しいパスワードでパスワードリセットを確定
    await confirmPasswordReset(auth, oobCode!, password);
    setIsSuccess(true);
  } catch (error) {
    console.error(error);
  }
};
さいごに
今回はFirebase Authenticationを使用して、カスタマイズしたパスワード再設定画面を実装する方法について解説しました。いくつかの記事で同様の内容が紹介されていましたが、情報が古いものが多かったため、今回新しく記事を作成しました。
この記事が参考になりましたら、いいねを押していただけると励みになります。よろしくお願いします。
参考
Discussion