【TypeScript勉強記】ReactチュートリアルアプリをTypeScriptで作る
初めに
チュートリアル:React の導入に倣い、三目並べゲームをTypeScriptで実装する。
また、完成したアプリをベースに将棋アプリを実装したい(別途別記事にする)
勉強した記録用に残しただけなので、誰かに読まれることを想定していませんがご了承くだしゃい。
学習素材
チュートリアル:React の導入
React公式チュートリアルをTypeScriptでやる
環境
React.js 18.2.0
TypeScript 4.9.5
Node.js 18.14.0
準備
アプリ起動
Node.jsとnpmがインストールされた状態で、ディレクトリを作成し、アプリを起動します。
npx create-react-app shogi --template typescript
cd shogi
npm start
Sass導入
create-react-appでプロジェクトを作成した場合、以下でReactのSassを使用することができる。
npm i sass
終わったら、.cssを.scssに変更する。
ファイル作成
まず、create-react-app で生成されたsrcフォルダの中身を全て削除して、更な状態に戻す。
$ rm -rf src/*
次に、今回はローカル環境での開発なので、チュートリアルの準備: オプション02に従ってファイルを作成する。
sassファイル
$ touch src/index.scss
index.scssにindex.cssの中身をコピーする。
tsxファイル
$ touch src/index.tsx
index.tsxの先頭に以下を追加し、index.jsの中身をコピーする。
import React from 'react';
import ReactDOM from 'react-dom/client';
import './index.css';
エラー対応
コンパイルエラー
jsファイルをtsxにそのままコピーすると、まずTypeScriptにより以下のコンパイルエラーが起きる。
Parameter 'i' implicitly has an 'any' type.
これは、renderSquare(i) の引数iに型を指定すればよい。
// 修正後
renderSquare(i: number) {
  return <Square />;
}
ts2345エラー
次に、TypescriptとReact 18 の環境では、document.getElementById("root")にてArgument of type 'HTMLElement | null' is not assignable to parameter of type 'Element | DocumentFragment' (ts 2345) のエラーが出る。
import React from 'react';
import ReactDOM from 'react-dom/client';
import './index.scss';
...(略)...
const root = ReactDOM.createRoot(document.getElementById("root"));
root.render(<Game />);
これは、getElementByIdに指定した要素がHTMLに無く、nullになっているために起きるエラーである。
この場合、以下のように末尾に!をつけるとエラーが解消される。
document.getElementById("root")!
これで2つのエラーが消えたので、npm startすると、以下のような画面が表示される。

チュートリアルアプリ実装
Propsの実装
「データを Props 経由で渡す」に倣い、<Board /> のrenderSquareメソッド内で、propsとしてvalueという名前の値を<Square />に渡すように変更する。
class Board extends React.Component {
  renderSquare(i: number) {
    return <Square value={i} />;
  }
そして<Square /> のrenderメソッドで、渡された値を表示するように、{/* TODO */}を{this.props.value}に書き換える。
class Square extends React.Component {
  render() {
    return (
      <button className="square">
        {this.props.value}
      </button>
    );
  }
}
こうすると、Property 'value' does not exist on type 'Readonly<{}>'.ts(2339)のエラーが出てくる。
これは、TypeScriptにおいてプロパティに型定義がされていないために出るエラーなので、Interfaceを使ってvalueを型定義する。
interface SquarePropsInterface {
   value: number;
}
class Square extends React.Component<SquarePropsInterface> {
  render() {
    return (
      <button className="square">
        {this.props.value}
      </button>
    );
  }
}
これで、描画された正方形の中に番号が入力された。

Stateの実装
次に、Stateを使ってクリック時に<Square /> の表示を'X'に書き換える。
Props同様、Stateにもinterfaceで型定義をする。
interface SquareStateInterface {
  value: string;
}
constructorで<Square />を初期化する。
class Square extends React.Component<SquarePropsInterface, SquareStateInterface> {
  constructor(props: SquarePropsInterface) {
    // JSにおいて、サブクラスのコンストラクタを定義する際は常に super を呼ぶ必要がある
    super(props)
    this.state = { // React コンポーネントはコンストラクタで this.state を設定することで、状態を持つことができるようになる
      value: "" // 現在の Square の状態
    }
  }
onClick関数を追加。
render() {
  return (
    <button
      className="square"
      onClick={() => this.setState({value: "X"})}
      >
        {this.state.value}
    </button>
  );
}
ゲームを完成させる
ここからは、盤面に “X” と “O” を交互に置けるようにし、どちらのプレーヤが勝利したか判定できるようにする。
State のリフトアップ
現時点では、それぞれの<Square />がゲームの状態を保持しているが、勝利の判定をするために、9個のマス目の値を1カ所で管理するようにする。
ここでは、ゲームの状態を親コンポーネント<Board />で保持し、<Board />が各<Square />にpropsを渡すことで、表示を切り替える。
なお、公式のチュートリアルには、以下のようにある。
To collect data from multiple children, or to have two child components communicate with each other, you need to declare the shared state in their parent component instead. The parent component can pass the state back down to the children by using props; this keeps the child components in sync with each other and with the parent component.
複数の子要素からデータを集めたい、または 2 つの子コンポーネントに互いにやりとりさせたいと思った場合は、代わりに親コンポーネント内で共有の state を宣言する必要があります。親コンポーネントは props を使うことで子に情報を返すことができます。こうすることで、子コンポーネントが兄弟同士、あるいは親との間で常に同期されるようになります。
このように、stateを親コンポーネントに宣言することを、リフトアップ (lift up) するという。
Boardコンポーネントに初期値Stateを設定
<Board />にコンストラクタを追加し、初期stateとして9個のマス目に対応する9個の""をセット。
class Board extends React.Component<BoardPropsInterface, BoardStateInterface> {
  constructor(props: BoardPropsInterface) {
    super(props)
    this.state = {
      squares: Array(9).fill("")
    }
  }
盤面が埋まっていくと、this.state.squares配列は以下のようになる。
[
  'O', null, 'X',
  'X', 'X', 'O',
  'O', null, null,
]
Boardコンポーネントがpropsを渡す仕組みを作る
「データを Props 経由で渡す」にて、<Board />からvalueプロパティを渡して0から8までの数字をそれぞれのマス目に表示させた。また、「インタラクティブなコンポーネントを作る」にて、<Square />のstateで“X”を表示するようにしたため、現在<Board />から渡されているvalueプロパティは無視されている。
ここでは、<Board />がpropsを渡すメカニズムを使うようにrenderSquareを書き換える。
BoardのrenderSquareがconstructorでsquaresを読み込むように書き換える。
renderSquare(i: number) {
    return <Square value={this.state.squares[i]} />;
}
これで各<Square />がvalueプロパティ('X'、'O'、または空のマス目の場合は null)を受け取るようになる。
マス目がクリックされた時の挙動を変更する
次に、<Square />が <Board />のstateを更新できるようにする。
現在マス目の情報を管理しているのは<Board />であり、
stateはそれを定義している<Board />内でプライベートなものなので、<Square />から<Board />のstateを直接書き換えることはできない。
代わりに、<Board />から<Square />に関数を渡し、マス目がクリックされた時に <Square />にその関数を呼ぶよう、renderSquareメソッドを以下のように書き換える。
renderSquare(i: number) {
  return (
    <Square
      value={this.state.squares[i]}
      onClick={() => this.handleClick(i)}/> // 追加
  )
}
Squaresコンポーネントに変更を加える
現在、<Board />から<Square />に渡されているpropsは、valueとonClickである。
<Square />はゲームの状態を保持する必要がなくなったので、constructorは削除し、以下のように変更する。
// constructorは削除
class Square extends React.Component<SquarePropsInterface, SquareStateInterface> {
  render() {
    return (
      <button
        className="square"
	// this.setState({value: "X"})をthis.props.onClick()に変更
        onClick={() => this.props.onClick()}
        >
	 // this.state.valueをthis.props.valueに変更
          {this.props.value}
      </button>
    );
  }
}
<Board />のhandleClick()を定義
上記のまま実行すると、<Board />にhandleClick()が定義されていないので、エラーになるので、以下を追加する。[1]
handleClick(i: number) {
  const squares: Array<string> = this.state.squares.slice()
  squares[i] = 'X';
  this.setState({
    squares: squares
  })
}
また、ここで以下Type 'string' is not assignable to type 'number'.のエラーが<Square />のvalueで出てくる。
No overload matches this call. (ts2769)
  Overload 1 of 2, '(props: SquarePropsInterface | Readonly<SquarePropsInterface>): Square', gave the following error.
    Type 'string' is not assignable to type 'number'.
  Overload 2 of 2, '(props: SquarePropsInterface, context: any): Square', gave the following error.
    Type 'string' is not assignable to type 'number'.
これは、SquarePropsInterfaceのvalueがnumber型が指定されているのが原因なので、value: stringに変更する。ついでに、onClickの型も定義する。
interface SquarePropsInterface {
  value: string;
  onClick: () => void
}
また、SquareStateInterfaceは不要になったので削除する。
これで、マス目をクリックすると値が書き込まれるようになった。
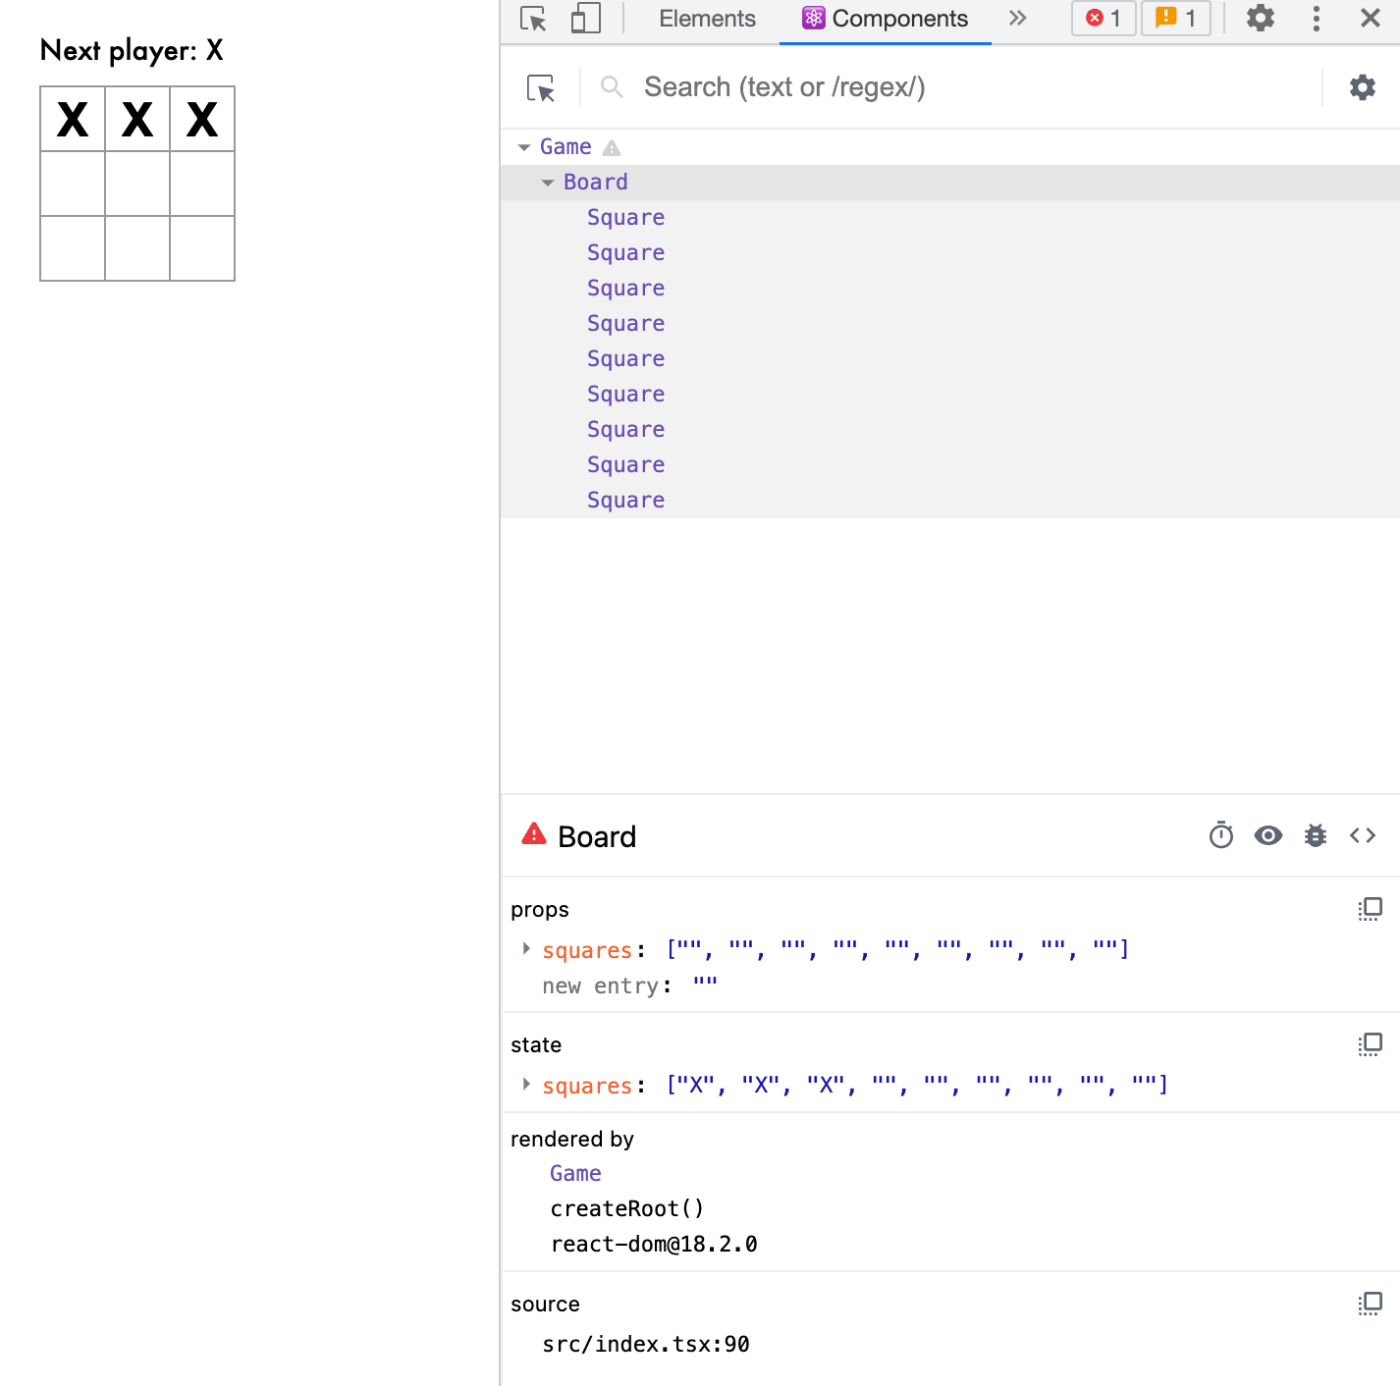
また、全てのマス目の状態は<Board />に保持され、<Board />のstateが変更されると、個々の<Square />も自動的に再レンダーされるようになった。[2]
<Square />は<Board />から値を受け取って、クリックされた時はそのことを <Board />に伝える制御されたコンポーネント(controlled component) になった。
Squareを関数コンポーネントに書き換える
チュートリアル「関数コンポーネント」より。
React における関数コンポーネントとは、render メソッドだけを有して自分の state を持たないコンポーネントを、よりシンプルに書くための方法です。React.Component を継承するクラスを定義する代わりに、props を入力として受け取り表示すべき内容を返す関数を定義します。関数コンポーネントはクラスよりも書くのが楽であり、多くのコンポーネントはこれで書くことができます。
Square クラスを以下の関数で書き換える。
function Square(props: SquarePropsInterface) {
  return (
    <button
      className="square"
      onClick={props.onClick}
      >
        {props.value}
    </button>
  );
}
手番の処理
チュートリアル「手番の処理」に倣い、“O” を盤面に表示する。
Boardのstateにどちらのプレーヤの手番なのかを決めるxIsNextを持たせ、これがtrueの場合に 'X' を描画するように修正する。
interface BoardStateInterface {
  squares: Array<string>
  xIsNext: boolean // 追加
}

class Board extends React.Component<BoardPropsInterface, BoardStateInterface> {
  constructor(props: BoardPropsInterface) {
    super(props)
    this.state = {
      squares: Array(9).fill(""),
      xIsNext: true // 追加
    }
  }
<Board />のhandleClick関数を書き換えてxIsNextを反転させるようにする。
handleClick(i: number) {
  const squares: Array<string> = this.state.squares.slice()
  squares[i] = this.state.xIsNext ? 'X' : '0' // 修正
  this.setState({
    squares: squares,
    xIsNext: !this.state.xIsNext // 追加
  })
  console.log(this.state);
}
<Board />のrender内にある “status” テキストも変更して、どちらのプレーヤの手番なのかを表示するようにする。
render() {
   const status = 'Next player: ' + (this.state.xIsNext ? 'X' : '0');
これにより、“X” 側と “O” 側が交互に着手できるようになった。

ゲーム勝者の判定
このヘルパー関数を型定義付きに書き換え、ファイル末尾に追加する。
<Board />のrender関数内でcalculateWinnerを呼び出し、勝利判定をする。
render() {
  const winner = calculateWinner(this.state.squares)
  let status;
  if (winner) {
    status = 'Winner: ' + winner;
  } else {
    status = 'Next player: ' + (this.state.xIsNext ? 'X' : '0');
  }
<Board />のhandleClick関数を書き換え、ゲームの決着が既についている場合やクリックされたマス目が既に埋まっている場合に早期にreturnするようにする。
handleClick(i: number) {
  const squares: Array<string> = this.state.squares.slice()
  if (calculateWinner(squares) || squares[i]) return // 追加
...(略)...
これで勝敗判定ができるようになった。

履歴保存
チュートリアル「着手の履歴の保存」では、トップレベルの<Game />コンポーネント内で過去の着手の履歴を保存し、表示できるようにしている。
まず、<Game />の初期stateをconstructor内でセットする。[3]
interface GamePropsInterface {
  squares: Array<string>
}
interface GameStateInterface {
  history: Array<{ [field: string]: string[]}>
  xIsNext: boolean
}

class Game extends React.Component<GamePropsInterface, GameStateInterface> {
  constructor(props: GamePropsInterface) {
    super(props)
    this.state = {
      history: [{
        squares: Array(9).fill("")
      }],
      xIsNext: true
    }
  }
次に、<Board />がsquaresとonClickプロパティを<Game />から受け取るようにする。<Board />内には多数のマス目に対応するクリックハンドラが1つだけあるため、<Square />の位置をonClickハンドラに渡してクリックされたマス目がどれかを伝えるようにする。
interface BoardPropsInterface {
  squares: Array<string>
  onClick: (i: number) => void // 追加
}
// そのまま
interface BoardStateInterface {
  squares: Array<string>
  xIsNext: boolean
}

class Board extends React.Component<BoardPropsInterface, BoardStateInterface> {
  // constructorを削除
  handleClick(i: number) {
    const squares: Array<string> = this.state.squares.slice()
    if (calculateWinner(squares) || squares[i]) return

    squares[i] = this.state.xIsNext ? 'X' : '0'
    this.setState({
      squares: squares,
      xIsNext: !this.state.xIsNext
    })
  }
  renderSquare(i: number) {
    return (
      <Square
	// this.state.squares[i] を this.props.squares[i] に置き換え
        value={this.props.squares[i]}
	// this.handleClick(i) を this.props.onClick(i) に置き換え
        onClick={() => this.props.onClick(i)}/>
    )
  }
<Game />がゲームのステータステキストを表示するようになるので、対応するコードは <Board />内のrenderメソッドからは削除する。
handleClickメソッドを<Board />から<Game />に移動し、修正する。なお、は元の配列をミューテートしないconcat()を使用した。
handleClick(i: number) {
  // 修正
  const history = this.state.history
  const current = history[history.length - 1]
  const squares: Array<string> = current.squares.slice()
  if (calculateWinner(squares) || squares[i]) return

  squares[i] = this.state.xIsNext ? 'X' : '0'
  this.setState({
  // 修正
    history: history.concat([{
      squares: squares
    }]),
    xIsNext: !this.state.xIsNext
  })
}
最後に、<Game />のrender関数を更新し、mapメソッドで着手履歴の配列をマップし、過去の手番に「ジャンプ」するためのボタンの一覧を表示する。[4]
interface GameStateInterface {
  history: Array<{ [field: string]: string[]}>
  xIsNext: boolean
  stepNumber: number // いま何手目の状態を見ているのかを表す
}
class Game extends React.Component<GamePropsInterface, GameStateInterface> {
  constructor(props: GamePropsInterface) {
    super(props)
    this.state = {
      history: [{
        squares: Array(9).fill("")
      }],
      xIsNext: true,
      stepNumber: 0
    }
  }
  ...(略)...
  // 追加
  jumpTo(step: number) {
    this.setState({
      stepNumber: step,
      xIsNext: (step % 2) === 0  // stepNumber が偶数の場合、xIsNextはtrue
    })
  }

  render() {
   // 修正
    const history = this.state.history
    const current = history[history.length - 1]
    const winner = calculateWinner(current.squares);
    // stepが history内の現在の要素を参照、moveが現在の要素のインデックスを参照
    const moves = history.map((step, move) => {
      const desc = move ?
        "Go to move #" + move :
        "Go to game start";
      return (
        <li key={move}>
          <button onClick={() => this.jumpTo(move)}>{desc}</button>
        </li>
      )
    })
なお、jumpToメソッド内ではstateのhistoryプロパティは更新しない。これは、stateの更新はマージされ、React はsetStateで直接指定されたプロパティのみを更新しほかのstateはそのまま残すためである。[5]
<Game />のhandleClick、renderを書き換える。
handleClick(i: number) {
  // 時間を巻き戻した時点で新しい着手を起こした場合、不要な履歴を確実に捨て去る
  const history = this.state.history.slice(0, this.state.stepNumber + 1)
  const current = history[history.length - 1]
  const squares: Array<string> = current.squares.slice()
  if (calculateWinner(squares) || squares[i]) return

  squares[i] = this.state.xIsNext ? 'X' : '0'
  this.setState({
    history: history.concat([{
      squares: squares
    }]),
    xIsNext: !this.state.xIsNext,
    // 新しい着手が発生した場合、stepNumber を更新する
    stepNumber: history.length
  })
}
...(略)...
render() {
  const history = this.state.history
  // 常に最後の着手後の状態ではなく、stepNumberによって現在選択されている着手をレンダー
  const current = history[this.state.stepNumber]
  const winner = calculateWinner(current.squares);
最後に、root.render...を以下のようにして完成。
const root = ReactDOM.createRoot(document.getElementById("root")!);
root.render(<Game squares={Array(9).fill("")} />);

-
ここで
slice()を使う理由。
チェートリアルでは、注釈2のコードで配列を直接変更せず、.slice()を使ってsquare配列のコピーを作成している。これは、イミュータビリティ(immutability; 不変性)を保つためである。
直接データのmutate(内部データを書き換えること)しないことには、複雑な機能が簡単に実装できる、変更の検出、React の再レンダータイミングの決定などの利点が得られる。
「イミュータビリティは何故重要なのか」より。 ↩︎ -
handleClick内では、squaresを直接変更する代わりに、.slice()で配列のコピーを作成している。 ↩︎ -
key が指定されなかった場合、React は警告を表示し、デフォルトでkeyとして配列のインデックスを使用する。配列のインデックスをkeyとして使うことは、項目を並び替えたり挿入/削除する際にバグの原因となる。
keyを選ぶより ↩︎
Discussion