Xamarin.Forms の後継の MAUI がカスタムのネイティブのコントロールにマッピングされたコントロールを作る方法としてカスタムレンダラーからハンドラーという方法になったので軽く見てみました。
仕組み
Microsoft.Maui.Controls.View あたりを継承してコントロール用のクラスを定義して Microsoft.Maui.Handlers.ViewHandler<TVirtualView, TPlatformView> を実装したハンドラーのクラスでネイティブのコントロールとのマッピングを行います。コントロールのクラスとハンドラーが出来たら MauiAppBuilder クラスの ConfigureMauiHandlers あたりで handlers.AddHandler<MyBox, MyBoxHandler>(); のようにコントロールとハンドラーを紐づけてあげることで動くようになります。
簡単なものを作ってみよう
Windows で MyBox というコントロールを Microsoft.UI.Xaml.Controls.Border の中に Microsoft.UI.Xaml.Controls.TextBlock を置いている状態のコントロールとして表示するようにしてみようと思います。
MyBox の作成
とりあえず実体は Border なので背景色が設定できるのと Text プロパティで表示する文字列も表示できるようにしつつ、イベントも試してみたいのでマウスがコントロール上に来た時に PointerEntered イベントを発行するようにしたいと思います。定義はこんな感じになります。
using System.ComponentModel;

namespace MyMauiApp;

public interface IMyBox : IView
{
    string? Text { get; set; }
    event EventHandler PointerEntered;
    void SendPointerEntered();
}

public class MyBox : View, IMyBox
{
    public static readonly BindableProperty TextProperty = BindableProperty.Create(
        "Text",
        typeof(string), typeof(MyBox));
    public string? Text
    {
        get => (string?)GetValue(TextProperty);
        set => SetValue(TextProperty, value);
    }

    public event EventHandler PointerEntered;

    [EditorBrowsable(EditorBrowsableState.Never)]
    public void SendPointerEntered() => PointerEntered?.Invoke(this, new());
}
インターフェースは必須ではないのですが、MAUI のリポジトリを見てるとインターフェースを定義しているので作ってみました。SendPointerEntered メソッドですが、これはハンドラー側からイベントを発火するための口になります。
MyBoxHandler の作成
では次にハンドラーを作ります。これはサポートするプラットフォームの数だけ作る必要があります。今回は妥協して Windows のものしか作りません。
using Microsoft.Maui.Handlers;

namespace MyMauiApp;

public class MyBoxHandler : ViewHandler<IMyBox, Microsoft.UI.Xaml.Controls.Border>
{
    public static IPropertyMapper<IMyBox, MyBoxHandler> Mapper =
        new PropertyMapper<IMyBox, MyBoxHandler>(ViewMapper)
        {
            [nameof(MyBox.Text)] = MapText,
        };

    private static void MapText(MyBoxHandler handler, IMyBox view)
    {
        ((Microsoft.UI.Xaml.Controls.TextBlock)handler.PlatformView.Child).Text = view.Text;
    }

    public static CommandMapper<IMyBox, MyBoxHandler> CommandMapper =
        new(ViewCommandMapper);

    public MyBoxHandler() : base(Mapper, CommandMapper)
    {
    }

    protected override Microsoft.UI.Xaml.Controls.Border CreatePlatformView() => new()
    {
        Child = new Microsoft.UI.Xaml.Controls.TextBlock
        {
            HorizontalAlignment = Microsoft.UI.Xaml.HorizontalAlignment.Center,
            VerticalAlignment = Microsoft.UI.Xaml.VerticalAlignment.Center,
        },
    };

    protected override void ConnectHandler(Microsoft.UI.Xaml.Controls.Border platformView)
    {
        base.ConnectHandler(platformView);
        platformView.PointerEntered += PlatformView_PointerEntered;
    }

    private void PlatformView_PointerEntered(object sender, Microsoft.UI.Xaml.Input.PointerRoutedEventArgs e)
    {
        VirtualView.SendPointerEntered();
    }

    protected override void DisconnectHandler(Microsoft.UI.Xaml.Controls.Border platformView)
    {
        platformView.PointerEntered -= PlatformView_PointerEntered;
        base.DisconnectHandler(platformView);
    }
}
1 つ目のポイントとして CreatePlatformView メソッドでネイティブのコントロールのインスタンスを作って返すところです。次に、見慣れない Mapper プロパティについてです。
これは MAUI の世界からネイティブの世界へのプロパティのマッピングを行います。プロパティ名をキーにマッピングロジックを指定するような感じです。
PropertyMapper を作るところで指定している ViewMapper は ViewHandler クラスで定義されている親のマッピング ロジックの詰まった PropertyMapper になります。コンストラクターで渡しておくと、ここらへんのマッピングロジックを数珠繋ぎのように呼び出してくれるようになっています。
親クラスのマッピングロジックが不要になることはレアケースだと思うので基本的にはコンストラクターで親の PropertyMapper を指定するようにしましょう。
この他にも、プラットフォーム固有のロジックをマッピングするための CommandMapper も同じような感じです。
そして ConnectHandler でネイティブの世界から MAUI の世界へのイベントの橋渡しをおこなうためのイベント ハンドラーの購読を行います。イベント ハンドラーでは、先ほど IMyBox のほうで定義しておいた SendPointerEntered メソッドを呼び出してイベントを起こしています。
ここまで出来たら、あとは ConfigureMauiHandlers でマッピングを追加する感じです。
using Microsoft.Maui.LifecycleEvents;
using System.Diagnostics;

namespace MyMauiApp;

public static partial class MauiProgram
{
    static partial void AddHandlers(IMauiHandlersCollection handlers);
    public static MauiApp CreateMauiApp()
    {
        var builder = MauiApp.CreateBuilder();
        builder
            .UseMauiApp<App>()
            .ConfigureMauiHandlers(handlers =>
            {
#if WINDOWS
                handlers.AddHandler<MyBox, MyBoxHandler>();
#endif
            })
            .ConfigureFonts(fonts =>
            {
                fonts.AddFont("OpenSans-Regular.ttf", "OpenSansRegular");
                fonts.AddFont("OpenSans-Semibold.ttf", "OpenSansSemibold");
            });

        return builder.Build();
    }
}
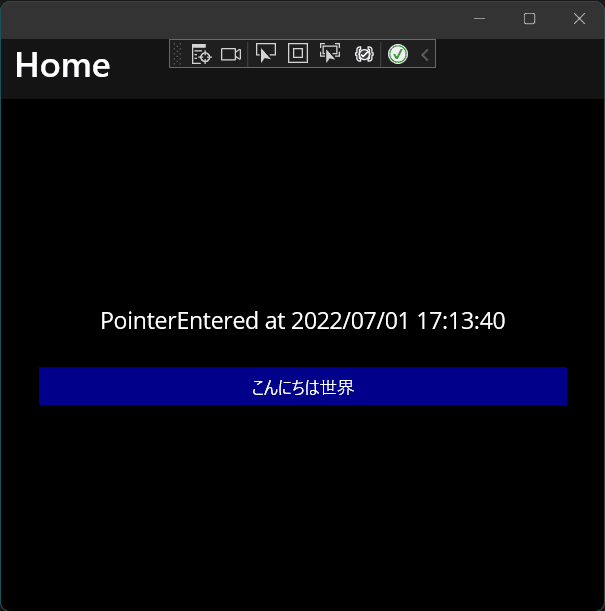
ここまでやると画面に置いて表示されるようになります。
<?xml version="1.0" encoding="utf-8" ?>
<ContentPage xmlns="http://schemas.microsoft.com/dotnet/2021/maui"
             xmlns:x="http://schemas.microsoft.com/winfx/2009/xaml"
             xmlns:local="clr-namespace:MyMauiApp"
             x:Class="MyMauiApp.MainPage">

    <ScrollView>
        <VerticalStackLayout
            Spacing="25"
            Padding="30,0"
            VerticalOptions="Center">

            <Label
                x:Name="myLabel"
                SemanticProperties.HeadingLevel="Level2"
                SemanticProperties.Description="Welcome to dot net Multi platform App U I"
                FontSize="18"
                HorizontalOptions="Center" />

            <local:MyBox Text="こんにちは世界"
                         PointerEntered="MyBox_PointerEntered"
                         MinimumHeightRequest="30"
                         MinimumWidthRequest="30"
                         Background="DarkBlue"/>
        </VerticalStackLayout>
    </ScrollView>

</ContentPage>
namespace MyMauiApp;

public partial class MainPage : ContentPage
{
	public MainPage()
	{
        InitializeComponent();
    }

    private void MyBox_PointerEntered(object sender, EventArgs e)
    {
        myLabel.Text = $"PointerEntered at {DateTime.Now}";
    }
}
動かすとこんな感じになります。Android とかで動かすとハンドラーがないのでエラーになります。
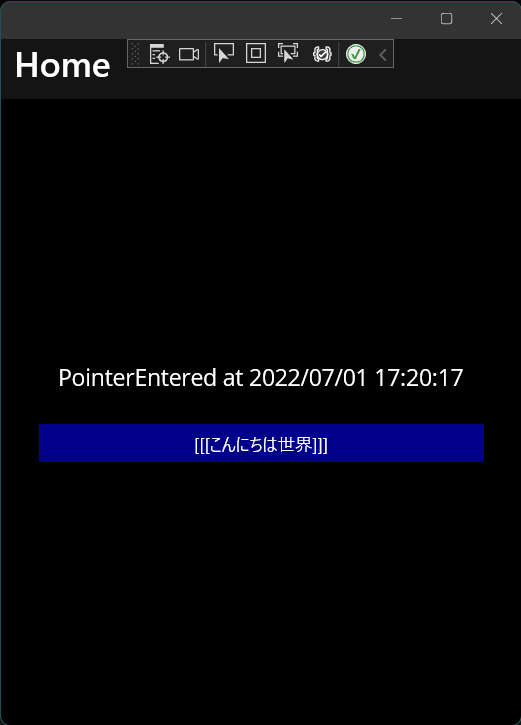
このように作っておくと以下のドキュメントにあるようにカスタムが出来るようなことに対応できます。
こうすると…
namespace MyMauiApp;

public partial class MainPage : ContentPage
{
	public MainPage()
	{
        InitializeComponent();
#if WINDOWS
        MyBoxHandler.Mapper.AppendToMapping("Text", (handler, view) =>
        {
            ((Microsoft.UI.Xaml.Controls.TextBlock)handler.PlatformView.Child).Text = $"[[[{view.Text}]]]";
        });
#endif
    }

    private void MyBox_PointerEntered(object sender, EventArgs e)
    {
        myLabel.Text = $"PointerEntered at {DateTime.Now}";
    }
}
こういう実行結果になります。
まとめ
以外と簡単にできました。CommandMapper 自体が利用シーンがそこまで多くないので例を示しづらい…。

Discussion