概要
以下の記事の続きとして Teams カスタム アプリから Graph API を叩くところまでをまとめます。
今回も Docker と devtunnel で完全ローカルで動かします。
今回実装したものはこちらの Github にあります。
トークンについて
SSO で取得したトークンではだめなのか
まず、 Graph API を叩くには叩くアプリケーションが認可を受けていることを証明するトークンが必要です。
ここで、「前回 SSO で認証した後、トークンが得られたからこれで叩けるね!」という声が聞こえてきますが、残念ながらこのトークンでは Graph API は叩けません。
以下の公開情報にも記載されていますが、SSO で認証した後に取得したトークンには Graph API を叩くためのアクセス許可などは含まれていません。
シングル サインオン (SSO) の現在の実装はユーザー レベルのアクセス許可に制限されています。これは Graph 呼び出しには使用できません。
そのため、 OBO (On-Behalf-Of) フローに従って Graph API を叩けるトークンと交換する必要があります。
On-Behalf-Of フローについて
On-Behalf-Of フローについてはこちらの公開情報にて詳細が記載されています。
上記の公開情報に記載されている以下の図をもって説明をします。
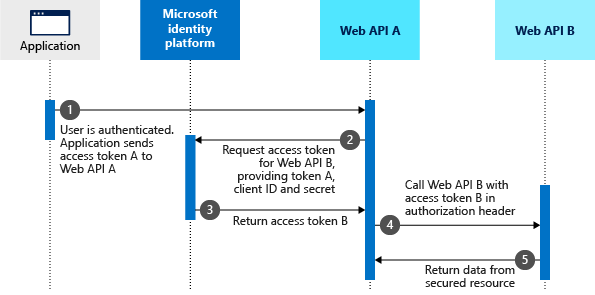
Teams カスタム アプリの場合、それぞれの要素は以下のように対応します。
| 図上での名称 | Teams カスタム アプリの場合 |
|---|---|
| Application | Teams カスタム アプリ |
| Microsoft Identity Platform | Entra ID |
| Web API A | バックエンド サーバー |
| Web API B | Microsoft Graph |
そのため、以下の様な手順で Teams カスタム アプリから Microsoft Graph を叩く必要があります。
- Teams カスタムアプリで認証をし、アクセストークン A をバックエンド サーバーに送ります。
- バックエンド サーバーから Entra ID に Microsoft Graph のアクセストークン B を要求します。
- Entra ID がバックエンド サーバーに Microsoft Graph のアクセス トークン B を返却します。
- バックエンド サーバーから Microsoft Graph へアクセス トークン B を使用して要求を実施します。
- Microsoft Graph からバックエンド サーバーへ結果が返却されます。
- 得られた結果を Teams カスタム アプリに返却します。
早速実装です。
今回は以下のステップで Graph API の /me エンドポイントを叩くことを目標にします。
- SSO で取得したトークンをバックエンド サーバーに送信する。
- バックエンド サーバー側でトークンを交換する。
- バックエンド サーバー側で交換したトークンを使って Graph API を叩く。
前回の記事の手順を完了していることを前提に書いています。
「SSO の実装はわかってるぜ!」という方は以下のリポジトリをクローンして始めていただければ問題ないかと思います。
0. バックエンド サーバーを作成する。
トークンの交換および、 Graph API を叩く用のバックエンド サーバーが必要なため、これを作成していきます。
以下の 6 STEP でさっくりと作成します。
- devtunnel で 3000 番のポートを開放する。
- package.json に
expressを追加する - コードを追加する
- Docker compose に追加する
-
./tsconfig.jsonでsrc/serverフォルダを対象外にします。 -
.env.localに変数を記載します。
- devtunnel で 3000 番のポートを開放します。
devtuunel list などで前回の記事で作成した devtunnel が見つかる場合には devtunnel port create <Tunnel ID> -p 3000 で 3000 番のポートを指定し、devtunnel host で 3000 / 3333 番のポートを解放できます。
新しく tunnel を作る場合
もし、違うエンドポイントになっていたり、そもそも見つからない場合には以下に沿って新しく tunnel を作成し、解放させます。
# 3333 のポートを開放する devtunnel を作成します。
devtuunel create -a
devtunnel port create -p 3333
devtunnel port create -p 3000

# devtunnel をホストして 3000, 3333 を開放します。
devtunnel host
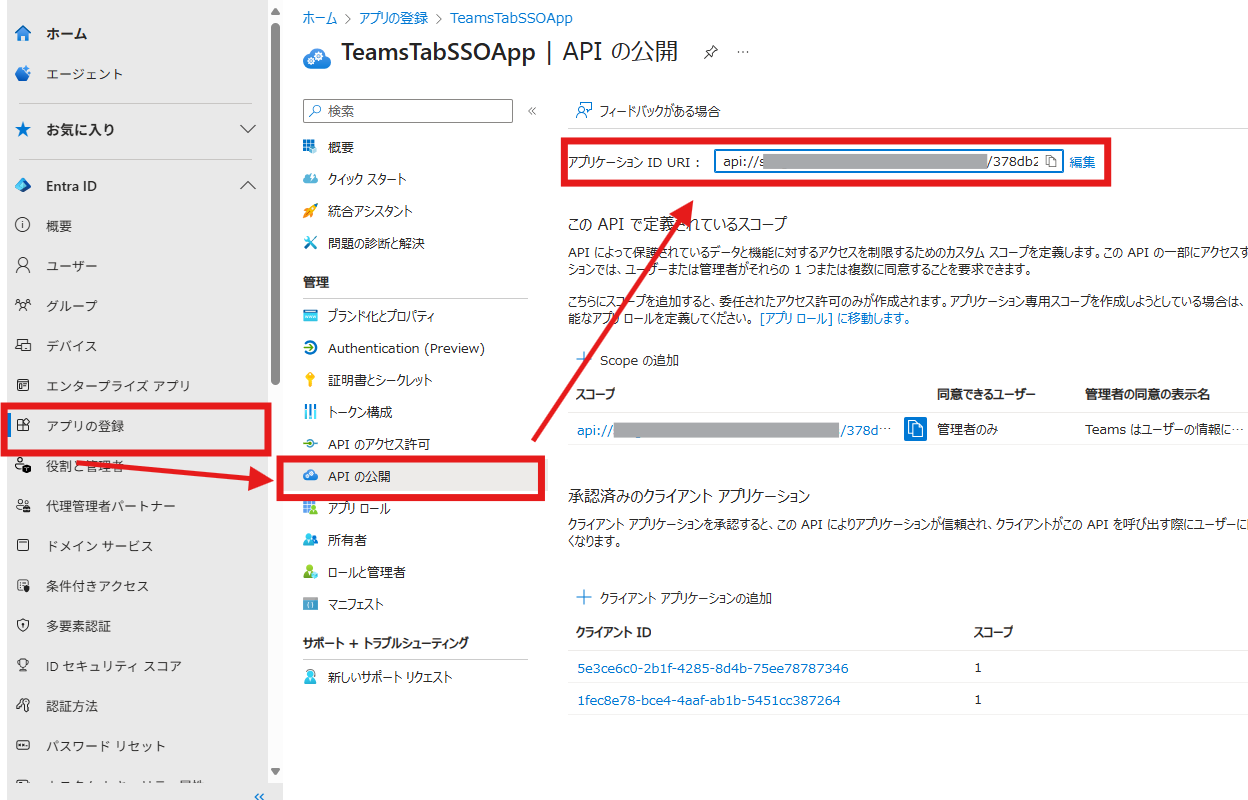
新しく開放した場合には以下にあるアプリケーション ID URI を 3333 番のポートにつながる新しいエンドポイントに合わせて更新しましょう。
- Entra ID 管理センター > アプリの登録 > API の公開 > アプリケーション ID URI
-
./package.jsonに以下を追加します。
{
    // ...
    "dependencies": {
        "@azure/msal-node": "^3.7.1",
        "cors": "^2.8.5",
        "dotenv": "^17.2.1",
        "express": "^4.21.2",
        "jwt-decode": "^4.0.0",
        // ...
    },
    "devDependencies": {
        "@types/cors": "^2.8.19",
        "@types/express": "^5.0.0",
        "@types/jwt-decode": "^2.2.1",
        // ...
    },
    "scripts": {
        "start:server": "ts-node ./src/server/index.ts"
        // ...
    },
    // ...
}
`package.json` の全貌
{
  "name": "teamstabssoapp",
  "version": "0.1.0",
  "engines": {
    "node": "18 || 20 || 22"
  },
  "private": true,
  "main": "./lib/app.js",
  "dependencies": {
    "@azure/msal-node": "^3.7.1",
    "cors": "^2.8.5",
    "dotenv": "^17.2.1",
    "express": "^4.21.2",
    "jwt-decode": "^4.0.0",
    "send": "^0.18.0"
  },
  "devDependencies": {
    "@microsoft/teams-js": "^2.31.1",
    "@types/cors": "^2.8.19",
    "@types/express": "^5.0.0",
    "@types/jwt-decode": "^2.2.1",
    "@types/node": "^18.0.0",
    "@types/send": "^0.17.1",
    "env-cmd": "^10.1.0",
    "nodemon": "^3.1.7",
    "shx": "^0.3.4",
    "ts-node": "^10.9.1",
    "typescript": "^4.1.2",
    "vite": "^6.0.2"
  },
  "scripts": {
    "dev:teamsfx": "env-cmd --silent -f .localConfigs npm run start",
    "start": "nodemon",
    "prestart": "npm run build:frontend",
    "build": "npm run build:frontend && npm run build:backend",
    "build:frontend": "vite build",
    "build:backend": "tsc --build && shx cp -r ./src/views ./src/static ./lib/",
    "test": "echo \"Error: no test specified\" && exit 1",
    "start:server": "ts-node ./src/server/index.ts"
  },
  "homepage": "."
}
-
src/serverフォルダを作成し、src/server/index.tsを作成します。
import express from "express";
import cors from "cors";
import dotenv from "dotenv";
dotenv.config({ path: "env/.env.local" });
const app = express();
const port = 3000;
// Middleware
app.use(express.json());
app.use(cors({ origin: process.env.TEAMS_APP_ENDPOINT }));
// Routes
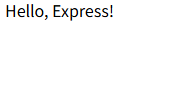
app.get("/", (req, res) => {
res.send("Hello, Express!");
});
app.get("/api/getProfile", (req, res) => {
res.send({ text: "Your Profile" });
});
// Start server
app.listen(port, () => {
console.log(`Server is running on http://localhost:${port}`);
});
-
./docker-compose.ymlに以下を追記します。
services:
    server:
        image: node:22-alpine
        working_dir: /server
        ports:
          - "3000:3000"
        volumes:
          - .:/server
          - /server/node_modules
        command: sh -c "npm ci && npm run start:server"
    ...
-
./tsconfig.jsonでsrc/serverフォルダを対象外にします。
    // ...
    "exclude": ["node_modules", "src/static", "src/server"]
    // "src/server" を追加します。
}
-
.env.localを新しく作成し、変数を記載します。
# ...
TEAMS_APP_ENDPOINT=<3333 番ポートにつながる devtunnel のエンドポイント>
VITE_BACKEND_SERVER_ENDPOINT=<3000 番ポートにつながる devtunnel のエンドポイント>
# ...
動作テスト①
以下のコマンドでバックエンド サーバーのコンテナを起動できます。
docker compose up server
これで、 http://localhost:3000 もしくは 3000 番のポートにつながるエンドポイントにアクセスし、以下の様な画面が表示されれば OK です。
1. SSO で取得したトークンをバックエンド サーバーに送信する。
Teams アプリ側で取得したトークンをバックエンド サーバーに送りつつ、 Graph の結果を要求します。
今回は Graph へリクエストを飛ばすボタンを配置します。
SSO での認証後アクセストークンを取得出来次第、 "/ME" というボタンから Graph リクエストをバックエンド サーバーへ送れるようにします。
-
src/views/hello.htmlに以下のコードを追加します。
<html>
  ...
  <body>
    <noscript>You need to enable JavaScript to run this app.</noscript>
    <div>
      <h1>Hello, World</h1>
      <span>
        <p>Your app is running</p>
        <p id="hubState"></p>
      </span>
    </div>
    <!-- ここから追加 -->
    <div>
      <button id="graphRequestButton">/ME</button>
      <textarea id="graphResponse"></textarea>
    </div>
    <!-- ここまで追加 -->
  </body>
</html>
-
src/static/scripts/m365agents.tsに以下のgraphRequest関数を追加します。
function graphRequest(token: string) {
    if (token) {
      fetch(`${import.meta.env.VITE_BACKEND_SERVER_ENDPOINT}/api/getProfile`, {
        method: "GET",
        mode: "cors",
        headers: {
          "Content-Type": "application/json",
          Authorization: `Bearer ${token}`,
        },
      }).then((response) => {
        if (response.ok) {
          response.json().then((data) => {
            console.log(data);
            const graphResponse = document.getElementById(
              "graphResponse"
            ) as HTMLTextAreaElement | null;
            if (graphResponse) {
              graphResponse.value = JSON.stringify(data, null, 2);
            }
          });
        } else {
          console.error("Error fetching profile:", response.statusText);
        }
      });
    }
}
-
authentication.getAuthToken().then()中にで "/ME" ボタンとgraphRequest関数を紐づけます。
.then((token: string) => {
    updateHubState(token);
    const graphRequestButton = document.getElementById(
        "graphRequestButton"
    ) as HTMLButtonElement | null;
    if (graphRequestButton) {
        graphRequestButton.onclick = () => graphRequest(token);
        graphRequestButton.disabled = false;
    }
})
この時点での `m365agents.ts` の全貌
import { app, authentication } from "@microsoft/teams-js";

(function () {
  "use strict";

  // Call the initialize API first
  app.initialize().then(() => {
    console.log("getAuthToken pre");
    authentication
      .getAuthToken({
        claims: [],
        silent: false,
        tenantId: undefined,
      })
      .then((token: string) => {
        // Use the token for authentication or API calls
        updateHubState(token);
        const graphRequestButton = document.getElementById(
          "graphRequestButton"
        ) as HTMLButtonElement | null;
        if (graphRequestButton) {
          graphRequestButton.onclick = () => graphRequest(token);
          graphRequestButton.disabled = false;
        }
      })
      .catch((error: any) => {
        updateHubState("Error: Unable to get authentication token");
        console.error("Error getting authentication token:", error);
      });
  });

  function updateHubState(hubName: string) {
    if (hubName) {
      const hubStateElement = document.getElementById("hubState");
      if (hubStateElement) {
        hubStateElement.innerHTML = "in " + hubName;
      }
    }
  }

  function graphRequest(token: string) {
    if (token) {
      fetch("<devtunnel で開いた 3000 番につながるエンドポイント>/api/getProfile", {
        method: "GET",
        mode: "cors",
        headers: {
          "Content-Type": "application/json",
          Authorization: `Bearer ${token}`,
        },
      }).then((response) => {
        if (response.ok) {
          response.json().then((data) => {
            console.log(data);
            const graphResponse = document.getElementById(
              "graphResponse"
            ) as HTMLTextAreaElement | null;
            if (graphResponse) {
              graphResponse.value = JSON.stringify(data, null, 2);
            }
          });
        } else {
          console.error("Error fetching profile:", response.statusText);
        }
      });
    }
  }

  // Notify success when the DOM content is fully loaded
  document.addEventListener("DOMContentLoaded", () => {
    app.notifySuccess();
  });
})();
動作確認②
docker compose up を実行して Teams カスタム アプリおよびバックエンド サーバーを起動します。
Teams から作成したアプリケーションにアクセスします。
※ もし Teams 上にこのアプリケーションが無い場合にはアプリパッケージを作成して Teams 上に追加しましょう。
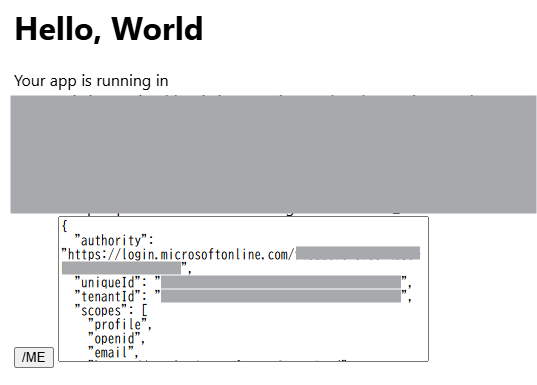
以下のように /ME ボタンとテキストエリアが表示され、 /ME ボタンをクリックしてテキスト エリアに結果が表示されれば OK です。

2. バックエンド サーバー側でトークンを交換する。
ではバックエンド サーバー側でトークンを受け取り、トークンを交換してみます。
上記 #1 の時点で、バックエンド サーバー側にトークンは送信しています。
そのため、バックエンド サーバー側で、トークンの受け取りとその交換を実装します。
トークンの交換を実施するために Entra ID 上のアプリケーションでクライアント シークレットも発行します。
- 以下のように
src/server/index.tsの/api/getProfileエンドポイントを更新します。
import { jwtDecode } from "jwt-decode";
import { ConfidentialClientApplication } from "@azure/msal-node";
import dotenv from "dotenv";
dotenv.config({ path: ".env.local" });
// ...
app.get("/api/getProfile", (req, res) => {
  const authHeader = req.headers["authorization"];
  const token =
    authHeader && authHeader.startsWith("Bearer ") ? authHeader.slice(7) : null;
  const tenantId = jwtDecode(token || "")["tid"];
  const msalClinet = new ConfidentialClientApplication({
    auth: {
      clientId: process.env.ENTRA_APP_ID || "",
      authority: `https://login.microsoftonline.com/${tenantId}`,
      clientSecret: process.env.ENTRA_CLIENT_SECRET,
    },
  });
  const scopes = ["https://graph.microsoft.com/User.Read"];
  (async () => {
    const result = await msalClinet.acquireTokenOnBehalfOf({
      authority: `https://login.microsoftonline.com/${tenantId}`,
      oboAssertion: token || "",
      scopes: scopes,
      skipCache: false,
    });
    res.status(200).json(result);
  })();
});
- Entra 管理センター にアクセスします。
- [アプリの登録] > [証明書とシークレット] にて [新しいクライアント シークレット] をクリックします。
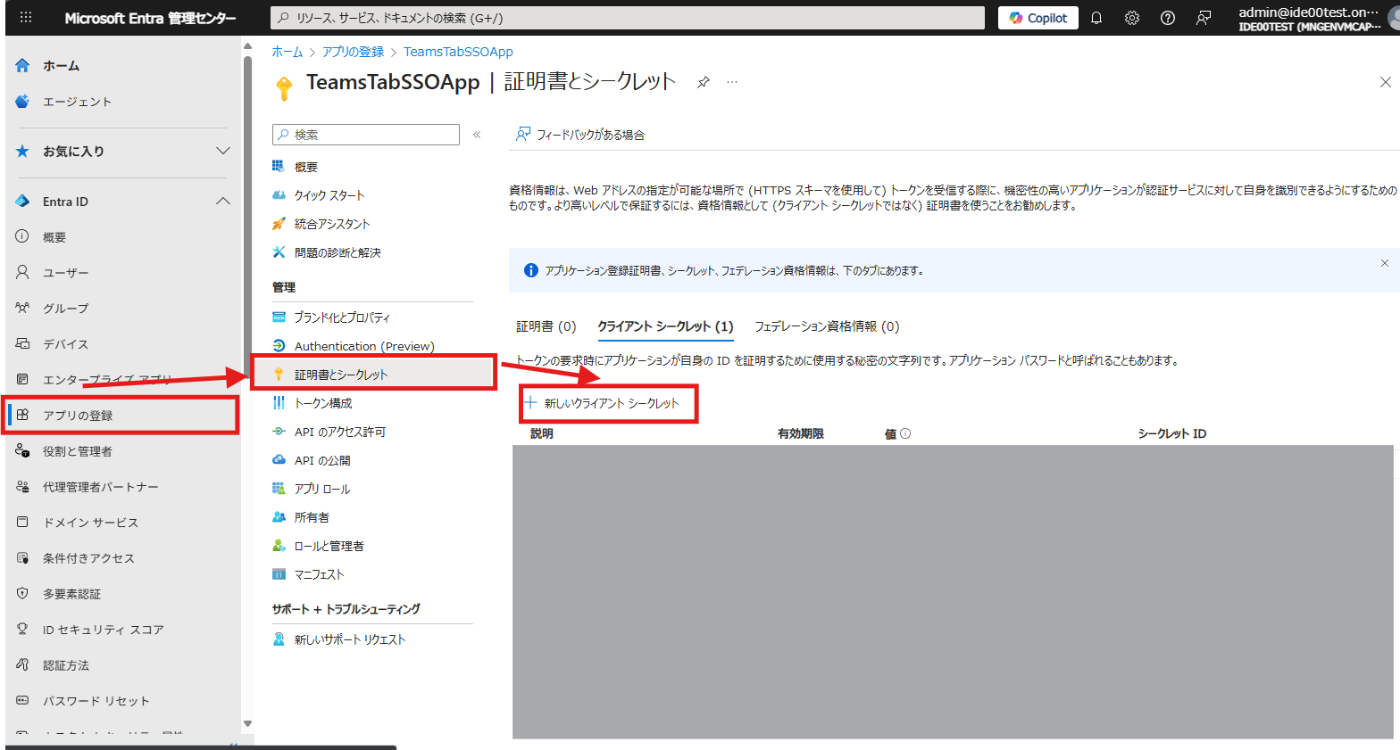
- [追加] をクリックします。
- 作成されたクライアント シークレットの "値" を以下のように
env/.env.localに記載します。
# ...
ENTRA_APP_ID=<アプリケーションのクライアント ID (./env/.env.local と同じ値で OK です。)>
ENTRA_CLIENT_SECRET=<作成したクライアント シークレットの値>
# ...
- [アプリの登録] > [API のアクセス許可] より [<テナント名> に管理者の同意を与えます] をクリックします。

- [はい] をクリックして、管理者の同意の確認を付与します。
動作確認③
docker compose up
docker compose up を実行して Teams カスタム アプリおよびバックエンド サーバーを起動します。
Teams から作成したアプリケーションにアクセスします。
※ もし Teams 上にこのアプリケーションが無い場合にはアプリパッケージを作成して Teams 上に追加しましょう。
以下のように /ME ボタンとテキストエリアが表示され、 /ME ボタンをクリックしてテキスト エリアに結果が表示されれば OK です。
3. バックエンド サーバー側で交換したトークンを使って Graph API を叩く。
交換して取得した Graph 用のトークンを使用して /me エンドポイントからユーザーの情報を取得します。
以下のように src/server/index.ts の /api/getProfile エンドポイントを更新します。
app.get("/api/getProfile", (req, res) => {
  const authHeader = req.headers["authorization"];
  const token =
    authHeader && authHeader.startsWith("Bearer ") ? authHeader.slice(7) : null;
  const tenantId = jwtDecode(token || "")["tid"];
  const msalClinet = new ConfidentialClientApplication({
    auth: {
      clientId: process.env.ENTRA_APP_ID || "",
      authority: `https://login.microsoftonline.com/${tenantId}`,
      clientSecret: process.env.ENTRA_CLIENT_SECRET,
    },
  });
  const scopes = ["https://graph.microsoft.com/User.Read"];
  (async () => {
    const result = await msalClinet.acquireTokenOnBehalfOf({
      authority: `https://login.microsoftonline.com/${tenantId}`,
      oboAssertion: token || "",
      scopes: scopes,
      skipCache: false,
    });
    // ココから追加
    const graphResult = await fetch("https://graph.microsoft.com/v1.0/me", {
      method: "GET",
      headers: {
        accept: "application/json",
        authorization: `Bearer ${result?.accessToken}`,
      },
      cache: "default",
    });
    const profile = await graphResult.json();
    // ここまで追加
    res.status(200).json(profile); // Teams カスタムアプリに返すものを profile に変更
  })();
});
実際に Teams 上で動作させてみる。
今回更新したアプリの動作を見てみましょう。
もし、 Teams 上にアプリが無い場合には前回の記事を参考に追加してみてください。
-
docker compose upでカスタム アプリとバックエンド サーバーを起動します。 - Teams web クライアント (https://teams.microsoft.com/) にアクセスします。
- カスタム アプリを開きます。
- トークンが表示されたら
/MEボタンをクリックします。 - 以下のようにユーザーの情報が取得できたことを確認できれば OK です!

今回実装したコードについて何をしているのかを考えてみる。
「上記の手順に沿って実装はしたけど結局何をしているのかわからない...」という方 (自分) 向けに今回実装した Teams カスタム アプリとバックエンド サーバーのコードについて説明を残しておこうと思います。
気にならないという方もいらっしゃると思うので、アコーディオンで記載します。
それぞれの動作を時系列順に
| Teams カスタム アプリ | バックエンド サーバー | |
|---|---|---|
| 1 | SSO で認証を実施し、トークンの取得を試みる | |
| 2 | 取得したトークンを表示する | |
| 3 | ボタンをクリックするとトークンを含めてバックエンドサーバーへリクエスト | |
| 4 | ヘッダーからトークンを取り出す | |
| 5 | トークンの交換をリクエストする | |
| 6 | 交換したトークンで Graph へ /me をリクエスト | |
| 7 | 得られたレスポンスをそのまま返す | |
| 8 | レスポンスを表示する |
Teams カスタム アプリ側
今回実装したコードの全貌はこちらです。
説明のために一部追加でコメントを入れています。
import { app, authentication } from "@microsoft/teams-js";

(function () {
  "use strict";

  app.initialize().then(() => {
    console.log("getAuthToken pre");
    // 1. アプリが起動次第、 SSO で認証を実施し、トークンの取得を試みます。
    authentication
      .getAuthToken({
        claims: [],
        silent: false,
        tenantId: undefined,
      })
      .then((token: string) => {
        // 2. SSO でトークンが取得出来たら、まずは updateHubState を更新して token を表示させています。
        updateHubState(token);
        // `src/views/hello.html` にある "/ME" ボタンを参照しています。
        const graphRequestButton = document.getElementById(
          "graphRequestButton"
        ) as HTMLButtonElement | null;

        // "/ME" ボタンが参照出来れば、クリックしたときに graphRequest を取得した token を使って発火するように設定しています。
        if (graphRequestButton) {
          graphRequestButton.onclick = () => graphRequest(token);
          graphRequestButton.disabled = false;
        }
      })
      .catch((error: any) => {
        updateHubState("Error: Unable to get authentication token");
        console.error("Error getting authentication token:", error);
      });
  });

  // hubState id が振り分けられている p タグの中身を更新します。
  function updateHubState(hubName: string) {
    if (hubName) {
      const hubStateElement = document.getElementById("hubState");
      if (hubStateElement) {
        hubStateElement.innerHTML = "in " + hubName;
      }
    }
  }

  // token を使用して、交換 -> /me エンドポイントへの要求を実施します。
  function graphRequest(token: string) {
    if (token) {
      // 3. token がある場合には、.env.local 内、 VITE_BACKEND_SERVER_ENDPOINT に指定されたエンドポイントの /api/getProfile に GET リクエストをします。
      fetch(`${import.meta.env.VITE_BACKEND_SERVER_ENDPOINT}/api/getProfile`, {
        method: "GET",
        mode: "cors",
        headers: {
          "Content-Type": "application/json",
          Authorization: `Bearer ${token}`, // ココに token を含めてバックエンドに送っています。
        },
      }).then((response) => {
        // 4. バックエンド サーバーから正常なレスポンスがあった場合には、その結果をテキストにしてテキストエリアに表示します。
        if (response.ok) {
          response.json().then((data) => {
            const graphResponse = document.getElementById(
              "graphResponse"
            ) as HTMLTextAreaElement | null;
            if (graphResponse) {
              graphResponse.value = JSON.stringify(data, null, 2);
            }
          });
        } else {
          console.error("Error fetching profile:", response.statusText);
        }
      });
    }
  }

  // Notify success when the DOM content is fully loaded
  document.addEventListener("DOMContentLoaded", () => {
    app.notifySuccess();
  });
})();
上記の通り、Teams カスタム アプリ側では以下の様な手順を追っています。
- アプリが起動次第、 SSO で認証を実施し、トークンの取得を試みる。
- SSO でトークンが取得出来たら、updateHubState を更新して token を表示する。
- ボタンをクリックした際に token がある場合には、バックエンド サーバーの /api/getProfile へ Header に token を含めて GET リクエストをする。
- バックエンド サーバーから正常なレスポンスがあった場合には、その結果をテキストにしてテキストエリアに表示する。
バックエンド サーバー側
今回実装したコードの全貌はこちらです。
説明のために一部追加でコメントを入れています。
import express from "express";
import cors from "cors";
import { jwtDecode } from "jwt-decode";
import { ConfidentialClientApplication } from "@azure/msal-node";
import dotenv from "dotenv";

dotenv.config({ path: ".env.local" });

const app = express();
const port = 3000;

// Middleware
app.use(express.json());
app.use(cors({ origin: process.env.TEAMS_APP_ENDPOINT }));

// Routes
app.get("/", (req, res) => {
  res.send("Hello, Express!");
});

// 実際に使うエンドポイントはここです。
app.get("/api/getProfile", (req, res) => {
  // 1. authorization ヘッダーから token を取り出します。
  const authHeader = req.headers["authorization"];
  const token =
    authHeader && authHeader.startsWith("Bearer ") ? authHeader.slice(7) : null;

  // 取り出したトークンをデコードしてテナント ID を取り出します。
  const tenantId = jwtDecode(token || "")["tid"];

  // テナント ID と Entra ID に登録したアプリケーションの情報から認証情報を整理しています。
  const msalClinet = new ConfidentialClientApplication({
    auth: {
      clientId: process.env.ENTRA_APP_ID || "",
      authority: `https://login.microsoftonline.com/${tenantId}`,
      clientSecret: process.env.ENTRA_CLIENT_SECRET,
    },
  });

  // Graph で使用するスコープを定義します。 (アプリケーション側の "API のアクセス許可" でも設定が必要です)
  const scopes = ["https://graph.microsoft.com/User.Read"];
  (async () => {
    // 2. トークンと、アプリケーションの情報を用いて、トークンの交換を実施します。
    const result = await msalClinet.acquireTokenOnBehalfOf({
      authority: `https://login.microsoftonline.com/${tenantId}`,
      oboAssertion: token || "",
      scopes: scopes,
      skipCache: false,
    });

    // 3. 得られたトークンを使用して /me エンドポイントへ GET リクエストを送信します。
    const graphResult = await fetch("https://graph.microsoft.com/v1.0/me", {
      method: "GET",
      headers: {
        accept: "application/json",
        authorization: `Bearer ${result?.accessToken}`,
      },
      cache: "default",
    });

    // 4. 結果が得られたらそのまま返答します。
    const profile = await graphResult.json();
    res.status(200).json(profile);
  })();
});

// Start server
app.listen(port, () => {
  console.log(`Server is running on http://localhost:${port}`);
});
上記の通り、Teams カスタム アプリ側では以下の様な手順を追っています。
- authorization ヘッダーから token を取り出す。
- token と、Entra ID 上のアプリケーションの情報を用いて、トークンの交換を実施する。
- 得られたトークンを使用して /me エンドポイントへ GET リクエストを送信する。
- 結果が得られたらそのまま返答する。
まとめ
今回は SSO で取得したトークンを Graph 用のトークンに交換して実際に Graph API でデータを取得するところまでを実装してみました。
今回は /me エンドポイントだったため、 Graph の "User.Read" アクセス許可のみでしたが、私用したいエンドポイントに合わせて必要なアクセス許可を指定してください。
引用

Discussion