はじめに
Log Analytics ワークスペースにおいて、 Analytics (分析) プランや Basic (基本) プランに加えて、より安価にログを取り込みができる Auxiliary (補助) プランがプレビューで追加になりました。
仕様などは公開ドキュメントを確認いただくとして、使用するにあたってかなりクセや制約があるので、そのあたりを確認していきます。
更新履歴
| 日付 | 内容 |
|---|---|
| 2024/08/04 | 新規作成 |
| 2024/08/05 | DCR の json ファイルと作成コマンドの修正 |
注意点
プレビューにおける制限なども含め、現時点で利用するには以下を注意する必要があります。
- 対象はカスタム テーブルのみ (テーブルに Auxiliary プランを設定)
- カスタム テーブルに TimeGenerated 列を含む必要がある
- TimeGenerated 列は ISO8601 形式のみをサポート
- 書き込み方法は以下の 2 つ
- Azure Monitor エージェント (AMA) を使用したテキストまたは JSON ファイルからの収集
- Log Ingestion API
- Azure Monitor エージェントの場合
- カスタム テーブルは TimeGenerated と RawData (string 型) の 2 つの列を含める
- ログの取り込み時刻を TimeGenerated 列に自動的に設定
- ログは全量をそのまま RawData に記録
- Auxiliary プランの設定は API 経由のみ
- テーブルの合計保持期間の設定は 365 日固定
- Auxiliary プランのテーブルに書き込むデータ収集ルールのログ書き込み先テーブルは 1 つのみ設定可能
- Auxiliary プランのテーブルに書き込むデータ収集ルールは変換ルールの設定不可
- Usage テーブルに使用状況は記録されない
検証
Auxiliary プランのカスタム テーブルの作成
以下の PowerShell スクリプトで API をキックして作成します。
# パラメータの設定
$subscriptionId = "xxxxxxxx-xxxx-xxxx-xxxx-xxxxxxxxxxxx"
$resourceGroupName = "myrg"
$workspaceName = "mylaws"
$tableName = "AuxLogTest_CL"

# Azure へのサインイン
Connect-AzAccount -subscription $subscriptionId

########## Aux テーブルの作成 ##########
# uri 指定
$uri = "/subscriptions/$subscriptionId/resourcegroups/$resourceGroupName/providers/Microsoft.OperationalInsights/workspaces/$workspaceName/tables/$($tableName)?api-version=2023-01-01-preview"

# ペイロード
$payload = @'
{
    "properties": {
        "schema": {
            "name": "AuxLogTest_CL",
            "columns": [
                {
                    "name": "TimeGenerated",
                    "type": "datetime"
                },
                {
                    "name": "RawData",
                    "type": "string"
                }
            ]
        },
        "totalRetentionInDays": 365,
        "plan": "Auxiliary"
    }
}
'@

# REST API の呼び出し
Invoke-AzRestMethod -Path $uri -Method Put -Payload $payload
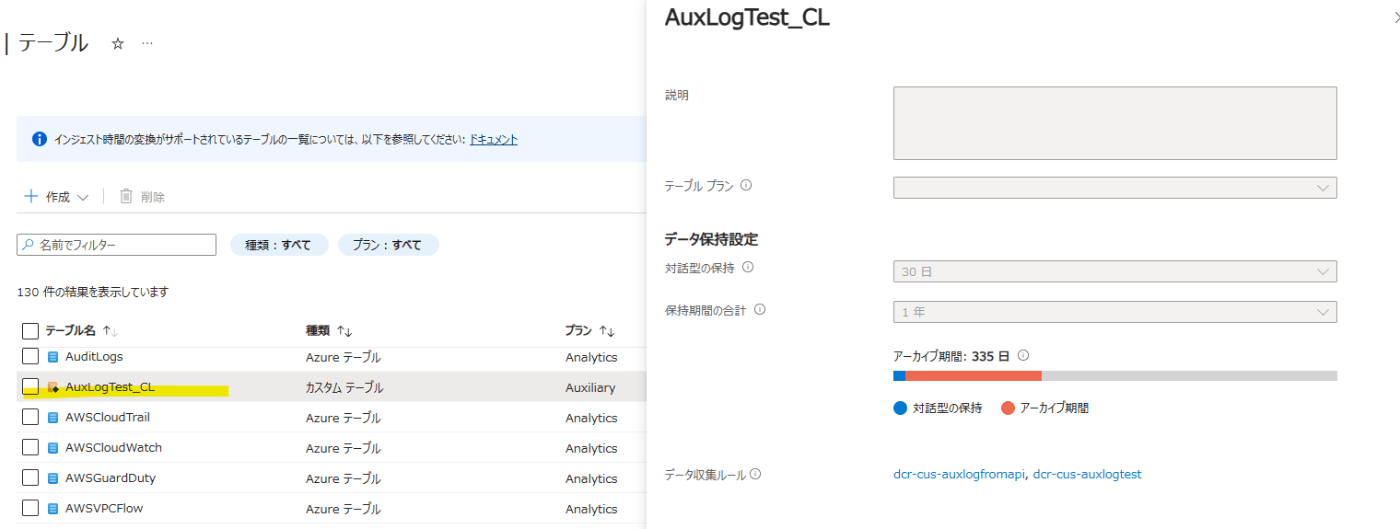
作成後は Azure ポータルから操作可能です。ですがテーブル プランは表示されません。
Azure Monitor エージェントでテキスト ログを収集
次に Azure Monitor エージェント経由でテキスト ログを先ほど作成したテーブルに記録します。Azure ポータルでカスタム テキスト ログ用のデータ収集ルールを作成する場合、変換ルールが必須になり Auxiliary プランの制約で目的のデータ収集ルールが作成できません。なので、以下のような json ファイルを準備し、Azure PowerShell で作成します。※ 事前にデータ収集エンドポイントの作成が必要です。
{
    "location": "centralus",
    "properties": {
        "dataCollectionEndpointId": "/subscriptions/xxxxxxxx-xxxx-xxxx-xxxx-xxxxxxxxxxxx/resourceGroups/myrg/providers/Microsoft.Insights/dataCollectionEndpoints/mydce",
        "streamDeclarations": {
            "Custom-AuxLogTest_CL": {
                "columns": [
                    {
                        "name": "TimeGenerated",
                        "type": "datetime"
                    },
                    {
                        "name": "RawData",
                        "type": "string"
                    }
                ]
            }
        },
        "dataSources": {
            "logFiles": [
                {
                    "streams": [
                        "Custom-AuxLogTest_CL"
                    ],
                    "filePatterns": [
                        "C:\\tmp\\*.log"
                    ],
                    "format": "text",
                    "settings": {
                        "text": {
                            "recordStartTimestampFormat": "ISO 8601"
                        }
                    },
                    "name": "Custom-AuxLogTest_CL"
                }
            ]
        },
        "destinations": {
            "logAnalytics": [
                {
                    "workspaceResourceId": "/subscriptions/xxxxxxxx-xxxx-xxxx-xxxx-xxxxxxxxxxxx/resourcegroups/myrg/providers/microsoft.operationalinsights/workspaces/mylaws",
                    "workspaceId": "xxxxxxxx-xxxx-xxxx-xxxx-xxxxxxxxxxxx",
                    "name": "mylaws"
                }
            ]
        },
        "dataFlows": [
            {
                "streams": [
                    "Custom-AuxLogTest_CL"
                ],
                "destinations": [
                    "mylaws"
                ],
                "outputStream": "Custom-AuxLogTest_CL"
            }
        ]
    }
}
作成用の Azure PowerShell コマンドはこちら。
New-AzDataCollectionRule -ResourceGroupName "myrg" -Name "dcr-txtlog" -JsonFilePath "<filepath>\dcr-auxtxtlog.json"
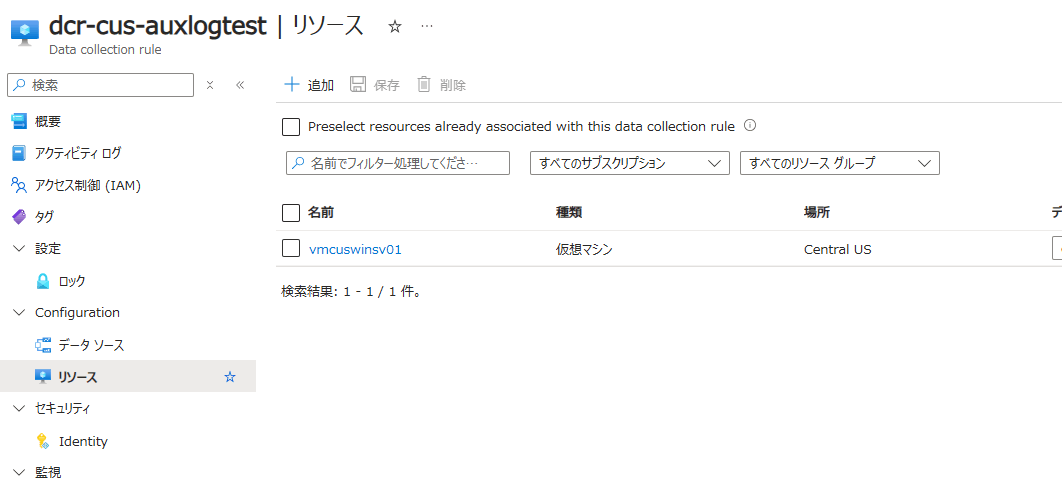
作成後、データ収集ルールのリソースにログを収集する仮想マシンを追加します。
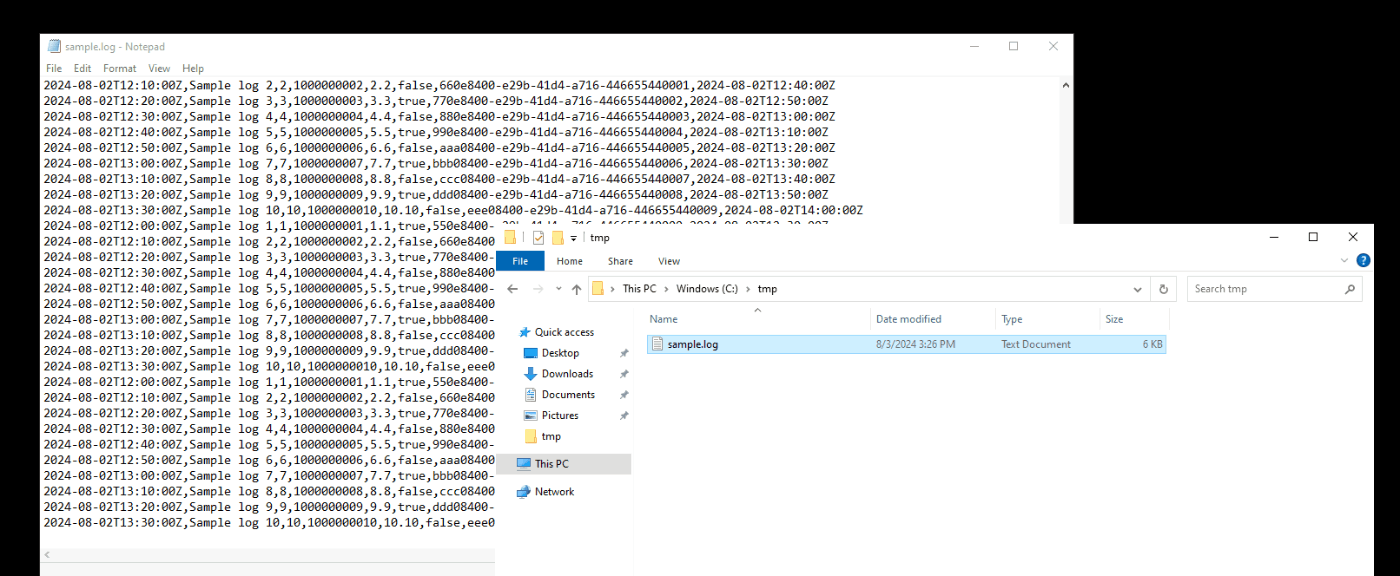
仮想マシン上にログを配置後、しばらくすると以下のようにログが取りこまれます。
Log Ingestion API
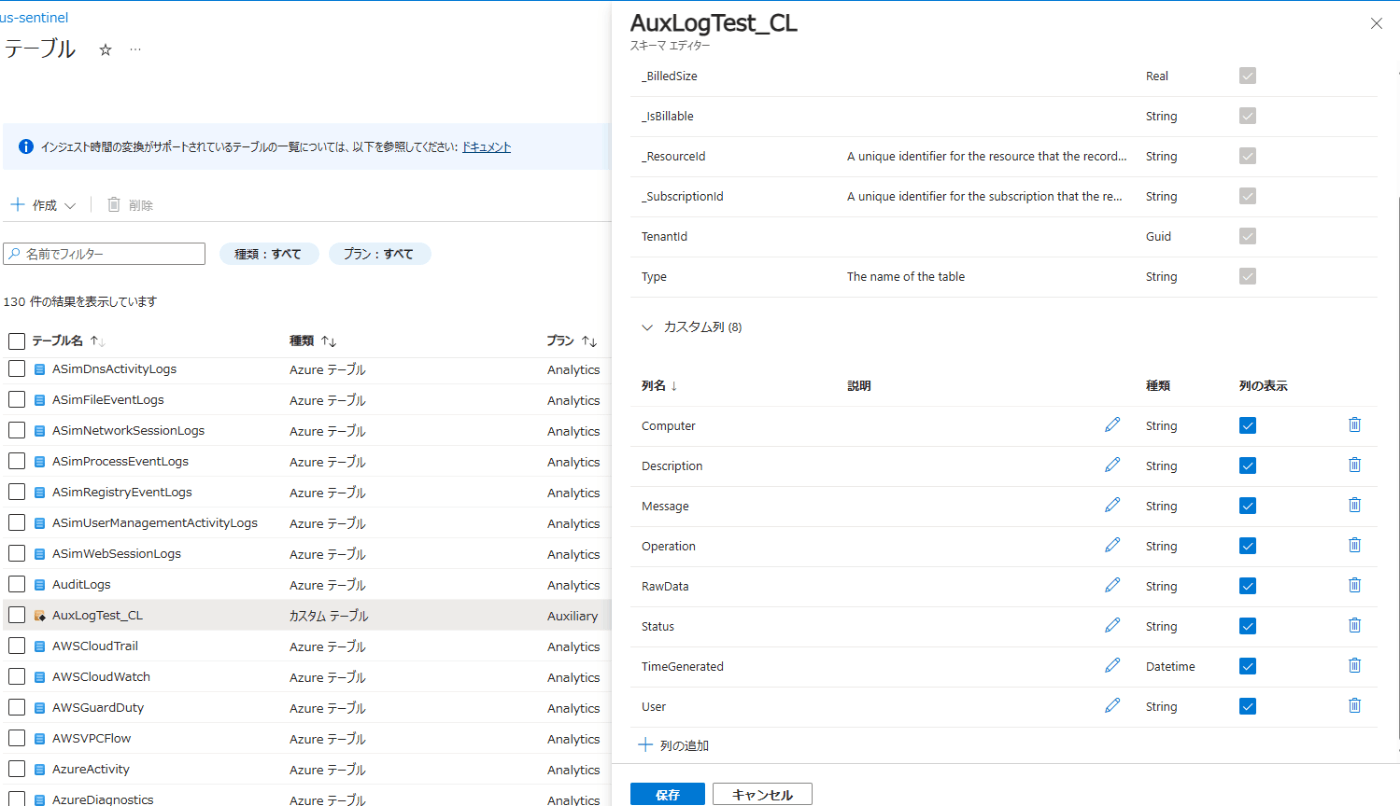
Log Ingestion API の場合は RawData 列以外も使用できるので、必要な列を Azure ポータルから追加します。
次にデータ収集ルールを作成します。
{
    "location": "centralus",
    "properties": {
        "dataCollectionEndpointId": "/subscriptions/xxxxxxxx-xxxx-xxxx-xxxx-xxxxxxxxxxxx/resourceGroups/myrg/providers/Microsoft.Insights/dataCollectionEndpoints/mydce",
        "streamDeclarations": {
            "Custom-AuxLogTest_CL": {
                "columns": [
                    {
                        "name": "TimeGenerated",
                        "type": "datetime"
                    },
                    {
                        "name": "User",
                        "type": "string"
                    },
                    {
                        "name": "Computer",
                        "type": "string"
                    },
                    {
                        "name": "Operation",
                        "type": "string"
                    },
                    {
                        "name": "Status",
                        "type": "string"
                    },
                    {
                        "name": "Description",
                        "type": "string"
                    }
                ]
            }
        },
        "dataSources": {},
        "destinations": {
            "logAnalytics": [
                {
                    "workspaceResourceId": "/subscriptions/xxxxxxxx-xxxx-xxxx-xxxx-xxxxxxxxxxxx/resourcegroups/myrg/providers/microsoft.operationalinsights/workspaces/mylaws",
                    "workspaceId": "xxxxxxxx-xxxx-xxxx-xxxx-xxxxxxxxxxxx",
                    "name": "mylaws"
                }
            ]
        },
        "dataFlows": [
            {
                "streams": [
                    "Custom-AuxLogTest_CL"
                ],
                "destinations": [
                    "mylaws"
                ],
                "outputStream": "Custom-AuxLogTest_CL"
            }
        ]
    }
}
作成用の Azure PowerShell はこちら。
New-AzDataCollectionRule -ResourceGroupName "myrg" -Name "dcr-txtlog" -JsonFilePath "<filepath>\dcr-auxapi.json"
Log Ingestion API 経由でログを書き込みます。サンプル ログは csv 形式としており、スクリプト内で json に変換しています。また、以下では API アクセスにユーザー認証のトークンを使用しているため、事前にログインユーザーに対して監視メトリック発行者 のロールを付与しておく必要があります。(ロール付与から反映までにけっこう時間がかかります)
# テナント ID を指定
$tenantId = "xxxxxxxx-xxxx-xxxx-xxxx-xxxxxxxxxxxx"

# データ送信に必要な情報
$dceEndpoint = "https://mydce-xxxx.centralus-1.ingest.monitor.azure.com"
$dcrImmutableId = "dcr-xxxxxxxxxxxxxxxxxxxxxxxxxxxxxxxx"
$streamName = "Custom-AuxLogTest_CL"

# ログファイル格納先
$filePath = "<filepath>\sample_log_file.csv"

# 一度に読み込む行数
$chunkSize = 500

# Entra ID に接続し、monitor 用の Bearaer Token を取得
Connect-AzAccount -Tenant $tenantId
$token = Get-AzAccessToken -ResourceUrl "https://monitor.azure.com"
$bearerToken = $token.Token

### Step 2: データの作成
$reader = New-Object System.IO.StreamReader($filePath, [System.Text.Encoding]::GetEncoding("utf-8"))

try {
    while ($null -ne ($line = $reader.ReadLine())) {
        $chunk = @()
        $i = 0

        do {
            # $line に格納されている csv を分割
            $TimeGenerated, $User, $Computer, $Operation, $Status, $Description = $line -split ','
            # ログを json に変換
            $jsonObject = '{ "TimeGenerated": "' + $TimeGenerated + '", "User": "' + $User + '", "Computer": "' + $Computer + '", "Operation": "' + $Operation + '", "Status": "' + $Status + '", "Description": "' + $Description + '" }'
            $chunk += $jsonObject
            $i++
            if ($i -eq $chunkSize -or $null -eq ($line = $reader.ReadLine())) {
                break
            }
        } while ($true)

        # json を準備
        $body = '[' + ($chunk -join ',') + ']'

        ### Step 3: DCE 経由で Log Analytics ワークスペースにデータを送信
        $headers = @{
            "Authorization"="Bearer $bearerToken";
            "Content-Type"="application/json"
        }
        $uri = "$dceEndpoint/dataCollectionRules/$dcrImmutableId/streams/$($streamName)?api-version=2021-11-01-preview"

        $uploadResponse = Invoke-RestMethod -Uri $uri -Method "Post" -Body $body -Headers $headers
        # 必要に応じて Response をチェックしエラーやロギングを処理

        # スロットリング対応のため 50ms 待機
        Start-Sleep -Milliseconds 50

    }
} finally {
    $reader.Close()
}
2024-08-03T15:00:00Z,User1,Computer1,Login,Success,User logged in successfully
2024-08-03T15:00:01Z,User2,Computer2,FileAccess,Failed,Access denied to the requested file
2024-08-03T15:00:02Z,User3,Computer3,Logout,Success,User logged out successfully
2024-08-03T15:00:03Z,User4,Computer4,Login,Failed,Incorrect password entered
2024-08-03T15:00:04Z,User5,Computer5,FileAccess,Success,File accessed successfully
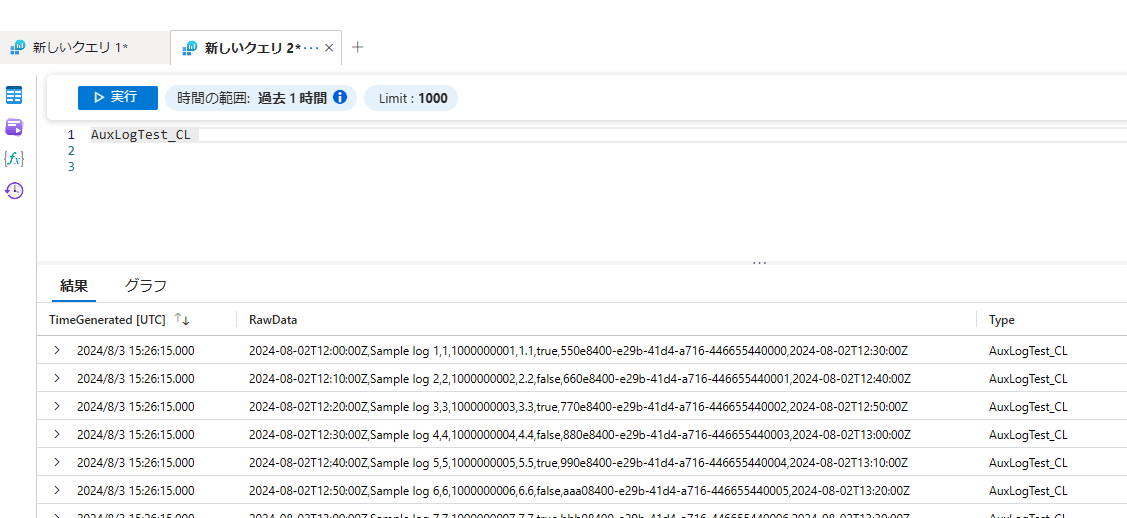
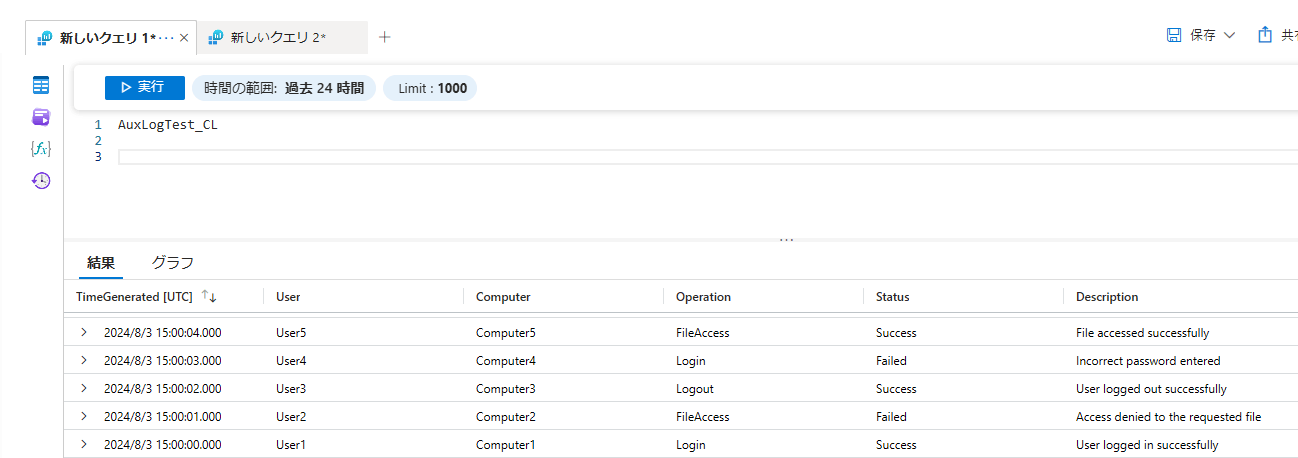
書き込みに成功すると、以下のように Log Analytics ワークスペースで確認できます。

Discussion
Auxiliary plan が出てきたタイミングあたりで、Basic plan でも KQL 全部使えるように変わったような気がするんですが気のせいですかね。。?
おー、そうですね、変わってます。Basic プランの保管日数が 30 日になったことは認識していましたが... ありがとうございます!