はじめに
この記事では、Next.js と Azure AI Service を使って、英会話のレッスンアプリを作成します。
フロント部分のコードは、Next.js で作成し、バックエンド部分は Azure AI Service を使ってハンズオンで実装します。
皆様も是非実装してみてください。
アーキテクチャ図は以下のようになります。
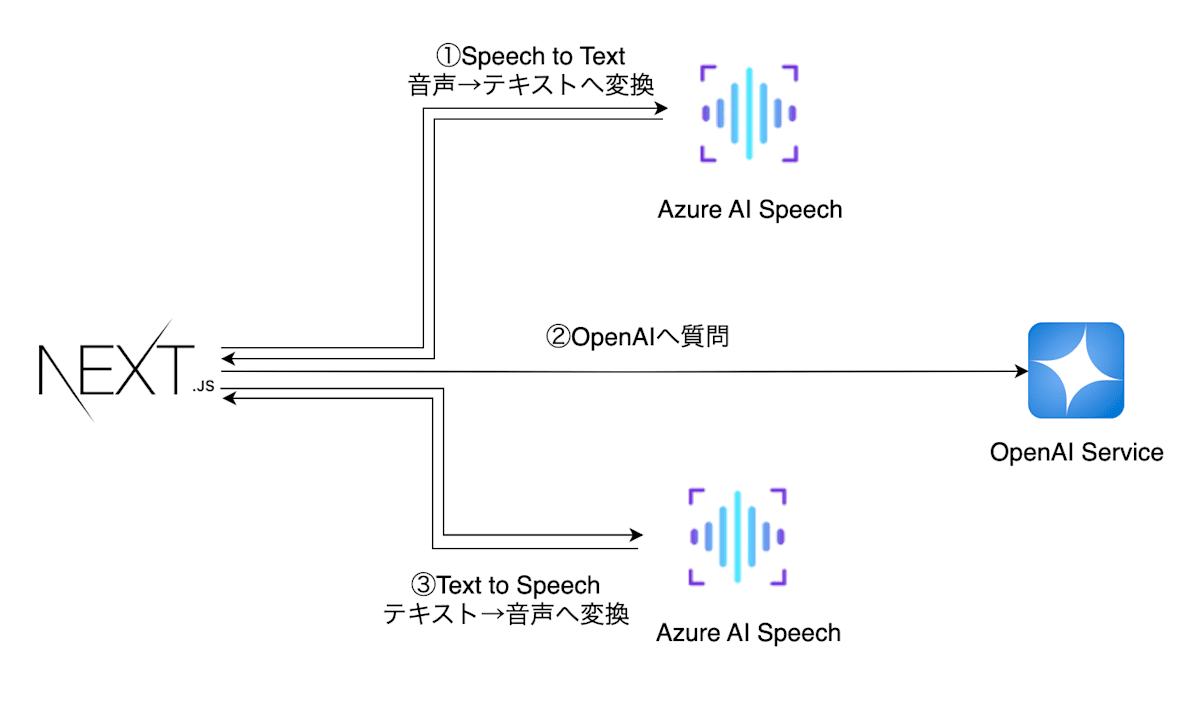
- Next.jsで実装したブラウザよりAzure AI Speechで質問を音声入力し、リアルタイムで音声→テキストへ変換
- テキストへ変換した質問をAzure OpenAIへ投げ、回答を生成
- 生成した回答をAzure AI Speechでテキスト→音声変換し、ブラウザに返却
- ブラウザで音声を再生
楽しそうですよね。
実際の画面は以下のようなシンプルな画面です。
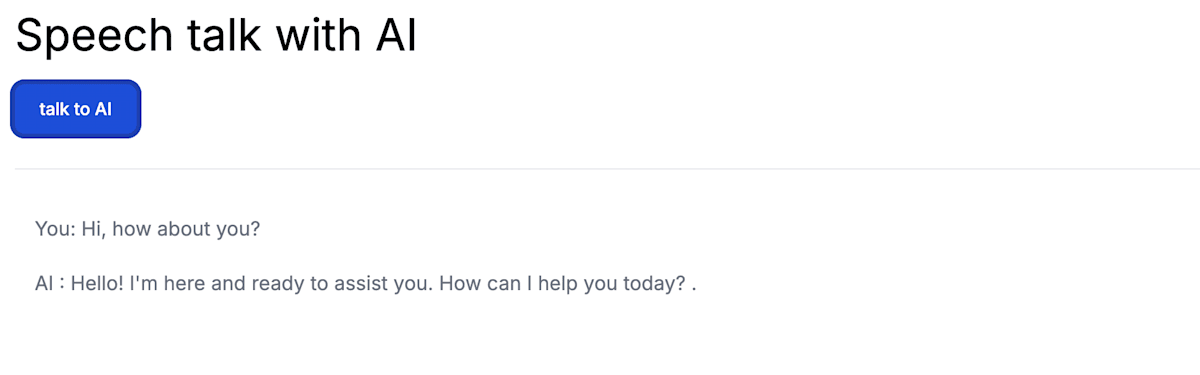
ボタンを押して、
Hi, How about you?
と言うと、OpenAIが音声で
Hello! I'm here and ready to assist you. How can I help you today? .
といい感じに返答してくれます。
それではやってみましょう🚀
Next.jsでフロントエンドのアプリを実装
環境構築
それではNext.jsのセットアップから始めましょう。
任意のフォルダにて、以下のコマンドを実行してください。
npx create-next-app . --ts
設定は全部Yesで回答でOKです。
✔ Would you like to use ESLint with this project? … No / Yes
✔ Would you like to use Tailwind CSS with this project? … No / Yes
✔ Would you like to use `src/` directory with this project? … No / Yes
✔ Use App Router (recommended)? … No / Yes
✔ Would you like to customize the default import alias? … No / Yes
✔ What import alias would you like configured? … @/*
Creating a new Next.js app in /Users/s.y/prj/04.webapp/sat-web-repo.
Next.jsのtemplateが作成されたと思います。
ライブラリのインストール
今回の package.json はこんな感じ
バージョンを合わせる為、ご自身の dependencies の箇所を下記のdependencies へ上書きしてください。
{
  "name": "app名",
  "version": "0.1.0",
  "private": true,
  "scripts": {
    "dev": "next dev",
    "build": "next build",
    "start": "next start",
    "lint": "next lint"
  },
  "dependencies": {
    "@azure/openai": "^1.0.0-beta.12",
    "@types/node": "22.5.0",
    "@types/react": "18.3.4",
    "@types/react-dom": "18.3.0",
    "autoprefixer": "10.4.20",
    "axios": "^1.7.5",
    "fs": "^0.0.1-security",
    "microsoft-cognitiveservices-speech-sdk": "^1.40.0",
    "next": "14.2.6",
    "node-wav-player": "^1.0.0",
    "postcss": "8.4.41",
    "react": "18.3.1",
    "react-dom": "18.3.1",
    "tailwindcss": "3.4.10",
    "typescript": "5.5.4",
    "universal-cookie": "^7.2.0",
    "use-sound": "^4.0.3"
  }
}
そして、必要なライブラリを一気にインストールしてください。
npm install
これでライブラリのインストールが完了です。
実装
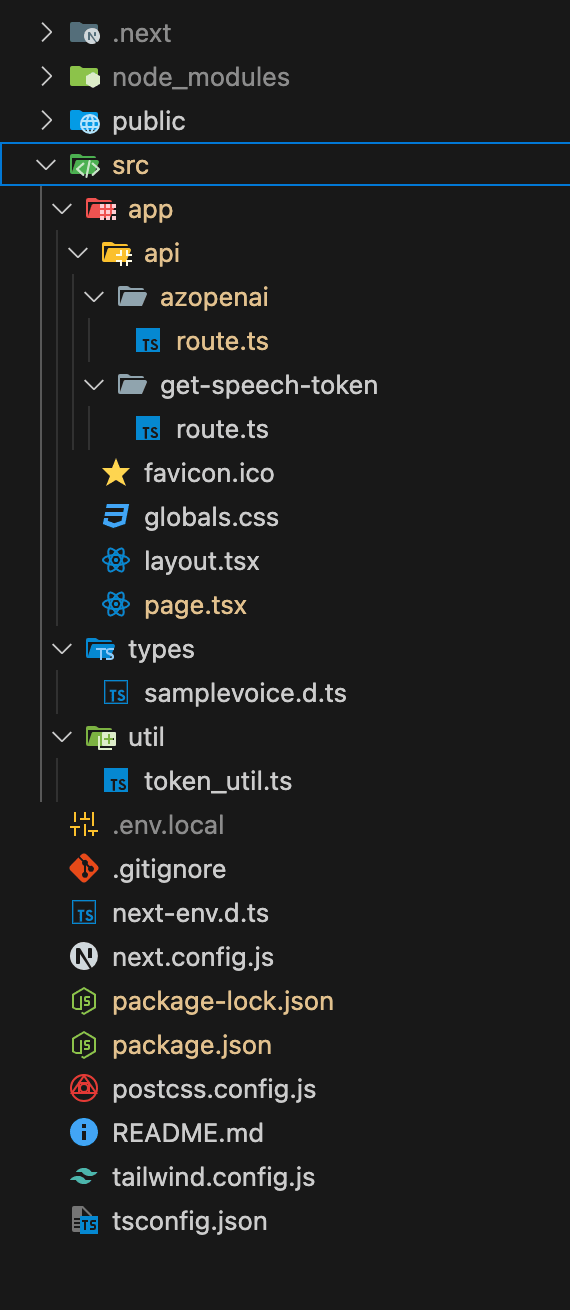
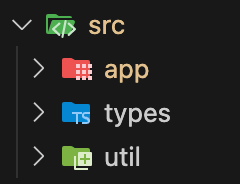
最終的な src/ ディレクトリの配下は以下のような後成になります。
では、作っていきましょう
まずはルート階層へ.env.localファイルを作成し、以下の内容を記述してください。
SPEECH_KEY=xxxxxxxxxxxxxxxxxxxxxxxxxxxxx
SPEECH_REGION=japaneast
NEXT_PUBLIC_URL=http://localhost:3000
AZURE_OPENAI_ENDPOINT=https://xxxxxxxxxxxxxxxxxxxxxxxxxxxxx.com/
AZURE_OPENAI_API_KEY=xxxxxxxxxxxxxxxxxxxxxxxxxxxxx
AZURE_OPENAI_DEPLOYMENT_ID=gpt-4o
src配下に types, utilディレクトリを作成してください。
util/token_util.tsファイルを作成してください。
import axios from 'axios';
import Cookie from 'universal-cookie';

export async function getTokenOrRefresh() {
    const cookie = new Cookie();
    const speechToken = cookie.get('speech-token');

    if (speechToken === undefined) {
        try {
            const res = await axios.get('/api/get-speech-token');
            const token = res.data.token;
            const region = res.data.region;
            cookie.set('speech-token', region + ':' + token, {maxAge: 540, path: '/'});
            return { authToken: token, region: region };
        } catch (err: any) {
            console.log(err.response.data);
            return { authToken: null, error: err.response.data };
        }
    } else {
        const idx = speechToken.indexOf(':');
        return { authToken: speechToken.slice(idx + 1), region: speechToken.slice(0, idx) };
    }
}
次にtypes/samplevoice.d.tsファイルを作成してください。
// src/types/custom.d.ts
declare module '*.wav' {
  const value: string;
  export default value;
}
次に、pages/app/pages.tsxファイルを修正します。
'use client';
import { ResultReason } from 'microsoft-cognitiveservices-speech-sdk';
import { useState } from 'react';
import { getTokenOrRefresh } from '../util/token_util';

const speechsdk = require('microsoft-cognitiveservices-speech-sdk');

export default function Home() {
  const [isLoading, setIsLoading] = useState<boolean>(false);
  const [displayText, setDisplayText] = useState("");
  const [displayAIText, setDisplayAIText] = useState('');
  const [player, updatePlayer] = useState({ p: undefined, muted: false });

  async function sttFromMic() {
    setIsLoading(true);
    const tokenObj = await getTokenOrRefresh();
    const speechConfig = speechsdk.SpeechConfig.fromAuthorizationToken(
      tokenObj.authToken,
      tokenObj.region
    );
    speechConfig.speechRecognitionLanguage = 'en-US';

    const audioConfig = speechsdk.AudioConfig.fromDefaultMicrophoneInput();
    const recognizer = new speechsdk.SpeechRecognizer(
      speechConfig,
      audioConfig
    );

    setDisplayText('speak into your microphone...');

    await recognizer.recognizeOnceAsync((result: any) => {
      if (result.reason === ResultReason.RecognizedSpeech) {
        setDisplayText(`You: ${result.text}`);
        getAzData(result.text);
      } else {
        setDisplayText(
          'ERROR: Speech was cancelled or could not be recognized. Ensure your microphone is working properly.'
        );
      }
    });
    setIsLoading(false);
  }

  const getAzData = async (message: string) => {
    setIsLoading(true);
    try {
      console.log('start message : ', message);
      // const url = '/api/azopenai';

      const response = await fetch(`http://localhost:3000/api/azopenai`, {
        method: 'POST',
        headers: {
          'Content-Type': 'application/json',
        },
        body: JSON.stringify({ message }),
      });

      console.log('🚀 ~ getAzData ~ response:', response);
      const { aiMessage } = await response.json();
      console.log('🚀 ~ getAzData ~ aiMessage:', aiMessage[0].message.content);
      // 回答を音声で読み上げ
      textToSpeech(aiMessage[0].message.content);
    } catch (err) {
      console.log('🚀 ~ file: index.tsx:32 ~ getAzData ~ err:', err);
    }
    setIsLoading(false);
  };

  const textToSpeech = async(answer: string) => {
    const tokenObj = await getTokenOrRefresh();
    const speechConfig = speechsdk.SpeechConfig.fromAuthorizationToken(
      tokenObj.authToken,
      tokenObj.region
    );
    const myPlayer = new speechsdk.SpeakerAudioDestination();
    updatePlayer((p) => {
      p.p = myPlayer;
      return p;
    });
    const audioConfig = speechsdk.AudioConfig.fromSpeakerOutput(player.p);

    let synthesizer = new speechsdk.SpeechSynthesizer(
      speechConfig,
      audioConfig
    );

    const textToSpeak = answer;
    // setDisplayText();
    setDisplayAIText(`AI : ${textToSpeak}`);
    synthesizer.speakTextAsync(
      textToSpeak,
      (result: any) => {
        let text;
        if (
          result.reason === speechsdk.ResultReason.SynthesizingAudioCompleted
        ) {
          text = `${textToSpeak} .\n`;
        } else if (result.reason === speechsdk.ResultReason.Canceled) {
          text = `synthesis failed. Error detail: ${result.errorDetails}.\n`;
        }
        synthesizer.close();
        synthesizer = undefined;
        setDisplayAIText("AI : " + text!);
      },
      function (err: any) {
        setDisplayAIText(`Error: ${err}.\n`);

        synthesizer.close();
        synthesizer = undefined;
      }
    );
  }

  return (
    <div className="app-container p-4">
      <h1 className="display-4 mb-5 text-4xl">Speech talk with AI</h1>
      <div className="row main-container">
        <div className="col-6">
          <button
            type="button"
            onClick={() => sttFromMic()}
            className="text-white bg-blue-700 hover:bg-blue-800 focus:ring-4 focus:ring-blue-300 font-medium rounded-lg text-sm px-5 py-2.5 me-2 mb-2 dark:bg-blue-600 dark:hover:bg-blue-700 focus:outline-none dark:focus:ring-blue-800"
          >
            talk to AI
          </button>
        </div>
        <hr className="my-5" />
        <div className="p-4 col-6 output-display rounded">
          <div className="mb-5 text-gray-500">{displayText}</div>
          <div className="mb-5 text-gray-500">{displayAIText}</div>
        </div>
        {isLoading ? (
          <div className="flex justify-center" aria-label="読み込み中">
            <div className="animate-spin h-8 w-8 bg-blue-300 rounded-xl"></div>
          </div>
        ) : (
          <></>
        )}
      </div>
    </div>
  );
}
次にapp配下へapiディレクトリを作成し、app/api/配下を以下のようにディレクトリとファイルを作成してください。
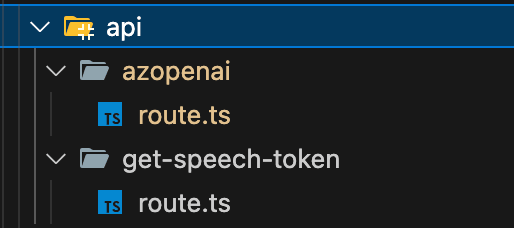
azopenai/route.tsファイルから実装します。
import { AzureKeyCredential, OpenAIClient } from '@azure/openai';
import { NextRequest } from 'next/dist/server/web/spec-extension/request';
import { NextResponse } from 'next/dist/server/web/spec-extension/response';

export const POST = async (req: NextRequest) => {
  try {
    const { message } = await req.json();

    const aiMessage = await returnAiMessage(message);
    console.log("🚀 ~ POST ~ aiMessage:", aiMessage)

    return NextResponse.json({ aiMessage }, { status: 200 });
  } catch (error: any) {
    return NextResponse.json({ aiMessage: error.message }, { status: 500 });
  }
};

const returnAiMessage = (message: any) => {
  return new Promise(async (resolve, reject) => {
    const endpoint = process.env.AZURE_OPENAI_ENDPOINT!;
    const azureApiKey = process.env.AZURE_OPENAI_API_KEY!;
    const deploymentId = process.env.AZURE_OPENAI_DEPLOYMENT_ID!;
    const content = `
      ${message}
      `;
    try {
      const messages = [
        { role: 'system', content: 'You are a helpful assistant.' },
        {
          role: 'user',
          content,
        },
      ];
      const client = new OpenAIClient(
        endpoint,
        new AzureKeyCredential(azureApiKey)
      );

      const result = await client.getChatCompletions(deploymentId, messages);
      console.log("🚀 ~ answer ~ result:", result.choices)
      resolve(result.choices);
    } catch (error: any) {
      console.log(
        '🚀 ~ file: openaiRepository.ts:29 ~ AzOpenaiRepository ~ returnnewPromise ~ error:',
        error
      );
      reject(error);
    }
  });
}

export const dynamic = 'force-dynamic';
次にget-speech-token/route.tsファイルを実装します。
import axios from 'axios';
import { NextRequest } from 'next/dist/server/web/spec-extension/request';
import { NextResponse } from 'next/dist/server/web/spec-extension/response';

export const GET = async (res:NextResponse,req: NextRequest) => {
  try {
        const speechKey = process.env.SPEECH_KEY;
        console.log("🚀 ~ GET ~ speechKey:", speechKey)
        const speechRegion = process.env.SPEECH_REGION;

        const headers = {
          headers: {
            'Ocp-Apim-Subscription-Key': speechKey,
            'Content-Type': 'application/x-www-form-urlencoded',
          },
        };

      try {
        const tokenResponse = await axios.post(
          `https://${speechRegion}.api.cognitive.microsoft.com/sts/v1.0/issueToken`,
          null,
          headers
        );
        // res.send({ token: tokenResponse.data, region: speechRegion });
        return NextResponse.json(
          {token: tokenResponse.data, region: speechRegion },
          { status: 200 }
        );
      } catch (err) {
        return NextResponse.json(
          { aiMessage: 'test message' },
          { status: 401 }
        );
      }
  } catch (error: any) {
    return NextResponse.json({ aiMessage: error.message }, { status: 500 });
  }
};

export const dynamic = 'force-dynamic';
これでNext.jsの実装は完了です。
アプリを起動して、エラーが出なければOKです。
npm run dev
Azure リソースのDeploy
リソースグループの作成
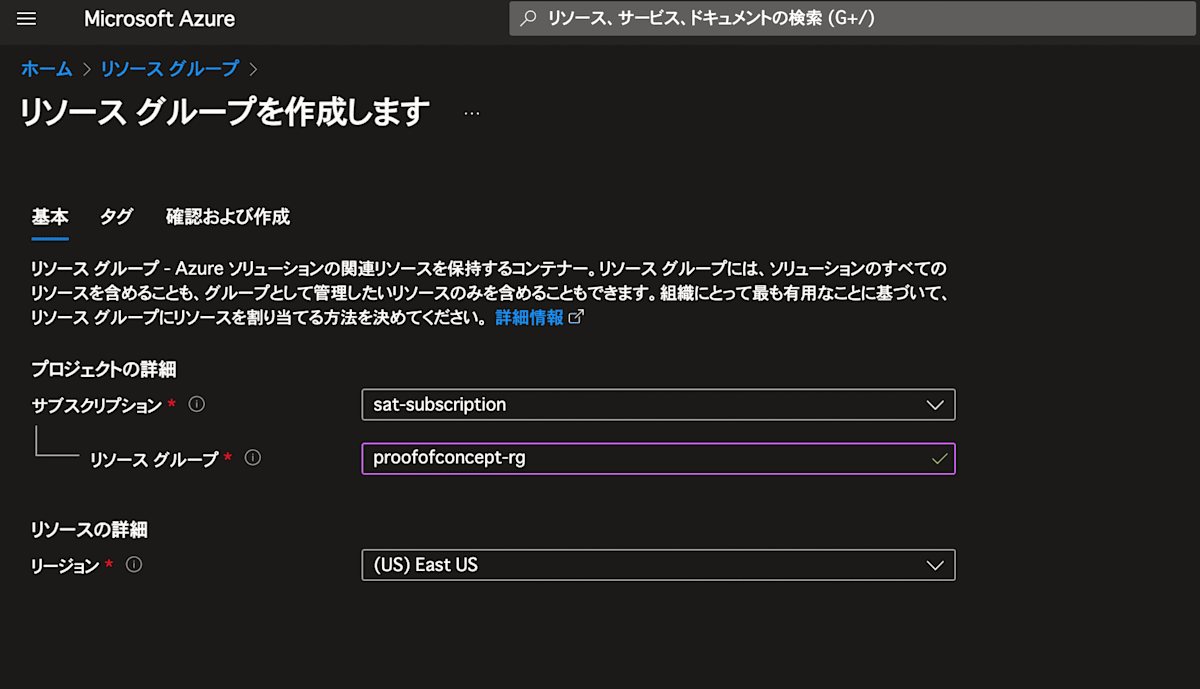
まずは、Azure Portalにログインしてリソースグループを作成してください。
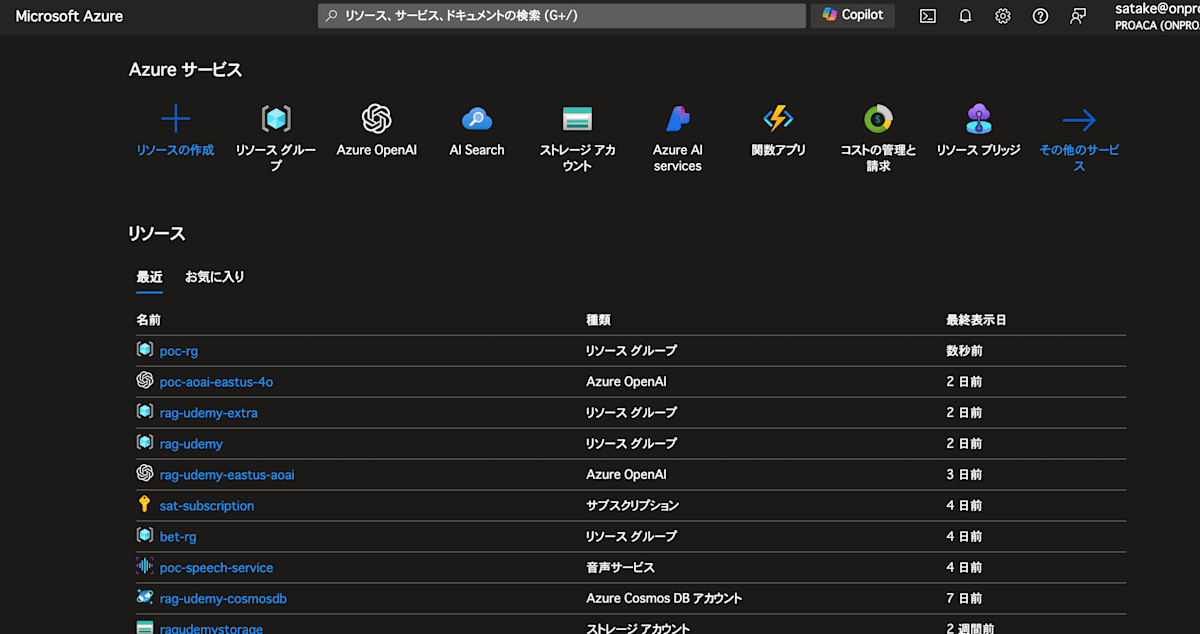
画面上部の窓より リソースグループ を検索し、リソースグループを作成してください。
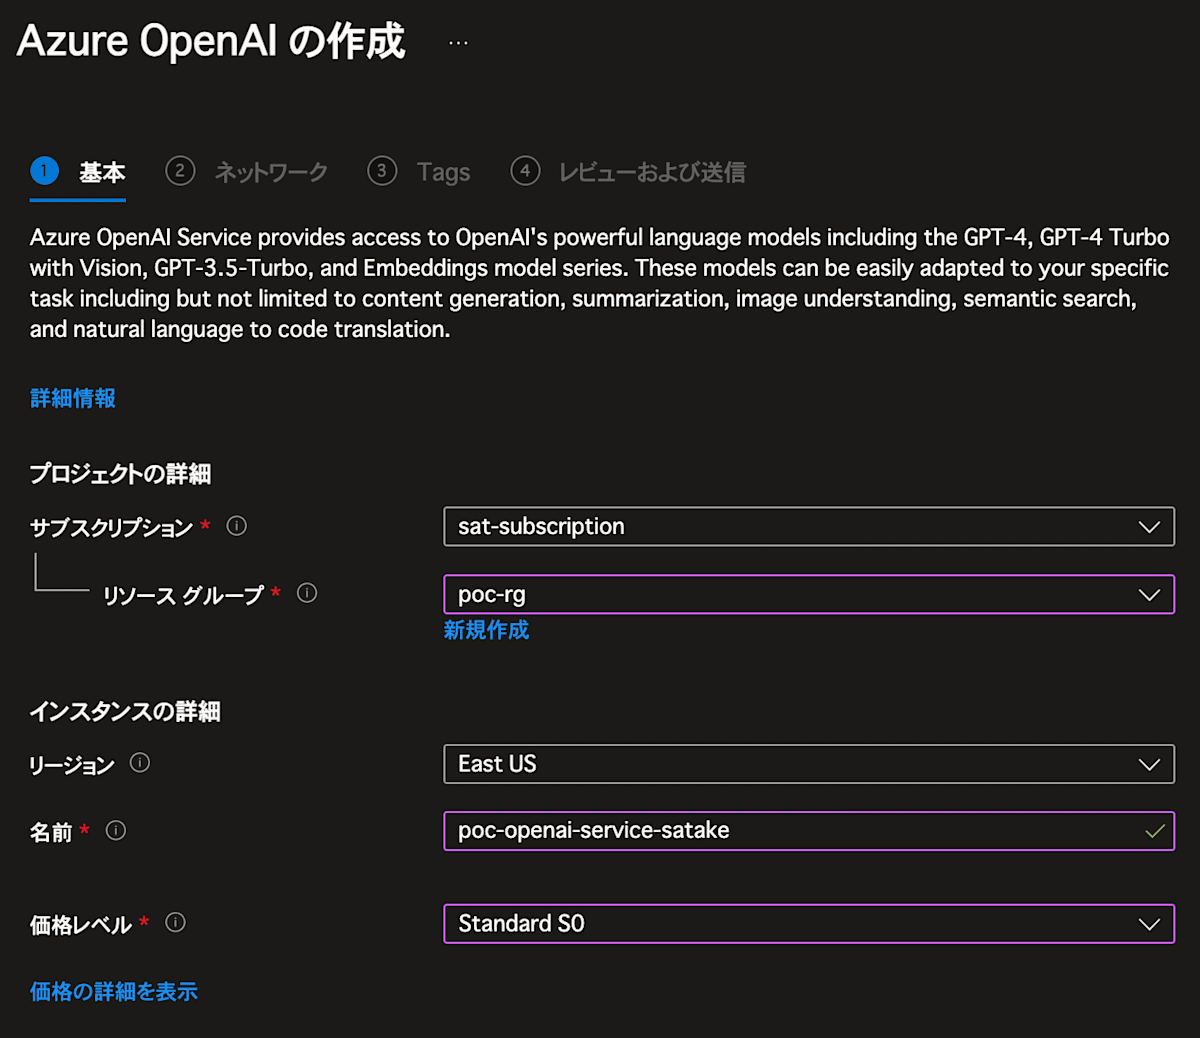
OpenAI Serviceの作成
では次はOpenAI Serviceを作成します。
Azure Portalの左上の窓より OpenAI を検索し、OpenAIを選択してください。
そして以下のようにリソースをDeloyしてください。
次はAzure OpenAI Studioにアクセスして、モデルのDeployを行ってください
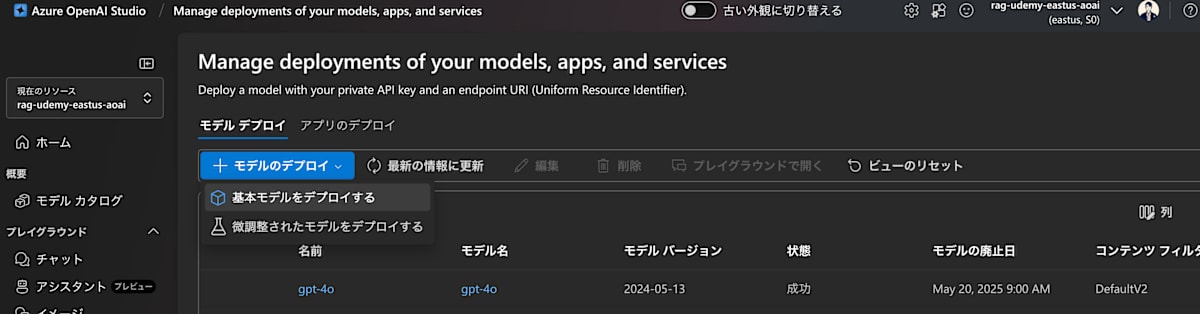
これでOpenAIのDeployが完了です。
Azure AI Speech の作成
次にAzure AI Speechを作成します。
Azure Portalの検索窓より 音声サービス を検索し、音声サービスを選択してください。
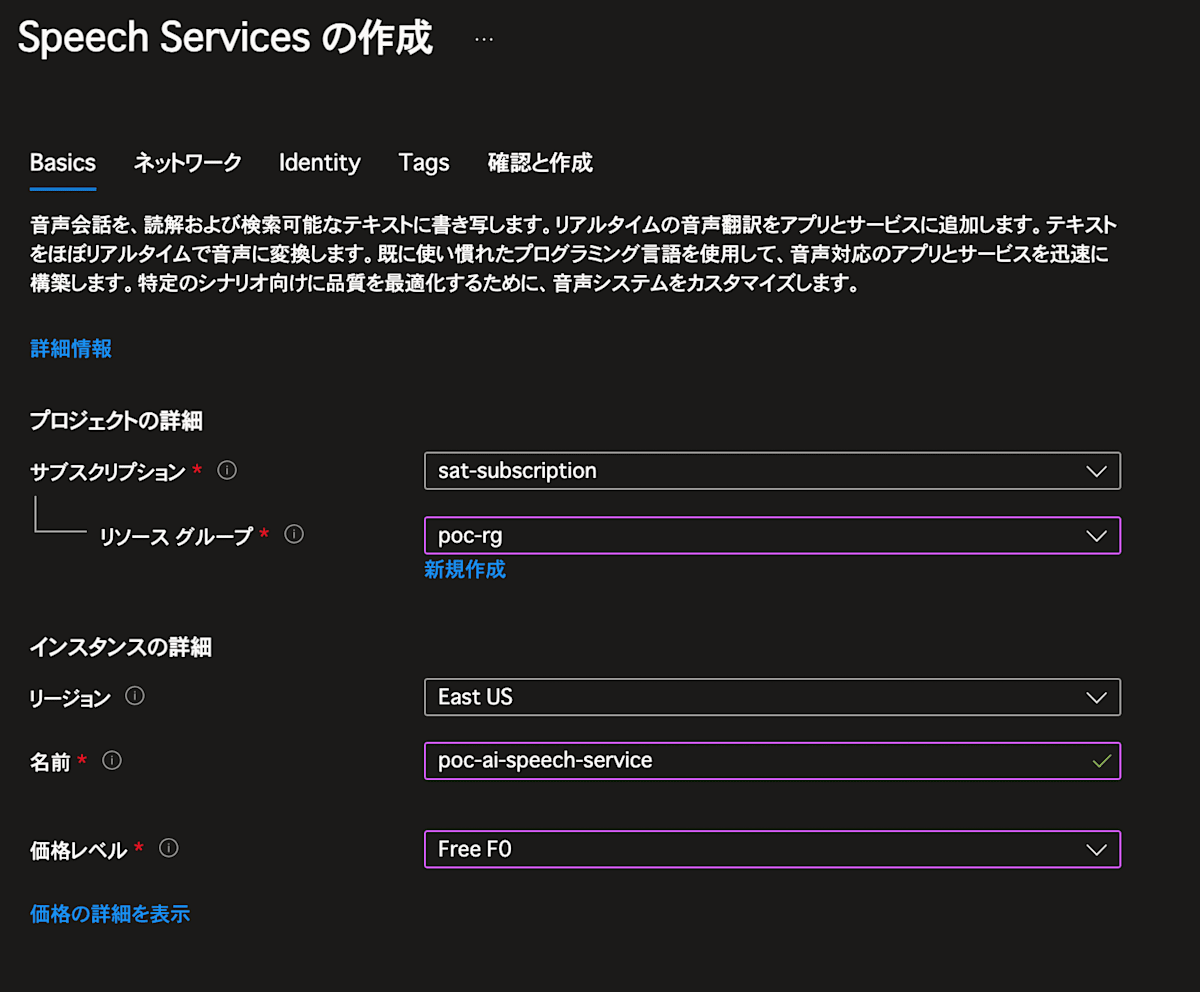
Deploy出来ればOKです!
環境変数の設定
.env.local の環境変数を設定します。
Azure OpenAI Serviceは以下を参照です。
リソース管理 > キーとエンドポイント
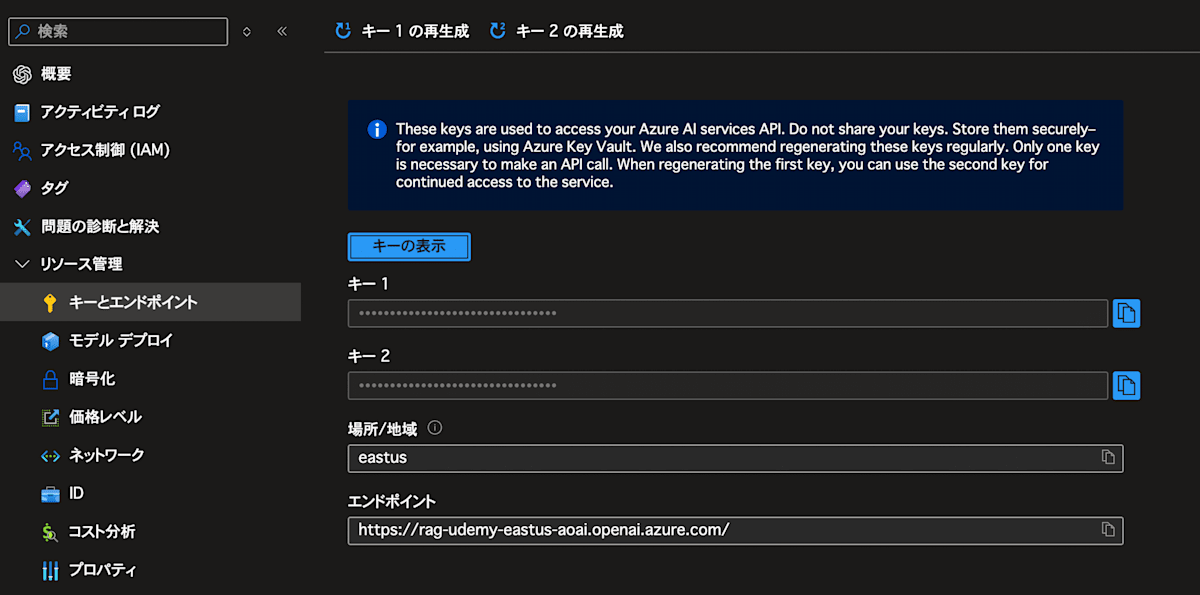
音声サービスも同様です。
リソース管理 > キーとエンドポイント
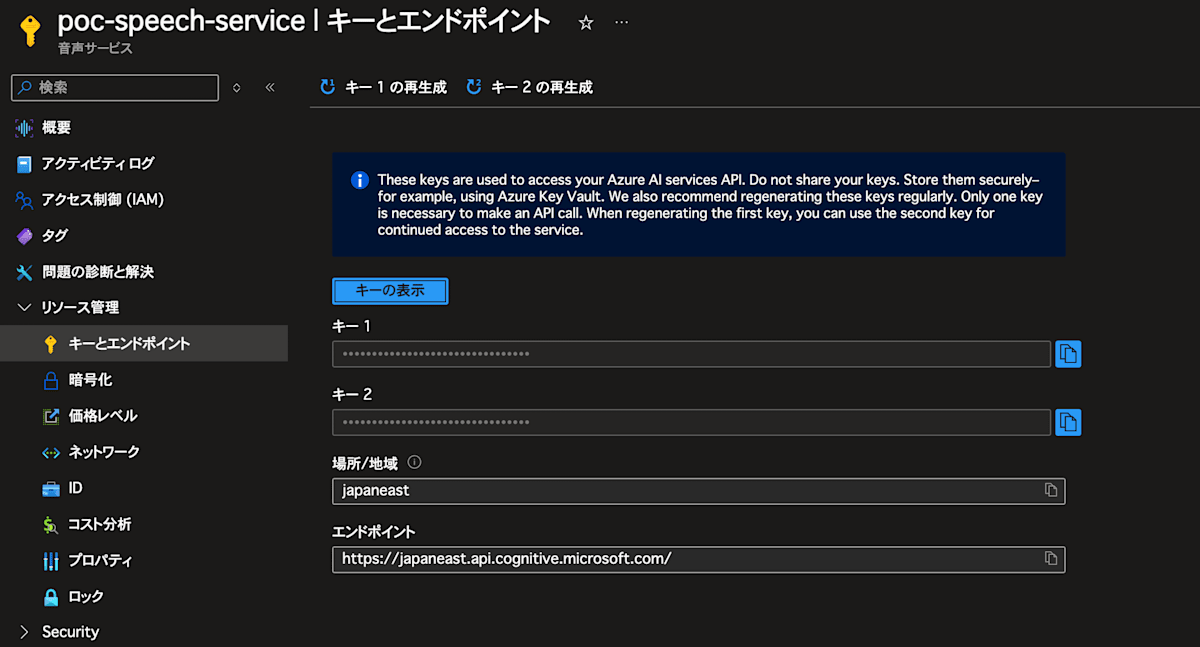
以下のような感じになります。
SPEECH_KEY=xxxxxxxxxxxxxxxxxxxxxxxxxx
SPEECH_REGION=japaneast
NEXT_PUBLIC_URL=http://localhost:3000

AZURE_OPENAI_ENDPOINT=https://xxxxxx.openai.azure.com/
AZURE_OPENAI_API_KEY=xxxxxxxxxxxxxxxxxxxxxxxxxx
AZURE_OPENAI_DEPLOYMENT_ID=gpt-4o
これで環境変数の設定は完了です!
動作確認
ではアプリを起動してみましょう!
Buttonを押して、音声で質問を入力してみてください。
OpenAIからの回答が音声で帰ってくれば成功です!
お疲れ様でした!
最後に
いかがだったでしょうか。
今回は、Next.jsとAzure AI Serviceを使って、英会話のレッスンアプリを作成しました。
音声データをテキストデータへ変換し、OpenAIで回答作成して、最後にテキストデータを音声データへ変換して返却するという流れでした。
Azure AI Serviceは、上記以外にも様々なサービスが提供されています。
皆様も是非活用して面白いアプリを作ってみてください。
それでは🖐️
参考資料

Discussion