
はじめに
この記事では、Next.js と Clerk を使って認証機能を実装し、ユーザー情報を Azure Cosmos DB に保存する流れを紹介します。
Clerkは、認証やユーザープロファイル管理を容易にするIdentity as a Service (IDaaS) で、Next.jsと組み合わせることで簡単にログイン機能やセッション管理が可能になります。
Azure Cosmos DBは、柔軟なスキーマレスデータベースで、グローバルスケール、高可用性、低遅延の特徴を持ちます。Clerkと組み合わせることで、ユーザー情報を安全に保存・管理できます。
上記を組み合わせると、簡単にユーザー管理機能を実装することが出来たので、ご紹介です。
構成としては以下の様なシンプルな構成となります。
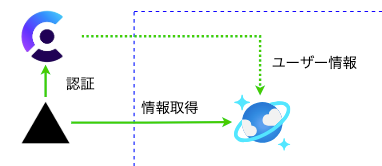
前提条件
- Node.js (v20以上推奨)
- npm または yarn
- Azure アカウント(Cosmos DBを利用するため)
- Clerkアカウント(無料のプランで始められます)
プロジェクトのセットアップ
1. Next.js プロジェクトの作成
任意のディレクトリを作成して、Next.jsプロジェクトを作成します。

cd poc-login
npx create-next-app@latest . --ts
Next.jsの設定は全てYesでOKで進めます。

今回は簡単にUIを構築する為に、shadcnを使います。
- shadcn をインストール
npx shadcn@latest init
色はneutralでOKです。
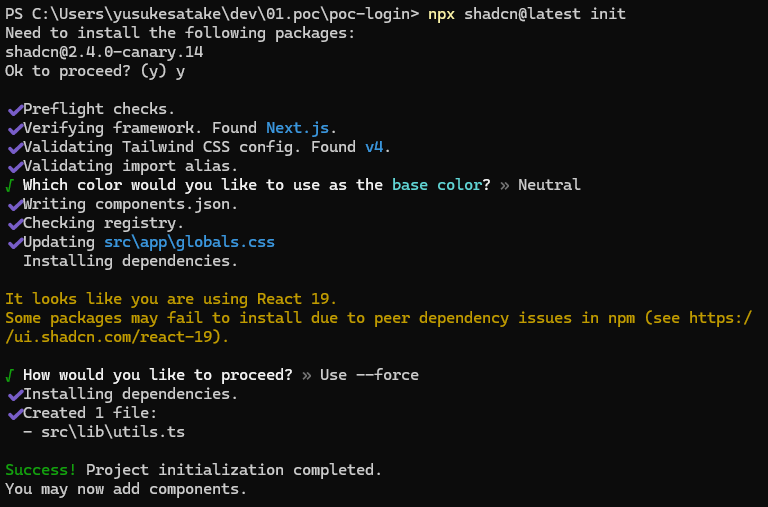
その後、全てのコンポーネントをインストールします。
npx shadcn@latest add --all
React19にて多少警告が出ますがそのまま進めてOK
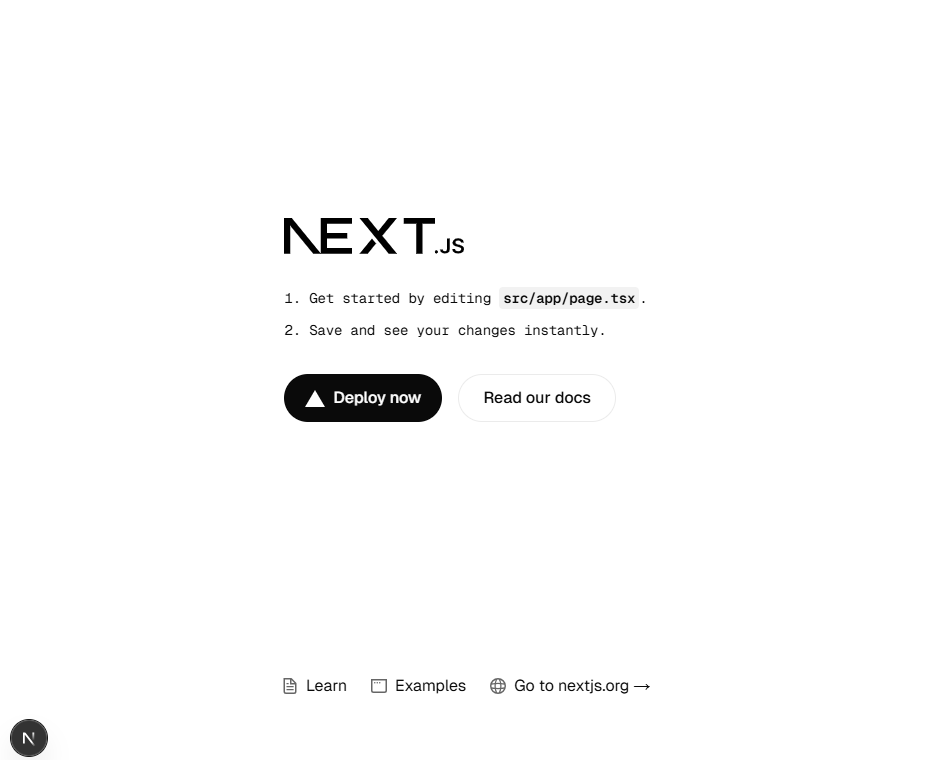
以下のコマンドで今のところ問題無く起動するか確認しましょう。
npm run dev
Next.js標準の画面が表示されればOK
ログイン画面の実装
今回はAI駆動開発を意識して、bolt.newを用いてログイン画面を作成します。
bolt.newは、AIが自動生成したコードを元に、画面を実装することが出来ます。
以下のプロンプトを投げてみました。
AI SaaSで画像生成等ができるようなサービス ランディングページ
画像はhttps://unsplash.com/ja/を使って見た目が美しいランディングページを作成して
cssはshadcnを用いてモダンなデザインにしてください

プロジェクト概要
生成AIサービスを使って画像を生成したり、背景を削除したり、画像を圧縮したりするサービスです。無料枠があり、クレジットがなくなると課金に移行します。
ターゲットユーザー
デザイナー・クリエイター
マーケター
SNS運用者
個人・小規模事業者
デザイン方向性
モダンでミニマルなデザイン
操作性を重視したUI/UX
信頼感のあるブランディング
直感的な機能説明
技術スタック
Next.js 14 (App Router)
TailwindCSS
shadcn/ui
framer-motion
必要なコンポーネントと機能
1. ヘッダー
shadcn/uiのNavigationMenuを使用したナビゲーション
各セクションへのスムーズスクロールリンク
モバイル対応のハンバーガーメニュー
ロゴ
CTAボタン(無料トライアル登録)
2. ヒーローセクション
キャッチーな見出し
サービスの主要機能のプレビュー
デモ動画または機能のスクリーンショット
メイン CTAボタン
3. 主要機能セクション
AI画像生成機能の説明
背景除去機能の説明
画像圧縮機能の説明
その他の画像編集・加工機能
4. ユースケースセクション
具体的な利用シーン
業種別の活用例
成功事例やケーススタディ
5. 料金プランセクション
フリープラン
スタータープラン
プロフェッショナルプラン
エンタープライズプラン
プラン比較表
よくある質問(FAQ)
6. CTAセクション
無料トライアル登録への誘導
利用可能なクレジット数の表示
アカウント作成の簡単な手順説明
7. フッター
運営会社情報
利用規約
プライバシーポリシー
お問い合わせ
SNSリンク
ステータスページへのリンク
アニメーション実装のポイント
スクロールトリガーのアニメーション
機能紹介のインタラクション
画像処理のビフォーアフター表示
料金表示のアニメーション
レスポンシブデザイン
モバイルでの操作性最適化
画像プレビューの適切な表示
フォーム要素の使いやすさ
ダッシュボードUIの最適化

パフォーマンス最適化

画像の遅延読み込み
処理済み画像のキャッシュ
First Contentful Paint の改善
Core Web Vitals対応
アクセシビリティ
スクリーンリーダー対応
キーボードナビゲーション
文字サイズ・コントラスト
フォーム要素のラベル付け
SEO対策

構造化データの実装
OGP設定
機能別のメタデータ
サイトマップ生成

注意点
利用規約の明確な提示
プライバシーポリシーの整備
データ保持期間の明記
API利用制限の明示
セキュリティ対策の説明
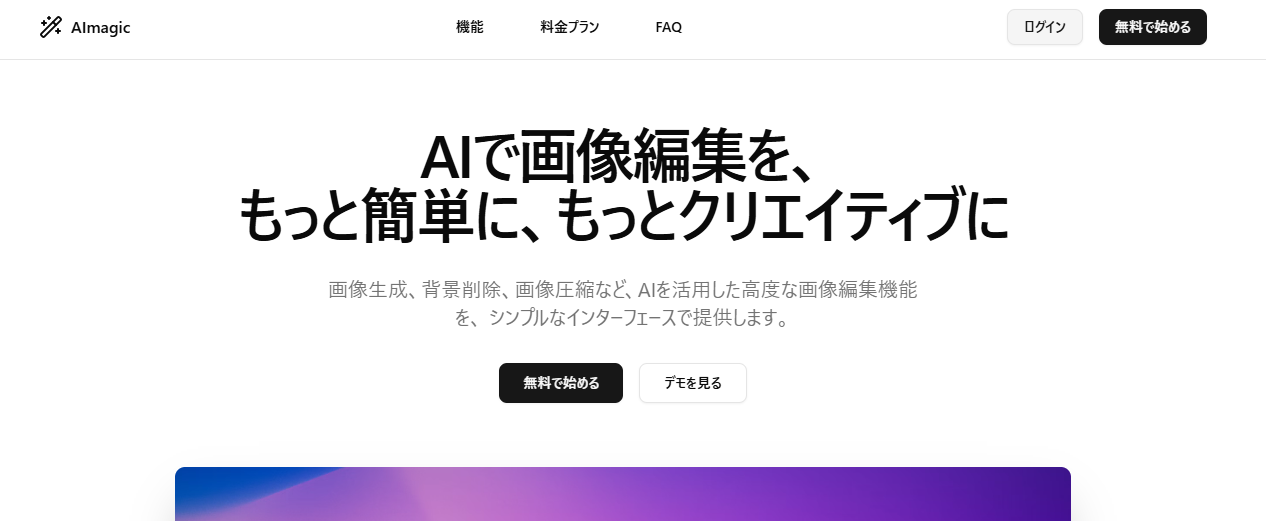
こんな感じで自然言語ベースでランディングページを作成してくれます

2秒でこんな幹事の画面が作成されました。

この画面をVSCodeへ移植していきます。
"use client";

import { Button } from "@/components/ui/button";
import { NavigationMenu, NavigationMenuItem, NavigationMenuLink, NavigationMenuList } from "@/components/ui/navigation-menu";
import { Card, CardContent, CardDescription, CardHeader, CardTitle } from "@/components/ui/card";
import { Tabs, TabsContent, TabsList, TabsTrigger } from "@/components/ui/tabs";
import { Accordion, AccordionContent, AccordionItem, AccordionTrigger } from "@/components/ui/accordion";
import { ImageIcon, Wand2Icon, CompassIcon as CompressIcon, TrashIcon, InstagramIcon, TwitterIcon, LinkedinIcon } from "lucide-react";
import Link from "next/link";

export default function Home() {
  return (
    <div className="min-h-screen bg-background">
      {/* Header */}
      <header className="fixed top-0 w-full bg-background/95 backdrop-blur supports-[backdrop-filter]:bg-background/60 z-50 border-b">
        <div className="container max-w-[1200px] mx-auto px-4">
          <div className="flex h-16 items-center justify-between">
            <div className="flex items-center gap-2">
              <Wand2Icon className="h-6 w-6" />
              <span className="font-bold">AImagic</span>
            </div>
            <NavigationMenu className="hidden md:flex">
              <NavigationMenuList className="flex gap-6">
                <NavigationMenuItem>
                  <NavigationMenuLink className="group inline-flex h-9 w-max items-center justify-center rounded-md bg-transparent px-4 py-2 text-sm font-medium transition-colors hover:bg-accent hover:text-accent-foreground focus:bg-accent focus:text-accent-foreground focus:outline-none disabled:pointer-events-none disabled:opacity-50" href="#features">
                    機能
                  </NavigationMenuLink>
                </NavigationMenuItem>
                <NavigationMenuItem>
                  <NavigationMenuLink className="group inline-flex h-9 w-max items-center justify-center rounded-md bg-transparent px-4 py-2 text-sm font-medium transition-colors hover:bg-accent hover:text-accent-foreground focus:bg-accent focus:text-accent-foreground focus:outline-none disabled:pointer-events-none disabled:opacity-50" href="#pricing">
                    料金プラン
                  </NavigationMenuLink>
                </NavigationMenuItem>
                <NavigationMenuItem>
                  <NavigationMenuLink className="group inline-flex h-9 w-max items-center justify-center rounded-md bg-transparent px-4 py-2 text-sm font-medium transition-colors hover:bg-accent hover:text-accent-foreground focus:bg-accent focus:text-accent-foreground focus:outline-none disabled:pointer-events-none disabled:opacity-50" href="#faq">
                    FAQ
                  </NavigationMenuLink>
                </NavigationMenuItem>
              </NavigationMenuList>
            </NavigationMenu>
            <div className="flex items-center space-x-4">
              <Button variant="outline">
                <Link href="/main">
                  ログイン
                </Link>
              </Button>
              <Button>無料で始める</Button>
            </div>
          </div>
        </div>
      </header>

      {/* Hero Section */}
      <section className="pt-24 md:pt-32 pb-16 md:pb-24">
        <div className="container max-w-[1200px] mx-auto px-4">
          <div className="flex flex-col items-center text-center space-y-8">
            <h1 className="text-4xl md:text-6xl font-bold tracking-tighter">
              AIで画像編集を、<br />もっと簡単に、もっとクリエイティブに
            </h1>
            <p className="text-xl text-muted-foreground max-w-[600px] mx-auto">
              画像生成、背景削除、画像圧縮など、AIを活用した高度な画像編集機能を、
              シンプルなインターフェースで提供します。
            </p>
            <div className="flex gap-4">
              <Button size="lg">無料で始める</Button>
              <Button size="lg" variant="outline">デモを見る</Button>
            </div>
            <div className="relative w-full max-w-4xl mx-auto mt-8">
              <img
                src="https://images.unsplash.com/photo-1618005182384-a83a8bd57fbe?q=80&w=2064&auto=format&fit=crop"
                alt="AI画像編集のデモ"
                className="rounded-lg shadow-2xl w-full"
              />
            </div>
          </div>
        </div>
      </section>

      {/* Features Section */}
      <section id="features" className="py-16 md:py-24 bg-muted/50">
        <div className="container max-w-[1200px] mx-auto px-4">
          <h2 className="text-3xl md:text-4xl font-bold text-center mb-12">主要機能</h2>
          <div className="grid md:grid-cols-2 lg:grid-cols-3 gap-8 max-w-5xl mx-auto">
            <Card>
              <CardHeader>
                <Wand2Icon className="h-8 w-8 mb-4" />
                <CardTitle>AI画像生成</CardTitle>
                <CardDescription>テキストから美しい画像を生成。アイデアを視覚化します。</CardDescription>
              </CardHeader>
              <CardContent>
                <img
                  src="https://images.unsplash.com/photo-1675426513962-63c6022a8626?q=80&w=2016&auto=format&fit=crop"
                  alt="AI画像生成"
                  className="rounded-lg w-full"
                />
              </CardContent>
            </Card>
            <Card>
              <CardHeader>
                <TrashIcon className="h-8 w-8 mb-4" />
                <CardTitle>背景削除</CardTitle>
                <CardDescription>ワンクリックで背景を自動削除。完璧な切り抜きを実現。</CardDescription>
              </CardHeader>
              <CardContent>
                <img
                  src="https://images.unsplash.com/photo-1635070041078-e363dbe005cb?q=80&w=2070&auto=format&fit=crop"
                  alt="背景削除"
                  className="rounded-lg w-full"
                />
              </CardContent>
            </Card>
            <Card>
              <CardHeader>
                <CompressIcon className="h-8 w-8 mb-4" />
                <CardTitle>画像圧縮</CardTitle>
                <CardDescription>品質を保ちながら、ファイルサイズを最適化。</CardDescription>
              </CardHeader>
              <CardContent>
                <img
                  src="https://images.unsplash.com/photo-1551288049-bebda4e38f71?q=80&w=2070&auto=format&fit=crop"
                  alt="画像圧縮"
                  className="rounded-lg w-full"
                />
              </CardContent>
            </Card>
          </div>
        </div>
      </section>

      {/* Pricing Section */}
      <section id="pricing" className="py-16 md:py-24">
        <div className="container max-w-[1200px] mx-auto px-4">
          <h2 className="text-3xl md:text-4xl font-bold text-center mb-12">料金プラン</h2>
          <Tabs defaultValue="monthly" className="w-full max-w-5xl mx-auto">
            <TabsList className="grid w-full grid-cols-2 mb-8">
              <TabsTrigger value="monthly">月額プラン</TabsTrigger>
              <TabsTrigger value="yearly">年額プラン(2ヶ月分お得)</TabsTrigger>
            </TabsList>
            <TabsContent value="monthly">
              <div className="grid md:grid-cols-3 gap-8">
                <Card>
                  <CardHeader>
                    <CardTitle>フリー</CardTitle>
                    <CardDescription>個人利用に最適</CardDescription>
                    <div className="text-3xl font-bold mt-4">¥0/月</div>
                  </CardHeader>
                  <CardContent>
                    <ul className="space-y-2">
                      <li>✓ 月100枚まで画像生成</li>
                      <li>✓ 基本的な編集機能</li>
                      <li>✓ 標準画質出力</li>
                    </ul>
                    <Button className="w-full mt-6">無料で始める</Button>
                  </CardContent>
                </Card>
                <Card className="border-primary">
                  <CardHeader>
                    <CardTitle>プロ</CardTitle>
                    <CardDescription>プロフェッショナル向け</CardDescription>
                    <div className="text-3xl font-bold mt-4">¥2,980/月</div>
                  </CardHeader>
                  <CardContent>
                    <ul className="space-y-2">
                      <li>✓ 月1000枚まで画像生成</li>
                      <li>✓ 全ての編集機能</li>
                      <li>✓ 高画質出力</li>
                      <li>✓ 優先サポート</li>
                    </ul>
                    <Button className="w-full mt-6">プロプランを選択</Button>
                  </CardContent>
                </Card>
                <Card>
                  <CardHeader>
                    <CardTitle>エンタープライズ</CardTitle>
                    <CardDescription>大規模利用向け</CardDescription>
                    <div className="text-3xl font-bold mt-4">要相談</div>
                  </CardHeader>
                  <CardContent>
                    <ul className="space-y-2">
                      <li>✓ 無制限の画像生成</li>
                      <li>✓ カスタム機能開発</li>
                      <li>✓ API連携</li>
                      <li>✓ 専任サポート</li>
                    </ul>
                    <Button variant="outline" className="w-full mt-6">お問い合わせ</Button>
                  </CardContent>
                </Card>
              </div>
            </TabsContent>
            <TabsContent value="yearly">
              {/* 年額プランの内容(月額と同じ構造で金額を変更) */}
            </TabsContent>
          </Tabs>
        </div>
      </section>

      {/* FAQ Section */}
      <section id="faq" className="py-16 md:py-24 bg-muted/50">
        <div className="container">
          <h2 className="text-3xl md:text-4xl font-bold text-center mb-12">よくある質問</h2>
          <Accordion type="single" collapsible className="w-full max-w-2xl mx-auto">
            <AccordionItem value="item-1">
              <AccordionTrigger>無料プランでできることは?</AccordionTrigger>
              <AccordionContent>
                無料プランでは月100枚までの画像生成、基本的な編集機能、標準画質での出力が可能です。
                商用利用も可能ですが、高度な機能や大量の画像処理には有料プランへのアップグレードをお勧めします。
              </AccordionContent>
            </AccordionItem>
            <AccordionItem value="item-2">
              <AccordionTrigger>支払い方法は?</AccordionTrigger>
              <AccordionContent>
                クレジットカード(Visa, Mastercard, American Express)、
                PayPal、銀行振込(法人のお客様のみ)に対応しています。
              </AccordionContent>
            </AccordionItem>
            <AccordionItem value="item-3">
              <AccordionTrigger>生成した画像の著作権は?</AccordionTrigger>
              <AccordionContent>
                AImagicで生成した画像の著作権は、生成したユーザーに帰属します。
                商用利用も可能ですが、詳細は利用規約をご確認ください。
              </AccordionContent>
            </AccordionItem>
          </Accordion>
        </div>
      </section>

      {/* CTA Section */}
      <section className="py-16 md:py-24">
        <div className="container">
          <div className="text-center space-y-8">
            <h2 className="text-3xl md:text-4xl font-bold">今すぐ始めましょう</h2>
            <p className="text-xl text-muted-foreground max-w-[600px] mx-auto">
              無料トライアルで100枚の画像生成クレジットをプレゼント。
              クレジットカード登録不要で、すぐに始められます。
            </p>
            <Button size="lg" className="mt-8">無料で始める</Button>
          </div>
        </div>
      </section>

      {/* Footer */}
      <footer className="border-t py-12 md:py-16">
        <div className="container">
          <div className="grid grid-cols-2 md:grid-cols-4 gap-8">
            <div>
              <h3 className="font-semibold mb-4">会社情報</h3>
              <ul className="space-y-2">
                <li><a href="#" className="text-muted-foreground hover:text-foreground">運営会社</a></li>
                <li><a href="#" className="text-muted-foreground hover:text-foreground">採用情報</a></li>
                <li><a href="#" className="text-muted-foreground hover:text-foreground">お問い合わせ</a></li>
              </ul>
            </div>
            <div>
              <h3 className="font-semibold mb-4">製品</h3>
              <ul className="space-y-2">
                <li><a href="#" className="text-muted-foreground hover:text-foreground">機能一覧</a></li>
                <li><a href="#" className="text-muted-foreground hover:text-foreground">料金プラン</a></li>
                <li><a href="#" className="text-muted-foreground hover:text-foreground">API連携</a></li>
              </ul>
            </div>
            <div>
              <h3 className="font-semibold mb-4">リソース</h3>
              <ul className="space-y-2">
                <li><a href="#" className="text-muted-foreground hover:text-foreground">ヘルプセンター</a></li>
                <li><a href="#" className="text-muted-foreground hover:text-foreground">開発者ドキュメント</a></li>
                <li><a href="#" className="text-muted-foreground hover:text-foreground">ステータス</a></li>
              </ul>
            </div>
            <div>
              <h3 className="font-semibold mb-4">法的情報</h3>
              <ul className="space-y-2">
                <li><a href="#" className="text-muted-foreground hover:text-foreground">利用規約</a></li>
                <li><a href="#" className="text-muted-foreground hover:text-foreground">プライバシーポリシー</a></li>
                <li><a href="#" className="text-muted-foreground hover:text-foreground">特定商取引法に基づく表記</a></li>
              </ul>
            </div>
          </div>
          <div className="mt-12 pt-8 border-t">
            <div className="flex justify-between items-center">
              <p className="text-sm text-muted-foreground">© 2024 AImagic. All rights reserved.</p>
              <div className="flex space-x-4">
                <a href="#" className="text-muted-foreground hover:text-foreground">
                  <TwitterIcon className="h-5 w-5" />
                </a>
                <a href="#" className="text-muted-foreground hover:text-foreground">
                  <InstagramIcon className="h-5 w-5" />
                </a>
                <a href="#" className="text-muted-foreground hover:text-foreground">
                  <LinkedinIcon className="h-5 w-5" />
                </a>
              </div>
            </div>
          </div>
        </div>
      </footer>
    </div>
  );
}
npm run devをして、画面確認して問題なければOKです。
Clerkのセットアップ
clerkへログインします
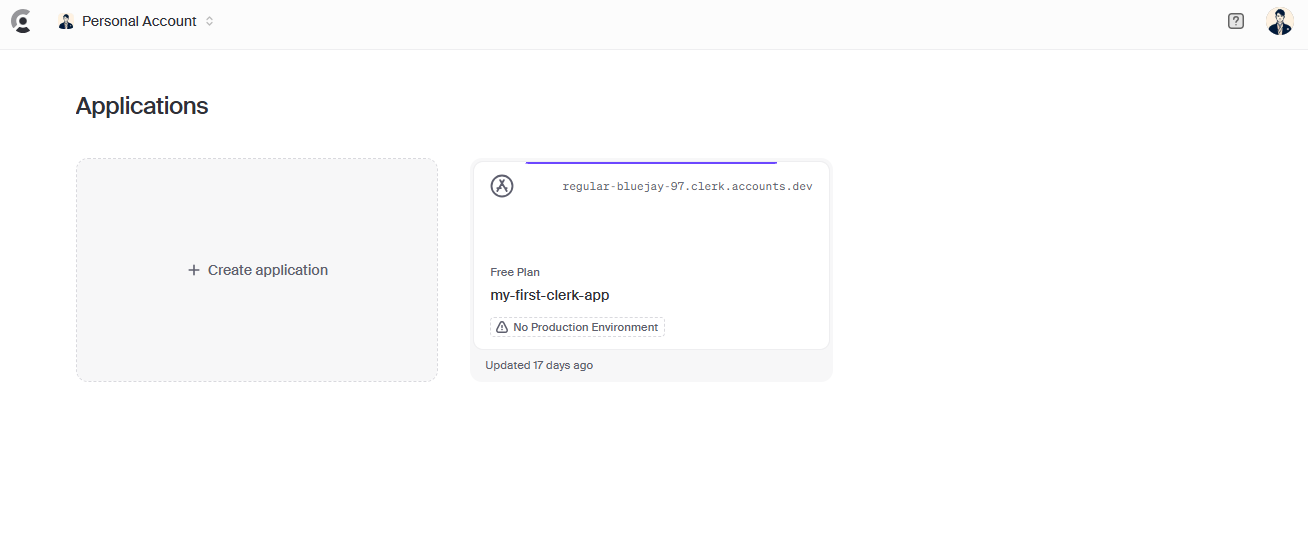
+Create Applicationをクリックして、新たなアプリケーションを作成
今回はシンプルにGitHubログインのみとします。
GoogleログインやEmail&Passwordログインも選択できます。

createすると、各種セッティングの画面が出てきます
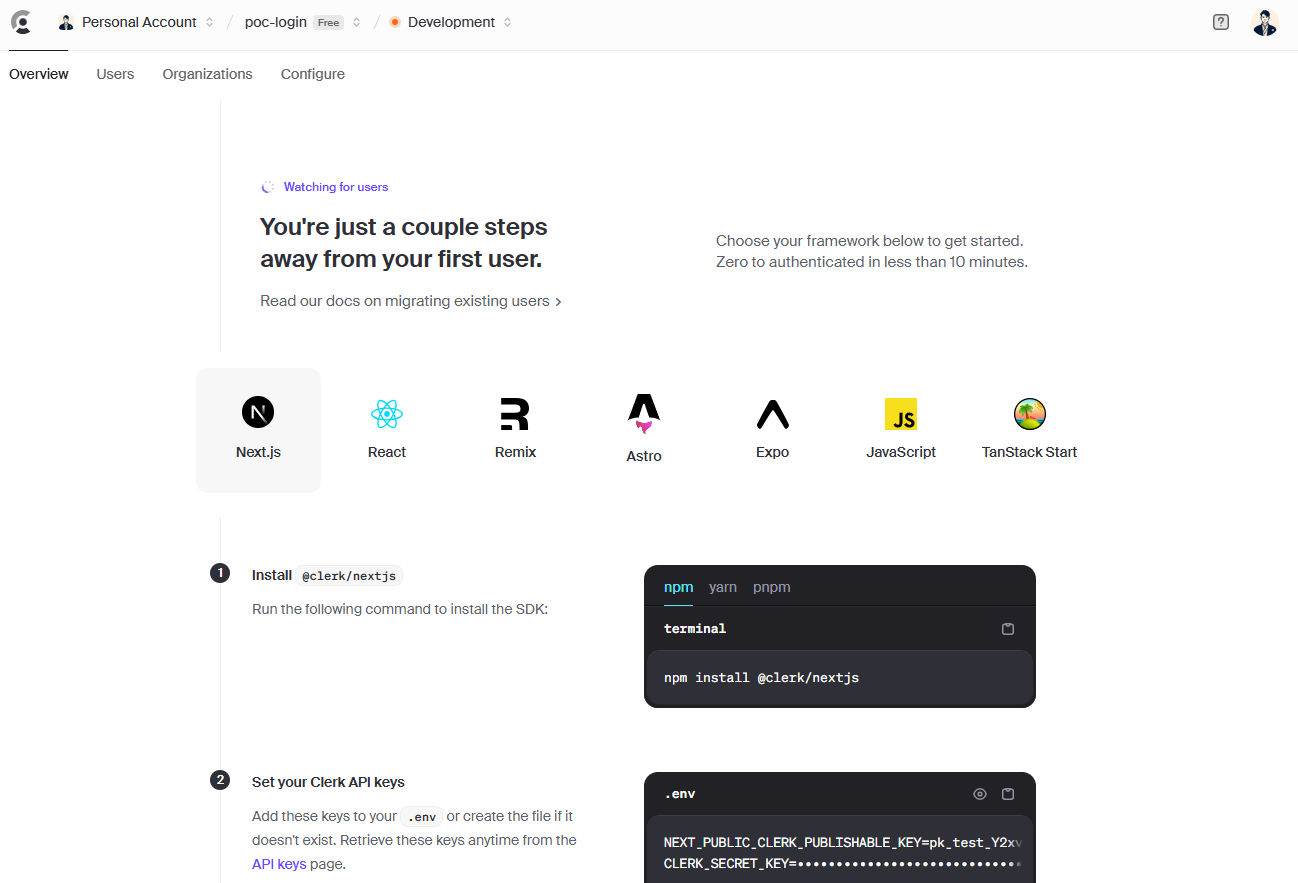
ClerkをNext.jsで使うために必要なパッケージをインストールします。
npm install @clerk/nextjs
筆者の環境はReact v19だとエラーとなるので、React v18を使ってます。
"react": "^18.2.0",
"react-dom": "^18.2.0",
.envファイルを作成します
NEXT_PUBLIC_CLERK_PUBLISHABLE_KEY=pk_test_xxxxxxxxxxxxxxxxxxxxxxxxxxxxxxxx
CLERK_SECRET_KEY=sk_test_xxxxxxxxxxxxxxxxxxxxxxxxxxxxxxxxxxx
src/appディレクトリ配下に以下のディレクトリを作成します。

sign-in/[[...signin]]/page.tsxは以下のコードを記載してください。
import { SignIn } from '@clerk/nextjs';

export default function Page() {
  return <SignIn />;
}
sign-up/[[...signup]]/page.tsxは以下のコードを記載してください。
import { SignUp } from '@clerk/nextjs';

export default function Page() {
  return <SignUp />;
}
srcディレクトリ直下にmiddleware.tsを作成します。
import { clerkMiddleware, createRouteMatcher } from '@clerk/nextjs/server';

const isPublicRoute = createRouteMatcher([
  '/sign-in(.*)',
  '/sign-up(.*)',
  '/',
]);

export default clerkMiddleware(async (auth, request) => {
  if (!isPublicRoute(request)) {
    await auth.protect();
  }
});

export const config = {
  matcher: [
    // Skip Next.js internals and all static files, unless found in search params
    '/((?!_next|[^?]*\\.(?:html?|css|js(?!on)|jpe?g|webp|png|gif|svg|ttf|woff2?|ico|csv|docx?|xlsx?|zip|webmanifest)).*)',
    // Always run for API routes
    '/(api|trpc)(.*)',
  ],
};
ログイン後の画面も簡単に作成しておきます。
const Main = () => {
    return (
        <div>ログイン完了</div>
    );
};

export default Main;
layout.tsx へClerkProviderを追加します。
import { ClerkProvider } from '@clerk/nextjs';
import type { Metadata } from "next";
import { Geist, Geist_Mono } from "next/font/google";
import "./globals.css";

const geistSans = Geist({
  variable: "--font-geist-sans",
  subsets: ["latin"],
});

const geistMono = Geist_Mono({
  variable: "--font-geist-mono",
  subsets: ["latin"],
});

export const metadata: Metadata = {
  title: "Create Next App",
  description: "Generated by create next app",
};

export default function RootLayout({
  children,
}: Readonly<{
  children: React.ReactNode;
}>) {
  return (
    <ClerkProvider afterSignOutUrl={'/main'}>
    <html lang="ja">
      <body
        className={`${geistSans.variable} ${geistMono.variable} antialiased`}
      >
        {children}
      </body>
    </html>
    </ClerkProvider>
  );
}
では、検証してみましょう。
画面右上のログインボタンをクリックすると、Clerkのログイン画面が表示されます。
GitHubのログイン画面が出てきました。

当然まだユーザー登録していないので、SignUp→Continue with GitHubをクリックしてください。
以下のような認証前の画面が出てきます。そのまま進めると...

mainページに遷移します。

Clerkの管理画面を見ると、Userが追加されていることがわかります。

これでログイン機能は完成です。
素晴らしく簡単ですね。
Webhookを用いたCosmosDBへのユーザー格納
ClerkのWebhookを使って、ユーザー情報をAzure Cosmos DBに保存する方法を紹介します。
src/app/api/webhook/clerk/route.tsというディレクトリとファイルを作成してください。
import { createUser, deleteUser, updateUser } from '@/lib/cosmos/user';
import { WebhookEvent } from '@clerk/nextjs/server';
import { headers } from 'next/headers';
import { Webhook } from 'svix';

export async function POST(req: Request) {
  const SIGNING_SECRET = process.env.SIGNING_SECRET;

  if (!SIGNING_SECRET) {
    throw new Error(
      'Error: Please add SIGNING_SECRET from Clerk Dashboard to .env or .env'
    );
  }

  // Create new Svix instance with secret
  const wh = new Webhook(SIGNING_SECRET);

  // Get headers
  const headerPayload = await headers();
  const svix_id = headerPayload.get('svix-id');
  const svix_timestamp = headerPayload.get('svix-timestamp');
  const svix_signature = headerPayload.get('svix-signature');

  // If there are no headers, error out
  if (!svix_id || !svix_timestamp || !svix_signature) {
    return new Response('Error: Missing Svix headers', {
      status: 400,
    });
  }

  // Get body
  const payload = await req.json();
  const body = JSON.stringify(payload);

  let evt: WebhookEvent;

  // Verify payload with headers
  try {
    evt = wh.verify(body, {
      'svix-id': svix_id,
      'svix-timestamp': svix_timestamp,
      'svix-signature': svix_signature,
    }) as WebhookEvent;
  } catch (err) {
    console.error('Error: Could not verify webhook:', err);
    return new Response('Error: Verification error', {
      status: 400,
    });
  }

  // Do something with payload
  // For this guide, log payload to console
  const { id } = evt.data;
  const eventType = evt.type;
  console.log(`Received webhook with ID ${id} and event type of ${eventType}`);
  if (evt.type === 'user.created') {
    const result = await createUser(
      evt.data.id,
      evt.data.email_addresses[0].email_address
    );
    console.log('🚀 ~ POST ~ result:', result);
    return new Response('user registered', { status: 200 });
  } else if (evt.type === 'user.updated') {
    const result = await updateUser(
      evt.data.id,
      evt.data.email_addresses[0].email_address
    );
    console.log('🚀 ~ POST ~ result:', result);
    return new Response('user updated', { status: 200 });
  } else if (evt.type === 'user.deleted') {
    const result = await deleteUser(evt.data.id!);
    console.log('🚀 ~ POST ~ result:', result);
    return new Response('user registered', { status: 200 });
  } else {
    return new Response('Webhook received', { status: 200 });
  }
}
次はlib/cosmos/user.tsを作成します。
import { CosmosClient } from '@azure/cosmos';

/**
 * ユーザー作成
 */
export const createUser = async (clerkId: string, email: string) => {
  return new Promise(async (resolve, reject) => {
    try {
      const cosmosClient = new CosmosClient(
        process.env.COSMOS_CONNECTION_STRING!
      );
      const database = cosmosClient.database(process.env.COSMOS_DATABASE_NAME!);
      const container = database.container(process.env.COSMOS_CONTAINER_NAME!);

      // 新規のユーザードキュメントを作成
      // idにはCosmos DBのユニークIDが必要となるので、通常はclerkIdやUUID等をそのまま渡すことが多いです
      const { resource } = await container.items.create({
        id: clerkId, // ここではclerkIdをそのままidとして利用
        clerkId: clerkId,
        email: email,
        createdAt: new Date().toISOString(),
      });

      // 作成したリソースを返却
      resolve(resource);
    } catch (error) {
      console.log(error);
      reject(error);
    }
  });
};

/**
 * ユーザー更新
 *  - 例として email を更新
 *  - 必要に応じて他のフィールドも同様に更新可能
 */
export const updateUser = async (clerkId: string, newEmail: string) => {
  return new Promise(async (resolve, reject) => {
    try {
      const cosmosClient = new CosmosClient(
        process.env.COSMOS_CONNECTION_STRING!
      );
      const database = cosmosClient.database(process.env.COSMOS_DATABASE_NAME!);
      const container = database.container(process.env.COSMOS_CONTAINER_NAME!);

      // 更新対象のアイテムを取得
      const item = container.item(clerkId, clerkId);
      const { resource: existingUser } = await item.read();

      if (!existingUser) {
        // ユーザーが見つからなかった場合
        throw new Error(`User with id ${clerkId} not found.`);
      }

      // 更新フィールドをマージ
      const updatedUser = {
        ...existingUser,
        email: newEmail,
        updatedAt: new Date().toISOString(),
      };

      // 置換 (replace) で更新を実施
      const { resource } = await item.replace(updatedUser);
      resolve(resource);
    } catch (error) {
      console.error(error);
      reject(error);
    }
  });
};

/**
 * ユーザー削除
 */
export const deleteUser = async (clerkId: string) => {
  return new Promise(async (resolve, reject) => {
    try {
      const cosmosClient = new CosmosClient(
        process.env.COSMOS_CONNECTION_STRING!
      );
      const database = cosmosClient.database(process.env.COSMOS_DATABASE_NAME!);
      const container = database.container(process.env.COSMOS_CONTAINER_NAME!);

      // 削除対象のアイテムを取得
      const item = container.item(clerkId, clerkId);
      const { resource: existingUser } = await item.read();

      if (!existingUser) {
        // 削除対象のユーザーが見つからなかった場合
        throw new Error(`User with id ${clerkId} not found.`);
      }

      // 対象ドキュメントを削除
      await container.item(clerkId, clerkId).delete();

      resolve(true);
    } catch (error) {
      console.error(error);
      reject(error);
    }
  });
};
次はAzure Portalへ移動してCosmosDBを作成します。

データエクスプローラーからDatabaseとContainerを作成します。

これでセット完了です。
VSCodeに戻り、.envファイルに以下の情報を追加してください。
Azureポータルでの記載場所は以下となります。

COSMOS_CONNECTION_STRING=AccountEndpoint=
COSMOS_DATABASE_NAME=
COSMOS_CONTAINER_NAME=
ここまでくればセッティングOKです。
ngrokを使って、ローカルサーバーを外部公開します。
choco install ngrok
ngrok config add-authtoken 2u1bMefxgqTzBSCmxFBjUWdBiye_xxxxxxxxxxxxxxxxxx
下記コマンドでURLが発行されます。
ngrok http http://localhost:8080
発行されたURLの末尾に /api/webhook/clerk を追加してください。
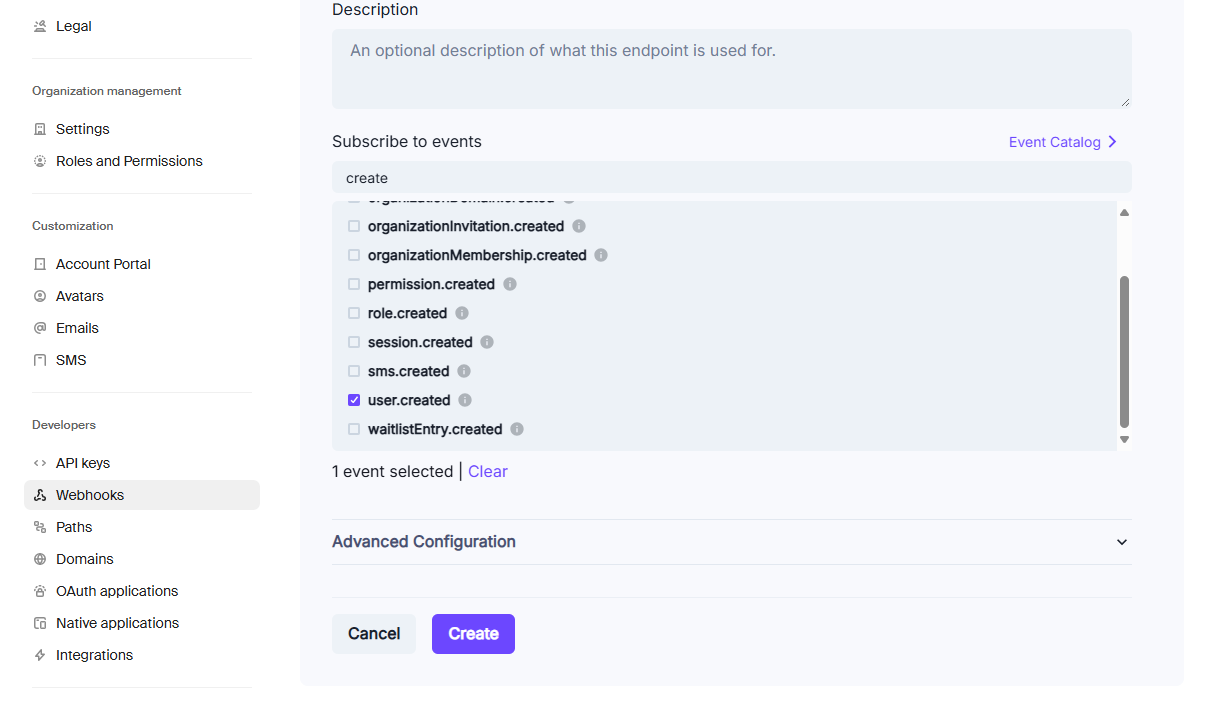
発行されたURLをEndpoint URLに貼り付けて、Subscribe to eventsでuser.createdを選択してcreateを選択してください。
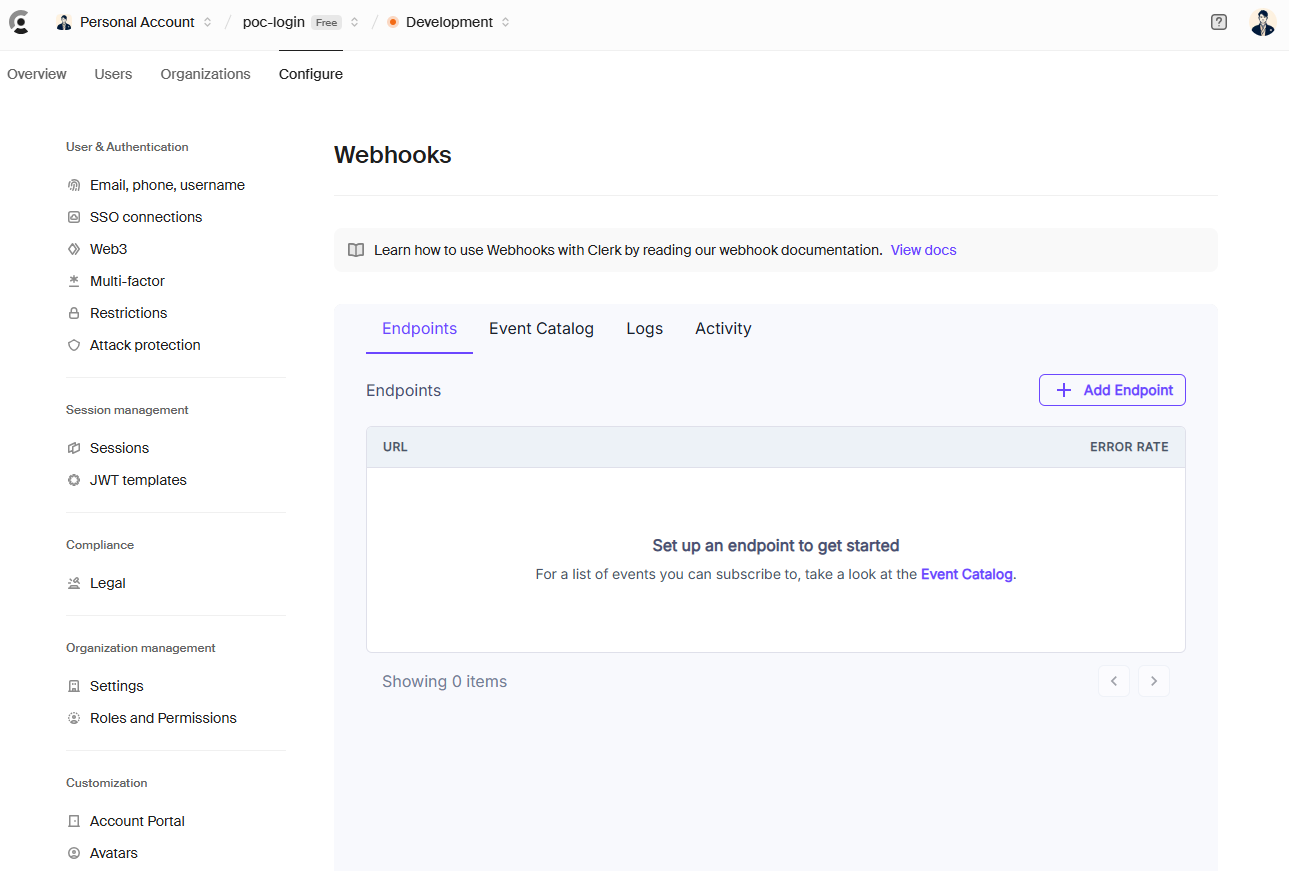
Clerkの管理画面に移動してください。
Configure→Webhookから+Add Endpointをクリックしてください。
Testingの箇所からuser.createdを選択して、Send Test Eventをクリックしてください。

上記実行後、CosmosDBへ値が格納されていればOKです。
まとめ
本記事では、Next.jsとClerkを組み合わせた認証と、Azure Cosmos DBへのユーザー情報の保存方法を紹介しました。
Clerkを使うと、ログイン機能やサインアップ画面の構築をほぼ自動的に行えるうえ、セッション管理やユーザープロファイル管理の負荷が軽減できます。
これに加えて、Azure Cosmos DBの柔軟なスケーラビリティを活かしてユーザーデータを保存すれば、スモールスタートから大規模アプリケーションまで対応可能です。
これで、Next.js + Clerk + Azure Cosmos DBを使った認証&データ保存基盤の概要が完成です。ぜひ活用してみてください!

Discussion