
はじめに
今回は Azure AI Agent Service を使って、シンプルなマルチエージェントアプリを TypeScript で実装していきます。
python での実装記事はかなり多く出てきているのですが、TypeScript になるとあまり情報が出てこなかった為、今回は TypeScript でハンズオンをしてみました。
是非ご参考ください 👍
本記事の目標
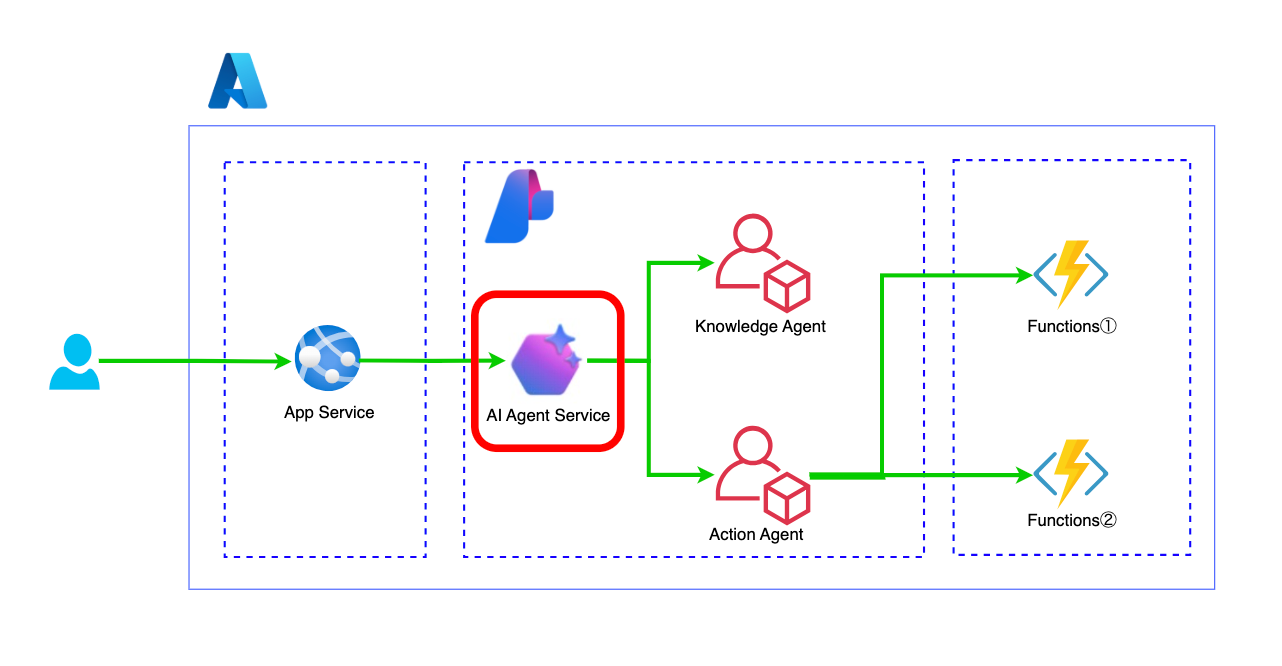
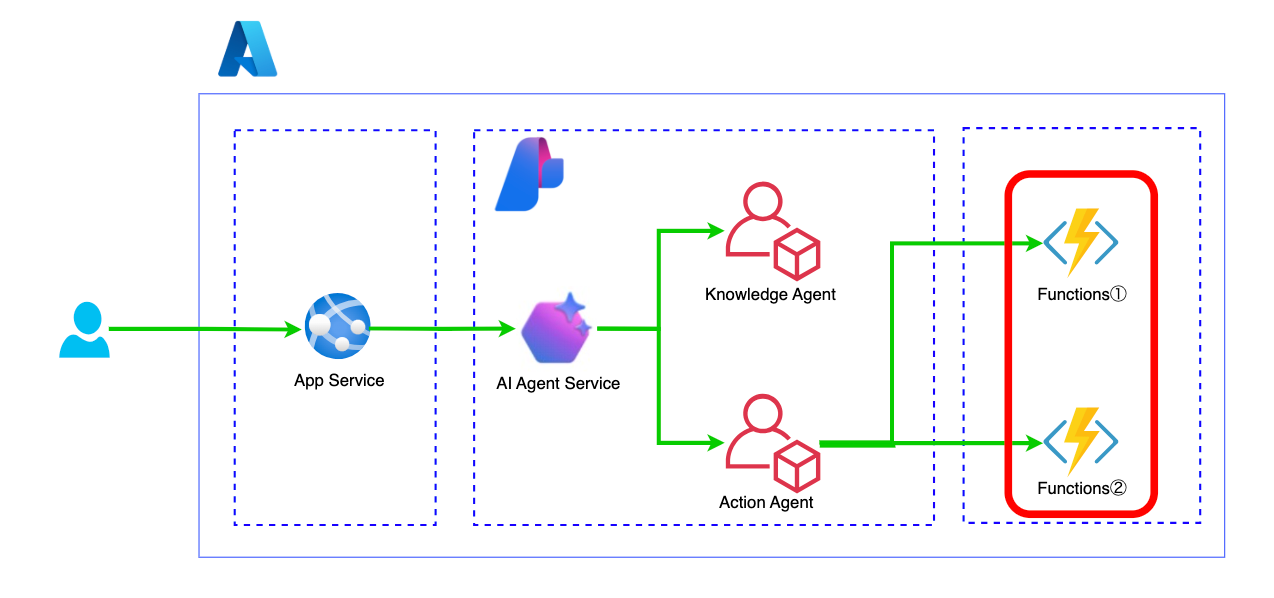
以下の構成を TypeScript で実装し、Azure AI Agent Service を利用して、マルチエージェントアプリを構築します。

- App Service へホスティングした Express.js を通じて、AI Agent Service SDK を使用
- Agent を管理している AI Foundry 内の Azure AI Agent Service から各種必要な Agent を呼び出し
- AI Agent より帰ってきた結果を Express.js へ return
今回準備する AI Agent は 2 体
- Knowledge-Agent
- 独自のドキュメントをセットしておき、RAG のようにドキュメントに沿った返答を行います。
- Action-Agent
- Function Calling を用いて2種類の Functions を呼び出します。
- Azure Functions は今回はモックとして天気の情報とユーザー情報を return するだけのものを用意します。
本記事で Azure AI Agent Service の基本的な使い方を学ぶことが出来ます。
それでは進めていきましょう。
ハンズオン
Azure AI Agent Service のセットアップ
以下の記事を参照し、AI Agent を構築していく
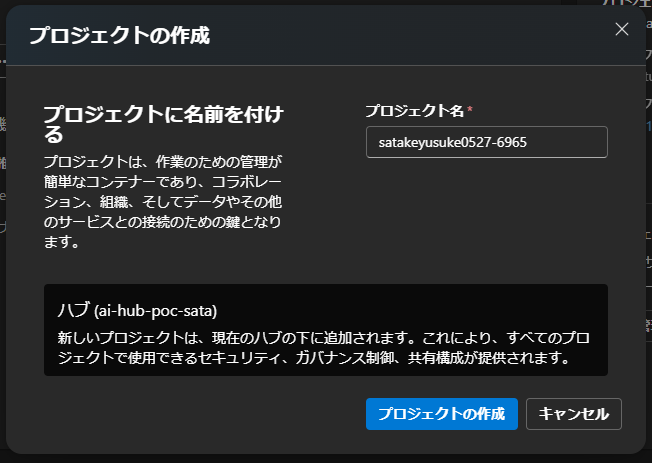
AI Foundry へアクセスし、新しいプロジェクトの作成を選択

そのまま、プロジェクトの作成をクリック
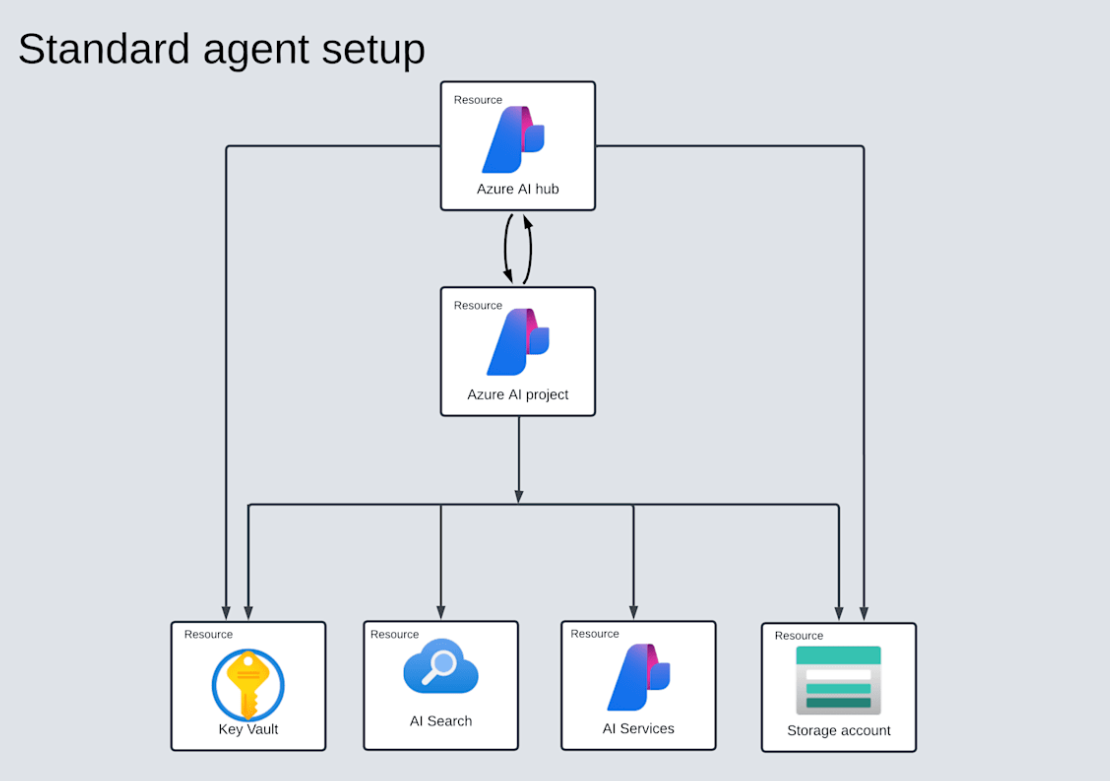
プロジェクトを作成すると、以下のリソースが作成される

図解すると以下。Azure AI hub の下に AI project が作成され、その下に KeyVault や AI Search, AI Services, Storage Account が作成される。
Azure AI Agent Service にてリソースを選択し、作成を進めていく。

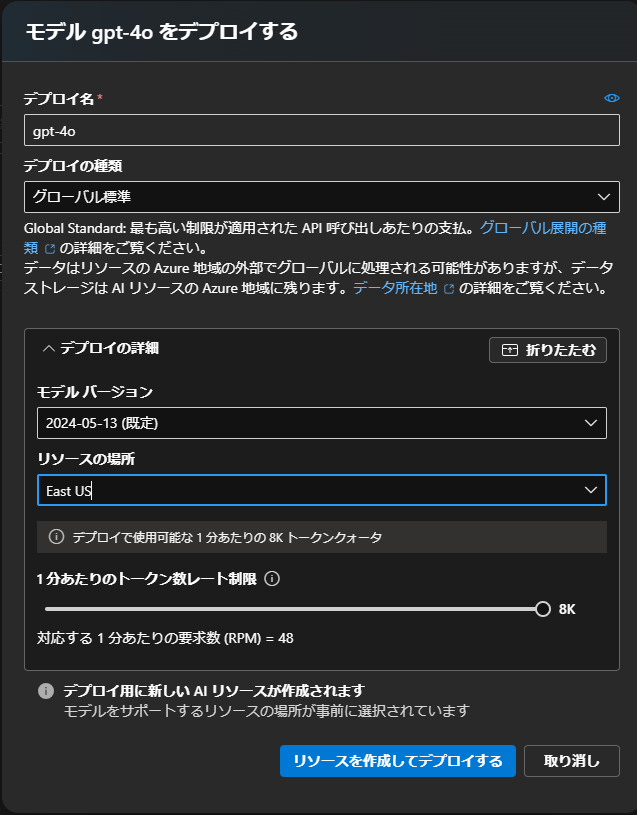
モデル を Deploy する

今回は GPT-4o を Deploy する
Agent が GUI 上で作成することが出来る。
これで AI Agent Service のセットアップは完了です。

今回は二人の AI Agent を作成しておきます。
- Knowledge-Agent
- 独自のドキュメントをセットしておき、RAG のようにドキュメントに沿った返答を行います。
- Action-Agent
- Function Calling を用いて2種類の Functions を呼び出します。
- Azure Functions は今回はモックとして天気の情報とユーザー情報を return するだけのものを用意します。

Knowledge-Agent は +新しいエージェントを選択し、
手順へ以下を記載
ドキュメントの中に記載されている内容を回答してください。結論だけ返答してください。
ナレッジの追加からファイルを選択し、お好きなファイルを Upload してください

Action-Agent は +新しいエージェントを選択し作成するだけで OK です。
内部で動作させる Azure Functions は(2025/04 時点で)手動追加ができないので、後ほどコードベースで追加します。
ここまできたら AI Agent Service のセットアップ完了です。
Azure Functions のセットアップ
以下の記事を参考にし、Azure Functions のセットアップを行います。
2 つの Azure Functions を作成します。
- get_weather
- 天気の情報を返すだけのモック
- get_users
- ユーザーの情報を返すだけのモック
開発環境のセットアップ
まず、必要なツールをインストールします。
Node.js のインストール
公式サイトから最新の Node.js をダウンロードし、インストールします。
node -v
Azure Functions Core Tools のインストール
Azure Functions Core Tools は、ローカル環境で Azure Functions を開発・実行するためのツールです。
npm install -g azure-functions-core-tools@4 --unsafe-perm true
プロジェクトの作成
次に、Azure Functions プロジェクトを作成します。
新しいプロジェクトの作成
以下のコマンドで新しい Azure Functions プロジェクトを作成します。
func init --typescript
関数の作成
以下のコマンドで新しい関数を作成します。
今回は HTTP トリガーを作成します。
func new --name get_wheather  --template "HTTP trigger" --authlevel "anonymous"
func new --name get_users  --template "HTTP trigger" --authlevel "anonymous"
上記コマンドを実行すると、src/functions ディレクトリに関数が作成されていることを確認してください。
TypeScript の設定
プロジェクトを TypeScript で実装するための設定を行います。
3.1 TypeScript の設定
tsconfig.json ファイルを作成し、以下の内容を記述します。
{
  "compilerOptions": {
    "module": "commonjs",
    "target": "es6",
    "outDir": "dist",
    "rootDir": ".",
    "sourceMap": true,
    "strict": false
  }
}
各関数の実装
今回はモックの関数なので、簡単な Azure Functions の実装を行います。
import {
  app,
  HttpRequest,
  HttpResponseInit,
  InvocationContext,
} from '@azure/functions';

export async function get_weather(
  request: HttpRequest,
  context: InvocationContext
): Promise<HttpResponseInit> {
  // ログ出力
  context.log(`Mocked weather function called. URL: "${request.url}"`);

  // 例: 適当な天気・気温をランダムで返す
  // ※ 完全に固定値にしたい場合は、下記のロジックを除いて
  //   "{ weather: '晴れ', temp: 25 }" のようにベタ書きでもOK
  const weatherCandidates = ['晴れ', '曇り', '雨', '雷雨'];
  const randomWeather =
    weatherCandidates[Math.floor(Math.random() * weatherCandidates.length)];

  // 15〜30度の範囲でランダム
  const randomTemp = (Math.random() * 15 + 15).toFixed(1);

  // モックのレスポンスデータ
  const data = {
    city: 'Osaka',
    weather: randomWeather,
    temperature: `${randomTemp}℃`,
  };

  return {
    status: 200,
    // JSON文字列として返す
    body: JSON.stringify({
      message: `モックの大阪の天気: ${randomWeather}, 気温: ${randomTemp}℃`,
      data,
    }),
    headers: { 'Content-Type': 'application/json' },
  };
}

// Azure Functions に登録 (Azure Functions Core Tools で func start したりして動作確認)
app.http('get_weather', {
  methods: ['GET', 'POST'],
  authLevel: 'anonymous',
  handler: get_weather,
});
import {
  app,
  HttpRequest,
  HttpResponseInit,
  InvocationContext,
} from '@azure/functions';

export async function get_users(
  request: HttpRequest,
  context: InvocationContext
): Promise<HttpResponseInit> {
  context.log(`Http function processed request for url "${request.url}"`);

  // 適当なユーザー情報を用意
  const mockUsers = [
    {
      id: 1,
      name: 'Alice',
      email: 'alice@example.com',
    },
    {
      id: 2,
      name: 'Bob',
      email: 'bob@example.com',
    },
    {
      id: 3,
      name: 'Charlie',
      email: 'charlie@example.com',
    },
  ];

  return {
    status: 200,
    body: JSON.stringify({
      message: 'Mocked user list',
      data: mockUsers,
    }),
    headers: {
      'Content-Type': 'application/json',
    },
  };
}

app.http('get_users', {
  methods: ['GET', 'POST'],
  authLevel: 'anonymous',
  handler: get_users,
});
Functions の実行
ローカルでの実行
以下のコマンドで TypeScript の関数をローカルで実行します
npm start
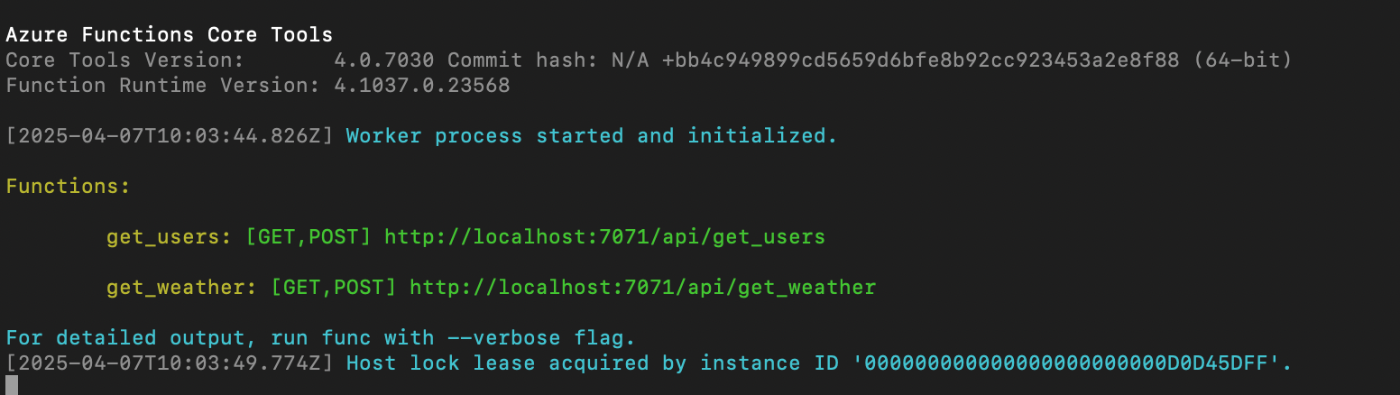
ブラウザでそれぞれ http://localhost:7071/api/get_users と http://localhost:7071/api/get_weather にアクセスし、関数が正しく動作することを確認します。
Azure へのデプロイ
Azure Functions を Deploy します。
Azure のポータル画面に行き、リソースグループと関数アプリを作成してください。

作成からホスティングプランを消費を選択し、作成します。
設定は以下のようになります。

ApplicationInsights は OFF にして、後はデフォルトの設定をして関数アプリを作成してください。

出来ましたでしょうか。
ここまでできたら、VSCode から Azure Functions をデプロイします。
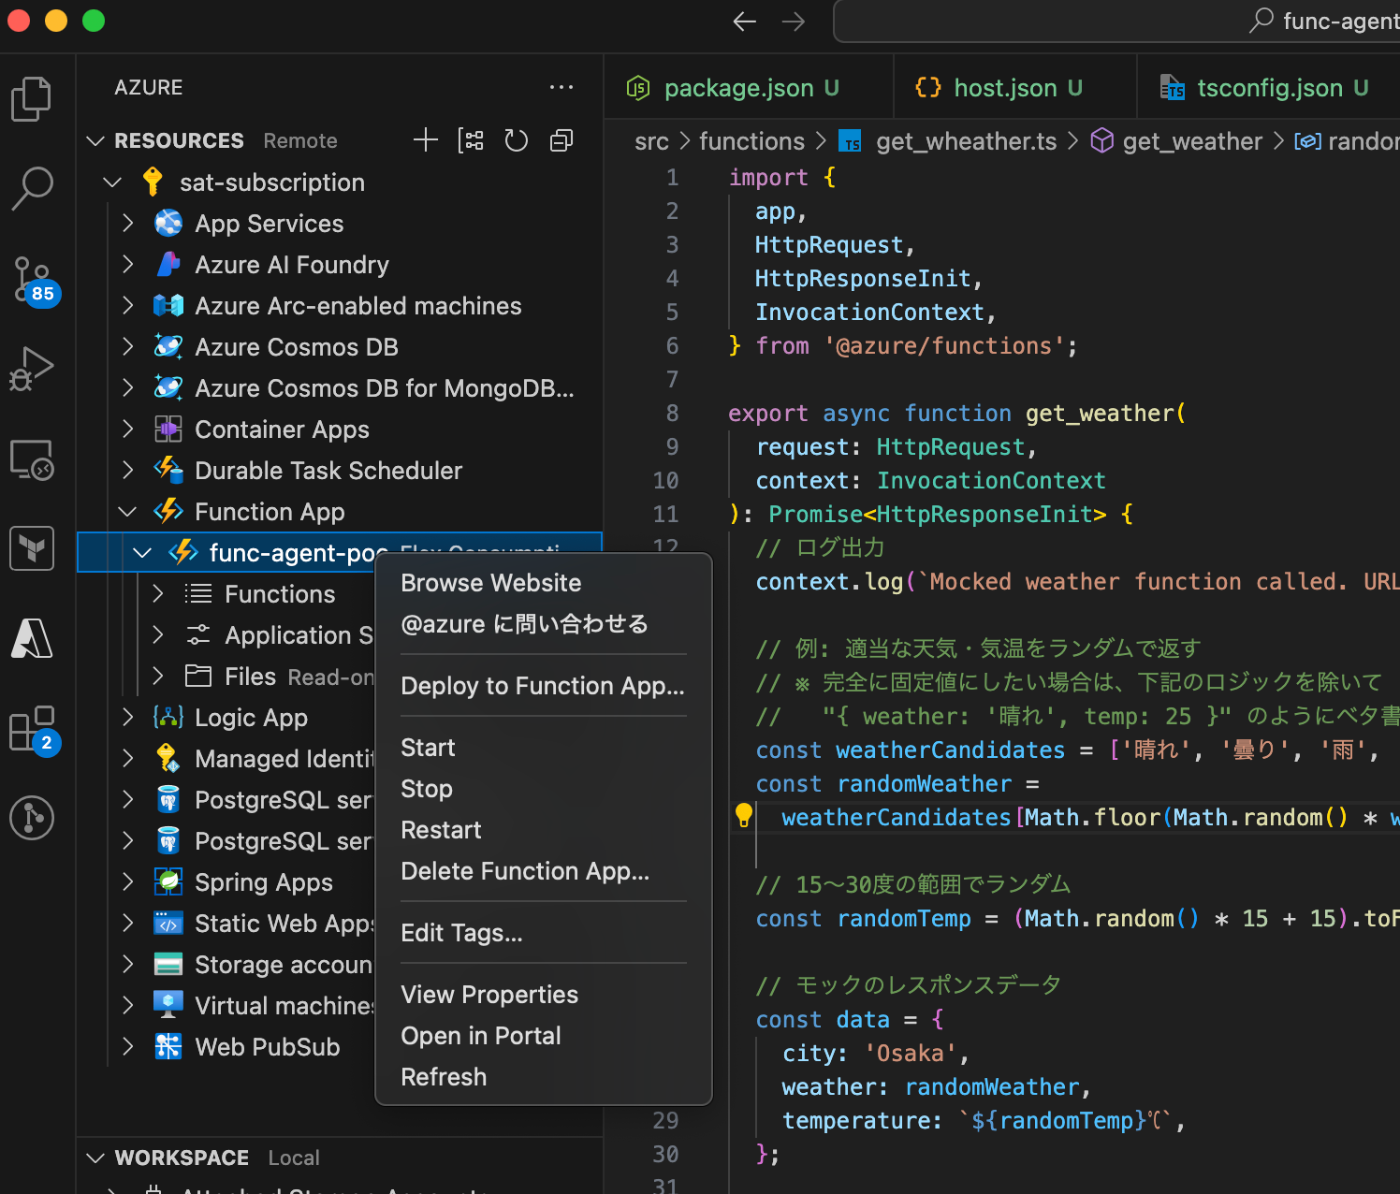
こちらクリックして Deploy 完了です。
Azure Portal より、二つの関数が作成されていることを確認してください。

Express.js のセットアップ
最後に Express.js のセットアップを行います。
任意のディレクトリに移動して、以下のコマンドを実行してください。
npx express-generator . --view ejs
npm install
npm install @azure/ai-projects
npm install @azure/identity
TypeScript 化する場合は以下のサイトを参照してください
各ディレクトリを以下のように作成してください。

- models/FunctionToolExecutor.ts
- Agent へ登録する Azure Functions を定義
- routes/action.ts
- Agent を呼び出し、必要な関数を Function Calling にて呼び出すコード
- routes/knowledge.ts
- Knowledge Agent を呼び出すコード
では、コードを順番に記載していきましょう。
API 全体を取りまとめる app.ts は以下のようになります。
import cookieParser from 'cookie-parser';
import express, { NextFunction, Request, Response } from 'express';
import createError from 'http-errors';
import logger from 'morgan';
import path from 'path';

import { router as actionRouter } from './routes/action';
import { router as indexRouter } from './routes/index';
import { router as knowledgeRouter } from './routes/knowledge';

const app = express();

// view engine setup
app.set('views', path.join('views')); //__dirNameと書いてある箇所を除く!
app.set('view engine', 'ejs');

app.use(logger('dev'));
app.use(express.json());
app.use(express.urlencoded({ extended: false }));
app.use(cookieParser());
app.use(express.static(path.join('public'))); //__dirNameと書いてある箇所を除く!
app.use(express.static('public'));

app.use('/', indexRouter);
app.use('/knowledge', knowledgeRouter);
app.use('/action', actionRouter);

// catch 404 and forward to error handler
app.use(function (req, res, next) {
  next(createError(404));
});


interface ErrorWithStatus extends Error {
  status: number;
}

app.use(function (
  err: ErrorWithStatus,
  req: Request,
  res: Response,
  next: NextFunction
) {
  // set locals, only providing error in development
  res.locals.message = err.message;
  res.locals.error = req.app.get('env') === 'development' ? err : {};

  // render the error page
  res.status(err.status || 500);
  res.render('error');
});

export default app;
Action Agent を呼び出すコードは以下のようになります。
ACTION_AGENT_ID は Action Agent のものを指定してください。
import {
  AIProjectsClient,
  isOutputOfType,
  MessageStreamEvent,
} from '@azure/ai-projects';
import { DefaultAzureCredential } from '@azure/identity';
import express from 'express';
import { FunctionToolExecutor } from '../models/FunctionToolExecutor';

const router = express.Router();

const connectionString =
  'eastus2.api.azureml.ms;xxxxxxxxxx-xxxx-xxxx-xxxx-xxxxxxxxxxxxxxxx;rg-agent-poc;prj-agent-poc';

const ACTION_AGENT_ID = 'asst_xxxxxxxxxxxxxxxxxxxx';

const QUESTION = 'Please tell me the all user.';

router.get('/', async function (req, res, next) {
  try {
    const client = AIProjectsClient.fromConnectionString(
      connectionString,
      new DefaultAzureCredential()
    );

    const actionAgentId = ACTION_AGENT_ID;

    const userQuestion = QUESTION;

    let thread = await client.agents.createThread();
    console.log('Created thread:', thread.id);

    await client.agents.createMessage(thread.id, {
      role: 'user',
      content: userQuestion,
    });
    console.log('Added user message:', userQuestion);

    const streamEventMessages = await client.agents
      .createRun(thread.id, actionAgentId)
      .stream();

    await new Promise<string>(async (resolve, reject) => {
      try {
        let textBuffer = '';

        for await (const eventMessage of streamEventMessages) {
          switch (eventMessage.event) {
            case MessageStreamEvent.ThreadMessageDelta: {
              const messageDelta: any = eventMessage.data;
              messageDelta.delta.content.forEach((contentPart: any) => {
                if (contentPart.type === 'text') {
                  const textValue = contentPart.text?.value || '';
                  textBuffer += textValue; // テキストを連結
                  process.stdout.write(textValue); // コンソールにも随時出力
                }
              });
              break;
            }
            case 'thread.run.requires_action': {
              const messageDelta: any = eventMessage.data;
              const requiredAction = messageDelta.requiredAction;
              const callId = requiredAction.submitToolOutputs.toolCalls[0].id;

              const executor = new FunctionToolExecutor();
              const toolCall = {
                id: callId,
                function: {
                  name: requiredAction.submitToolOutputs.toolCalls[0].function
                    .name,
                  parameters: '{}',
                },
              };

              try {
                const result = await executor.invokeTool(toolCall as any);

                const toolOutputs = [
                  {
                    toolCallId: callId,
                    output: JSON.stringify(result?.output),
                  },
                ];

                await client.agents.submitToolOutputsToRun(
                  thread.id,
                  messageDelta.id,
                  toolOutputs
                );

                await client.agents
                  .createRun(thread.id, actionAgentId)
                  .stream();
              } catch (err) {
                console.error('Error invoking tool:', err);
              }
              break;
            }
            case 'done': {
              console.log('Received done event.');
              // done イベントが来たら resolve
              resolve(textBuffer);
              break;
            }
            default: {
              console.log('[Default event handler]', eventMessage.event);
              break;
            }
          }
        }

        console.log('\n--- Stream completed ---\n');
        resolve(textBuffer);
      } catch (err) {
        reject(err);
      }
    });

    const messages = await client.agents.listMessages(thread.id);
    console.log('=== Final conversation messages === :');

    let finalResult: string | null = null;

    for (let i = 0; i < messages.data.length; i++) {
      const msg = messages.data[i];
      if (msg.content && msg.content[0]) {
        const content0 = msg.content[0];
        if (isOutputOfType(content0, 'text')) {
          const textObj = (content0 as any).text;
          console.log(`[${msg.role}]`, textObj.value);
          finalResult += textObj.value;
        } else {
          console.log(`[${msg.role}] (Non-text message)`, content0);
        }
      }
    }

    console.log('🚀 ~ finalResult:', finalResult);

    res.json({
      status: '200',
      finalResult,
    });
  } catch (error) {
    next(error);
  }
});

export { router };
Knowledge Agent を呼び出すコードは以下のようになります。
agentId は Knowledge Agent のものを指定してください。
import type {
  MessageDeltaChunk,
  MessageDeltaTextContent,
  MessageTextContentOutput,
} from '@azure/ai-projects';
import {
  AIProjectsClient,
  ErrorEvent,
  isOutputOfType,
  MessageStreamEvent,
} from '@azure/ai-projects';
import { DefaultAzureCredential } from '@azure/identity';

import express from 'express';
const router = express.Router();

const connectionString =
  'eastus2.api.azureml.ms;xxxxxxx-xxxx-xxxx-xxxx-xxxxxxxxxxx;rg-agent-poc;prj-agent-poc';

if (!connectionString) {
  throw new Error(
    'AZURE_AI_PROJECTS_CONNECTION_STRING must be set in the environment variables'
  );
}

const question = 'Please tell me total poc amount from 1/23 to 2/17.';

/* GET users listing. */
router.get('/', async function (req, res, next) {
  const client = AIProjectsClient.fromConnectionString(
    connectionString || '',
    new DefaultAzureCredential()
  );

  // RAG用のエージェントを指定
  const agentId = 'asst_xxxxxxxxxxxxxxxxxxxx';

  // Step 3: Create a thread
  const thread = await client.agents.createThread();

  await client.agents.createMessage(thread.id, {
    role: 'user',
    content: question,
  });

  // 既存エージェントを直接利用
  const streamEventMessages = await client.agents
    .createRun(thread.id, agentId)
    .stream();

  for await (const eventMessage of streamEventMessages) {
    switch (eventMessage.event) {
      case MessageStreamEvent.ThreadMessageDelta:
        {
          const messageDelta = eventMessage.data as MessageDeltaChunk;
          messageDelta.delta.content.forEach((contentPart) => {
            if (contentPart.type === 'text') {
              const textContent = contentPart as MessageDeltaTextContent;
              console.log(textContent.text?.value || '');
            }
          });
        }
        break;
      case ErrorEvent.Error:
        console.log(`An error occurred: ${eventMessage.data}`);
        break;
    }
  }

  // 6. Print the messages from the agent
  const messages = await client.agents.listMessages(thread.id);

  let resultMessage = '';

  // Messages iterate from oldest to newest
  // messages[0] is the most recent
  for (let i = messages.data.length - 1; i >= 0; i--) {
    const m = messages.data[i];
    if (isOutputOfType<MessageTextContentOutput>(m.content[0], 'text')) {
      const textContent = m.content[0] as MessageTextContentOutput;
      console.log(`${textContent.text.value}`);
      resultMessage += `${textContent.text.value}`;
      console.log(`---------------------------------`);
    }
  }

  res.json(resultMessage);
});

export { router };
// models/FunctionToolExecutor.ts
import {
  FunctionToolDefinition,
  FunctionToolDefinitionOutput,
  RequiredToolCallOutput,
  ToolOutput,
  ToolUtility,
} from '@azure/ai-projects';

export class FunctionToolExecutor {
  private functionTools: {
    func: (...args: any[]) => Promise<any>;
    definition: FunctionToolDefinition;
  }[];

  constructor() {
    this.functionTools = [
      {
        // ユーザー情報を返す関数
        func: this.callGetUsers,
        ...ToolUtility.createFunctionTool({
          name: 'get_users',
          description:
            'Returns a list of users. Use this function when the user asks for users.',
          parameters: {}, // パラメータ不要の場合は空オブジェクトでOK
        }),
      },
      {
        // 天気情報を返す関数
        func: this.callGetWeather,
        ...ToolUtility.createFunctionTool({
          name: 'get_weather',
          description:
            'Returns weather information. Use this function when the user asks for weather.',
          parameters: {}, // 今回はパラメータなし(必要に応じて city 等を追加可能)
        }),
      },
    ];
  }

  // Azure Functions の get_users エンドポイントを呼び出す
  public async callGetUsers(): Promise<any> {
    const endpoint = 'https://xxxx-agent-poc.azurewebsites.net/api/get_users?';
    const response = await fetch(endpoint);
    return await response.json();
  }

  // Azure Functions の get_weather エンドポイントを呼び出す
  public async callGetWeather(): Promise<any> {
    const endpoint =
      'https://xxxx-agent-poc.azurewebsites.net/api/get_weather?';
    const response = await fetch(endpoint);
    return await response.json();
  }

  // Function Calling リクエストに応じて、該当する関数を呼び出す
  public async invokeTool(
    toolCall: RequiredToolCallOutput & FunctionToolDefinitionOutput
  ): Promise<ToolOutput | undefined> {
    console.log(`Function tool call - ${toolCall.function.name}`);

    const args: any[] = [];
    if (toolCall.function.parameters) {
      try {
        const params = JSON.parse(toolCall.function.parameters);
        for (const key in params) {
          if (Object.prototype.hasOwnProperty.call(params, key)) {
            args.push(params[key]);
          }
        }
      } catch (error) {
        console.error(
          `Failed to parse parameters: ${toolCall.function.parameters}`,
          error
        );
        return undefined;
      }
    }
    const tool = this.functionTools.find(
      (tool) => tool.definition.function.name === toolCall.function.name
    );
    if (!tool) {
      return undefined;
    }
    const result = await tool.func(...args);
    return result
      ? {
          toolCallId: toolCall.id,
          output: JSON.stringify(result),
        }
      : undefined;
  }

  // エージェントに渡すためのツール定義一覧を返す
  public getFunctionDefinitions(): FunctionToolDefinition[] {
    return this.functionTools.map((tool) => tool.definition);
  }
}
package.json の scripts に以下を追加してください。
"scripts": {
    "start": "node ./bin/www",
    "dev": "ts-node-dev ./src/bin/www --respawn"
  },
ここまできたら、準備完了です。
以下コードで Express を実行し、Agent を動作させてください。
npm run dev
-
Knowledge-Agent は以下の http リクエストで動作します。
http://localhost:3000/knowledge -
Action-Agent は以下の http リクエストで動作します。
http://localhost:3000/action
ブラウザでそれぞれのエンドポイントにアクセスし、Knowledge-Agent と Action-Agent が動作することを確認します。

私の PoC 数を記載したドキュメントをアップロードしたので、正しく返答してくれますね。
参照しているドキュメントも return してくれていることがわかります。
次に Action-Agent へリクエストを投げてみます。
- http://localhost:3000/action へリクエスト

全てのユーザーを教えてという質問に対して、適切な関数を選択し、ユーザーを返してくれていることがわかりますね。
質問の内容によって Function Calling による関数の選択を行い、適切な関数を呼び出してくれているのですが、この精度がほぼほぼ間違いなく意図通りの関数が呼ばれていることが素晴らしかったです。
今回は独立した AI Agent を用意し、それぞれをエンドポイント毎に動かすという基本的なものでしたが、今後はエージェントを組み合わせ、AI Agent 同士の連携を行うことが出来るようになると、より複雑なアプリケーションを構築することが出来るようになると思います。
また、AI Agent Service を用いると、そこまで複雑な実装をしなくても簡単にマルチエージェントのアプリケーションが作れることがわかりました。
素晴らしいですね。
また、AI Agent Service は Microsoft Fabric や Trip Adviser との連携も出来るようになったので、今後の進化にも期待です。
最後に
今回の構成で Azure AI Agent Service を使って、マルチエージェントアプリを構築することが出来ました。
今後は AI Agent Service の SDK もより多くのコネクタに対応するようになりそうなので、引き続き check していきたいと思います。
それでは 👋
スタートアップ企業様向けのお知らせ
日本マイクロソフトでは、スタートアップ企業様向けに、ビジネスを支援するプログラムをご提供しています。
Azure の無料クレジットが最大$150,000もらえるので、是非チェックしてみてください。

Discussion