はじめに
Agent Framework で以下に記事を掲載していますが、継続で色々と触っていきたいと思います。
Agent Framework でエージェント機能を簡単に実装できることは方々のサンプルでご存じな方は多いと思いますが、今回は Agent Framework で MCP サーバを構築し、その実例まで行いたいと思います。
Agent Framework で MCP サーバを実装するサンプルは以下にもあるので、こちらも参照して頂ければ幸いです。
Agent Framework で MCP サーバの実装する
あまり御託は好きでは無いので、実際のコードを見てみましょう。まずは ASP.NET Core のプロジェクトを作成し、以下のライブラリをインストールしましょう。
dotnet add package Azure.AI.OpenAI --version 2.5.0-beta.1
dotnet add package Azure.Identity --version 1.18.0-beta.2

dotnet add package Microsoft.Agents.AI --version 1.0.0-preview.251125.1
dotnet add package Microsoft.Agents.AI.DevUI --version 1.0.0-preview.251125.1
dotnet add package Microsoft.Agents.AI.Hosting.AzureFunctions --version 1.0.0-preview.251125.1

dotnet add package Microsoft.ApplicationInsights.WorkerService --version 2.23.0

dotnet add package Microsoft.Azure.Functions.Worker --version 2.51.0
dotnet add package Microsoft.Azure.Functions.Worker.ApplicationInsights --version 2.50.0
dotnet add package Microsoft.Azure.Functions.Worker.Extensions.DurableTask.AzureManaged --version 1.0.1
dotnet add package Microsoft.Azure.Functions.Worker.Extensions.Http --version 3.3.0
dotnet add package Microsoft.Azure.Functions.Worker.Extensions.Http.AspNetCore --version 2.1.0
dotnet add package Microsoft.Azure.Functions.Worker.Sdk --version 2.0.7
上記をあえて明記したのは、アセンブリのバージョンを間違えると動かないことが発生したからです。以下の Kazuki Ota さんの記事も参考にしていただければ幸いです。
では実際のソースコードを見てみましょう。私はよくハマるのですが、Microsoft.Extensions.AI のアセンブリをインストールして using に追加しないと AsIChatClient メソッドがコンパイルエラーになるのでご留意ください。
using Azure.AI.OpenAI;
using Azure.Identity;
using Microsoft.Agents.AI;
using Microsoft.Agents.AI.DurableTask;
using Microsoft.Agents.AI.Hosting.AzureFunctions;
using Microsoft.Azure.Functions.Worker.Builder;
using Microsoft.Extensions.AI;
using Microsoft.Extensions.Hosting;

class Program
{
    public static async Task Main(string[] args)
    {
        string endpoint = "https://your-openai-endpoint.openai.azure.com/";
        string deploymentName = "your-deplyoment-name-forexample-gpt-4.1-mini";
        AzureOpenAIClient client = new AzureOpenAIClient(new Uri(endpoint), new AzureCliCredential());

        AIAgent agent = client.GetChatClient(deploymentName).AsIChatClient().CreateAIAgent(
            instructions: @"In this Normalian project, to facilitate management, class names must follow naming conventions based on business categories.
            Class names according to business categories are provided by the `GenerateClassNamingConvention` tool.
            Please define classes using the names provided here. Do not define classes with any other names.

            If you are unsure about the business category from the class name, use the `DetermineBusinessCategory` tool to obtain the business category.",
            name: "NormalianProjectAdvisor",
            description: "This tool describes naming rule overview of the Normalian project.");


        using IHost app = FunctionsApplication
            .CreateBuilder(args)
            .ConfigureFunctionsWebApplication()
            .ConfigureDurableAgents(options =>
            {
                options.AddAIAgent(agent, enableHttpTrigger: false, enableMcpToolTrigger: true);
            })
            .Build();
        app.Run();
    }
}
上記をご覧になれば分かる通り、非常に単純な方法でエージェント登録が可能です。ConfigureDurableAgents メソッドにて、enableMcpToolTrigger オプションを true にするだけで MCP サーバとしての公開が可能です。他のソースコードは存在せずに MCP サーバ公開ができているので、非常に単純なコードでの MCP サーバ構築が可能なことが分かります。
実際に実行すると以下の様にコンソールに表示されます。

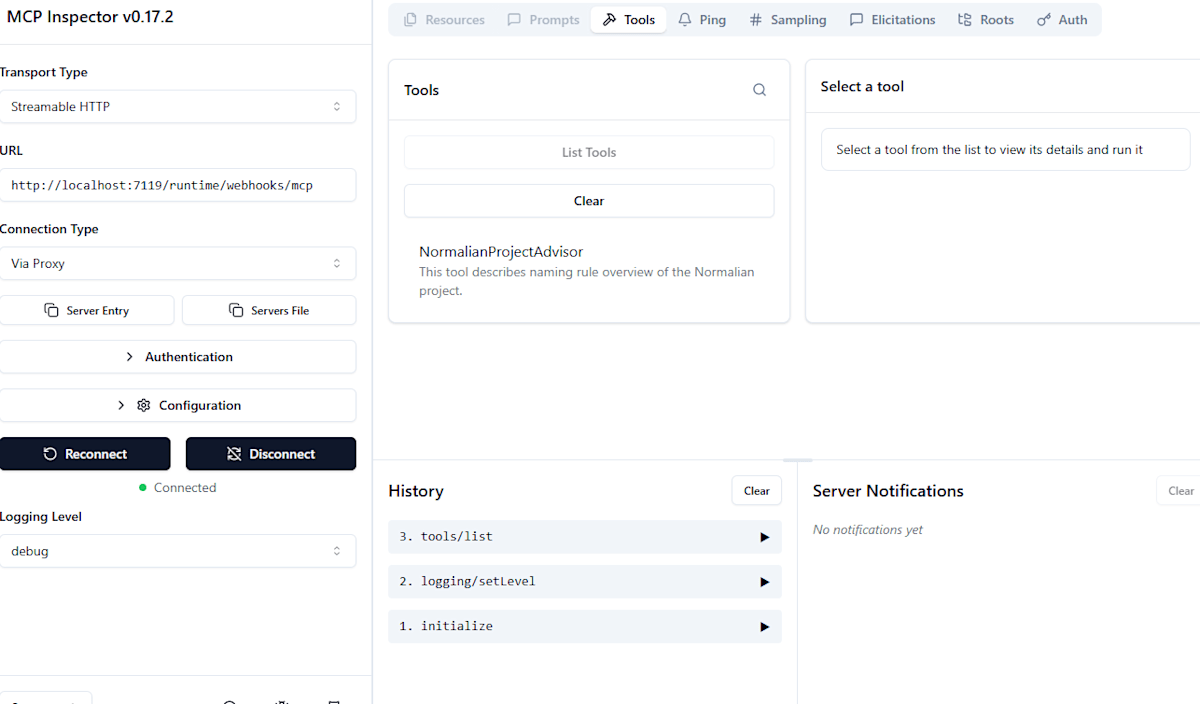
上記の http://localhost:7119/runtime/webhooks/mcp のURL(ポート番号等は環境に合わせて変更してください)は他でも使うのでご留意下さい。
MCP Inspector での確認
以下の記事でも記載がありますが、MCP Inspector を実行して MCP として公開されているかの確認をしましょう。
以下の様に npx コマンドで MCP Inspector を実行しましょう。
npx @modelcontextprotocol/inspector
以下の様に Transport Type の "Streamable HTTP" からコピーした URL を入力し、以下の様に MCP サーバとして公開されたサービスが閲覧可能です。
GitHub Copilot で呼んでみよう
次に構築した MCP サーバを GitHub Copilot から呼んでみましょう。Visual Studio Code を開いた後、 .vscode\mcp.json に以下の設定ファイルを追加し、Start を実行して以下の様に Running の状態にします。

実際の mcp.json は以下となります。
{
	"servers": {
        "mine-mcp-server": {
            "type": "http",
            "url": "http://localhost:7119/runtime/webhooks/mcp"
        }
	},
	"inputs": []
}
上記の設定を元に、VS Code 上から GitHub Copilot に質問をすると以下の様に MCP サーバ経由で質問を回答してくれます。

上記で Agent Framework を利用した MCP サーバの公開& GitHub Copilot での活用が理解できたと思います。他の適用についても是非試して頂ければ幸いです。

Discussion