React Email とは
React Email は、React コンポーネントを使用してメールテンプレートを構築するためのフレームワークです。
HTML メールの複雑さを抽象化し、開発者が使い慣れた React でメールを作成できるようにするものです。
主な特徴は以下です。
- React ベース: 使い慣れた React コンポーネントでメールを設計
- レスポンシブ対応: 様々なデバイスでの表示に最適化
- 再利用可能なコンポーネント: 一貫したデザインを実現
- 型安全: TypeScript によるサポート
- プレビュー機能: 開発中にリアルタイムでメールをプレビュー
HTML メールの作成は難しい!?
HTML メールの作成は、通常の Web ページ開発とは異なる多くの複雑さと制約を持っています。
Gmail や Outlook など、メールクライアントは様々なレンダリングエンジンを使用しており、それぞれが異なる HTML/CSS のサポートレベルを持っています。
React Email がこれらの複雑さを効果的に抽象化し、開発者体験を向上させてくれます。
React と TypeScript でメールを作成・送信する
React Email でメールを作成して、送信してみましょう!
セットアップ
今回は pnpm を使用し、Manual Setup を参考にセットアップしていきます。
mkdir react-email-app
cd react-email-app
npm init
必要な React Email パッケージをインストールしていきます。
pnpm add react-email -D -E
pnpm add @react-email/components react react-dom -E
package.json にデバッグ用のコマンドを追記します。
{
  "scripts": {
    "dev": "email dev"
  }
}
ディレクトリ構成
デフォルトの設定で開発する場合、emails フォルダにメールテンプレートを格納し、static フォルダには画像などの静的ファイルを格納します。
emails フォルダはメールテンプレートを格納する場所なので、.tsx ファイルがメールと判定されてしまいます。それを _ プレフィックスをつけることで回避することができます。
root
└── emails
    ├── _components
    │   ├── header.tsx
    │   └── footer.tsx
    ├── static
    │   └── mountain.png
    └── my-email.tsx
メール本文を実装する
Tailwind コンポーネントを使い、メールを装飾してみました。
import {
Body,
Button,
Container,
Head,
Html,
Preview,
Section,
Tailwind,
Text
} from "@react-email/components";
import Header from "./_components/header";
import Footer from "./_components/footer";
interface MyEmailProps {
title?: string;
userId?: string;
userName?: string;
}
const STATIC_URL = process.env.BASE_URL ? `https://${process.env.BASE_URL}` : "";
export default function MyEmail({ title, userId, userName }: MyEmailProps) {
const titleText = title || "これはテストメールです";
return (
<Html>
<Tailwind>
<Body className="bg-white my-auto mx-auto font-sans px-2">
<Container>
<Head>
<title>{titleText}</title>
</Head>
<Preview>{titleText}</Preview>
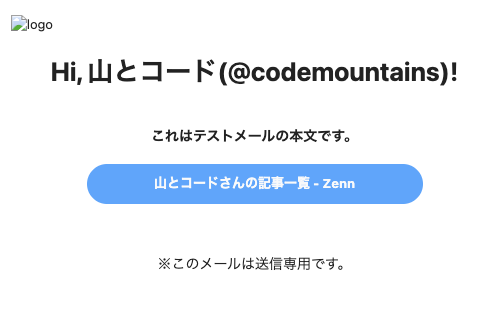
<Header logoUrl={`${STATIC_URL}/static/logo.png`} text={`Hi, ${userName}(@${userId})!`} />
<Section>
<Text className="text-center font-bold">これはテストメールの本文です。</Text>
<Button
href={`https://zenn.dev/${userId}`}
className="mx-auto block w-full w-[320px] rounded-full bg-blue-400 px-2 py-3 text-center font-bold text-neutral-50"
>
{userName}さんの記事一覧 - Zenn
</Button>
</Section>
<Footer />
</Container>
</Body>
</Tailwind>
</Html>
);
}
MyEmail.PreviewProps = {
title: "これはテストメールです",
userId: "codemountains",
userName: "山とコード",
};
import { Column, Heading, Img, Row, Section } from "@react-email/components";

interface HeaderProps {
  logoUrl: string;
  text: string;
}

export default function Header({ logoUrl, text }: HeaderProps) {
  return (
    <Section>
      <Img src={logoUrl} alt="logo" className="mx-auto"/>
      <Row>
        <Column>
          <Heading className="text-center">{text}</Heading>
        </Column>
      </Row>
    </Section>
  );
};
import { Section, Text } from "@react-email/components";

export default function Footer() {
  return (
    <Section className="mt-8">
      <Text className="text-center">※このメールは送信専用です。</Text>
    </Section>
  );
};
デバッグとテスト送信
pnpm dev で開発用サーバを起動して、メールのデザインを確認することができます。

プレビュー時の Props は PreviewProps で、以下のように指定しています。
MyEmail.PreviewProps = {
  title: "これはテストメールです",
  userId: "codemountains",
  userName: "山とコード",
};
また、メールのテスト送信機能も備わっています。
画面右上の [Send] から、Resend 経由でメールを送信できます。

Gmail での表示結果です。
Resend で送信処理を実装する
メールを送信する処理を自前でも実装してみます。
Resend のパッケージをインストールします。
また、React コンポーネントを扱う都合上 .tsx ファイル単体を実行したいので、tsx コマンドを使用します。
pnpm add resend
pnpm add -D tsx
Send email using Resend を参考に、sender/send-my-email.tsx を作成しました。
import { Resend } from "resend";
import MyEmail from "../emails/my-email";

const Send = async () => {
  console.log("Sending email...");

  // Resend の API キーを埋め込む
  const resend = new Resend("re_123456789");

  try {
    await resend.emails.send({
      from: "Sending Test <onboarding@resend.dev>",
      to: "to_email_address", // 送信先を指定
      subject: "My email sending test",
      react: <MyEmail title="Test with Resend" userId="codemountains" userName="山とコード" />
    });

    console.log("Email sent completed!");
  } catch (error) {
    console.error(error);
  }
};

Send();
以下のコマンドで実行します。
npx tsx sender/send-my-email.tsx
HTML ファイルをエクスポートする
メール送信処理は Node.js でなく、他の言語で実装したいケースもあると思います。
そのようなユースケースの場合は、作成したメールテンプレートを HTML でエクスポートすることができます。
出力先は ./out です。
{
  "scripts": {
    "export": "email export"
  }
}
HTML ファイルをエクスポートする際の注意点は Props です。
当然、上記 my-email.tsx ではエクスポート時に MyEmailProps を指定できないので、値が undefined となります。
Hi, undefined(@undefined)!
まとめ
HTML を直接記述することなく、E メールを作成できました🤝🤝🤝
普段から React を使用している場合、非常に便利な選択肢になるのかなと思います!
参考

Discussion