サクッとRustプロジェクトをWASMにコンパイルしてコンテナで動かしてみた
はじめに
Rust、WASM、コンテナの関係性が何となくわかってきたので、感覚を掴むために手を動かしてみました。使用しているフレームワークやツールにはこだわりはなく、とりあえず一連の流れを体験したい方向けです。
準備さえあれば10分もあれば終わる内容です!
WASMと聞いてもピンとこない方、関係性を何となく知りたい方は、まずは以下の記事を読むことをお勧めします。
必要なもの
Rancher desktop >= 1.13.0
※ Docker desktopではなくRancher desktopが前提となります。
準備
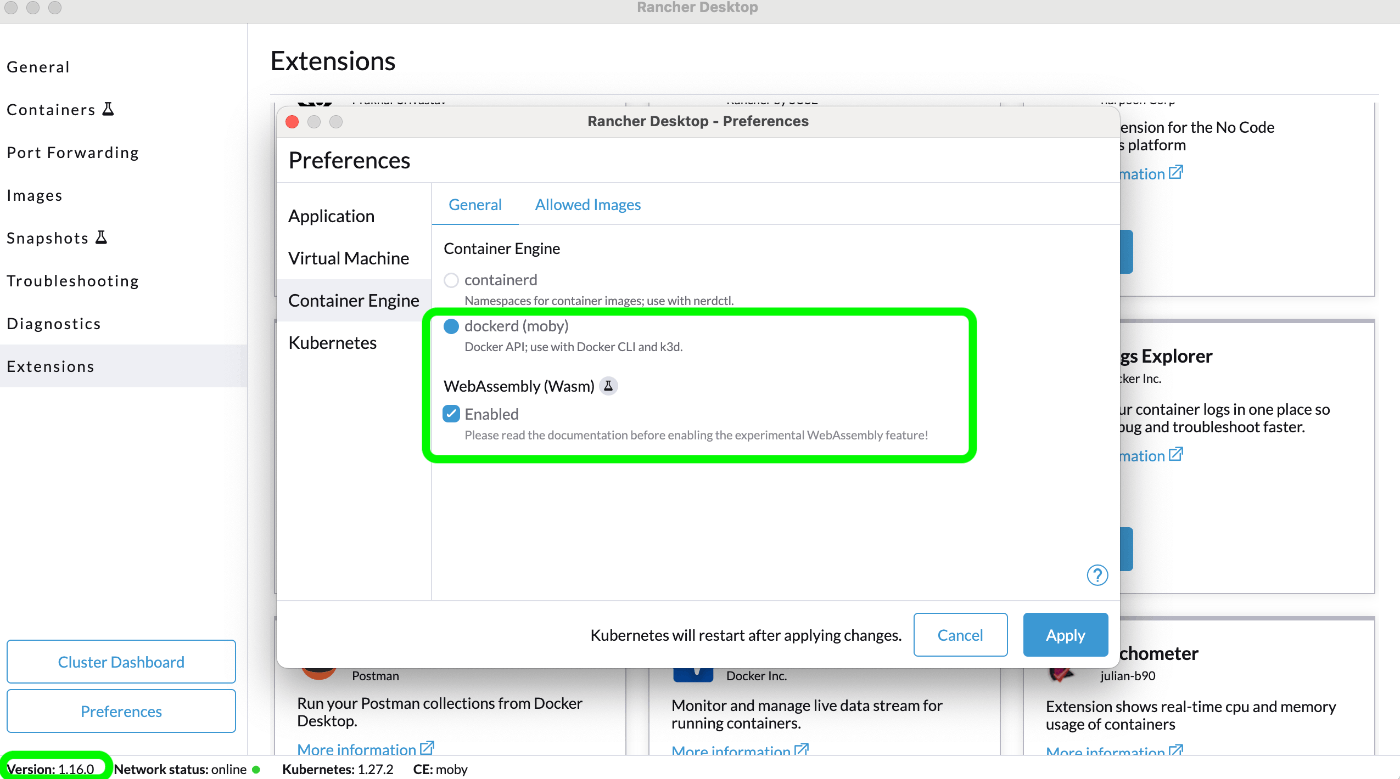
1. Rancher desktopのバージョンが1.13.0以上であることを確認
2. PreferencesでContainer Engineをdockerd、WebAssemblyをEnabledにする

※ WASM を enabled にすると既存の image が全て使えなくなります。disabled にすると image store が元に戻り、使えるようになります。
3. Spinをインストール
WASMモジュールを多くの言語でサクッと作れるフレームワークです。Macならbrewでインストールできます。
サクッとRustプロジェクトをWASMにコンパイルしてコンテナで動かしてみる
1. spin newでRustプロジェクトを作成します。今回はシンプルなAPIを作成するためhttp-rustを選択します。
% spin new
Pick a template to start your application with:
  http-c (HTTP request handler using C and the Zig toolchain)
  http-empty (HTTP application with no components)
  http-go (HTTP request handler using (Tiny)Go)
  http-grain (HTTP request handler using Grain)
  http-js (HTTP request handler using JavaScript)
  http-php (HTTP request handler using PHP)
  http-py (HTTP request handler using Python)
> http-rust (HTTP request handler using Rust)
  http-ts (HTTP request handler using TypeScript)
  http-zig (HTTP request handler using Zig)
  redirect (Redirects a HTTP route)
  redis-go (Redis message handler using (Tiny)Go)
  redis-js (Redis message handler using JavaScript)
  redis-rust (Redis message handler using Rust)
  redis-ts (Redis message handler using TypeScript)
  static-fileserver (Serves static files from an asset directory)
プロジェクト名は今回はhello-wasmとしました、あとはEnterでOKです。
2. プロジェクトの中身の確認
src/lib.rsにAPIの中身のコードが書いてあります。
Cargo.tomlにはRustプロジェクトの基本情報、クレート(Rustパッケージ)、ビルド設定が、
spin.tomlにはSpinフレームワークの設定が書いてあります。
hello-wasm
├─ .gitignore
├─ Cargo.lock
├─ Cargo.toml
├─ spin.toml
└─ src
   └─ lib.rs
3. RustコードをWASMにコンパイル
以下のコマンドでコンパイルします。
cargo build --target wasm32-wasi --release
/target/wasm32-wasi/release/hello_wasm.wasmに生成されてるのを確認しましょう。
4. Dockerfileの追加
以下の内容でDockerfileを追加しましょう。
ポイントはFROM scratchで空のイメージを指定しています。
つまりOSなど含まないんですね。
FROM scratch
COPY spin.toml /spin.toml
COPY /target/wasm32-wasi/release/hello_wasm.wasm /target/wasm32-wasi/release/hello_wasm.wasm
5. WASMモジュールをコンテナイメージにBuild & Run
以下のコマンドでコンテナを動かします。
ここで、io.containerd.spin.v2はSpinが提供するWebAssemblyランタイムです。
% docker buildx build \
  --load \
  --platform wasi/wasm \
  --provenance=false \
  -t hello-wasm:0.1.0 .
% docker run \
    --runtime io.containerd.spin.v2 \
    --platform wasi/wasm \
    --publish 8080:80 \
    hello-wasm:0.1.0 \
    /
今回はSpinフレームワークとそれに対応したランタイムを使用しましたが、別のフレームワークやランタイムを使用したい場合があるかと思います。その場合は、現時点では各フレームワーク、ランタイムに対応したshimをcontainerd-shimsにインストールする必要があるようです。
Rancher Desktop 1.13 comes bundled with the containerd-spin-shim-v2 shim preinstalled. Future releases are expected to download additional shims automatically when the feature is enabled.
For now additional shims can be installed by the user into the containerd-shims cache directory on the host. The location is
Linux: ~/.local/share/rancher-desktop/containerd-shims
macOS: ~/Library/Application Support/rancher-desktop/containerd-shims
Windows: %LOCALAPPDATA%\rancher-desktop\containerd-shims
引用:Working with WebAssembly
6. cURLしてみる
動作確認です。
% curl http://localhost:8080/
Hello, Fermyon
感想
ランタイムの互換性などはこれから緩和されていくものなのか気になりました。
イメージのbuildが過去史上最速で終わりました。軽量なのが感覚的にもわかりました!
Discussion