
はじめに
visionOS 2.0 から、エンタープライズ向けアプリ限定ではありますがカメラへのアクセスが許可されました。Swift を用いた実装の場合は特に問題にはならないのですが、MESON では基本的に Unity を用いて開発を行っています。
その関係で、Swift <-> Unity 間でやり取りしないとならず、取得したテクスチャを C# 側に持ってこようとするとコピーが発生してオーバーヘッドが発生してしまいます。
そこで、ネイティブプラグインを書いて、ネイティブで取得した画像をそのまま Unity で使えるようにしたのでその解説記事を書きたいと思います。
ちなみに実際に動作させた動画は以下です。だいぶ高速に描画できているのが分かるかと思います。
Main Camera Access の環境構築そのものはここでは割愛します。実装に絞って解説していきます。
環境構築
実装の説明の前に、まずはメインカメラアクセスのための環境構築について書きます。
Bundle ID の登録
まずは Developer ページからアプリの Identifiers の登録を行います。

App IDs を選択し、 Continue ボタンを押下します。
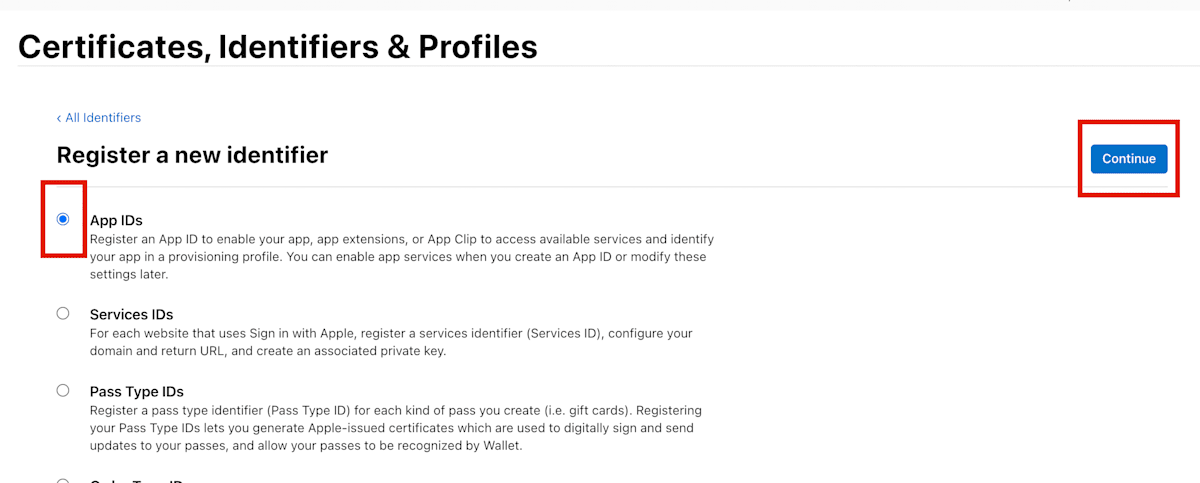
続いて App を選択し、 Continue ボタンを押下します。

Description に説明を入れ、 BundleID にプロジェクトで使用するバンドル ID を設定します。加えて、 Additional Capabilities タブを選択し、 Main Camera Access にチェックを入れます。

Xcode プロジェクトの設定
以下は Xcode での設定です。Unity でも同様に設定しておいてください。
設定で Bundle Identifier が、前段で設定したものと同じになっているかを確認します。

次に Capability に Main Camera Access を追加します。


Main Camera Access を追加すると自動的に entitlements ファイルが追加されます。ファイルを選択し、 com.apple.developer.arkit.main-camera-access.allow が YES になっていることを確認してください。
最後にライセンスファイルを追加します。Apple からもらったライセンスファイルを Xcode プロジェクトに追加してください。

実装方針
全体を俯瞰するために実装方針を示します。
冒頭で書いたように、素直に C# 側で使おうとするとコピーのオーバーヘッドが高く速度が出せません。そのため、ネイティブ側で生成したテクスチャのポインタをそのまま利用する形で実装します。
Unity にはネイティブのテクスチャのポインタを利用して Texture2D を生成する CreateExternalTexture メソッドがあり、これを利用します。
前提情報
実装の解説に入る前にいくつかの前提について書いておきたいと思います。
Main Camera Access から得られる画像は iOS の ARKit と同様、YUV 形式の画像となっています。そのため、そのままでは扱えるフォーマットが Unity 側にないので利用できません。そこで、取得した画像をネイティブ側で Unity が扱える BGRA 形式に変換して渡します。
実装解説
ここから実際に実装した内容について解説していきます。
ネイティブ(Swift)側の実装
最初に解説するのはネイティブ(Swift)側の実装です。
今回の実装では DLL などは作成せず、Swift ファイルを Unity プロジェクトに入れる形で実装しました。
キャプチャの開始
まずは visionOS の Main Camera Access API を使ってカメラの映像をキャプチャする方法を解説します。これは Unity を利用しない場合も同様です。
基本的な流れは ARKitSession に CameraProvider を渡して、プロバイダ経由でカメラ映像を取得します。
実際のコードを見てみましょう。
let arKitSession = ARKitSession()

@_cdecl("startCapture")
public func startCampture() {
    isRunning = true

    Task {
        // メインカメラへのフォーマットを作成
        let formats = CameraVideoFormat.supportedVideoFormats(for: .main, cameraPositions: [.left])

        // ARKitSessionを作成してカメラアクセスをリクエスト
        // let arKitSession = ARKitSession()
        let status = await arKitSession.queryAuthorization(for: [.cameraAccess])
        print("Query Authorization Status :", status)

        // ARKitSessionでカメラフレームを取得するためのプロバイダを実行
        let cameraFrameProvider = CameraFrameProvider()
        do {
            try await arKitSession.run([cameraFrameProvider])
        }
        catch {
            print("ARKit Session Faield:", error)
            return
        }

        print("Running ARKit Session.")

        // ここでカメラフレームの更新があったらPixelBufferが取得できる
        for await cameraFrameUpdate in cameraFrameProvider.cameraFrameUpdates(for:  formats[0])! {
            if !isRunning {
                break
            }

            // ここで、Unity に渡すためのテクスチャの生成・更新を行う
            createTexture(cameraFrameUpdate.primarySample.pixelBuffer)
        }
    }
}
現状は左目用のカメラ映像のみが取得できる状態です。もしかしたら将来的に両目のカメラアクセスが許可されるかもしれません。
取得するフォーマットを指定したら、ARKitSession にカメラアクセスの許可を求めるために queryAuthorization を呼び出します。その後、ARKitSession に CameraFrameProvider を渡して run を呼び出すことでカメラ映像の取得を開始します。
問題なくカメラ映像取得の開始が出来たら以後はカメラフィードを取得するためのループを開始します。このループは await を用いて、カメラ映像が到着するのを非同期で待ち続ける形です。取得されるデータは CVPixelBuffer 形式です。これを Unity で扱える形に変換して保持しておきます。
プロバイダの役割
ARKitSessin に渡しているカメラプロバイダですが、他にもいくつかのプロバイダがあります。例えば BarcodeDetectionProvider などがあります。
なぜこのデータプロバイダがあるかという理由について、以下の記事が参考になります。
少しだけ引用させてもらうと、
ARKitは多くのカメラやセンサーのデータを利用してAR体験を実現するわけだが、そういったセンサーデータを、クライアント(我々が開発するアプリ)に勝手に提供することはしない。
センサーのデータはARKitのデーモンに送られ、内部アルゴリズムによって処理される。
ユーザーがアクセスを拒否しているデータを提供するDataProviderでセッションを実行しようとすると、セッションが失敗する。
というように、データプロバイダを介することで、プライバシーやデータ構造などを適切に処理した状態でアプリ開発者にデータを渡せる、というわけです。
Unity が扱える形に変換
取得したデータ( CVPixelBuffer )を Unity が扱える形に変換する処理を解説します。ここでは CVPixelBuffer を MTLTexture に変換し、このテクスチャのポインタを Unity に渡す形で実装します。
この実装は @fuzikiさんの記事([Unity]TextureをSwiftのNativePluginから送る)を参考にさせていただきました。
// カメラから届いたピクセルバッファ(CVPixelBuffer)を MTLTexture に変換する
private func createTexture(_ pixelBuffer: CVPixelBuffer) {

    // 取得した CVPixelBuffer は YUV 形式のためそれを BGRA 形式に変換して処理を行います。(変換処理については後述)
    guard let pixelBufferBGRA: CVPixelBuffer = try? pixelBuffer.toBGRA() else { return }

    let width = CVPixelBufferGetWidth(pixelBufferBGRA)
    let height = CVPixelBufferGetHeight(pixelBufferBGRA)

    // MTLTexture を作成するために必要なクラスを使って準備します
    var cvTexture: CVMetalTexture?
    if textureCache == nil {
        CVMetalTextureCacheCreate(kCFAllocatorDefault, nil, mtlDevice, nil, &textureCache)
    }
    _ = CVMetalTextureCacheCreateTextureFromImage(kCFAllocatorDefault,
                                                  textureCache,
                                                  pixelBufferBGRA,
                                                  nil,
                                                  .bgra8Unorm_srgb,
                                                  width,
                                                  height,
                                                  0,
                                                  &cvTexture)

    guard let imageTexture = cvTexture else { return }

    // 生成された CVMetalTexture から MTLTexture を取り出します
    let texture: MTLTexture = CVMetalTextureGetTexture(imageTexture)!

    // ここで currentTexture を(必要であれば)生成します
    // 以後、Unity 側にはこの currentTexture の参照が渡されます
    if currentTexture == nil {
        let texdescriptor = MTLTextureDescriptor
            .texture2DDescriptor(pixelFormat: texture.pixelFormat,
                                 width: texture.width,
                                 height: texture.height,
                                 mipmapped: false)
        texdescriptor.usage = .unknown
        currentTexture = mtlDevice.makeTexture(descriptor: texdescriptor)
    }

    // CommandBuffer を用いてカメラのデータを currentTexture にコピーします
    if commandQueue == nil {
        commandQueue = mtlDevice.makeCommandQueue()
    }

    let commandBuffer = commandQueue.makeCommandBuffer()!
    let blitEncoder = commandBuffer.makeBlitCommandEncoder()!

    blitEncoder.copy(from: texture,
                     sourceSlice: 0, sourceLevel: 0,
                     sourceOrigin: MTLOrigin(x: 0, y: 0, z: 0),
                     sourceSize: MTLSizeMake(texture.width, texture.height, texture.depth),
                     to: currentTexture!, destinationSlice: 0, destinationLevel: 0,
                     destinationOrigin: MTLOrigin(x: 0, y: 0, z: 0))
    blitEncoder.endEncoding()
    commandBuffer.commit()
    commandBuffer.waitUntilCompleted()

    // C# に渡すために Opaque ポインタとして参照を保持しておきます。C# が実際にアクセスするのはこの pointer です
    if pointer == nil {
        pointer = Unmanaged.passUnretained(currentTexture!).toOpaque()
    }
}
ここで行っているのは、カメラ画像( CVPixelBuffer )から MTLTexture へ変換する処理の流れです。(ちなみに CV は Core Video の略)
大まかな理解としては、Core Video 関連のデータ構造から Metal 関連のデータ構造へ変換している、と考えるといいでしょう。
流れは「 CVPixelBuffer -> CVMetalTexture -> MTLTexture 」となっています。Core Video と Metal は異なる概念のため、それを橋渡しする役割として CVMetalTexture が存在します。
この変換処理をするにあたって、さらに CVMetalTextureCache というクラスを利用します。
ドキュメントから引用すると以下のように説明されています。
A Core Video Metal texture cache creates and manages CVMetalTexture textures. You use a CVMetalTextureCache object to directly read from or write to GPU-based Core Video image buffers in rendering, or for sharing data with Metal kernels.
キャッシュオブジェクトはその名の通り Cache と、CVMetalTexture の管理を行います。このオブジェクトを利用することで GPU ベースの Core Video のイメージバッファを直接読み書きすることができます。
YUV から BGRA への変換
上記の生成処理とは別に、画像フォーマットを変換する必要があります。(解説が前後していますが、こちらの変換処理後に MTLTexture に変換しています)
なお、変換処理については以下の記事を参考にさせていただきました。
extension CVPixelBuffer {
    public func toBGRA() throws -> CVPixelBuffer? {
        let pixelBuffer = self

        /// Check format
        let pixelFormat = CVPixelBufferGetPixelFormatType(pixelBuffer)
        guard pixelFormat == kCVPixelFormatType_420YpCbCr8BiPlanarFullRange else { return pixelBuffer }

        /// Split plane
        let yImage: VImage = pixelBuffer.with({ VImage(pixelBuffer: $0, plane: 0) })!
        let cbcrImage: VImage = pixelBuffer.with({ VImage(pixelBuffer: $0, plane: 1) })!

        /// Create output pixelBuffer
        let outPixelBuffer = CVPixelBuffer.make(width: yImage.width, height: yImage.height, format: kCVPixelFormatType_32BGRA)!

        /// Convert yuv to argb
        var argbImage = outPixelBuffer.with({ VImage(pixelBuffer: $0) })!
        try argbImage.draw(yBuffer: yImage.buffer, cbcrBuffer: cbcrImage.buffer)
        /// Convert argb to bgra
        argbImage.permute(channelMap: [3, 2, 1, 0])

        return outPixelBuffer
    }
}

struct VImage {
    let width: Int
    let height: Int
    let bytesPerRow: Int
    var buffer: vImage_Buffer

    init?(pixelBuffer: CVPixelBuffer, plane: Int) {
        guard let rawBuffer = CVPixelBufferGetBaseAddressOfPlane(pixelBuffer, plane) else { return nil }
        self.width = CVPixelBufferGetWidthOfPlane(pixelBuffer, plane)
        self.height = CVPixelBufferGetHeightOfPlane(pixelBuffer, plane)
        self.bytesPerRow = CVPixelBufferGetBytesPerRowOfPlane(pixelBuffer, plane)
        self.buffer = vImage_Buffer(
            data: UnsafeMutableRawPointer(mutating: rawBuffer),
            height: vImagePixelCount(height),
            width: vImagePixelCount(width),
            rowBytes: bytesPerRow
        )
    }

    init?(pixelBuffer: CVPixelBuffer) {
        guard let rawBuffer = CVPixelBufferGetBaseAddress(pixelBuffer) else { return nil }
        self.width = CVPixelBufferGetWidth(pixelBuffer)
        self.height = CVPixelBufferGetHeight(pixelBuffer)
        self.bytesPerRow = CVPixelBufferGetBytesPerRow(pixelBuffer)
        self.buffer = vImage_Buffer(
            data: UnsafeMutableRawPointer(mutating: rawBuffer),
            height: vImagePixelCount(height),
            width: vImagePixelCount(width),
            rowBytes: bytesPerRow
        )
    }

    mutating func draw(yBuffer: vImage_Buffer, cbcrBuffer: vImage_Buffer) throws {
        try buffer.draw(yBuffer: yBuffer, cbcrBuffer: cbcrBuffer)
    }

    mutating func permute(channelMap: [UInt8]) {
        buffer.permute(channelMap: channelMap)
    }
}

extension CVPixelBuffer {
    func with<T>(_ closure: ((_ pixelBuffer: CVPixelBuffer) -> T)) -> T {
        CVPixelBufferLockBaseAddress(self, .readOnly)
        let result = closure(self)
        CVPixelBufferUnlockBaseAddress(self, .readOnly)
        return result
    }

    static func make(width: Int, height: Int, format: OSType) -> CVPixelBuffer? {
        var pixelBuffer: CVPixelBuffer? = nil
        CVPixelBufferCreate(kCFAllocatorDefault,
                            width,
                            height,
                            format,
                            [String(kCVPixelBufferIOSurfacePropertiesKey): [
                                "IOSurfaceOpenGLESFBOCompatibility": true,
                                "IOSurfaceOpenGLESTextureCompatibility": true,
                                "IOSurfaceCoreAnimationCompatibility": true,
                            ]] as CFDictionary,
                            &pixelBuffer)
        return pixelBuffer
    }
}

extension vImage_Buffer {
    mutating func draw(yBuffer: vImage_Buffer, cbcrBuffer: vImage_Buffer) throws {
        var yBuffer = yBuffer
        var cbcrBuffer = cbcrBuffer
        var conversionMatrix: vImage_YpCbCrToARGB = {
            var pixelRange = vImage_YpCbCrPixelRange(Yp_bias: 0, CbCr_bias: 128, YpRangeMax: 255, CbCrRangeMax: 255, YpMax: 255, YpMin: 1, CbCrMax: 255, CbCrMin: 0)
            var matrix = vImage_YpCbCrToARGB()
            vImageConvert_YpCbCrToARGB_GenerateConversion(kvImage_YpCbCrToARGBMatrix_ITU_R_709_2, &pixelRange, &matrix, kvImage420Yp8_CbCr8, kvImageARGB8888, UInt32(kvImageNoFlags))
            return matrix
        }()
        let error = vImageConvert_420Yp8_CbCr8ToARGB8888(&yBuffer, &cbcrBuffer, &self, &conversionMatrix, nil, 255, UInt32(kvImageNoFlags))
        if error != kvImageNoError {
            fatalError()
        }
    }

    mutating func permute(channelMap: [UInt8]) {
        vImagePermuteChannels_ARGB8888(&self, &self, channelMap, 0)
    }
}
実装していてハマった点
いくつか実装するにあたってハマった点について書いておきます。
CVMetalTexture 生成時に nil になる
CVMetalTextureCacheCreateTextureFromImage を利用して CVPixelBuffer から CVMetalTexture を生成するのですが、カメラ映像をそのまま指定した場合は問題なく生成できていたものの、前述の YUV -> BGRA 変換を行った際に、生成結果が nil になることがありました。
具体的には以下の &cvTexture の内容が nil になってしまいました。
var cvTexture: CVMetalTexture?
if textureCache == nil {
    CVMetalTextureCacheCreate(kCFAllocatorDefault, nil, mtlDevice, nil, &textureCache)
}
_ = CVMetalTextureCacheCreateTextureFromImage(kCFAllocatorDefault,
                                              textureCache,
                                              pixelBufferBGRA,
                                              nil,
                                              .bgra8Unorm_srgb,
                                              width,
                                              height,
                                              0,
                                              &cvTexture)
結論から言うと、変換処理の際に CVPixelBuffer を生成しているのですがこの生成時のパラメータ設定に問題がありました。具体的には CVPixelBufferCreate 関数の引数である pixelBufferAttributes に nil を指定すると問題が発生するようです。
ドキュメントにも以下のように記述がありました。
The value for this key is of type CFDictionary. Provide a value for this key if you want Core Video to use the IOSurface framework to allocate the pixel buffer. Provide an empty dictionary to use the default IOSurface options.
空の辞書を渡すことでデフォルトオプションが利用できますが、 nil の指定だとダメということのようです。
static func make(width: Int, height: Int, format: OSType) -> CVPixelBuffer? {
    var pixelBuffer: CVPixelBuffer? = nil
    CVPixelBufferCreate(kCFAllocatorDefault,
                        width,
                        height,
                        format,
                        nil,
                        &pixelBuffer)
    return pixelBuffer
}
static func make(width: Int, height: Int, format: OSType) -> CVPixelBuffer? {
    var pixelBuffer: CVPixelBuffer? = nil
    CVPixelBufferCreate(kCFAllocatorDefault,
                        width,
                        height,
                        format,
                        // 以下のように、nil ではなく空の CFDictionary を渡す必要がある
                        [kCVPixelBufferIOSurfacePropertiesKey as String: [:]] as CFDictionary,
                        &pixelBuffer)
    return pixelBuffer
}
この問題について気づくきっかけになったのは以下のスレッドです。このスレッドでは OpenGL 系のプロパティを指定していますが今回の実装では空の辞書で問題ありませんでした。
Swift コード全文
今回実装したコード全文を載せておきます。
import ARKit
import AVKit
import SwiftUI
import RealityKit
import Foundation
import CoreGraphics
import MetalKit
import Accelerate
var currentTexture: MTLTexture?
let mtlDevice: MTLDevice = MTLCreateSystemDefaultDevice()!
var textureCache: CVMetalTextureCache! = nil
var commandQueue: MTLCommandQueue!
var pointer: UnsafeMutableRawPointer! = nil
var isRunning: Bool = false
let arKitSession = ARKitSession()
@_cdecl("startCapture")
public func startCampture() {
print("############ START ############")
isRunning = true
Task {
// メインカメラへのフォーマットを作成
let formats = CameraVideoFormat.supportedVideoFormats(for: .main, cameraPositions: [.left])
// ARKitSessionを作成してカメラアクセスをリクエスト
// let arKitSession = ARKitSession()
let status = await arKitSession.queryAuthorization(for: [.cameraAccess])
print("Query Authorization Status :", status)
// ARKitSessionでカメラフレームを取得するためのプロバイダを実行
let cameraFrameProvider = CameraFrameProvider()
do {
try await arKitSession.run([cameraFrameProvider])
}
catch {
print("ARKit Session Faield:", error)
return
}
print("Running ARKit Session.")
// ここでカメラフレームの更新があったらPixelBufferが取得できる
for await cameraFrameUpdate in cameraFrameProvider.cameraFrameUpdates(for: formats[0])! {
if !isRunning {
break
}
createTexture(cameraFrameUpdate.primarySample.pixelBuffer)
}
}
}
@_cdecl("stopCapture")
public func stopCapture() {
print("############ STOP ##############")
isRunning = false
arKitSession.stop()
}
@_cdecl("getTexture")
public func getTexture() -> UnsafeMutableRawPointer? {
return pointer
}
private func createTexture(_ pixelBuffer: CVPixelBuffer) {
guard let pixelBufferBGRA: CVPixelBuffer = try? pixelBuffer.toBGRA() else { return }
let width = CVPixelBufferGetWidth(pixelBufferBGRA)
let height = CVPixelBufferGetHeight(pixelBufferBGRA)
// print("Width: \(width), Height: \(height)")
var cvTexture: CVMetalTexture?
if textureCache == nil {
CVMetalTextureCacheCreate(kCFAllocatorDefault, nil, mtlDevice, nil, &textureCache)
}
_ = CVMetalTextureCacheCreateTextureFromImage(kCFAllocatorDefault,
textureCache,
pixelBufferBGRA,
nil,
.bgra8Unorm_srgb,
width,
height,
0,
&cvTexture)
guard let imageTexture = cvTexture else { return }
let texture: MTLTexture = CVMetalTextureGetTexture(imageTexture)!
if currentTexture == nil {
let texdescriptor = MTLTextureDescriptor
.texture2DDescriptor(pixelFormat: texture.pixelFormat,
width: texture.width,
height: texture.height,
mipmapped: false)
texdescriptor.usage = .unknown
currentTexture = mtlDevice.makeTexture(descriptor: texdescriptor)
}
if commandQueue == nil {
commandQueue = mtlDevice.makeCommandQueue()
}
let commandBuffer = commandQueue.makeCommandBuffer()!
let blitEncoder = commandBuffer.makeBlitCommandEncoder()!
blitEncoder.copy(from: texture,
sourceSlice: 0, sourceLevel: 0,
sourceOrigin: MTLOrigin(x: 0, y: 0, z: 0),
sourceSize: MTLSizeMake(texture.width, texture.height, texture.depth),
to: currentTexture!, destinationSlice: 0, destinationLevel: 0,
destinationOrigin: MTLOrigin(x: 0, y: 0, z: 0))
blitEncoder.endEncoding()
commandBuffer.commit()
commandBuffer.waitUntilCompleted()
if pointer == nil {
pointer = Unmanaged.passUnretained(currentTexture!).toOpaque()
}
}
// ----------------------------------------------------
extension CVPixelBuffer {
public func toBGRA() throws -> CVPixelBuffer? {
let pixelBuffer = self
/// Check format
let pixelFormat = CVPixelBufferGetPixelFormatType(pixelBuffer)
guard pixelFormat == kCVPixelFormatType_420YpCbCr8BiPlanarFullRange else { return pixelBuffer }
/// Split plane
let yImage: VImage = pixelBuffer.with({ VImage(pixelBuffer: $0, plane: 0) })!
let cbcrImage: VImage = pixelBuffer.with({ VImage(pixelBuffer: $0, plane: 1) })!
/// Create output pixelBuffer
let outPixelBuffer = CVPixelBuffer.make(width: yImage.width, height: yImage.height, format: kCVPixelFormatType_32BGRA)!
/// Convert yuv to argb
var argbImage = outPixelBuffer.with({ VImage(pixelBuffer: $0) })!
try argbImage.draw(yBuffer: yImage.buffer, cbcrBuffer: cbcrImage.buffer)
/// Convert argb to bgra
argbImage.permute(channelMap: [3, 2, 1, 0])
return outPixelBuffer
}
}
struct VImage {
let width: Int
let height: Int
let bytesPerRow: Int
var buffer: vImage_Buffer
init?(pixelBuffer: CVPixelBuffer, plane: Int) {
guard let rawBuffer = CVPixelBufferGetBaseAddressOfPlane(pixelBuffer, plane) else { return nil }
self.width = CVPixelBufferGetWidthOfPlane(pixelBuffer, plane)
self.height = CVPixelBufferGetHeightOfPlane(pixelBuffer, plane)
self.bytesPerRow = CVPixelBufferGetBytesPerRowOfPlane(pixelBuffer, plane)
self.buffer = vImage_Buffer(
data: UnsafeMutableRawPointer(mutating: rawBuffer),
height: vImagePixelCount(height),
width: vImagePixelCount(width),
rowBytes: bytesPerRow
)
}
init?(pixelBuffer: CVPixelBuffer) {
guard let rawBuffer = CVPixelBufferGetBaseAddress(pixelBuffer) else { return nil }
self.width = CVPixelBufferGetWidth(pixelBuffer)
self.height = CVPixelBufferGetHeight(pixelBuffer)
self.bytesPerRow = CVPixelBufferGetBytesPerRow(pixelBuffer)
self.buffer = vImage_Buffer(
data: UnsafeMutableRawPointer(mutating: rawBuffer),
height: vImagePixelCount(height),
width: vImagePixelCount(width),
rowBytes: bytesPerRow
)
}
mutating func draw(yBuffer: vImage_Buffer, cbcrBuffer: vImage_Buffer) throws {
try buffer.draw(yBuffer: yBuffer, cbcrBuffer: cbcrBuffer)
}
mutating func permute(channelMap: [UInt8]) {
buffer.permute(channelMap: channelMap)
}
}
extension CVPixelBuffer {
func with<T>(_ closure: ((_ pixelBuffer: CVPixelBuffer) -> T)) -> T {
CVPixelBufferLockBaseAddress(self, .readOnly)
let result = closure(self)
CVPixelBufferUnlockBaseAddress(self, .readOnly)
return result
}
static func make(width: Int, height: Int, format: OSType) -> CVPixelBuffer? {
var pixelBuffer: CVPixelBuffer? = nil
CVPixelBufferCreate(kCFAllocatorDefault,
width,
height,
format,
[String(kCVPixelBufferIOSurfacePropertiesKey): [
    "IOSurfaceOpenGLESFBOCompatibility": true,
    "IOSurfaceOpenGLESTextureCompatibility": true,
    "IOSurfaceCoreAnimationCompatibility": true,
]] as CFDictionary,
&pixelBuffer)
return pixelBuffer
}
}
extension vImage_Buffer {
mutating func draw(yBuffer: vImage_Buffer, cbcrBuffer: vImage_Buffer) throws {
var yBuffer = yBuffer
var cbcrBuffer = cbcrBuffer
var conversionMatrix: vImage_YpCbCrToARGB = {
var pixelRange = vImage_YpCbCrPixelRange(Yp_bias: 0, CbCr_bias: 128, YpRangeMax: 255, CbCrRangeMax: 255, YpMax: 255, YpMin: 1, CbCrMax: 255, CbCrMin: 0)
var matrix = vImage_YpCbCrToARGB()
vImageConvert_YpCbCrToARGB_GenerateConversion(kvImage_YpCbCrToARGBMatrix_ITU_R_709_2, &pixelRange, &matrix, kvImage420Yp8_CbCr8, kvImageARGB8888, UInt32(kvImageNoFlags))
return matrix
}()
let error = vImageConvert_420Yp8_CbCr8ToARGB8888(&yBuffer, &cbcrBuffer, &self, &conversionMatrix, nil, 255, UInt32(kvImageNoFlags))
if error != kvImageNoError {
fatalError()
}
}
mutating func permute(channelMap: [UInt8]) {
vImagePermuteChannels_ARGB8888(&self, &self, channelMap, 0)
}
}
Unity (C#) 側の実装
次に、前述の Swift で生成したテクスチャを Unity で受け取るための C# 側の実装を紹介します。
ネイティブ側の呼び出し設定
まずはネイティブ側の関数を Unity から呼び出すための設定を行います。
Swift 側で @_cdecl で指定した関数名を指定します。
@_cdecl("startCapture")
public func startCampture() {}

@_cdecl("stopCapture")
public func stopCapture() {}

@_cdecl("getTexture")
public func getTexture() -> UnsafeMutableRawPointer? {}
[DllImport("__Internal")]
private static extern void startCapture();

[DllImport("__Internal")]
private static extern void stopCapture();

[DllImport("__Internal")]
private static extern IntPtr getTexture();
セットアップ
C# 側の実装ではネイティブ側で作成したテクスチャのポインタを保持する Texture2D と、それをコピーして実際に利用するための RenderTexture を作成します。(ふたつ生成する理由については後述します)
まずは RenderTexture を作成してキャプチャ開始を通知します。
private void Start()
{
    // Create a render texture to show the camera image on a raw image.
    _renderTexture = new RenderTexture(_width, _height, 1, RenderTextureFormat.ARGB32);
    _renderTexture.enableRandomWrite = true;
    _renderTexture.Create();

    // キャプチャの開始。この処理は Swift 側で実行される
    startCapture();
}
テクスチャを取得する
Main Camera Access を開始したらネイティブ側で生成したテクスチャを取得します。
private void TryGetTexture()
{
    IntPtr texturePtr = getTexture();

    // ネイティブ側でまだテクスチャが作成されていない場合はスキップ
    if (texturePtr == IntPtr.Zero) return;

    // 後略
}
getTexture は Swift 側で定義された関数です。これを利用してネイティブ側のテクスチャのポインタを取得します。取得されるのは IntPtr 型です。
なお、取得されるポインタは Swift で以下のように Unmanaged.passUnretained で生成されたものです。(いわゆる void* 型と考えるといいでしょう)
pointer = Unmanaged.passUnretained(currentTexture!).toOpaque()
テクスチャを生成
無事、テクスチャのポインタを取得することができたらそのポインタを参照する Texture2D を生成します。生成には CreateExternalTexture メソッドを利用します。名前の通り、外部で生成されたテクスチャ用いて Texture2D を生成するためのメソッドです。
private void TryGetTexture()
{
    // 前略

    _texturePtr = texturePtr;

    // Create a texture to update the camera image.
    _texture = Texture2D.CreateExternalTexture(_width, _height, TextureFormat.BGRA32, false, false, _texturePtr);
    _texture.UpdateExternalTexture(_texturePtr);

    // 後略
}
テクスチャを RenderTexture にコピーする
テクスチャを生成したら、その内容を RenderTexture に Graphics.Blit を使ってコピーします。
private void TryGetTexture()
{
    // 前略

    Graphics.Blit(_texture, _renderTexture, _material);

    _hasSetTexture = true;
}
なぜコピーが必要なのか
さて、なぜ Texture2D をそのまま使わず RenderTexture にコピーするのでしょうか。理由は Unity 側の visionOS に対する PolySpatial の対応に起因するようです。
以下の Unity Discussions で Unity の中の人が回答してくれています。
It’s not supported directly, the way you’re trying to use it. We are limited by the restrictions of RealityKit’s TextureResource 5 API, which doesn’t allow using MTLTexture objects directly. For RenderTextures, however, we use the DrawableQueue 6 API to obtain an MTLTexture from RealityKit, to which we copy the contents of the RenderTexture (using a GPU blit). What you may be able to do is to copy the contents of the texture created with CreateExternalTexture to a RenderTexture (using a GPU operation like Graphics.CopyTexture 6 or Graphics.Blit 3), then use that RenderTexture in a material. You will have to explicitly mark the RenderTexture as dirty every time you update it using
Unity.PolySpatial.PolySpatialObjectUtils.MarkDirty(renderTexture).
要約すると、RealityKit の TextureResource API では MTLTexture の直接の参照を許可していないようです。しかし DrawableQueue API では利用できるため、これを利用して RenderTexture にコピーしろ、ということのようです。
直接 Texture2D を使うとエラーが発生する
ちなみに、生成した Texture2D を RawImage などに直に指定すると以下のようなエラーが発生します。
[AssetManager] Exception calling GetPixels32() on Texture . The texture is likely not marked as readable, perhaps because it was dynamically created.
System.ArgumentException: Texture2D.GetPixels32: not allowed on native textures. (Texture '')
  at Unity.PolySpatial.Internals.ConversionHelpers.ToPolySpatialFallbackTextureData (UnityEngine.Texture2D tex2d, System.Action`2[T1,T2] postConversionCallback, UnityEngine.Experimental.Rendering.GraphicsFormat fallbackGraphicsFormat, Unity.PolySpatial.Internals.PolySpatialTextureFallbackMode fallbackMode) [0x00000] in <00000000000000000000000000000000>:0
  at Unity.PolySpatial.Internals.LocalAssetManager.SendTextureAssetChanged (Unity.PolySpatial.Internals.PolySpatialAssetID assetID, UnityEngine.Object unityTexture, System.Boolean allowNativeTextures) [0x00000] in <00000000000000000000000000000000>:0
  at Unity.PolySpatial.Internals.LocalAssetManager.FetchAssetChangesCallback (Unity.PolySpatial.Internals.ObjectDispatcherProxy+TypeDispatchData data) [0x00000] in <00000000000000000000000000000000>:0
  at Unity.PolySpatial.Internals.ObjectDispatcherProxy+<>c__DisplayClass13_0.<.ctor>b__0 (UnityEngine.TypeDispatchData real) [0x00000] in <00000000000000000000000000000000>:0
  at UnityEngine.ObjectDispatcher+<>c.<.cctor>b__54_0 (UnityEngine.Object[] changed, System.IntPtr changedID, System.IntPtr destroyedID, System.Int32 changedCount, System.Int32 destroyedCount, System.Action`1[T] callback) [0x00000] in <00000000000000000000000000000000>:0
  at Unity.PolySpatial.Internals.LocalAssetManager.ProcessChanges () [0x00000] in <00000000000000000000000000000000>:0
  at Unity.PolySpatial.Internals.PolySpatialUnitySimulation.UpdateInternal () [0x00000] in <00000000000000000000000000000000>:0
  at Unity.PolySpatial.Internals.PolySpatialCore.PolySpatialAfterLateUpdate () [0x00000] in <00000000000000000000000000000000>:0
テクスチャの更新
基本的には CreateExternalTexture() で生成したテクスチャはネイティブ側のテクスチャを参照しているため、ネイティブ側で更新処理が走れば自動的に更新されます。しかし、C# 側ではさらに RenderTexture にコピーしないとなりません。
private void UpdateTexture()
{
    Graphics.Blit(_texture, _renderTexture, _material); // このマテリアルは、取得されるカメラデータが上下反転しているので、反転処理のために設定している
    // 以下の処理で Dirty フラグを立てないと更新されない
    Unity.PolySpatial.PolySpatialObjectUtils.MarkDirty(_renderTexture);
}
以上の処理により、高速に Unity 側でもカメラ映像を描画することができるようになります。
コード全文
using System;
using System.Runtime.InteropServices;
using Unity.PolySpatial.InputDevices;
using UnityEngine;
using UnityEngine.UI;
using UnityEngine.InputSystem.EnhancedTouch;
using UnityEngine.InputSystem.LowLevel;
using UnityEngine.InputSystem.Utilities;
using Touch = UnityEngine.InputSystem.EnhancedTouch.Touch;

namespace CameraCaptureSample
{
    public class CaptureBridge : MonoBehaviour
    {
        [SerializeField] private RawImage _preview;
        [SerializeField] private Texture2D _dummyTexture;
        [SerializeField] private Material _material;

        [DllImport("__Internal")]
        private static extern void startCapture();

        [DllImport("__Internal")]
        private static extern void stopCapture();

        [DllImport("__Internal")]
        private static extern IntPtr getTexture();

        private bool _hasSetTexture;
        private Texture2D _texture;
        private RenderTexture _renderTexture;
        private IntPtr _texturePtr;

        private int _width = 1920;
        private int _height = 1080;

        private bool _isRunning = false;

        private void Start()
        {
            EnhancedTouchSupport.Enable();

            // Create a render texture to show the camera image on a raw image.
            _renderTexture = new RenderTexture(_width, _height, 1, RenderTextureFormat.ARGB32);
            _renderTexture.enableRandomWrite = true;
            _renderTexture.Create();
            _preview.texture = _renderTexture;

            startCapture();
        }

        private void Update()
        {
            if (_hasSetTexture)
            {
                UpdateTexture();
            }
            else
            {
                TryGetTexture();
            }
        }

        private void TryGetTexture()
        {
            IntPtr texturePtr = getTexture();
            if (texturePtr == IntPtr.Zero) return;

            _texturePtr = texturePtr;

            if (_texture != null)
            {
                Destroy(_texture);
            }

            // Create a texture to update the camera image.
            _texture = Texture2D.CreateExternalTexture(_width, _height, TextureFormat.BGRA32, false, false, _texturePtr);
            _texture.UpdateExternalTexture(_texturePtr);
            Graphics.Blit(_texture, _renderTexture, _material);

            _preview.texture = _renderTexture;

            _hasSetTexture = true;
        }

        private void UpdateTexture()
        {
            Graphics.Blit(_texture, _renderTexture, _material);
            Unity.PolySpatial.PolySpatialObjectUtils.MarkDirty(_renderTexture);
        }
    }
}
さいごに
Apple Vision Pro でもカメラアクセスが(限定的ではありますが)解放されました。いずれはきっと、パーミッションの許可を得て一般ユーザ向けアプリでもカメラアクセスを行えるようにしてくれると思います。
AR においてはやはり、外界の情報をアプリ側で扱いながら処理をすることがとても重要だと考えます。カメラの映像が利用できれば、例えば機械学習を用いてなにが写っているか判定したり、その内容に応じてコンテンツの出し分けを行う、などの表現も可能になるでしょう。
カメラアクセスはポテンシャルが相当に高いと感じています。開発者のリクエストが多ければ Apple も真剣に取り組んでくれるので、ぜひみなさんもフィードバックを送ってみてください。
エンジニア絶賛募集中!
MESONではUnityエンジニアを絶賛募集中です! XR、空間コンピューティングのプロジェクトに関わってみたい! 開発したい! という方はぜひご応募ください!
MESONのメンバーページからご応募いただくか、TwitterのDMなどでご連絡ください。
書いた人
比留間 和也(あだな:えど)
カヤック時代にWEBエンジニアとしてリーダーを務め、その後VRに出会いコロプラに転職。 コロプラでは仮想現実チームにてXRコンテンツ開発に携わる。 DAYDREAM向けゲーム「NYORO THE SNAKE & SEVEN ISLANDS」をリリース。その後、ARに惹かれてMESONに入社。 MESONではARエンジニアとして活躍中。
またプライベートでもAR/VRの開発をしており、インディー部門でTGSに出展など公私関わらずAR/VRコンテンツ制作に精を出す。プライベートな時間でも開発しているように、新しいことを学ぶことが趣味で、最近は英語を学んでいる。
MESON Works
MESONの制作実績一覧もあります。ご興味ある方はぜひ見てみてください。

Discussion