xstateを勉強する
が気になりだったので触ってみた
にたくさんexampleがあるのでcloneSite、suffixがreactのものをいくつか触ってみた
摂氏と華氏の相互変換ツール
temperatureMachine.tsから見ていく
export const temperatureMachine = createMachine({
  types: {} as {
    context: TemperatureContext;
    events: TemperatureEvent;
  },
  context: { tempC: undefined, tempF: undefined },
  on: {
    CELSIUS: {
      actions: assign({
        tempC: ({ event }) => event.value,
        tempF: ({ event }) =>
          event.value.length ? +event.value * (9 / 5) + 32 : ''
      })
    },
    FAHRENHEIT: {
      actions: assign({
        tempC: ({ event }) =>
          event.value.length ? (+event.value - 32) * (5 / 9) : '',
        tempF: ({ event }) => event.value
      })
    }
  }
});
typesはTypeScript対応で、型をつけられるらしい
contextはステートマシンが持ってるデータ。今回だと摂氏温度と華氏温度
TemperatureContextで型をつけている
onは多分setterみたいなやつ。コンポーネントで使ってるところを見た方が分かりやすいので一旦スルー
App.tsx
const [state, send] = useMachine(temperatureMachine);

const { tempC, tempF } = state.context;
useMachineにmachine定義を入れて、現在のstateとその更新関数sendが返ってきてる
state.contextでcontextを読み取る。machineの定義でinitialとか使ってstate管理してるときは多分state.valueで取れそう。多分後で出てきます(試しながら書いてるので分からず)
<input
  type="number"
  id="celsius"
  value={tempC ?? ''}
  onChange={(e) => {
    send({ type: 'CELSIUS', value: e.target.value });
  }}
  placeholder="e.g., 0"
/>
tempCで現在の摂氏温度を取得
send({ type: 'CELSIUS', value: e.target.value })で、CELSIUSにe.target.valueを入力している
これがさっきの
on: {
    CELSIUS: {
      actions: assign({
        tempC: ({ event }) => event.value,
        tempF: ({ event }) =>
          event.value.length ? +event.value * (9 / 5) + 32 : ''
      })
    },
    FAHRENHEIT: {
      actions: assign({
        tempC: ({ event }) =>
          event.value.length ? (+event.value - 32) * (5 / 9) : '',
        tempF: ({ event }) => event.value
      })
    }
  }
に関係していて、CELSIUS.actionsのassignの与えている引数を見ると、
tempCではeventからevent.valueを返し、
tempFでは色々計算してreturnしている
tempCは摂氏の温度計算なので、CELSIUSの入力欄に入力されたものをそのままmachineに入れておけばいいけど、華氏は計算する必要があるのでtempFでは色々計算してる
FAHRENHEIT(これなんて読むの)では華氏の計算なので逆のことをしている
今更だけどUIはこんな感じになっている

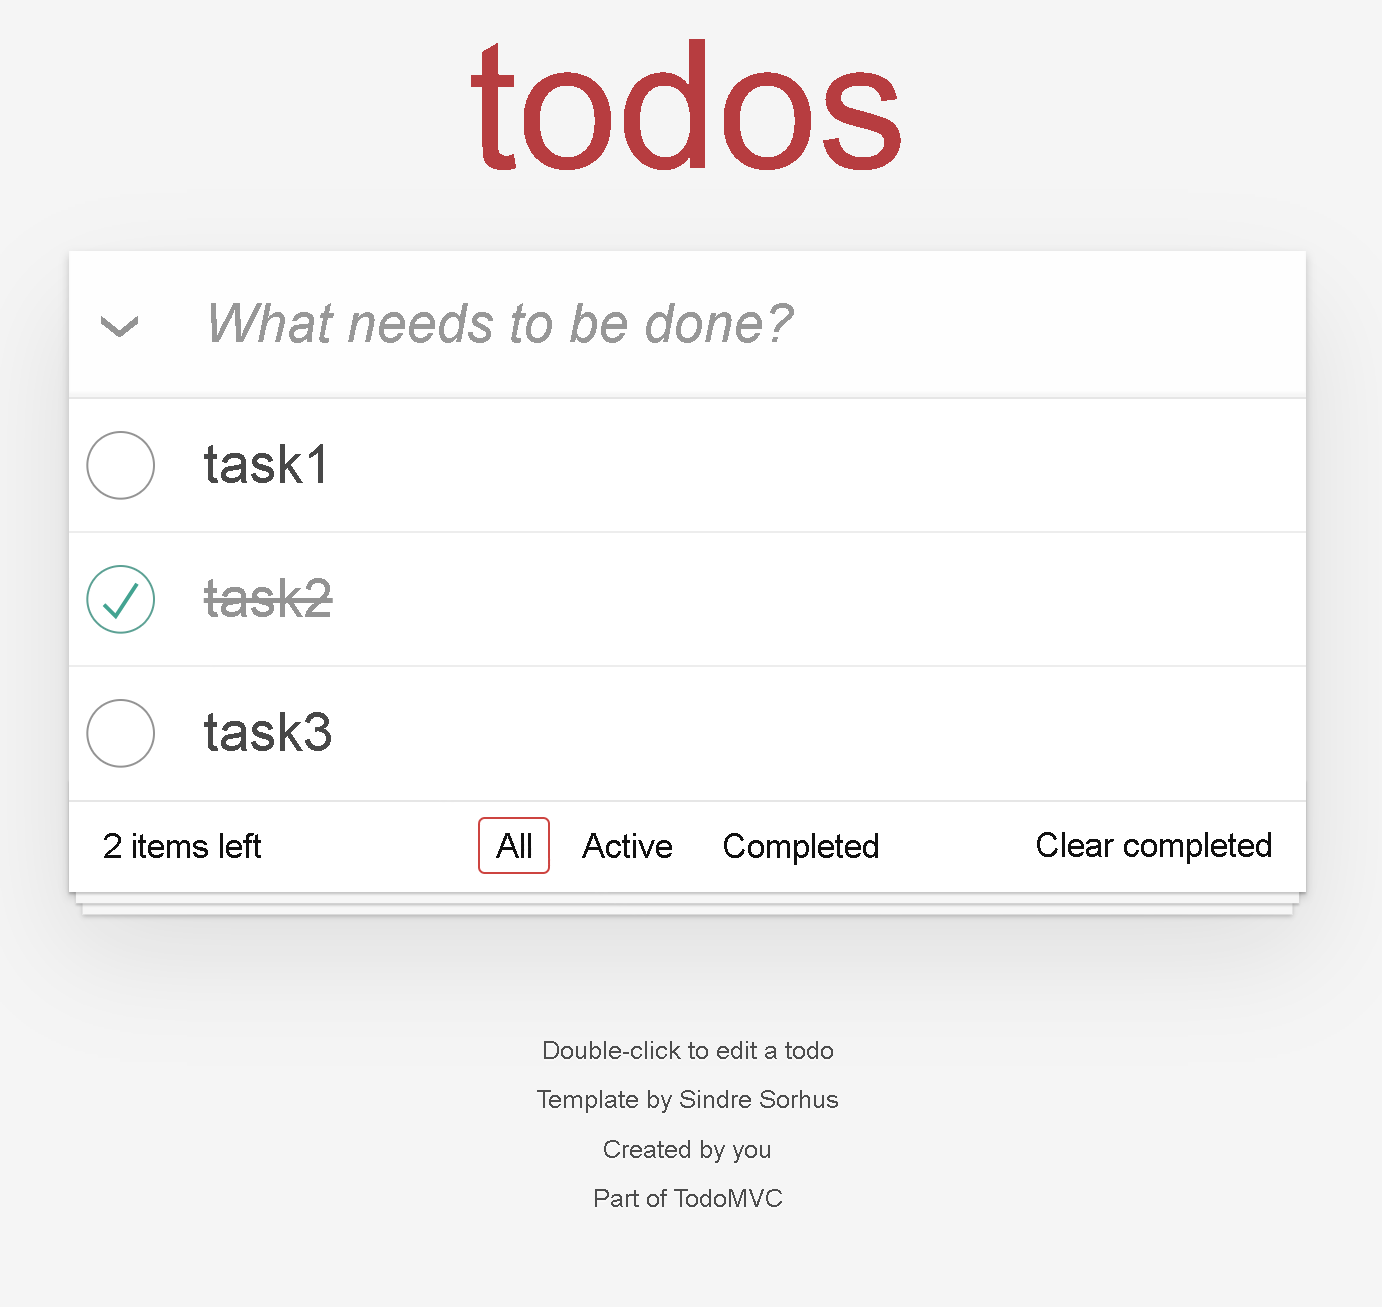
TODOリスト
todo-mvcっていうライブラリがあるらしくて、それを使ってる
UIはこんな感じ
今回はコンポーネントから見た方が分かりやすそうなのでそうする
App.tsx
export const TodosContext = createActorContext(todosMachine, {
  state: JSON.parse(localStorage.getItem('todos') || 'null')
});

function App() {
  return (
    <TodosContext.Provider>
      <Todos />
createActorContextでcontextを作成してる
localStorageに保存できるようになっているので、最初にそこから取り出してきたり取り出してこなかったりして、contextでデータを扱うらしい
Todos.tsx
contextからデータを読み取っている
const todosActorRef = TodosContext.useActorRef();
const { send } = todosActorRef;
const todo = TodosContext.useSelector((s) => s.context.todo);
const todos = TodosContext.useSelector((s) => s.context.todos);
const filter = TodosContext.useSelector((s) => s.context.filter);
それ以降は長いので、一旦どこをクリックしたら何が起こるかを見ていく
タスクの入力欄
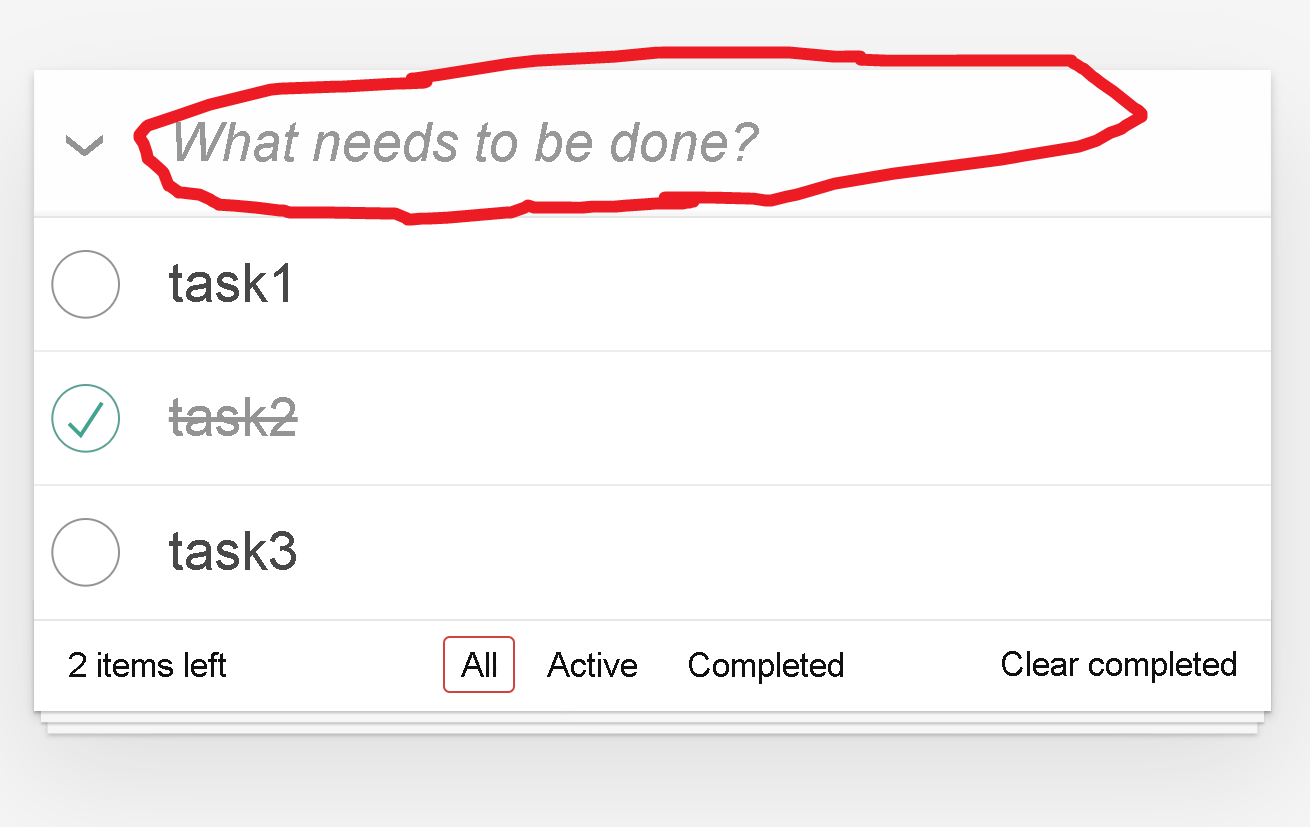
<input
  ref={inputRef}
  className="new-todo"
  placeholder="What needs to be done?"
  autoFocus
  onKeyPress={(ev) => {
    if (ev.key === 'Enter') {
      send({ type: 'newTodo.commit', value: ev.currentTarget.value });
    }
  }}
  onChange={(ev) =>
    send({ type: 'newTodo.change', value: ev.currentTarget.value })
  }
  value={todo}
/>
onChangeでnewTodo.changeに入力値を渡し、Enterを押すとnewTodo.commitに入力値が渡される
ちなみにmachineの定義(の一部)がこうなっていて、eventsの8つのうちの2つをここで使っている
context: {
  todo: string;
  todos: TodoItem[];
  filter: TodosFilter;
};
events:
  | { type: 'newTodo.change'; value: string }
  | { type: 'newTodo.commit'; value: string }
  | { type: 'todo.commit'; todo: TodoItem }
  | { type: 'todo.delete'; id: string }
  | { type: 'filter.change'; filter: TodosFilter }
  | { type: 'todo.mark'; id: string; mark: 'active' | 'completed' }
  | { type: 'todo.markAll'; mark: 'active' | 'completed' }
  | { type: 'todos.clearCompleted' };
トグルボタン(って言うのかなこれ)

<input
  id="toggle-all"
  className="toggle-all"
  type="checkbox"
  checked={allCompleted}
  onChange={() => {
    send({
      type: 'todo.markAll',
      mark: allCompleted ? 'active' : 'completed'
    });
  }}
/>
todo.markAllに、'active'か'completed'かを渡している
これはクリックしたら、全て完了状態であれば全部未完に、1つでも未完があれば全て完了状態にするトグルボタン
Allとかのボタン
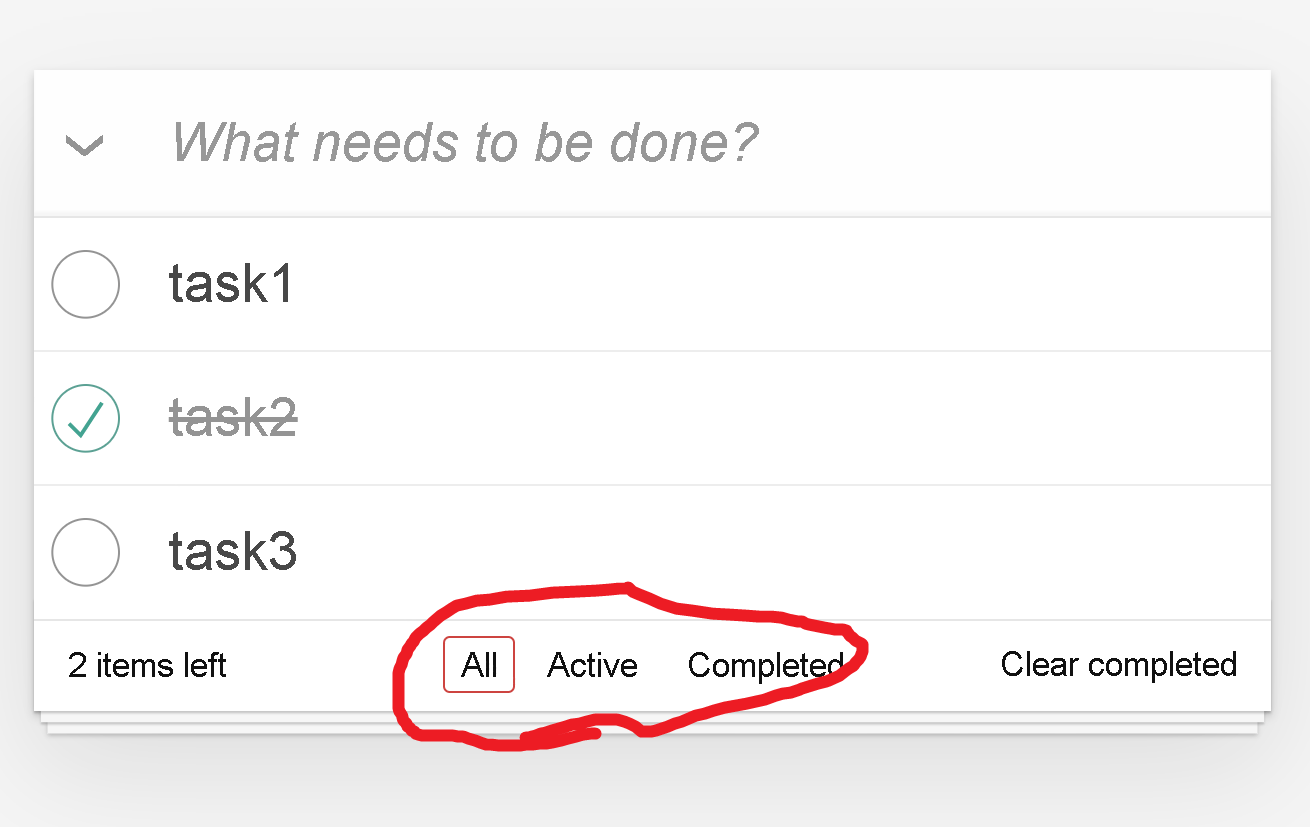
<a
  className={cn({
    selected: filter === 'active'
  })}
  href="#/active"
>
  Active
</a>
単純にリンク先に飛ばしている
これをuseHashChangeとかで読み込んで、filter.changeイベントに渡している
useHashChange(() => {
    send({
      type: 'filter.change',
      filter: (window.location.hash.slice(2) || 'all') as TodosFilter
    });
  });
export type TodosFilter = 'all' | 'active' | 'completed';
localStorageへの保存
 useEffect(() => {
    todosActorRef.subscribe(() => {
      localStorage.setItem(
        'todos',
        JSON.stringify(todosActorRef.getPersistedSnapshot?.())
      );
    });
  }, [todosActorRef]);
refの変更を検知して保存しているらしい
Todo.tsx
大体同じような感じでいくつかsendしたりしなかったりしてるので省略
なお、ここではTodos.tsxでtodosMachineを使っていたのとは別で、todoMachineを定義してそれを使っています
一箇所だけ
.provideでmachine定義を動的に上書きできるらしい
Todoコンポーネントにpropsとして渡されてるtodoなどを使っているので、こうなっていそう
const todoActorRef = useActorRef(
    todoMachine.provide({
      actions: {
        onCommit: ({ context }) => {
          todosActorRef.send({
            type: 'todo.commit',
            todo: {
              ...todo,
              title: context.title
            }
          });
        },
     ...
  );
machineのcontextとeventsの説明をコメントで書いてみた
context: {
  todo: string; // 入力欄に入力中の値
  todos: TodoItem[]; // todoリスト
  filter: TodosFilter; // 現在のフィルタリング状態(URLのハッシュ)
};
events:
  | { type: 'newTodo.change'; value: string } // 入力欄に入力
  | { type: 'newTodo.commit'; value: string }  // 入力欄でenterを押して確定
  | { type: 'todo.commit'; todo: TodoItem }  // タスク名を編集して確定
  | { type: 'todo.delete'; id: string }  // タスクを削除
  | { type: 'filter.change'; filter: TodosFilter } // URLのハッシュが変わる
  | { type: 'todo.mark'; id: string; mark: 'active' | 'completed' } // チェックボックスでタスクの完了状態を変更
  | { type: 'todo.markAll'; mark: 'active' | 'completed' } // トグルボタンを押す
  | { type: 'todos.clearCompleted' }; // clear completedボタンで完了したタスクを全部消す
今更だけどここらへんはステートマシンというよりはただの状態管理ライブラリみたいな感じ
todomachineの方がちょっとステートマシンっぽかったので見てみる
初期状態の定義
initial: 'reading'
この状態のときにこうなったらこの状態に移る、みたいな定義
states: {
    reading: {
      on: {
        edit: 'editing'
      }
    },
    editing: {
      ...
      on: {
        blur: {
          target: 'reading',
          actions: 'onCommit'
        },
...
イベントの定義はこんな感じ
events: {} as
  | {
      type: 'edit';
    }
  | {
      type: 'blur';
    }
  | {
      type: 'cancel';
    }
  | {
      type: 'change';
      value: string;
    },
readingのときにtypeがeditのものがきたらeditingに移る
editingのときにblurがきたら、onCommitをしてreadingに移る
みたいな感じ
UIで言うと、タスク名をダブルクリックすると編集できる状態になって、enterを押すと確定されて通常状態に戻る、みたいな感じになっていた
次はもっとステートマシンっぽい例を探したいけど、一旦終わり