


はじめに
ご覧いただきありがとうございます。阿河です。
Amazon SageMakerでジョブを実行するときに、VPC Configやタグの情報をパラメータで指定していますが、非常に手間に感じていました。
また組織利用等で設定を共通化したいケースにおいて、ユーザーが手動でパラメータ指定する状況は、何かと不都合が起きることがあります。
yamlファイルでデフォルト値を指定することで上記の手間や不安が取り除かれたので、記事にまとめてみました。
合わせてライフサイクル設定を利用することで、Configのセッティング自体の手間も削減できるようにします。
前提
- Amazon SageMakerノートブックインスタンスの利用を想定しています。
- Python SageMaker SDKを前提としてます。
概要
- config.ymlについて
- ライフサイクル設定で自動設定する
- 動作確認
1. config.ymlについて
SchemaVersion: '1.0'
CustomParameters:
  AnyStringKey: 'AnyStringValue'
SageMaker:
  Endpoint:
    Tags:
      - Key: "tag_key"
        Value: "tag_value"
  Model:
      - Environment:
          'var1': 'value1'
          'var2': 'value2'
    EnableNetworkIsolation: true
    ExecutionRoleArn: 'arn:aws:iam::555555555555:role/IMRole'
    VpcConfig:
      SecurityGroupIds:
        - 'sg123'
      Subnets:
        - 'subnet-1234'
    Tags:
    - Key: 'tag_key'
      Value: 'tag_value'
config.ymlを利用すれば、例えば「TrainingJob」「Processing」ジョブを実行するときに、明示的にタグの設定値を渡さずとも、Configで定義した通りに自動で設定反映がされます。
デフォルト値が自動でジョブに反映されるため、手動でパラメータ指定をすることによるミスや設定の非整合性を防止することができます。
ただしノートブックインスタンスを立ち上げるたびにConfigのセッティングがリセットされてしまうため、ライフサイクル設定を紐づけることにより、ノートブックインスタンス利用時はConfigが自動適用されるようにします。
2. ライフサイクル設定で自動設定する
※lifecycle-stack.yml
AWSTemplateFormatVersion: "2010-09-09"

Parameters:

  subnets1:
    Type: String
    Default: "subnet-xxx"
  subnets2:
    Type: String
    Default: "subnet-xxx"
  sg:
    Type: String
    Default: "sg-xxx"
  user:
    Type: String
    Default: "hoge"

Resources:
  NotebookInstanceLifecycleConfig:
    Type: "AWS::SageMaker::NotebookInstanceLifecycleConfig"
    Properties:
      NotebookInstanceLifecycleConfigName: NotebookInstanceLifecycleConfig
      OnStart:
        - Content:
            Fn::Base64: !Sub |
              #!/bin/bash
              set -e

              user_config_path="/home/ec2-user/.config/sagemaker"
              user_config_file="${!user_config_path}/config.yaml"
              system_config_path="/etc/xdg/sagemaker"
              system_config_file="${!system_config_path}/config.yaml"

              if [ ! -d "$user_config_path" ]; then
                  sudo -u ec2-user mkdir -p "$user_config_path"
              fi
              if [ ! -d "$system_config_path" ]; then
                  sudo mkdir -p "$system_config_path"
              fi

              sudo -u ec2-user bash -c "cat > '$user_config_file' << 'EOF'
              SchemaVersion: '1.0'
              SageMaker:
                Endpoint:
                  Tags:
                  - Key: 'User'
                    Value: '${user}'
                EndpointConfig:
                  Tags:
                    - Key: 'User'
                      Value: '${user}'
                Model:
                  VpcConfig:
                    SecurityGroupIds:
                      - '${sg}'
                    Subnets:
                      - '${subnets1}'
                      - '${subnets2}'
                  Tags:
                    - Key: 'User'
                      Value: '${user}'
                TrainingJob:
                  VpcConfig:
                    SecurityGroupIds:
                      - '${sg}'
                    Subnets:
                      - '${subnets1}'
                      - '${subnets2}'
                  Tags:
                    - Key: 'User'
                      Value: '${user}'
              EOF"

              sudo cp "$user_config_file" "$system_config_file"

              systemctl restart jupyter-server


Outputs:
  NotebookInstanceLifecycleConfig:
    Value: !GetAtt NotebookInstanceLifecycleConfig.NotebookInstanceLifecycleConfigName
    Export:
      Name: NotebookInstanceLifecycleConfig
上記CloudFormationテンプレートで、ノートブックインスタンス用のライフサイクル設定をデプロイし、Direct Internet Accessを禁じたノートブックインスタンスに紐づけます。
プライベート環境下でのSageMakerの利用方法については、今回のテーマと逸れるので概要は省略します。
config.ymlの設定により、「TrainingJob」「Model」「EndpointConfig」「Endpoint」それぞれにVPC Configやタグの設定を入れています。必要に応じて「Processing Job」や「AutML」などのセクションを追加したり、タグ以外の設定も追加可能です。
詳細はドキュメントを御覧ください。
CloudFormationのパラメータとしては
subnet1: VPC Configで指定するサブネットの指定
subnet2: VPC Configで指定するサブネットの指定
sg: VPC Configで指定するセキュリティグループの指定
user: Userタグで指定する値
本記事では「VPC Config」「タグ」を自動設定することが目的のため、パラメータで両者を指定できるようにしています。
3. 動作確認
起動したノートブックインスタンスで、所定のファイルに書き込みが行われていることを確認します。
sh-4.2$ sudo cat /home/ec2-user/.config/sagemaker/config.yaml
SchemaVersion: '1.0'
SageMaker:
  Endpoint:
    Tags:
    - Key: 'User'
      Value: 'hoge'
  EndpointConfig:
    Tags:
      - Key: 'User'
        Value: 'hoge'
  Model:
    VpcConfig:
      SecurityGroupIds:
        - 'sg-xxx'
      Subnets:
        - 'subnet-xxx'
        - 'subnet-xxx'
    Tags:
      - Key: 'User'
        Value: 'hoge'
  TrainingJob:
    VpcConfig:
      SecurityGroupIds:
        - 'sg-xxx'
      Subnets:
        - 'subnet-xxx'
        - 'subnet-xxx'
    Tags:
      - Key: 'User'
        Value: 'hoge'
/home/ec2-user/.config/sagemaker/config.yaml
/etc/xdg/sagemaker/config.yaml
上記に、同様の内容のconfig.yamlファイルの作成が確認できます。
VPC Configやタグを指定せずに、トレーニングジョブを実行してみます。
サンプルコードとして、上記を利用します。
sess = sagemaker.Session(default_bucket='xxx')

hyperparameters = {"max_depth":"5",
                        "eta":"0.2",
                        "gamma":"4",
                        "min_child_weight":"6",
                        "subsample":"0.8",
                        "objective":"binary:logistic",
                        "num_round":"100"}

xgb = sagemaker.estimator.Estimator(container,
                                    role,
                                    hyperparameters=hyperparameters,
                                    instance_count=1,
                                    instance_type='ml.m4.xlarge',
                                    sagemaker_session=sess)

xgb.fit({'train': s3_input_train, 'validation': s3_input_validation}, job_name='xxx')
sagemaker.config INFO - Applied value from config key = SageMaker.TrainingJob.VpcConfig.Subnets
sagemaker.config INFO - Applied value from config key = SageMaker.TrainingJob.VpcConfig.SecurityGroupIds
sagemaker.config INFO - Applied value(s) from config key = SageMaker.TrainingJob.Tags
INFO:sagemaker:Creating training-job with name: xxx
2024-03-04 19:44:35 Starting - Starting the training job...
2024-03-04 19:44:52 Starting - Preparing the instances for training..
設定が反映され、トレーニングジョブが走ります。
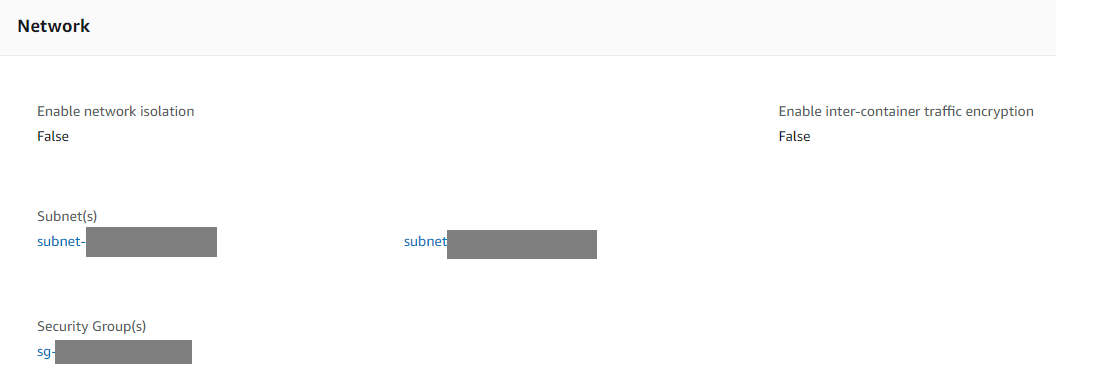
VPC Configやタグ値を明示的に指定せずとも、設定が自動反映されています。
xgb_predictor = xgb.deploy(initial_instance_count = 1, instance_type = 'ml.m4.xlarge', model_name = 'xxx', endpoint_name = 'xxx')
エンドポイントをデプロイします。
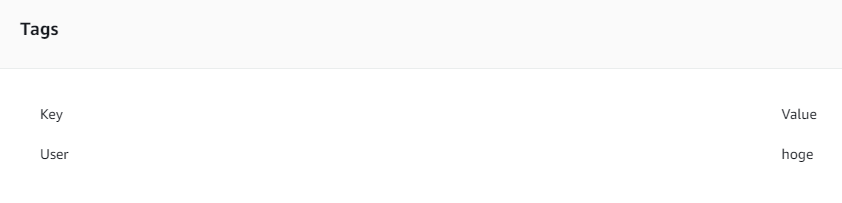
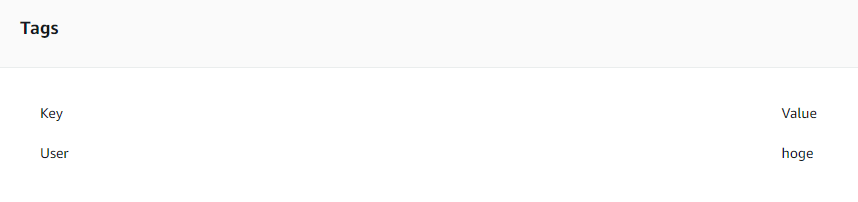
「Model」「Endpoint configurations」「Endpoints」それぞれに対して、想定どおりにUserタグがついています。
おわりに
誰かの参考になれば幸いです。
ここまで御覧いただきありがとうございました。
MEGAZONEはAWS プレミアティア サービスパートナーとして多数のCompetencyを取得しており、大企業、ゲーム会社、スタートアップ、公共機関などさまざまな分野の5,000以上のお客様にAWSソリューションとサービスを提供しています。
Discussion