Neovim環境構築 w/ Lazy
昨日はNeovimの環境構築をNvChadから行っていたが、不安定っぽい動作があったので、Lazyから自分で環境構築をしてみる。
.config/nvim、.cache/nvim、.local/share/nvim の内容を削除して、全部リセットする。
Nerdフォント、wl-copyを導入する。$WAYLAND_DISPLAY環境変数を設定する。導入の仕方は、前回のスクラップを参照のこと。

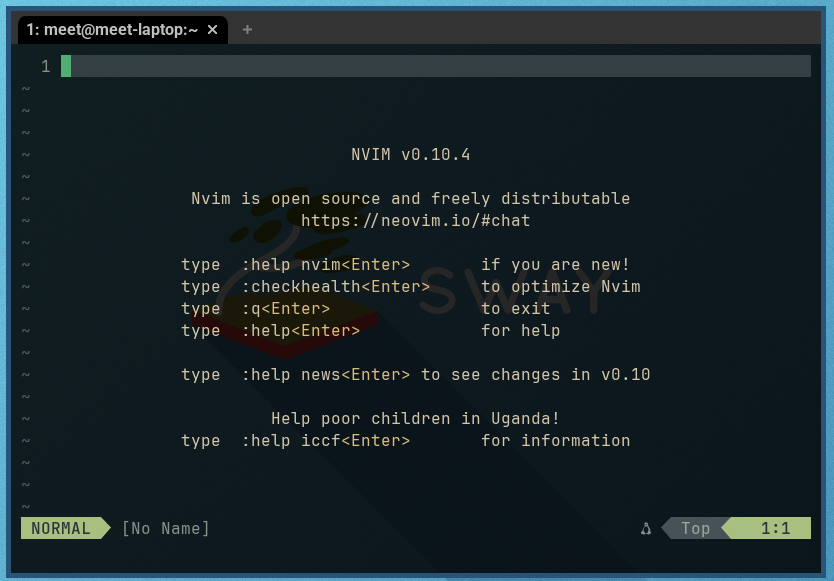
最初の状態。
.vimrcに最低限書いてあったことを、init.luaにも書いておく。
vim.o.number = true
vim.o.cursorline = true

vim.o.expandtab = true
vim.o.tabstop = 4
vim.o.shiftwidth = 4

vim.opt.clipboard:append({ "unnamedplus" })

init.luaに少し書き込みをした後。行番号とカーソル位置ハイライトの表示。
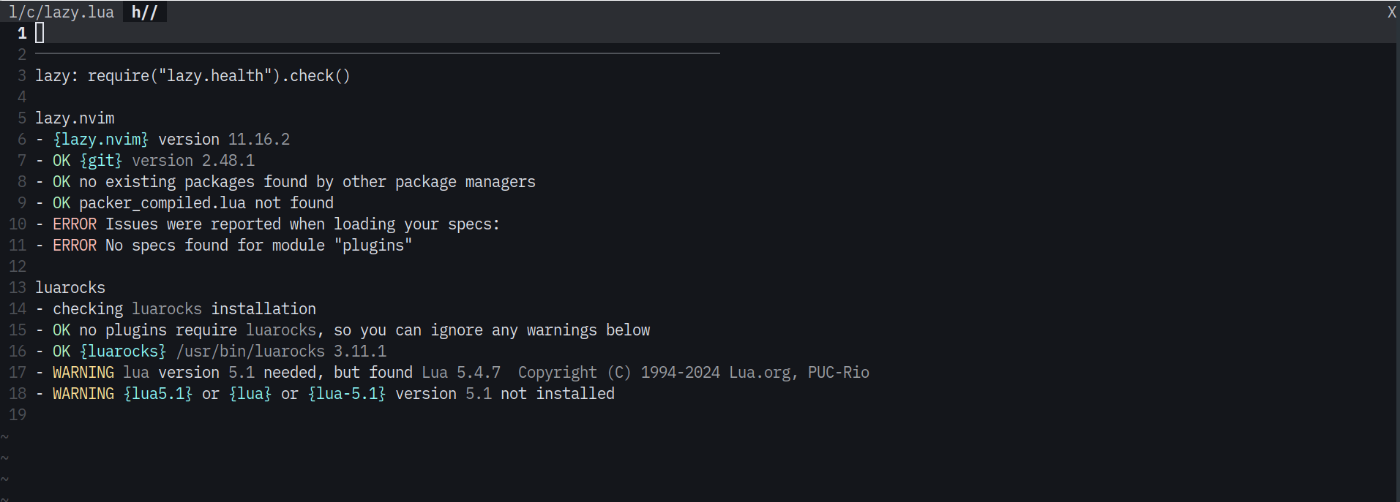
この状態で、:checkhealthを走らせてみる。エラーは出ていない。警告に関しては、「こういう言語で書かれたプラグインもあるから気をつけてね」程度だと認識している。

NodeやらPerlやらPythonやらがないとの警告。
Lazyをインストールする。インストール方法は公式ホームページの通り。「Structured Setup」の方でインストールする。エラーが出るのが嫌なので、lazy.luaを書いた後に、init.luaに書き足す。
-- Bootstrap lazy.nvim
local lazypath = vim.fn.stdpath("data") .. "/lazy/lazy.nvim"
if not (vim.uv or vim.loop).fs_stat(lazypath) then
    local lazyrepo = "https://github.com/folke/lazy.nvim.git"
    local out = vim.fn.system({ "git", "clone", "--filter=blob:none", "--branch=stable", lazyrepo, lazypath })
    if vim.v.shell_error ~= 0 then
        vim.api.nvim_echo({
            { "Failed to clone lazy.nvim:\n", "ErrorMsg" },
            { out, "WarningMsg" },
            { "\nPress any key to exit..." },
        }, true, {})
        vim.fn.getchar()
        os.exit(1)
    end
end
vim.opt.rtp:prepend(lazypath)

-- Make sure to setup `mapleader` and `maplocalleader` before
-- loading lazy.nvim so that mappings are correct.
-- This is also a good place to setup other settings (vim.opt)
vim.g.mapleader = " "
vim.g.maplocalleader = "\\"

-- Setup lazy.nvim
require("lazy").setup({
    spec = {
        -- import your plugins
        { import = "plugins" },
    },
    -- Configure any other settings here. See the documentation for more details.
    -- colorscheme that will be used when installing plugins.
    install = { colorscheme = { "habamax" } },
    -- automatically check for plugin updates
    checker = { enabled = true },
})
(前略)
require("config.lazy")
nvimを再起動すると、しばらく黒画面があってから、エラーが出る。プラグインが何もないと怒られるらしい。

表示されたエラー
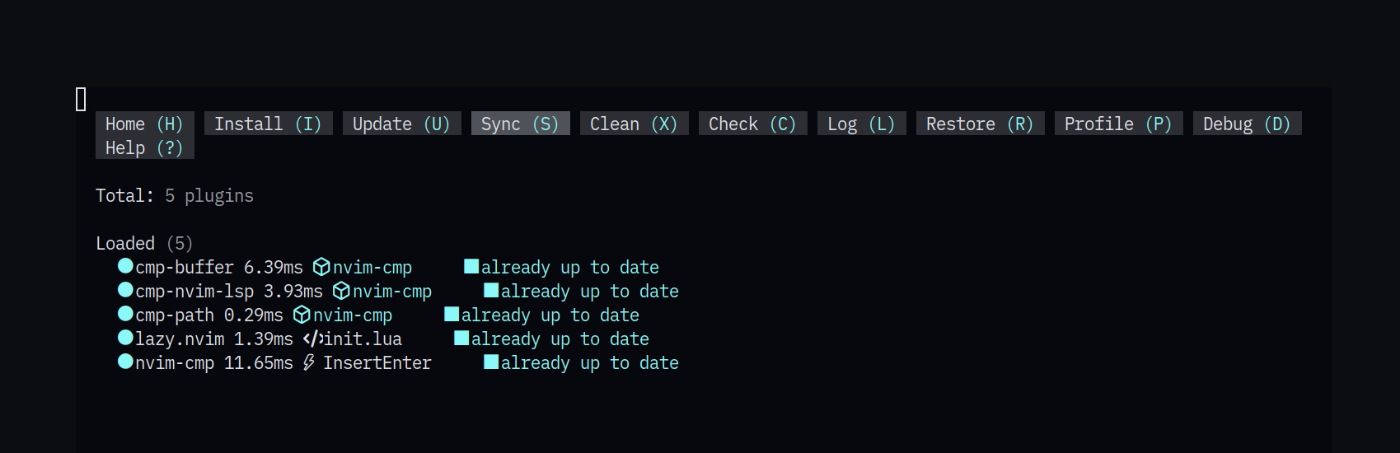
Lazy.nvimのアップデートがあるそうなので、アップデートしてみる。
:Lazyで、LazyのGUIを立ち上げる。

Shift+uで、アップデートを開始する。
:checkhealth lazyで、状態を確認する。
出ているエラーは、プラグインが何もないというエラーのみ。また、luarocksが必要なようなので、pacmanで入れてやった。(無理やり無効化しようとしたが、エラーは消えなかった)
これで、Lazyのセットアップまでは完了。
ここからは、色々とプラグインを入れていく。
補完関連
nvim-cmpを使う。今後も色々追加していくかもしれないが、一旦単体で。
LazyVimのデフォルト設定の「Full Spec」を、そのまま~/.config/nvim/lua/plugins/cmp.luaにコピペした。また、同時にLazyVimも導入しようと思ったが、うまくいかなかったのでやめた。それにともない、cmp.luaでLazyVimを使っていた行を削除した。また、キーバインドもいじった。最終的な設定ファイルは、以下のようになった。
return {
    "hrsh7th/nvim-cmp",
    version = false, -- last release is way too old
    event = "InsertEnter",
    dependencies = {
        "hrsh7th/cmp-nvim-lsp",
        "hrsh7th/cmp-buffer",
        "hrsh7th/cmp-path",
    },
    -- Not all LSP servers add brackets when completing a function.
    -- To better deal with this, LazyVim adds a custom option to cmp,
    -- that you can configure. For example:
    --
    -- ```lua
    -- opts = {
    --   auto_brackets = { "python" }
    -- }
    -- ```
    opts = function()
        vim.api.nvim_set_hl(0, "CmpGhostText", { link = "Comment", default = true })
        local cmp = require("cmp")
        local defaults = require("cmp.config.default")()
        local auto_select = true
        return {
            auto_brackets = {}, -- configure any filetype to auto add brackets
            completion = {
                completeopt = "menu,menuone,noinsert" .. (auto_select and "" or ",noselect"),
            },
            preselect = auto_select and cmp.PreselectMode.Item or cmp.PreselectMode.None,
            mapping = {
                ["<M-k>"] = cmp.mapping.select_prev_item(),
                ["<Up>"] = cmp.mapping.select_prev_item(),
                ["<M-j>"] = cmp.mapping.select_next_item(),
                ["<Down>"] = cmp.mapping.select_next_item(),
                ["<C-d>"] = cmp.mapping.scroll_docs(-4),
                ["<C-f>"] = cmp.mapping.scroll_docs(4),
                ["<C-e>"] = cmp.mapping.close(),

                ["<Tab>"] = cmp.mapping.confirm {
                behavior = cmp.ConfirmBehavior.Insert,
                select = true,
                },
            },
            sources = cmp.config.sources({
                { name = "nvim_lsp" },
                { name = "path" },
            }, {
                { name = "buffer" },
            }),
            formatting = {
                format = function(entry, item)
                    local widths = {
                        abbr = vim.g.cmp_widths and vim.g.cmp_widths.abbr or 40,
                        menu = vim.g.cmp_widths and vim.g.cmp_widths.menu or 30,
                    }

                    for key, width in pairs(widths) do
                        if item[key] and vim.fn.strdisplaywidth(item[key]) > width then
                            item[key] = vim.fn.strcharpart(item[key], 0, width - 1) .. "…"
                        end
                    end

                    return item
                end,
            },
            experimental = {
                -- only show ghost text when we show ai completions
                ghost_text = vim.g.ai_cmp and {
                    hl_group = "CmpGhostText",
                } or false,
            },
            sorting = defaults.sorting,
        }
    end,
}

補完が出るようになった。
ファイルツリー
nvim-treeを使う。公式のインストールガイドにある設定ファイルを、~/.config/lua/plugins/nvim-tree.luaにコピペする。また、一番上に表示されている親ディレクトリを選択してしまうとディレクトリが移動してしまってかなり不便なので、非表示にする。
return {
    "nvim-tree/nvim-tree.lua",
    version = "*",
    lazy = false,
    dependencies = {
        "nvim-tree/nvim-web-devicons",
    },
    config = function()
    require("nvim-tree").setup {
        renderer = { root_folder_label = false }
    }
    end,
}
キーバインドを設定しておく。新しく設定ファイルを作ってみる。
vim.keymap.set("n", "<C-S-e>", "<cmd>NvimTreeToggle<CR>", { desc = "nvim-tree toggle window" })
(前略)
require("config.mappings")
require("config.lazy")
これで、Ctrl+Shift+Eでファイルツリーのウィンドウが開くようになった。

ステータスライン
nvim-lualineを用いる。
return {
    'nvim-lualine/lualine.nvim',
    dependencies = { 'nvim-tree/nvim-web-devicons' }
}
(前略)
require("lualine").setup()

ステータスラインが表示されるようになった
テーマ
これは、完全に見た目だけの問題なのでミニマリズムには反するかもしれないが、everforestが非常に好みなので入れたい。
ドキュメントに書いてある通り、設定ファイルを書く。
return {
    'sainnhe/everforest',
    lazy = false,
    priority = 1000,
    config = function()
        -- Optionally configure and load the colorscheme
        -- directly inside the plugin declaration.
        vim.g.everforest_enable_italic = true
        vim.cmd.colorscheme('everforest')
    end
}

見た目がいい感じになった
基本的なプラグインのいくつかを追加することができ、単純なテキストエディタとしては快適に使えるようになった。
Rust向け環境構築
さて、NeovimではLSPがデフォルトで入っているため、ここから別途プラグインを入れなくてもエラーを表示したり、インレイヒントを表示したりすることが可能(!)
cf)
が、いかんせんBuilt-inがまだ不安定なので、nvim-lspconfigを補助に使う。
rust-analyzerを導入する。
$ rustup component add rust-analyzer
nvim-lspconfigに関する設定ファイルをつくる。
return {
    "neovim/nvim-lspconfig",
    lazy = false,
    config = function()
        local lspconfig = require("lspconfig")

        lspconfig.rust_analyzer.setup({
            settings = {
                ["rust-analyzer"] = {
                    check = {
                        command = "clippy"
                    },
                    hint = { enable = true }
                }
            }
        })

    end,
}
inlay_hintをトグルするキーを設定する。今回は、Ctrl+Shift+Hにした。
(前略)
vim.keymap.set("n", "<C-S-h>", "<cmd>lua vim.lsp.inlay_hint.enable(not vim.lsp.inlay_hint.is_enabled())<CR>", { desc = "toggle inlay_hint" })
LSPのステータスがわかりやすいように、fedgetを入れた。
2025年2月22日時点での設定を、GitHubにアップした。(Added .gigignoreのコミット)

Neovimの初期設定

2025年2月22日時点ではこんな感じ
everforestのレポジトリに、透過させる設定が書いてあったので、試してみた。
ターミナルも透過できないと、透過はしない模様。
ターミナルには、WezTermを使用。
(KDE環境ではよくわからないエラーでWezTermが起動しなかったので、今回はSwayの環境で動かした)
いい感じに透過している。
return {
    'sainnhe/everforest',
    lazy = false,
    priority = 1000,
    config = function()
        -- Optionally configure and load the colorscheme
        -- directly inside the plugin declaration.
        vim.g.everforest_enable_italic = true
+       vim.g.everforest_transparent_background = 2
        vim.cmd.colorscheme('everforest')
    end
}
また、WezTermの設定は以下の通り。
local wezterm = require("wezterm")
local config = wezterm.config_builder()

config.window_background_opacity = 0.85
config.macos_window_background_blur = 20

return config
括弧の自動補完をする、nvim-autopairsを導入した。
return {
    'windwp/nvim-autopairs',
    event = "InsertEnter",
    config = true
    -- use opts = {} for passing setup options
    -- this is equivalent to setup({}) function
}