StreamDeck をカメラモニタにしてみた。
この記事は Go Advent Calendar 2021、24日目の記事です。
はじめに
みなさんは StreamDeck をご存じでしょうか。
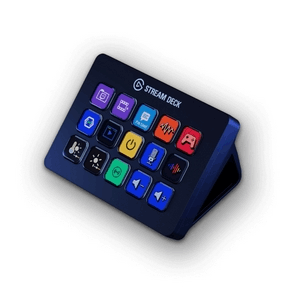
StreamDeck は数々のアクションを起動することができるLCDキーを搭載したデバイスで、シーンを切り替える、アプリケーションやメディアを起動する、オーディオを調整する、などの操作をキーボードショートカットをマッピングしたり記憶する必要が無くなる便利な物です。主に YouTuber の皆さんが使っている事が多い様ですが、エンジニアの皆さんがエディタやブラウザを起動したり、特定の業務をボタン1つで実行するなど、便利に使っておられる様です。
さて 2021 年、僕は GitHub Stars に選ばれました。色々なプレゼント を GitHub 社から頂いたのですが、その中に StreamDeck がありました。
一応 StreamDeck の存在は知っていたので、一度試してみたいなと思っていたので、ちょうど良かったと思います。
StreamDeck を Go から操作する
さて、こういうデバイスを手にしてしまうと何か作ってしまいたくなるのがプログラマなのですが、オフィシャルのドキュメントを調べた所、プラグイン機構がありました。StreamDeck は StreamDeck アプリケーションを介して StreamDeck プラグインと websocket/json で通信します。StreamDeck プラグインは StreamDeck アプリケーションに対してテキストや画像といった情報を交換し、StreamDeck で発生したボタン押下や、StreamDeck アプリケーションで発生したプロパティ変更といったイベントを受け取ります。

探してみた所、幾らか Go 言語から StreamDeck を操作するパッケージが既にありました。その中でも、実用的なのが samwho/streamdeck でした。
試しに作ってみたのが「ルパンは2度死ぬボタン」です。
仕組みはとても簡単で、ボタンが押される度に embed で読み込んだ画像ファイルを切り替えているだけです。
action.RegisterHandler(streamdeck.KeyDown, func(ctx context.Context, client *streamdeck.Client, event streamdeck.Event) error {
	s, ok := settings[event.Context]
	if !ok {
		return fmt.Errorf("couldn't find settings for context %v", event.Context)
	}

	s.Counter++
	if s.Counter > 7 {
		s.Counter = 0
	}
	if err := client.SetSettings(ctx, s); err != nil {
		return err
	}

	in, err := local.Open(fmt.Sprintf("static/%d.png", s.Counter+1))
	if err != nil {
		return err
	}
	defer in.Close()
	bi, _, err := image.Decode(in)
	if err != nil {
		return err
	}

	img, err := streamdeck.Image(bi)
	if err != nil {
		return err
	}

	return client.SetImage(ctx, img, streamdeck.HardwareAndSoftware)
})
意外とキレイな画像がでる物ですね。そう思った僕はなぜか StreamDeck にリアルタイム映像を表示したくなってきたのです。
もう1度言いますね、なぜか StreamDeck にリアルタイム映像を表示したくなってきたのです。
カメラ動画を表示してみよう
Go でカメラ動画を扱うのであれば OpenCV の cgo パッケージ gocv を使うのが良いです。
実装例は以下の通り。
cam, err := gocv.OpenVideoCapture(0)
if err != nil {
	return
}
defer cam.Close()

frame := gocv.NewMat()
defer frame.Close()

if ok := cam.Read(&frame); !ok {
	continue
}
これで OpenCV の Mat にフレームが読み込まれます。StreamDeck の LED に画像を設定するには、streamdeck.Image(img) を使い、Go の image.Image を渡す必要があるので、frame を変換します。
nbuf, err := gocv.IMEncode(".jpg", frame)
if err != nil {
	continue
}
img, err := jpeg.Decode(bytes.NewReader(nbuf.GetBytes()))
if err != nil {
	continue
}
ここで注意点ですが、StreamDeck プラグインは StreamDeck アプリケーションから起動されます。ですので、gocv つまり OpenCV に必要な DLL 等の検索パスは、開発用に開いているコマンドプロンプトや、Windows Terminal で実行するパスとは異なる場合があります。筆者の場合は、開発用に msys2/mingw64 へのパスを通しているので、このプラグインを動かす為に、デプロイ先に必要な DLL をコピーする必要がありました。具体的には以下の DLL をデプロイ先(プラグイン配置フォルダ)にコピーしました。
libopencv_features2d452.dll
libopencv_calib3d452.dll
libopencv_dnn452.dll
libopencv_core452.dll
libopencv_highgui452.dll
libopencv_imgcodecs452.dll
libopencv_objdetect452.dll
libopencv_imgproc452.dll
libopencv_photo452.dll
libopencv_video452.dll
libopencv_videoio452.dll
libstdc++-6.dll
libgcc_s_seh-1.dll
libopencv_flann452.dll
libwinpthread-1.dll
tbb.dll
libprotobuf.dll
zlib1.dll
libopenblas.dll
libIlmImf-2_5.dll
libjpeg-8.dll
libpng16-16.dll
libopenjp2-7.dll
libtiff-5.dll
libwebp-7.dll
libgfortran-5.dll
libHalf-2_5.dll
libIex-2_5.dll
libIlmThread-2_5.dll
libImath-2_5.dll
libdeflate.dll
libjbig-0.dll
liblzma-5.dll
libLerc.dll
libzstd.dll
libquadmath-0.dll
せっかくなので顔判別しよう
もうここまで来ると、初めに何を実現しようと考えていたかなんて、どうでも良くなります。haarcascade_frontalface_default.xml を読み込んで Classifier を作ります。
classifier := gocv.NewCascadeClassifier()
defer classifier.Close()

classifier.Load(filepath.Join(filepath.Dir(exepath), "haarcascade_frontalface_default.xml"))

if ok := cam.Read(&frame); !ok {
	continue
}

rects := classifier.DetectMultiScale(frame)
得た矩形に対して画像ファイルを貼り付けます。
canvas := image.NewRGBA(img.Bounds())
draw.Draw(canvas, img.Bounds(), img, image.Point{0, 0}, draw.Over)
for _, rect := range rects {
	pt := image.Point{rect.Min.X, rect.Min.Y}
	fimg := resize.Resize(uint(rect.Dx()), uint(rect.Dy()), maskImg, resize.NearestNeighbor)
	draw.Copy(canvas, pt, fimg, fimg.Bounds(), draw.Over, nil)
}
$ make install
でビルドしたバイナリや依存している DLL が配置される様にしてあります。

ちゃんとリアルタイム映像が StreamDeck の LED に表示されました。これでいざモニタが壊れてしまっても安心ですね。ただしサイズが 72x72 (ピクセル)ですが。だいたい 6~7fps くらい出るので、まぁまぁ体感は悪くはないです。
まとめ
LED ボタンでアクション登録できる StreamDeck の LED に、カメラストリーム映像をリアルタイム表示し(ちょっと待て)、顔にアノニマスのお面を貼り付けました(意味が分からない)。こんな小さな LED でもちゃんと機能しているので StreamDeck は素晴らしい。
作った物は以下に置いておきます。
Discussion