Docker on Limaで脱Docker Desktop for Mac
いよいよ Docker Desktopの有償化 の期限(2/1から有償化)が迫ってきましたね。
各所で代替案が話題になっており、私も
- Vagrant
- Multipass
- podman
- Lima
あたりを検証していました。
その中でも、 Lima上でDockerを動かす方法が一番簡単で、Docker Desktop for Macに近い使用感で利用できましたので、その方法をご紹介したいと思います。
Limaとは
LinuxのVMをmacOS上に立ち上げることができるもので、VirtualBoxに近いイメージです。
VirtualBoxとの違いは以下となります。
- 導入が簡単
- brewで簡単にインストールできる
- セットアップが簡単
- 起動したいVM環境を定義したyamlファイルを用意し、
limactl startコマンドを叩くだけで環境ができる
- 起動したいVM環境を定義したyamlファイルを用意し、
- macOSとゲストOS間のシームレスな連携
- ファイルシステムやネットワークなどが共有される
なぜLimaを直接利用しないのか
Limaにはcontainerdが含まれています。
lima nerdctl compose -f docker-compose.yml up
と指定することで、いままでの docker-compose.yml を利用しつつ、Limaのcontainerd上でコンテナを起動することができます。
ただし、以下の理由でLimaを直接利用することは止めました。
-
nerdctl composeはdocker-composeのコマンドを全て実装しているわけではない - localstackを利用する場合、localstackからUNIXドメインソケット経由でのDocker連携が必要だった
- IDEなどからもDocker連携したい場面がある
Docker on Lima?
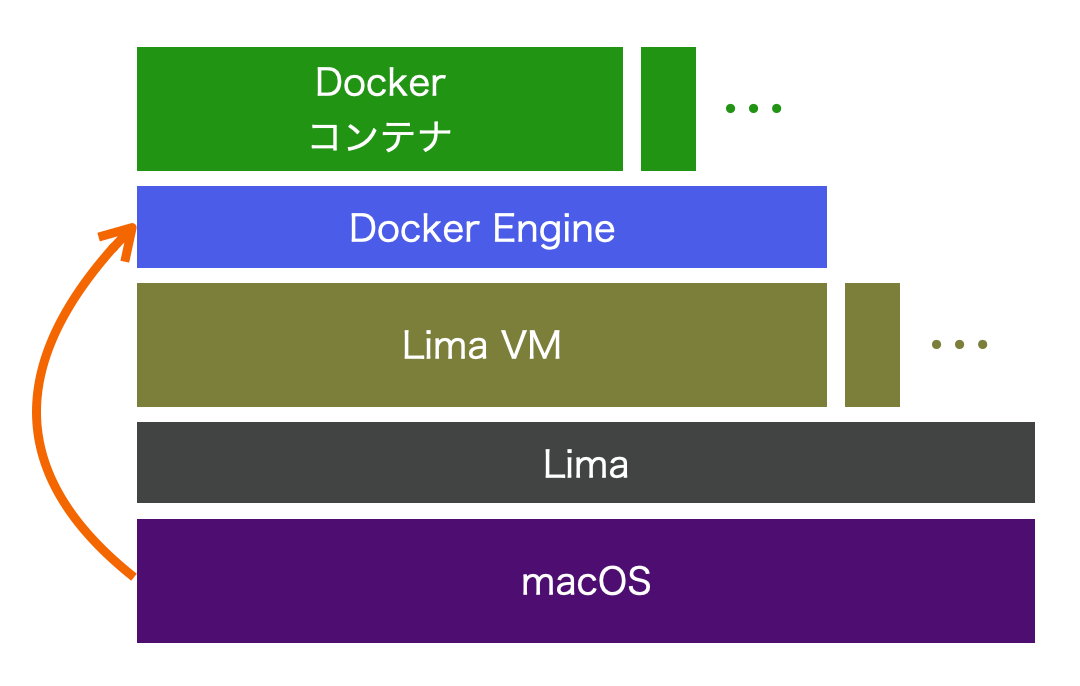
上記問題を解決するために、Lima上でDocker Engineを起動し、macOSからはUNIXドメインソケット経由で直接Dockerにアクセスする方法を取りました。
事前準備
macOSのファイルディスクリプタの上限の引き上げ
macOSとLimaは、現バージョンではSSHFSでファイル共有を行っています。
その関係で、Docker内でのファイル操作であってもmacOS側でもファイルアクセスが行われるため、ファイルディスクリプタの上限に引っかかりやすくなっています(macOSはデフォルトで256が上限)。
検証時は、Dockerコンテナ内でsprite画像を生成した際に、途中で Operation not permitted : open というエラーが発生しました。
まさかこのエラー内容からmacOS側のファイルディスクリプタの上限に引っかかってるとは思わず、原因の特定にかなり苦労しました…。
macOSのファイルディスクリプタの上限を引き上げる方法は以下になります。
- /Library/LaunchDaemons/limit.maxfiles.plistファイルを作成
<?xml version="1.0" encoding="UTF-8"?>
  <!DOCTYPE plist PUBLIC "-//Apple//DTD PLIST 1.0//EN"
          "http://www.apple.com/DTDs/PropertyList-1.0.dtd">
  <plist version="1.0">
    <dict>
      <key>Label</key>
      <string>limit.maxfiles</string>
      <key>ProgramArguments</key>
      <array>
        <string>launchctl</string>
        <string>limit</string>
        <string>maxfiles</string>
        <string>64000</string>
        <string>64000</string>
      </array>
      <key>RunAtLoad</key>
      <true/>
      <key>ServiceIPC</key>
      <false/>
    </dict>
  </plist>
- ファイルのオーナーをrootに変更
sudo chown root /Library/LaunchDaemons/limit.maxfiles.plist
- 設定の有効化
sudo launchctl load -w /Library/LaunchDaemons/limit.maxfiles.plist
-
macOSを再起動
-
反映の確認
$ ulimit -a
Maximum size of core files created                           (kB, -c) 0
Maximum size of a process’s data segment                     (kB, -d) unlimited
Maximum size of files created by the shell                   (kB, -f) unlimited
Maximum size that may be locked into memory                  (kB, -l) unlimited
Maximum resident set size                                    (kB, -m) unlimited
Maximum number of open file descriptors                          (-n) 64000
Maximum stack size                                           (kB, -s) 8192
Maximum amount of cpu time in seconds                   (seconds, -t) unlimited
Maximum number of processes available to a single user           (-u) 2048
Maximum amount of virtual memory available to the shell      (kB, -v) unlimited
環境構築
Limaのインストール
brewでインストールするだけです。簡単。
brew install lima
lima.ymlファイル作成
以下の内容の lima_sample.yml ファイルを作成します。
内容はlimaのリポジトリに含まれている Dockerのexample を利用しています。
作業ディレクトリをマウントするため、mountsのlocation指定を必要に応じて修正します。
arch: "default"
images:
  - location: "https://cloud-images.ubuntu.com/impish/current/impish-server-cloudimg-amd64.img"
    arch: "x86_64"
  - location: "https://cloud-images.ubuntu.com/impish/current/impish-server-cloudimg-arm64.img"
    arch: "aarch64"
cpus: 4
memory: "8GiB"
disk: "100GiB"
mounts:
  - location: "~"
    # CAUTION: `writable` SHOULD be false for the home directory.
    # Setting `writable` to true is possible, but untested and dangerous.
    writable: false
  # 作業ディレクトリを指定
  - location: "~/Documents/workspaces"
    writable: true
ssh:
  localPort: 60006
  loadDotSSHPubKeys: true
containerd:
  # Enable system-wide (aka rootful)  containerd and its dependencies (BuildKit, Stargz Snapshotter)
  # Default: false
  system: false
  # Enable user-scoped (aka rootless) containerd and its dependencies
  # Default: true
  user: true
provision:
  # `system` is executed with the root privilege
  - mode: system
    script: |
      #!/bin/sh
      sed -i 's/host.lima.internal.*/host.lima.internal host.docker.internal/' /etc/hosts
  - mode: system
    script: |
      #!/bin/bash
      set -eux -o pipefail
      command -v docker >/dev/null 2>&1 && exit 0
      export DEBIAN_FRONTEND=noninteractive
      curl -fsSL https://get.docker.com | sh
      # NOTE: you may remove the lines below, if you prefer to use rootful docker, not rootless
      systemctl disable --now docker
      apt-get install -y uidmap dbus-user-session
  # `user` is executed without the root privilege
  - mode: user
    script: |
      #!/bin/bash
      set -eux -o pipefail
      systemctl --user start dbus
      dockerd-rootless-setuptool.sh install
      docker context use rootless
probes:
  - script: |
      #!/bin/bash
      set -eux -o pipefail
      if ! timeout 30s bash -c "until command -v docker >/dev/null 2>&1; do sleep 3; done"; then
        echo >&2 "docker is not installed yet"
        exit 1
      fi
      if ! timeout 30s bash -c "until pgrep rootlesskit; do sleep 3; done"; then
        echo >&2 "rootlesskit (used by rootless docker) is not running"
        exit 1
      fi
    hint: See "/var/log/cloud-init-output.log". in the guest
portForwards:
  - guestSocket: "/run/user/{{.UID}}/docker.sock"
    hostSocket: "{{.Dir}}/sock/docker.sock"
message: |
  To run `docker` on the host (assumes docker-cli is installed):
  $ export DOCKER_HOST=unix://{{.Dir}}/sock/docker.sock
  $ docker ...
Lima VMの起動
初回起動時
ymlを指定して起動します
limactl start lima_sample.yml
初回の場合は、
- Proceed with the default configuration
- Open an editor to override the configuration
の選択肢を聞かれるため、 Proceed with the default configuration を選択します。
以下のようなログが表示されれば成功です。
? Creating an instance "lima_sample" Proceed with the default configuration

...

INFO[0147] [hostagent] The final requirement 1 of 1 is satisfied
INFO[0147] READY. Run `limactl shell lima_sample` to open the shell.
INFO[0147] To run `docker` on the host (assumes docker-cli is installed):
INFO[0147] $ export DOCKER_HOST=unix:///Users/xxx/.lima/lima_sample/sock/docker.sock
INFO[0147] $ docker ...
2回目以降の起動時
2回目以降はファイルではなくLima VMの名前を指定して起動します。
limactl start lima_sample
Lima上のDockerへのアクセス準備
Lima上で動作しているDockerを利用するためには ~/.lima/lima_sample/sock/docker.sock を利用します。
このままではDocker Desktop for Macの環境と異なるため、 /var/run/docker.sock にシンボリックリンクを作成します。
sudo ln -sf ~/.lima/lima_sample/sock/docker.sock /var/run/docker.sock
手軽に切り替えたい場合は、 DOCKER_HOST で指定することもできます。
export DOCKER_HOST=unix://$HOME/.lima/lima_sample/sock/docker.sock
Dockerの利用
上記手順ですでにDockerがLima上で動作しています。
$ docker ps
CONTAINER ID   IMAGE     COMMAND   CREATED   STATUS    PORTS     NAMES
あとは通常通り、 docker-compose などを利用できます。
Lima VMの状態確認
$ limactl list
NAME              STATUS     SSH                ARCH      CPUS    MEMORY    DISK      DIR
lima_sample       Running    127.0.0.1:60006    x86_64    4       8GiB      100GiB    /Users/xxxx/.lima/lima_sample
Lima VMの停止
limactl stop lima_sample
Lima VMの環境破棄
limactl delete lima_sample
注意点
- Docker Desktop for Macを起動すると
/var/run/docker.sockファイルが上書きされてしまいます。その場合は再度シンボリックリンクを作成し直します。 - 環境やアプリケーションの特性にもよりますが、SSHFSを利用している関係からか、パフォーマンス面はDocker Desktop for Macよりも劣っていました。
将来的には9pやSambaへの切り替えも計画しているようなので、そのあたりが対応されれば改善されるかもしれません。 - 検証はIntel Macで行いました。
M1 MacではMySQLが起動しなかったりするようですが、これは今回の構成が原因ではなく、M1 Macの問題のようです(ネット上ではMariaDBを利用するなどで回避されている様子)。
Discussion