EKSでk6 on k8sによる継続的な負荷テストを可視化する
キャパシティ計画と負荷試験の重要性
去年の11月ごろ、Taylor Swift (テイラー・スウィフト)のチケットの販売により前代未聞の需要があり、Ticketmaster(チケットマスター)が運営している販売サイトはシステム障害になった。
一方、 Stripe(ストライプ)はアメリカ最大のセール Black Friday (ブラックフライデー)の期間でシステム稼働率99.9999%に達した。
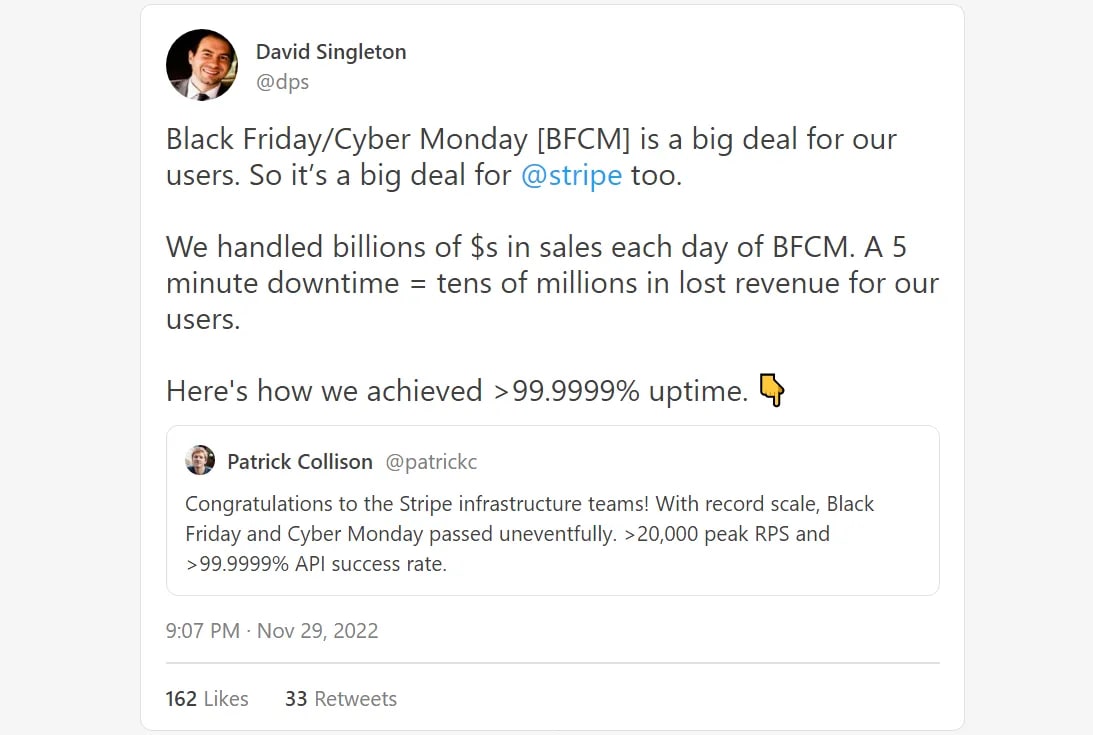
From: Designing Stripe for Black Friday: How to achieve 99.9999% uptime
負荷試験とは
負荷試験とは、ウェブアプリがどの程度の負荷に耐えられるかを検証するテストのこと。

From: Understanding the different types of load tests
負荷試験と呼ばれる中で、いくつかの試験がある。まず、スモークテストは、システムが最低限の負荷をられるかのテスト。ストレステストは、通常よりやや大きい負荷があるテスト。スパイクテストは、最大予測負荷のテスト。
常に更新されているウェブアプリに対しては、リリースする前にきちんと負荷試験をするのが推奨される。それを自動化するため、継続的な負荷テストを行うシステムが生まれた。今回の記事は、EKSで自動的に負荷試験を実行させるプラットフォームを紹介する。
AWSのk8sサービス「EKS」で負荷試験ツールk6を導入する
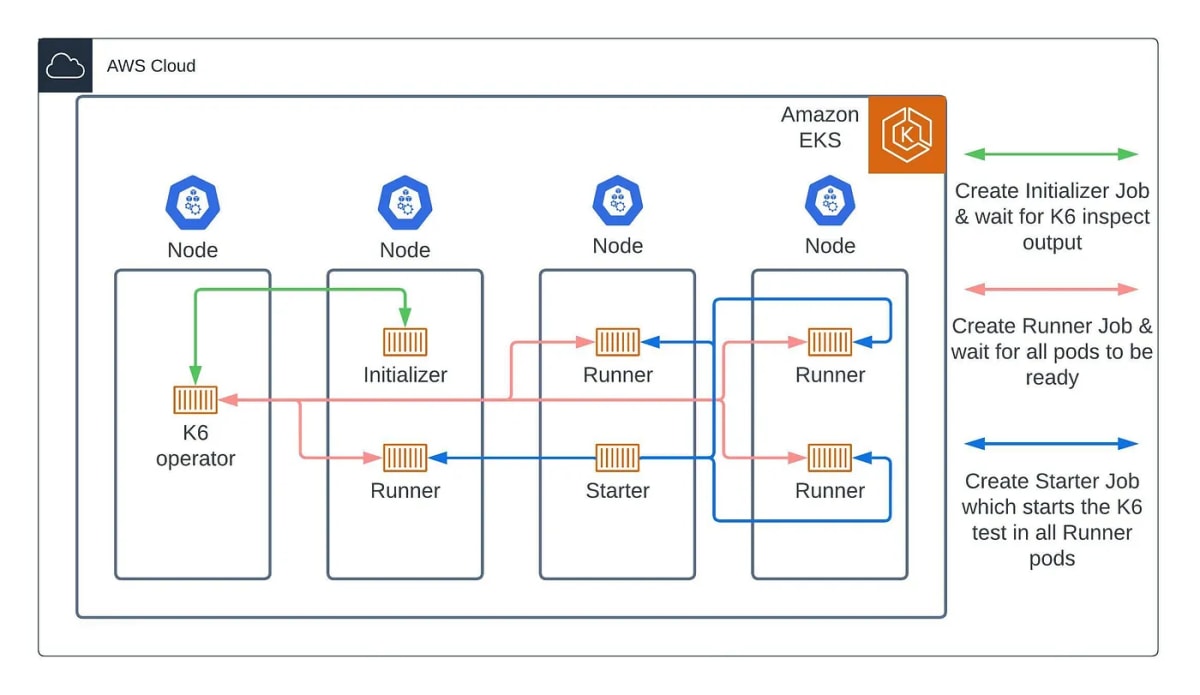
From: Your own K6 cloud in Amazon EKS—Easy Way Out
Kubernetesの環境でk6を実行すると、複数のクライアントからのリクエストを、複数のポッドでシミュレートできる。仮想インスタンスであるPodは隔離されているコンテナを持っているので、たとえ一つのノードでも複数のPodを同時に実行させるメリットがある。
負荷試験プラットフォームの構築
今回はEKSでk6 on eksを導入する。それには、Secrets ManagerとEBSそれぞれのDriverが必要になる。
- 環境変数はAWS Secrets Managerで一括管理。クラスタと接続するには
AWS Secrets CSI Driverが必要 - ストレージはノードごとAWS EBSに接続。EBSサービスをクラスタと接続するには
AWS EBS CSI driverが必要
EKS clusterを立ち上げる
下準備:
awscliをインストール
eksctlをインストール
以下のコマンドでawscliを設定する
aws configure
クラスタの設定をyamlファイルで定義する
# myapp-eks-cluster.yaml
apiVersion: eksctl.io/v1alpha5
kind: ClusterConfig

metadata:
  name: myapp-eks-cluster
  region: ap-northeast-1

iamIdentityMappings:
  - arn: arn:aws:iam::12345678:role/admin # role for myapp-dev aws accounts
    groups:
      - system:masters
    noDuplicateARNs: true # prevents shadowing of ARNs

nodeGroups:
  - name: myapp-eks-ng-1
    instanceType: t3.medium
    desiredCapacity: 3
    minSize: 3
    maxSize: 10
    iam:
      withAddonPolicies:
        autoScaler: true
        albIngress: true
    ssh:
      allow: true # will use ~/.ssh/id_rsa.pub as the default ssh key
以下のコマンドを実行するとクラスタは生成される
eksctl create cluster -f myapp-eks-cluster.yaml
eksctlはCloudFormationを経由してクラスタ作成するので、CloudFormationでクラスタを確認できる

kubectlを用いてEKSクラスタと接続する
接続できたら新しいcontextが追加される。Contextデータはパソコンに保存されるので、一旦追加したら、次回からは以下のコマンドは実行する必要はない。
aws eks update-kubeconfig --region ap-northeast-1 --name myapp-eks-cluster
Context確認
$ kubectl config current-context
[AWS-account]@myapp-eks-cluster.ap-northeast-1.eksctl.io
ノード確認
$ kubectl get nodes
NAME                                                STATUS   ROLES    AGE   VERSION
ip-192-168-21-131.ap-northeast-1.compute.internal   Ready    <none>   57m   v1.25.12-eks-8ccc7ba
ip-192-168-41-162.ap-northeast-1.compute.internal   Ready    <none>   57m   v1.25.12-eks-8ccc7ba
ip-192-168-72-34.ap-northeast-1.compute.internal    Ready    <none>   57m   v1.25.12-eks-8ccc7ba
負荷試験のためのnamespaceを作成
kubectl create namespace loadtest
他のクラスタに接続するためcontextを変更したら、以下のコマンドで元のcontextへ移す
kubectl config get-contexts # context一覧を表示する

kubectl config use-context [AWS-account]@myapp-eks-cluster.ap-northeast-1.eksctl.io
クラスタをAWS EBSと紐付ける
eksctl create iamserviceaccount \
    --name ebs-csi-controller-sa \
    --namespace kube-system \
    --cluster myapp-eks-cluster  \
    --role-name AmazonEKS_EBS_CSI_DriverRole \
    --role-only \
    --attach-policy-arn arn:aws:iam::aws:policy/service-role/AmazonEBSCSIDriverPolicy \
    --approve
eksctl create addon --name aws-ebs-csi-driver --cluster myapp-eks-cluster --service-account-role-arn arn:aws:iam::1234567:role/AmazonEKS_EBS_CSI_DriverRole --force
EBSのStorage Classを定義
# storageclass.yaml
apiVersion: storage.k8s.io/v1
kind: StorageClass
metadata:
  name: ebs-sc
provisioner: ebs.csi.aws.com
volumeBindingMode: WaitForFirstConsumer
allowVolumeExpansion: true
クラスタをAWS Secrets Managerと紐付ける
AWS Secrets CSI Driverをインストール
helm repo add secrets-store-csi-driver \
    https://kubernetes-sigs.github.io/secrets-store-csi-driver/charts

helm install -n kube-system csi-secrets-store secrets-store-csi-driver/secrets-store-csi-driver --set grpcSupportedProviders=”aws” --set syncSecret.enabled=true
シークレットを参照できるIAMポリシーを作成
POLICY_ARN=$(aws --region ap-northeast-1 --query Policy.Arn --output text iam create-policy --policy-name myapp-secrets-policy --policy-document '{
    "Version": "2012-10-17",
    "Statement": [ {
        "Effect": "Allow",
        "Action": ["secretsmanager:GetSecretValue", "secretsmanager:DescribeSecret"],
        "Resource": ["arn:aws:secretsmanager:ap-northeast-1:1234567:secret:myapp-secrets-123"]
    } ]
}')
IAMポリシーを持つServiceAccountを作成
eksctl create iamserviceaccount --name myapp-sa --region ap-northeast-1 --cluster myapp-eks-cluster --attach-policy-arn "$POLICY_ARN" --approve --override-existing-serviceaccounts
AWSのレポによるテンプレートでSecret ManagerのSA、CR、CRB、DSを作成
# secrets/aws-provider-installer.yaml

# https://github.com/aws/secrets-store-csi-driver-provider-aws/blob/main/deployment/aws-provider-installer.yaml
# https://kubernetes.io/docs/reference/access-authn-authz/rbac
apiVersion: v1
kind: ServiceAccount
metadata:
  name: csi-secrets-store-provider-aws
  namespace: kube-system
---
apiVersion: rbac.authorization.k8s.io/v1
kind: ClusterRole
metadata:
  name: csi-secrets-store-provider-aws-cluster-role
rules:
- apiGroups: [""]
  resources: ["serviceaccounts/token"]
  verbs: ["create"]
- apiGroups: [""]
  resources: ["serviceaccounts"]
  verbs: ["get"]
- apiGroups: [""]
  resources: ["pods"]
  verbs: ["get"]
- apiGroups: [""]
  resources: ["nodes"]
  verbs: ["get"]
---
apiVersion: rbac.authorization.k8s.io/v1
kind: ClusterRoleBinding
metadata:
  name: csi-secrets-store-provider-aws-cluster-rolebinding
roleRef:
  apiGroup: rbac.authorization.k8s.io
  kind: ClusterRole
  name: csi-secrets-store-provider-aws-cluster-role
subjects:
- kind: ServiceAccount
  name: csi-secrets-store-provider-aws
  namespace: kube-system
---
apiVersion: apps/v1
kind: DaemonSet
metadata:
  namespace: kube-system
  name: csi-secrets-store-provider-aws
  labels:
    app: csi-secrets-store-provider-aws
spec:
  updateStrategy:
    type: RollingUpdate
  selector:
    matchLabels:
      app: csi-secrets-store-provider-aws
  template:
    metadata:
      labels:
        app: csi-secrets-store-provider-aws
    spec:
      serviceAccountName: csi-secrets-store-provider-aws
      hostNetwork: false
      containers:
        - name: provider-aws-installer
          image: public.ecr.aws/aws-secrets-manager/secrets-store-csi-driver-provider-aws:1.0.r2-50-g5b4aca1-2023.06.09.21.19
          imagePullPolicy: Always
          args:
              - --provider-volume=/etc/kubernetes/secrets-store-csi-providers
          resources:
            requests:
              cpu: 50m
              memory: 100Mi
            limits:
              cpu: 50m
              memory: 100Mi
          securityContext:
            privileged: false
            allowPrivilegeEscalation: false
          volumeMounts:
            - mountPath: "/etc/kubernetes/secrets-store-csi-providers"
              name: providervol
            - name: mountpoint-dir
              mountPath: /var/lib/kubelet/pods
              mountPropagation: HostToContainer
      volumes:
        - name: providervol
          hostPath:
            path: "/etc/kubernetes/secrets-store-csi-providers"
        - name: mountpoint-dir
          hostPath:
            path: /var/lib/kubelet/pods
            type: DirectoryOrCreate
      nodeSelector:
        kubernetes.io/os: linux
AWS Secrets Managerで環境変数をシークレットとして書き込む

結果可視化ツールGrafanaを立ち上げる
loadtest
├── grafana
│   ├── grafana-deploy.yaml
│   ├── grafana-pvc.yaml
│   ├── grafana-secrets-provider.yaml
│   ├── grafana-service.yaml
Grafanaのデプロイオブジェクトを定義する
# grafana/grafana-deploy.yaml
apiVersion: apps/v1
kind: Deployment
metadata:
  namespace: loadtest
  labels:
    app: grafana
  name: grafana
spec:
  replicas: 1 # can be more than 1
  selector:
    matchLabels:
      app: grafana
  template:
    metadata:
      labels:
        app: grafana
    spec:
      serviceAccountName: myapp-loadtest-sa
      containers:
      - name: grafana
        image: docker.io/grafana/grafana:7.3.3
        env:
          - name: GF_SECURITY_ADMIN_USER
            valueFrom:
              secretKeyRef:
                name: grafana-settings
                key: GF_SECURITY_ADMIN_USER
          - name: GF_SECURITY_ADMIN_PASSWORD
            valueFrom:
              secretKeyRef:
                name: grafana-settings
                key: GF_SECURITY_ADMIN_PASSWORD
        volumeMounts:
          - name: secrets-store-inline
            mountPath: "/mnt/secrets-store"
            readOnly: true
          - name: data-dir
            mountPath: /var/lib/grafana/
      securityContext:
        fsGroup: 472
      volumes:
      - name: secrets-store-inline
        csi:
          driver: secrets-store.csi.k8s.io
          readOnly: true
          volumeAttributes:
            secretProviderClass: "grafana-secrets-provider-class"
      - name: data-dir
        persistentVolumeClaim:
          claimName: grafana-pvc
Grafanaのストレージ(バックエンドはEBS)を定義する
# grafana/grafana-pvc.yaml
apiVersion: v1
kind: PersistentVolumeClaim
metadata:
  name: grafana-pvc
spec:
  accessModes:
    - ReadWriteOnce
  resources:
    requests:
      storage: 1Gi
# grafana/grafana-secrets-provider.yaml
apiVersion: secrets-store.csi.x-k8s.io/v1
kind: SecretProviderClass
metadata:
  name: grafana-secrets-provider-class
  namespace: loadtest # ns for provider must match ns of pods that consume it
spec:
  provider: aws
  secretObjects:
    - secretName: grafana-settings
      type: Opaque
      data:
        - objectName: "GF_SECURITY_ADMIN_USER"
          key: "GF_SECURITY_ADMIN_USER"
        - objectName: "GF_SECURITY_ADMIN_PASSWORD"
          key: "GF_SECURITY_ADMIN_PASSWORD"
  parameters:
    objects: |
        - objectName: "arn:aws:secretsmanager:ap-northeast-1:510447560360:secret:myapp-secrets-RzDvXV"
          objectAlias: "myapp-secrets"
          jmesPath:
          - path: "GF_SECURITY_ADMIN_USER"
            objectAlias: "GF_SECURITY_ADMIN_USER"
          - path: "GF_SECURITY_ADMIN_PASSWORD"
            objectAlias: "GF_SECURITY_ADMIN_PASSWORD"
# grafana/grafana-service.yaml
apiVersion: v1
kind: Service
metadata:
  labels:
    app: grafana
  name: grafana
  namespace: loadtest
spec:
  ports:
  - protocol: TCP
    port: 80
    targetPort: 3000
  selector:
    app: grafana
  type: LoadBalancer
以下のコマンドでGrafanaに必要なKubernetesオブジェクトをデプロイする
kubectl apply -f grafana/
時系列データを保存するInfluxDBを立ち上げる
loadtest
├── grafana
│   ├── ...
├── influxdb
│   ├── influxdb-deploy.yaml
│   ├── influxdb-pvc.yaml
│   ├── influxdb-secrets-provider.yaml
│   ├── influxdb-service.yaml
# influxdb/influxdb-deploy.yaml
apiVersion: apps/v1
kind: Deployment
metadata:
  namespace: loadtest
  labels:
    app: influxdb
  name: influxdb
spec:
  replicas: 1
  selector:
    matchLabels:
      app: influxdb
  template:
    metadata:
      labels:
        app: influxdb
    spec:
      serviceAccountName: myapp-loadtest-sa
      containers:
      - name: influxdb
        image: docker.io/influxdb:1.8
        env:
          - name: INFLUXDB_DB
            valueFrom:
              secretKeyRef:
                name: db-settings
                key: INFLUXDB_DB
          - name: INFLUXDB_USERNAME
            valueFrom:
              secretKeyRef:
                name: db-settings
                key: INFLUXDB_USERNAME
          - name: INFLUXDB_PASSWORD
            valueFrom:
              secretKeyRef:
                name: db-settings
                key: INFLUXDB_PASSWORD
          - name: INFLUXDB_HOST
            valueFrom:
              secretKeyRef:
                name: db-settings
                key: INFLUXDB_HOST
        volumeMounts:
        - name: secrets-store-inline
          mountPath: "/mnt/secrets-store"
          readOnly: true
        - name: var-lib-influxdb
          mountPath: /var/lib/influxdb
      volumes:
      - name: secrets-store-inline
        csi:
          driver: secrets-store.csi.k8s.io
          readOnly: true
          volumeAttributes:
            secretProviderClass: "influxdb-secrets-provider-class"
      - name: var-lib-influxdb
        persistentVolumeClaim:
          claimName: influxdb-pvc
# influxdb/influxdb-pvc.yaml
apiVersion: v1
kind: PersistentVolumeClaim
metadata:
  namespace: loadtest
  labels:
    app: influxdb
  name: influxdb-pvc
spec:
  accessModes:
  - ReadWriteOnce
  resources:
    requests:
      storage: 5Gi
# influxdb/influxdb-secrets-provider.yaml
apiVersion: secrets-store.csi.x-k8s.io/v1
kind: SecretProviderClass
metadata:
  name: influxdb-secrets-provider-class
  namespace: loadtest # ns for provider must match ns of pods that consume it
spec:
  provider: aws
  secretObjects:
    - secretName: db-settings
      type: Opaque
      data:
        - objectName: "INFLUXDB_DB"
          key: "INFLUXDB_DB"
        - objectName: "INFLUXDB_USERNAME"
          key: "INFLUXDB_USERNAME"
        - objectName: "INFLUXDB_PASSWORD"
          key: "INFLUXDB_PASSWORD"
        - objectName: "INFLUXDB_HOST"
          key: "INFLUXDB_HOST"
  parameters:
    objects: |
        - objectName: "arn:aws:secretsmanager:ap-northeast-1:510447560360:secret:myapp-secrets-123"
          objectAlias: "myapp-secrets"
          jmesPath:
          - path: "INFLUXDB_DB"
            objectAlias: "INFLUXDB_DB"
          - path: "INFLUXDB_USERNAME"
            objectAlias: "INFLUXDB_USERNAME"
          - path: "INFLUXDB_PASSWORD"
            objectAlias: "INFLUXDB_PASSWORD"
          - path: "INFLUXDB_HOST"
            objectAlias: "INFLUXDB_HOST"
# influxdb/influxdb-service.yaml
apiVersion: v1
kind: Service
metadata:
  labels:
    app: influxdb
  name: influxdb
  namespace: loadtest
spec:
  ports:
  - port: 8086
    protocol: TCP
    targetPort: 8086
  selector:
    app: influxdb
  type: LoadBalancer
以下のコマンドでInfluxdbに必要なKubernetesオブジェクトをデプロイする
kubectl apply -f influxdb/
GrafanaとInfluxDBを連携する
以下のコマンドでGrafanaサービスのIPを取得する
kubectl -n loadtest get services
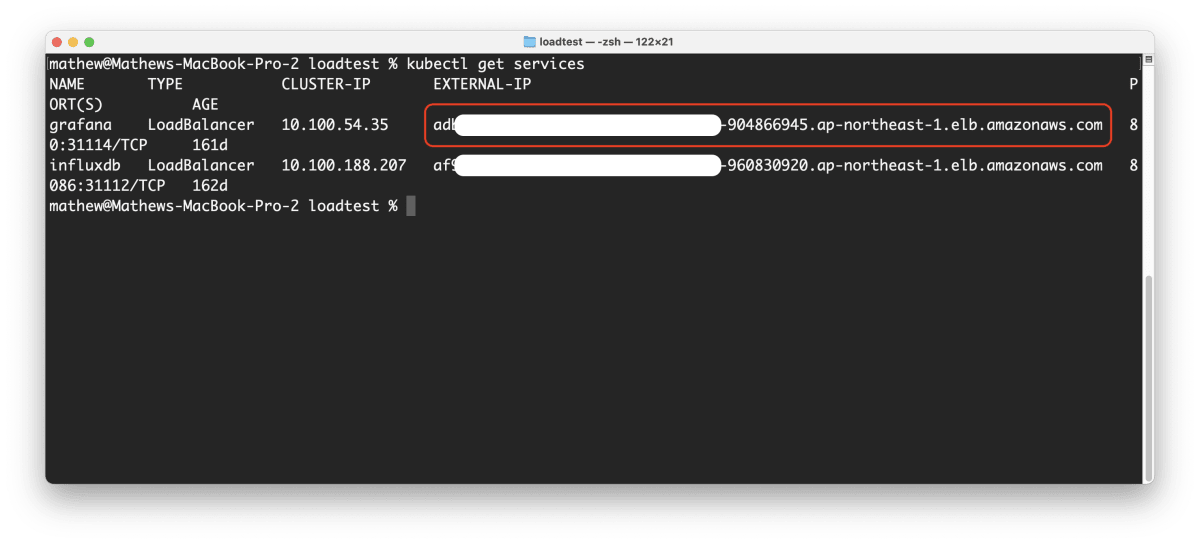
ブラウサでIPを入力すると直接アクセスできる

AWS Secrets Managerに入力した環境変数を使ってAdminとしてログインする。
- username:
GF_SECURITY_ADMIN_USER - password:
GF_SECURITY_ADMIN_PASSWORD
設定 > データソース > InfluxDBを追加する
URLにInfluxDBと接続するポートを入力
$ kubectl get services
influxdb .. 8086:31112/TCP // URL: http://influxdb:8086/
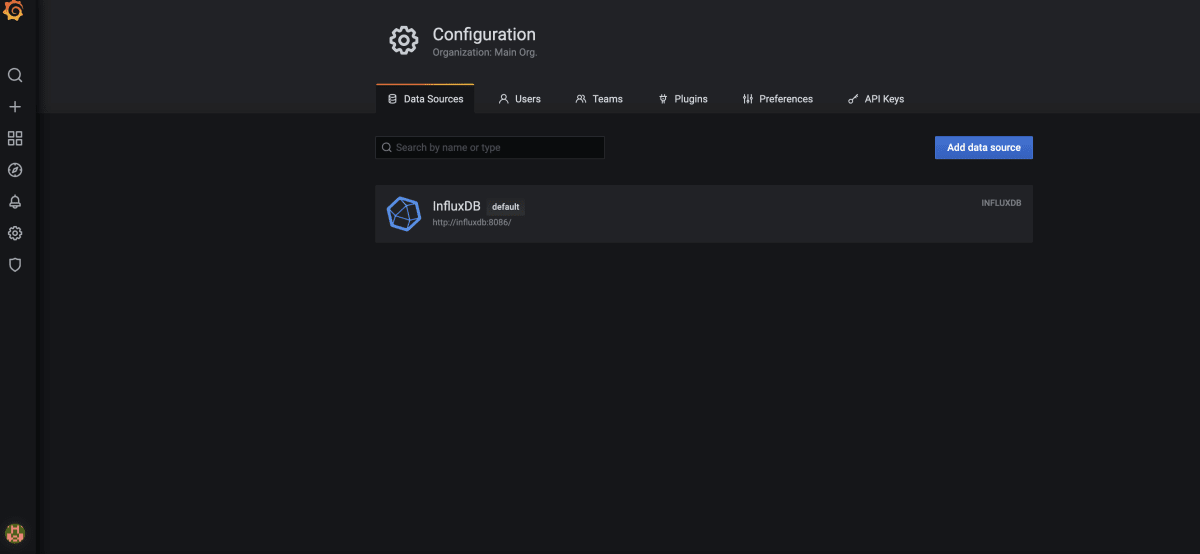
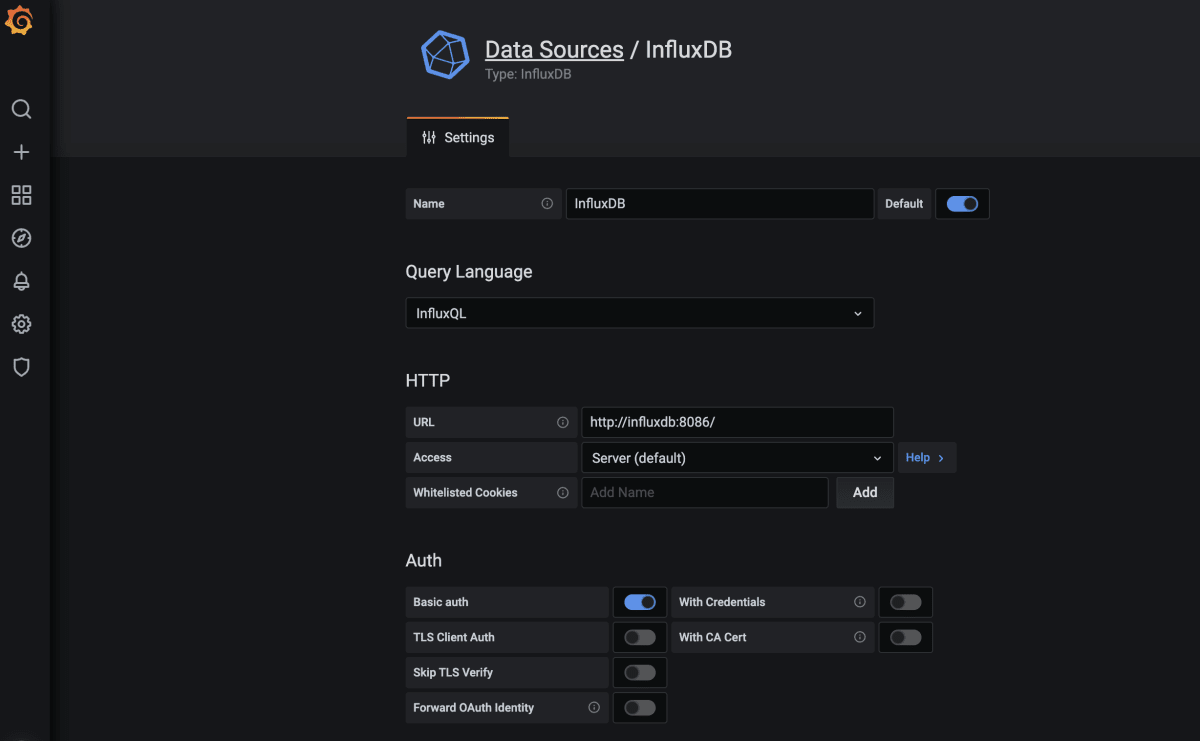
データベースへのアクセス情報を入力した後、コネクションをテストする
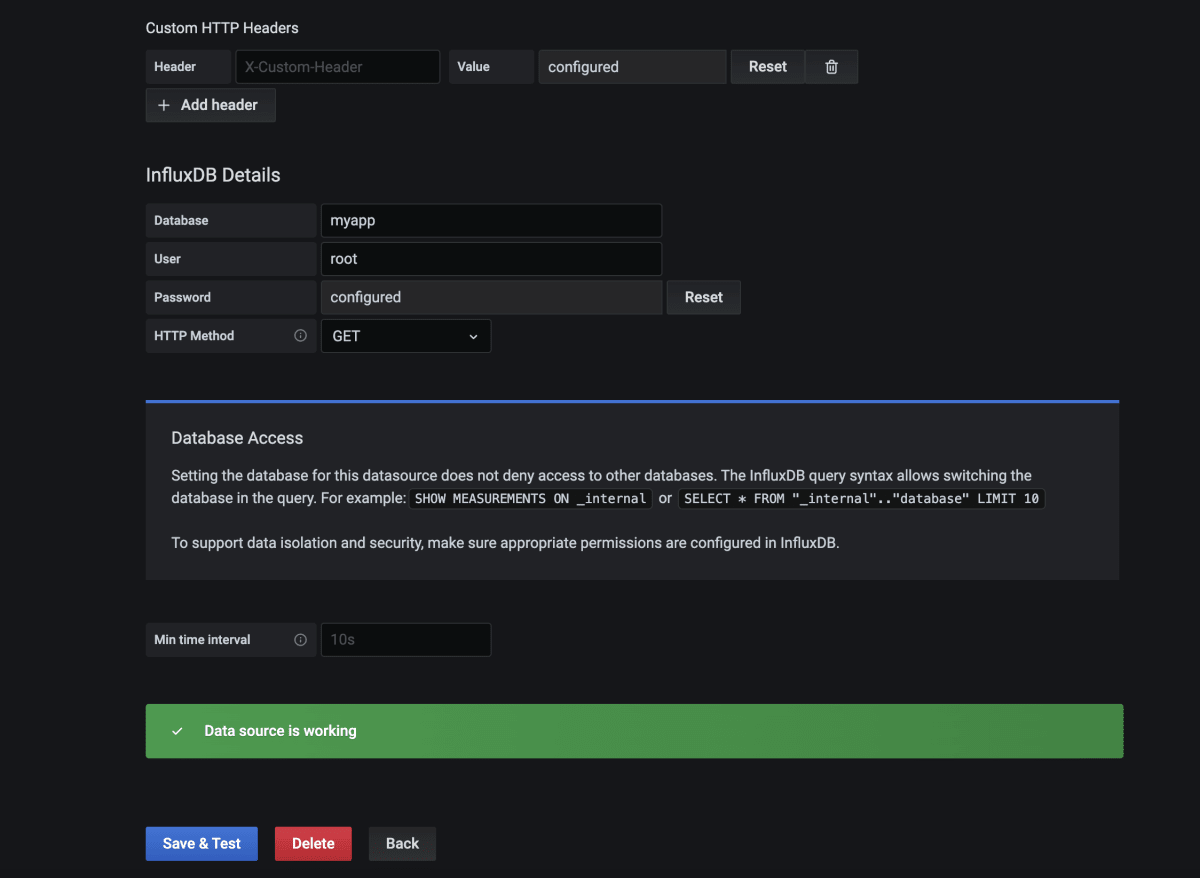
Create > DashboardでK6 Dashboardを追加する
負荷テストを作成する
TypeScriptでK6テストのテンプレートをクローンする
git clone https://github.com/grafana/k6-template-typescript
cd k6-template-typescript
npm install
sample-test.tsを書く
# src/sample-test.ts

# https://k6.io/blog/running-distributed-tests-on-k8s/
import { sleep, check } from 'k6';
import { Options } from 'k6/options';
import http from 'k6/http';

export let options:Options = {
  vus: 50,
  duration: '10s'
};

export default () => {
  const res = http.get('https://test-api.k6.io');
  check(res, {
    'status is 200': () => res.status === 200,
  });
  sleep(1);
};
以下のコマンドでdist/sample-test.jsにtranspileする
npm run start
ローカルでテストを実行してみる
k6 run dist/sample-test.js
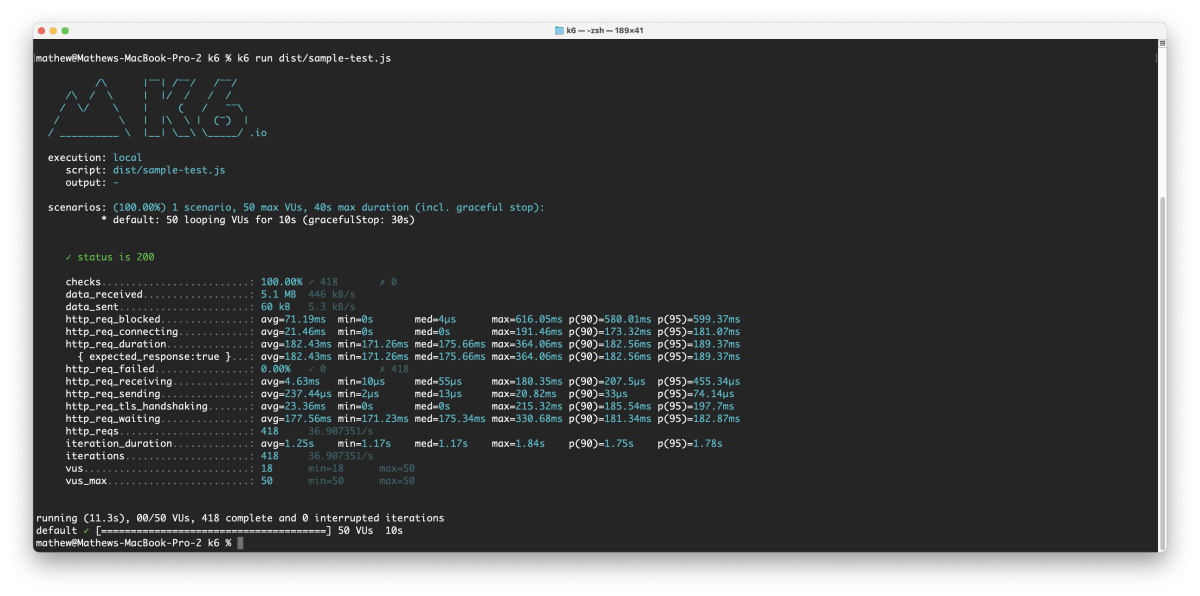
テストファイルをクラスタにConfigMapとしてアップロードする
$ kubectl create configmap myapp-loadtest-configmap --from-file dist/sample-test.js

configmap/myapp-loadtest-configmap created
# k6
apiVersion: k6.io/v1alpha1
kind: K6
metadata:
  name: k6-sample
  namespace: loadtest
spec:
  parallelism: 4
  script:
    configMap:
      name: myapp-loadtest-configmap
      file: sample-test.js
  arguments: --out influxdb=http://influxdb:8086/loadtest
  runner:
    serviceAccountName: myapp-loadtest-sa
$ kubectl apply -f k6-sample.yaml

k6.k6.io/k6-sample created
kubectl get pods
k logs [pod-name]
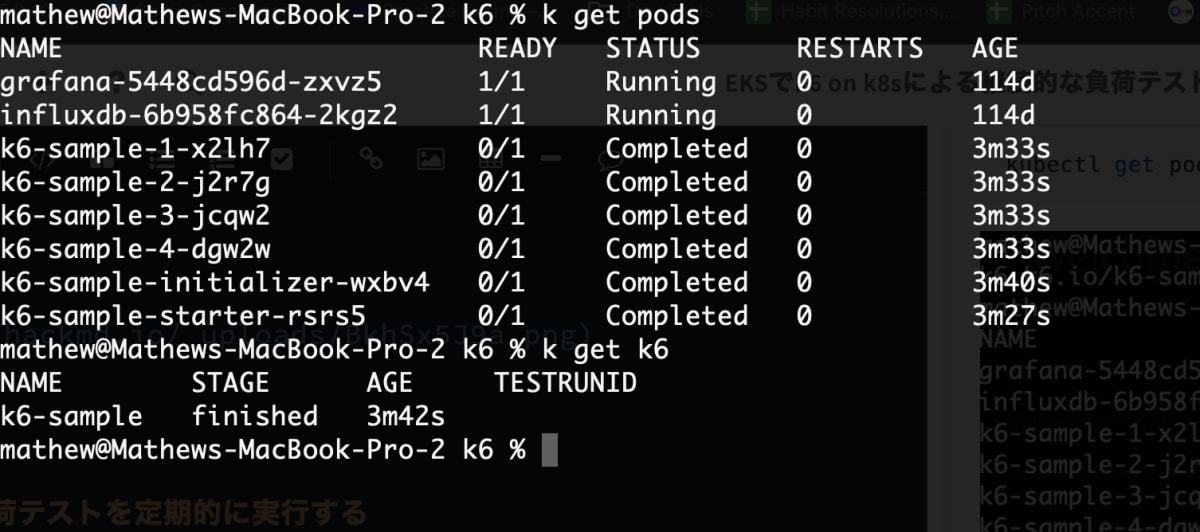
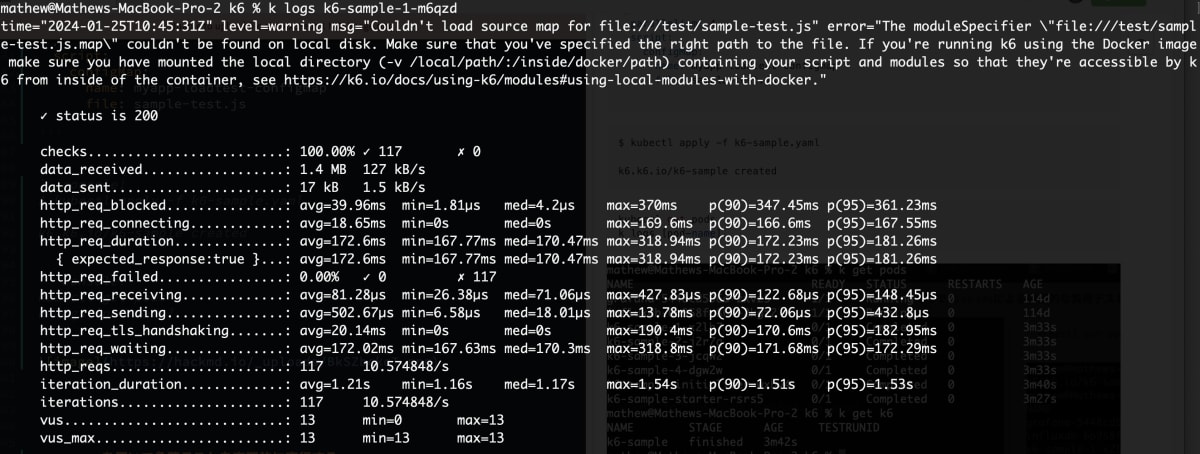
Grafanaで結果を確認する
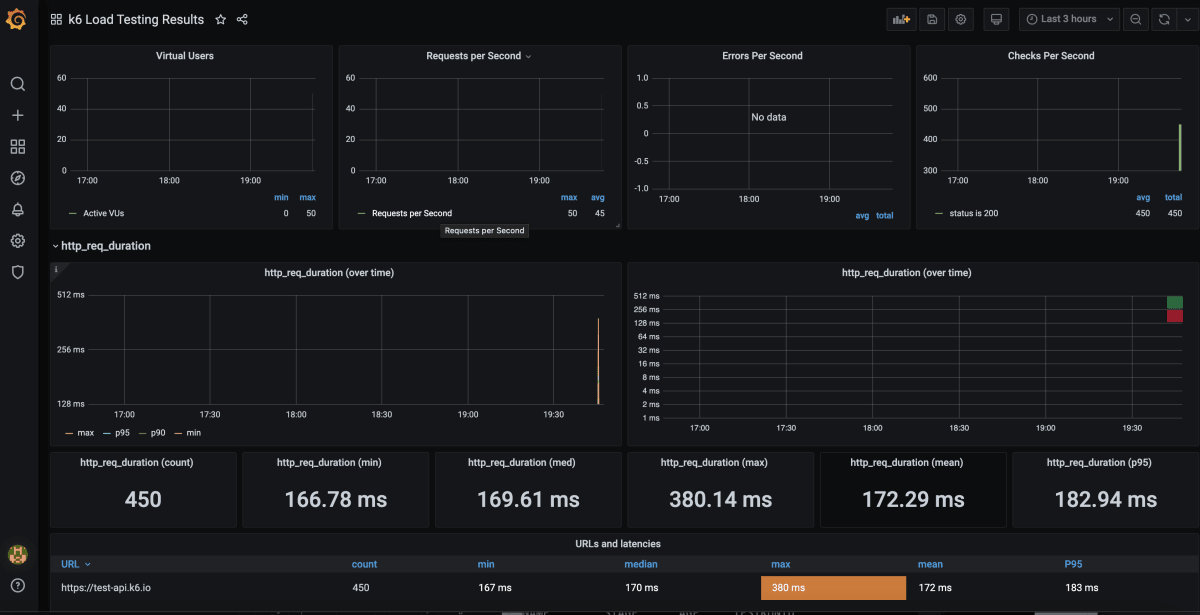
Cronを用いて負荷テストを定期的に実行する
継続的な負荷テストを作成するには、k8sのcron jobで定期的にK6スクリプトを実行させる。
# test-cronjob.yaml
apiVersion: batch/v1
kind: CronJob
metadata:
  name: clockin-test-cronjob
  namespace: loadtest
spec:
  schedule: "0 7 * * *" # 7am every day
  jobTemplate:
    spec:
      template:
        spec:
          serviceAccountName: myapp-loadtest-sa
          volumes:
            - name: scripts-vol
              configMap:
                name: myapp-loadtest-configmap
          containers:
            - name: k6
              image: grafana/k6:0.46.0
              volumeMounts:
                - name: scripts-vol
                  mountPath: "/scripts"
                  readOnly: true
              env:
                - name: K6_OUT
                  value: influxdb=http://influxdb:8086/loadtest
              args:
                - run
                - /scripts/sample-test.js
          restartPolicy: OnFailure
コスト削減
毎日一回だけテストするなら、他の時間でNode Groupを削除すればEKSのコストを抑えられる。Event BridgeからEKS APIのUpdateNodegroupConfigを呼び出して、希望するノード数を決まった時に更新させる。
スケジュール
月曜日から金曜日の 9:00 に EC2 を起動させる場合
0 9 ? * 2-6 *
ターゲット
EKS の 「UpdateNodegroupConfig」 を選択する
{
  "ClusterName": "myapp-eks-cluster",
  "NodegroupName": "myapp-eks-ng-1",
  "ScalingConfig": {
    "MinSize": 0,
    "MaxSize": 4,
    "DesiredSize": 4
  }
}
スケジュール
月曜日から金曜日の 19:00 に EC2 を削除させる場合
0 19 ? * 2-6 *
ターゲット
EKS の 「UpdateNodegroupConfig」 を選択する
{
  "ClusterName": "myapp-eks-cluster",
  "NodegroupName": "myapp-eks-ng-1",
  "ScalingConfig": {
    "MinSize": 0,
    "MaxSize": 4,
    "DesiredSize": 0
  }
}
From: @montani - EKS Managed Node Group を EventBridge で毎日「起動/削除」する
ノード付きのEBSストレージは常にコストがかかるので、その点にはご留意ください。
文献
- https://learningdaily.dev/designing-stripe-for-black-friday-how-to-achieve-99-9999-uptime-cd720232c14
- https://www.educative.io/blog/taylor-swift-ticketmaster-meltdown
- https://k6.io/docs/test-types/load-test-types/
- https://k6.io/blog/running-distributed-tests-on-k8s/
- https://blog.devops.dev/your-own-k6-cloud-in-amazon-eks-easy-way-out-be36dd9ed633
- https://eksctl.io/getting-started/
- https://qiita.com/motani/items/b32f1607d34ae8e5bc00
Discussion